How to Set Up Podcast Equipment
Welcome to the era of remote podcasting, where your voice can reach millions from the comfort of your home. Creating a podcast studio in your living space is not just an exciting venture; it’s a practical step towards producing quality content that resonates with your audience. Whether you’re a seasoned podcaster looking to upgrade your setup or a newcomer eager to dip your toes in the podcasting world, this guide will walk you through every step of the process. With technology more accessible and affordable than ever, setting up a podcast studio at home is within reach for everyone. Let’s embark on this journey together, and if you need the basics to get rolling make sure you check out our no-bs podcast equipment recommendations.
Setting Up Your Podcasting Equipment: A Step-by-Step Guide for Beginners
This guide is designed for beginners, assuming you have all the equipment mentioned earlier. We’ll cover a basic setup using either a USB or XLR microphone.
Prepare Your Space:
- Choose a quiet location: Minimize background noise and echoes. Consider using a closet or a room with soft furnishings to dampen sound.
- Gather your equipment: Have your microphone, headphones, cables, computer, and audio interface (if using XLR mics) within easy reach.
- Refer to manuals: Consult the user manuals for your specific equipment if you need guidance.
Connect Your Microphone:
Click here for my favorite podcast setup
- USB Microphone: Plug the USB cable from the microphone into an available USB port on your computer.
- Your computer should automatically recognize the microphone.
- XLR Microphone: Connect the XLR cable from the microphone to the XLR input on your audio interface.
- Connect the audio interface to your computer via USB.
Adjust Input Settings:
- USB Microphone: Open your recording software (e.g., Audacity).
- Go to the software’s preferences or settings.
- Select your USB microphone as the input device.
- Adjust the input level so the sound isn’t too loud or quiet.
- XLR Microphone: Follow the steps above, but select your audio interface as the input device.
- Adjust the gain (input level) on the audio interface if necessary.
Connect Your Headphones:
-
- Plug your headphones into the headphone jack on your audio interface (if using XLR mics) or directly into your computer (using a USB mic).
Test Your Setup:
-
- Record a test track: Speak into the microphone at your usual speaking volume and listen to the recording.
- Check for sound quality: Make sure there are no pops, clicks, or excessive background noise.
- Adjust as needed: If the sound is too quiet or too loud, adjust the input levels accordingly.
Test & Verify The Equipment By Publishing to Your Podcasting Platform
Click here for my favorite podcasting platform with a free trial
- Create a Test Episode: Record a short test episode, keeping it under 10 minutes. This can be as simple as introducing yourself and the concept of your podcast. Ensure the audio quality is good, as this will be representative of your future episodes.
- Upload the Test Episode: Use the platform’s uploading tools to add your test episode. Pay attention to the uploading speed, file size limitations, and any formatting requirements (e.g., MP3 format).
- Check for Errors: After the upload is complete, carefully review the episode on the platform’s dashboard for any errors in the title, description, artwork, or audio playback.
- Generate the RSS Feed: Most podcasting platforms automatically generate an RSS feed for your show. Locate this feed URL and validate it using an online RSS feed validator (e.g., https://validator.w3.org/feed/). This ensures the feed is correctly formatted and compatible with podcast directories.
- Submit to a Directory (Optional): If the platform doesn’t automatically distribute to directories, manually submit your RSS feed to a test podcast directory like Podcast Index ([invalid URL removed]) to verify that your episode appears correctly.
- Test on Different Devices and Apps: Listen to your test episode on various devices (e.g., computer, smartphone, tablet) and podcast apps (e.g., Apple Podcasts, Spotify, Overcast). This ensures compatibility and consistent playback across different platforms.
- Analyze Analytics (If Available): If the platform offers analytics, monitor the data for your test episode. Check for download numbers, listener demographics, and listening patterns. Although the data might be limited, it can give you a feel for the platform’s analytics capabilities.
- Test Additional Features: Explore any additional features the platform offers, such as episode scheduling, private podcasting options, or monetization tools. Test all features to ensure they function as expected and align with your needs.
- Review Pricing and Plans: If you’re using a free trial, carefully review the pricing plans and features associated with each tier. Consider your future needs and budget to determine if the platform’s pricing structure is sustainable for you.
- Seek Feedback: Share the link to your test episode with friends, family, or fellow podcasters and ask for feedback on the audio quality, platform usability, and overall listening experience.
Additional Tips For Good Podcasting Audio:
- Use a pop filter: Place a pop filter between the microphone and your mouth to reduce plosive sounds (like “p” and “b”) that can cause unwanted pops in your recording. Aim the pop filter at the microphone, with a gap of about 4-6 inches between it and the microphone.
- Position your microphone correctly: The ideal distance between your mouth and the microphone depends on the microphone type. For condenser microphones (most USB mics), a good starting point is 6-12 inches away. Experiment to find the distance that gives you the best sound quality. Here are some additional tips for microphone placement:
- Avoid pointing the microphone directly at your mouth, as this can cause boomy audio. Instead, aim it slightly off to the side.
- If you’re using multiple microphones in a group setting, position them at an equal distance from each speaker.
- Consider using a microphone stand or boom arm to hold your microphone in place and give you more flexibility in positioning.
- Speak clearly and confidently: Project your voice and articulate your words clearly. Enunciate properly to avoid muffled-sounding audio. If you tend to speak softly, practice projecting your voice without yelling.
- Experiment with microphone placement: The best microphone position can vary depending on your voice, the room acoustics, and your microphone type. Take some time to experiment with different placements to find the sweet spot where your voice sounds best. Record yourself from different distances and angles, and listen back to compare the sound quality.
For XLR Microphones and Mixers:
If you’re using a mixer with multiple microphone inputs, follow the mixer’s instructions to connect the microphones and adjust the individual levels. Then, connect the mixer’s output to your audio interface or computer. You can learn more about the best mixers for podcasting here.

Zoom PodTrak P4 Portable Multitrack Podcast Recorder
Setting Up Your Podcast Studio: Essential Tips
How to setup your home studio.
- Embrace Simplicity: A sophisticated studio doesn’t necessarily mean a complicated setup. Start with the essentials and gradually build up as you identify your needs. This approach not only keeps initial costs down but also makes it easier to manage and adapt your space.
- Budget Wisely: The market is flooded with options ranging from budget-friendly to high-end. However, a higher price tag doesn’t always guarantee better quality. Focus on finding equipment that offers the best balance between cost and performance, tailored to your specific needs.
- Quality Over Quantity: Invest in durable equipment that delivers clear, crisp audio. Even if the difference in sound quality might seem minimal at first, superior audio can significantly enhance the listening experience and set your podcast apart.
- Research is Key: Spend time understanding the features and functionalities of different pieces of equipment. Reading reviews, watching tutorials, and consulting with fellow podcasters can provide valuable insights and help you make informed decisions.
- Trust Your Instincts: Ultimately, your podcast studio is a personal space that should reflect your style and comfort. If a piece of equipment or a particular setup feels right, it’s likely a good fit for you. Remember, the goal is to create an environment where you can be your most creative and authentic self.
Choosing the Right Room
The first step in establishing a podcast studio is selecting an appropriate room. The ideal space minimizes external noise interference and optimizes sound quality. Here are criteria to guide your choice:
- Quietness: Choose a room with minimal noise from both inside and outside the house. Avoid areas near busy streets or communal spaces.
- Size and Shape: Small to medium-sized rooms are preferable. They’re easier to soundproof and treat acoustically. Avoid large, empty spaces that can produce echo.
- External Walls: Rooms without shared walls with neighbors or busy streets reduce the risk of noise intrusion.
- Windows: Fewer windows mean fewer opportunities for external noise to enter and less sound leakage.
- Flooring: Carpeted floors help absorb sound. Hard surfaces reflect sound, contributing to reverb and echo.
- Furnishings: Soft furnishings like sofas, curtains, and bookshelves can naturally dampen sound and improve acoustics.
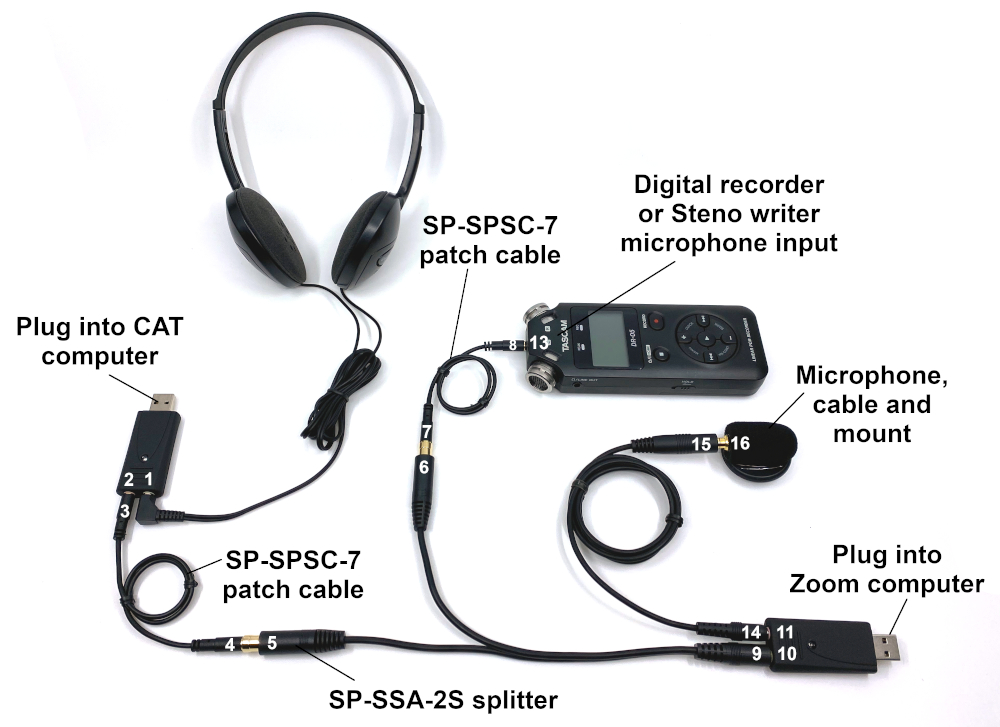
Credit: Sound Professionals
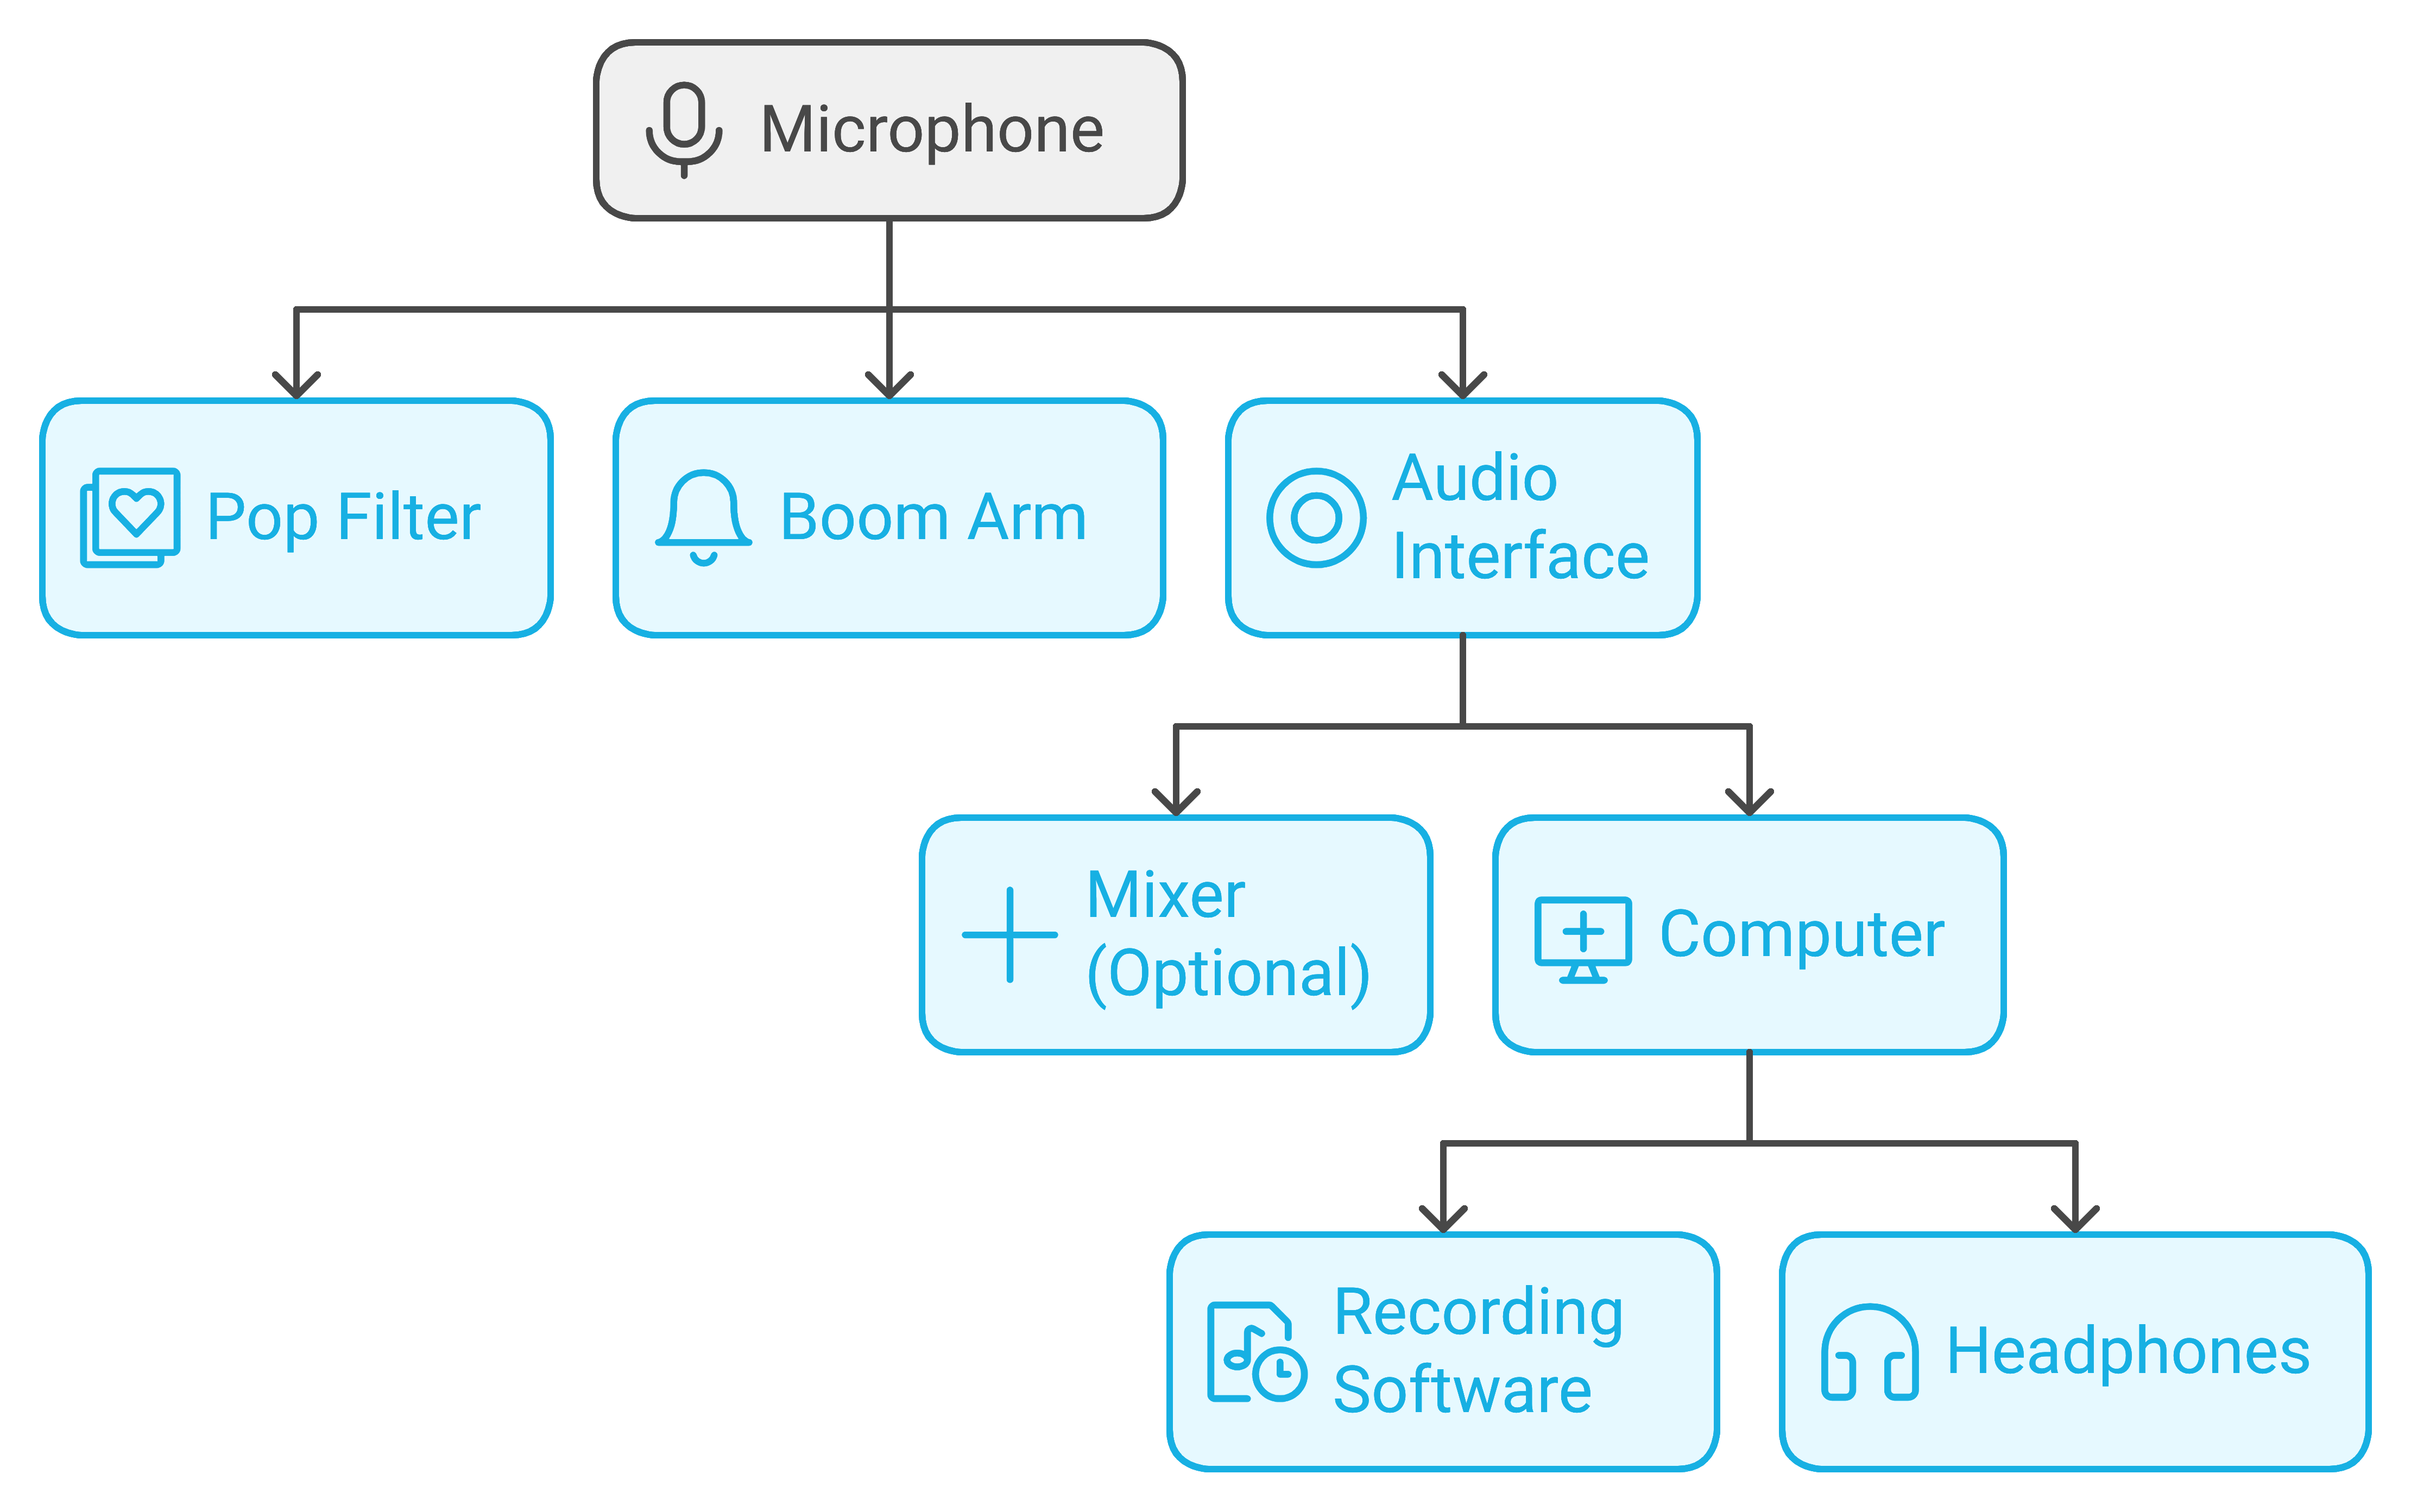
Equipment Needed for a Podcast Setup
Click here for my favorite podcasting starter kit
If you don’t yet have your podcast equipment, we’ve got an article that goes into detail. We also have a great post specific to home podcast setups here.

Microphone Selection
- Dynamic Microphones: Best for noisy environments as they pick up less background noise. Ideal for live recordings and interviews.
- Condenser Microphones: Capture a wider range of frequencies, offering studio-quality sound. Best in controlled, quiet environments.
Pop Filters and Shock Mounts
- Pop Filters: Attach to your mic stand and sit between you and the microphone to reduce plosives (hard “P” and “B” sounds).
- Shock Mounts: Prevent vibrations from reaching the mic, reducing unwanted noise.
Audio Interface
- Purpose: Converts analog signals from your microphone into digital signals that your computer can process.
- Selection: Choose based on the number of microphones you plan to use. Ensure it has enough inputs and supports the necessary power requirements (e.g., phantom power for condenser mics).
Mixer
- Use: Allows you to adjust levels, balance, and tone of multiple audio inputs before it hits your computer.
- Selection: Consider if you need a mixer based on the complexity of your podcast. Solo or dual hosts may not need one, but multi-microphone setups will benefit.
Computer and Digital Audio Workstation (DAW)
- Computer: Should have sufficient processing power and storage to handle large audio files without lag.
- DAW: Software used for recording, editing, and mixing your podcast. Options range from beginner-friendly (e.g., GarageBand, Audacity) to professional-grade (e.g., Adobe Audition, Logic Pro X).
Headphones
- Closed-back Headphones: Recommended for monitoring while recording to prevent mic pickup of playback.
- Quality: Essential for accurate audio editing and mixing. Look for comfort and clear sound reproduction.
Cables and Stands
- XLR Cables: Needed for connecting mics to audio interfaces or mixers. Ensure they are of good quality to prevent signal loss.
- Mic Stands or Boom Arms: Secure your microphone in place and can be adjusted for comfort and optimal sound capture.
Acoustic Treatment
- Purpose: Improves sound quality by controlling reverb and echo in your recording space.
- Implementation: Use acoustic panels, bass traps, and diffusers to treat your room. Even simple solutions like heavy curtains or bookshelves filled with books can significantly improve room acoustics.
Conclusion
Creating a podcast studio at home has never been more accessible. With the right equipment and setup, you can produce high-quality content that rivals professional studios. From selecting the perfect microphone to soundproofing your space, each step is crucial in crafting a listening experience your audience will love. Remember, the journey to great audio is both personal and technical; trust your instincts and invest in equipment that meets your specific needs. Now, armed with knowledge and passion, you’re ready to start podcasting and share your voice with the world.
- Best Headphones for Podcasting: The Only Buying Guide Podcasters Actually Need
- Best Cameras for Podcasting in 2026: Expert Picks for Every Budget
- StreamYard Business Plan Review: Is It Worth $299/Month for Teams?
- Synology DS1525+ for Podcasters: What You Need to Know Before You Buy
- StreamYard Pricing (2026): Full Comparison of Plans, Differences, Features & Discounts