Matt
Why Podcasters Are Upgrading to the RØDECaster Video Console
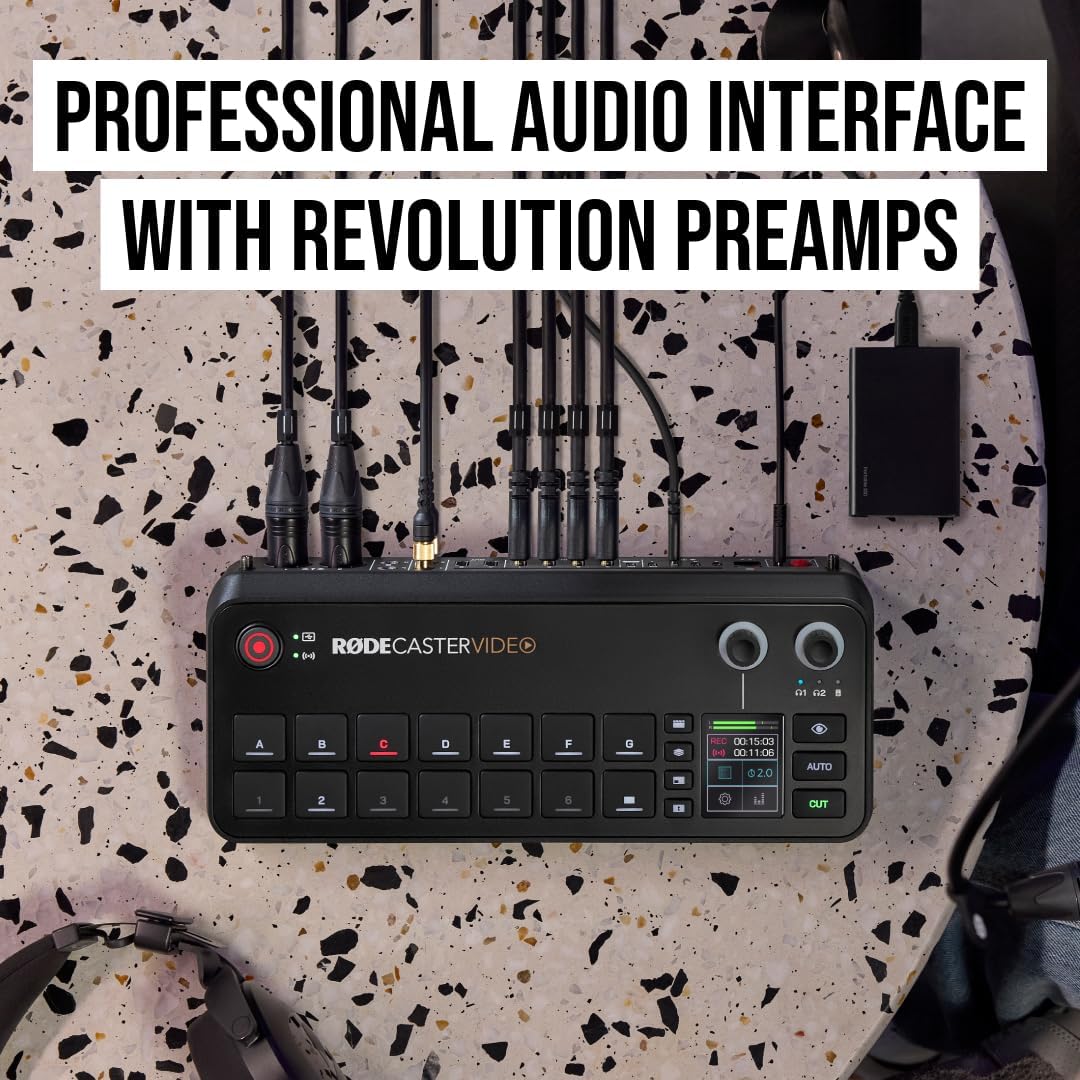
If you’re a podcaster thinking about adding video to your show, there’s one all-in-one production console that’s turning heads in the creator world: the RØDECaster Video. It’s more than just a mixer or a switcher—it’s a complete video and audio production console built specifically for creators who want to elevate their podcasting game.
What Is the RØDECaster Video?
The RØDECaster Video is an all-in-one production hub that combines a professional audio mixer, video switcher, scene controller, and live streaming interface. It lets you record, stream, and produce video podcasts in real time without juggling multiple devices or software.
For podcasters, that means fewer headaches and more time focusing on the content.
Click Here To Learn More
Why Podcasters Are Making the Switch
Audio + Video, Seamlessly Integrated
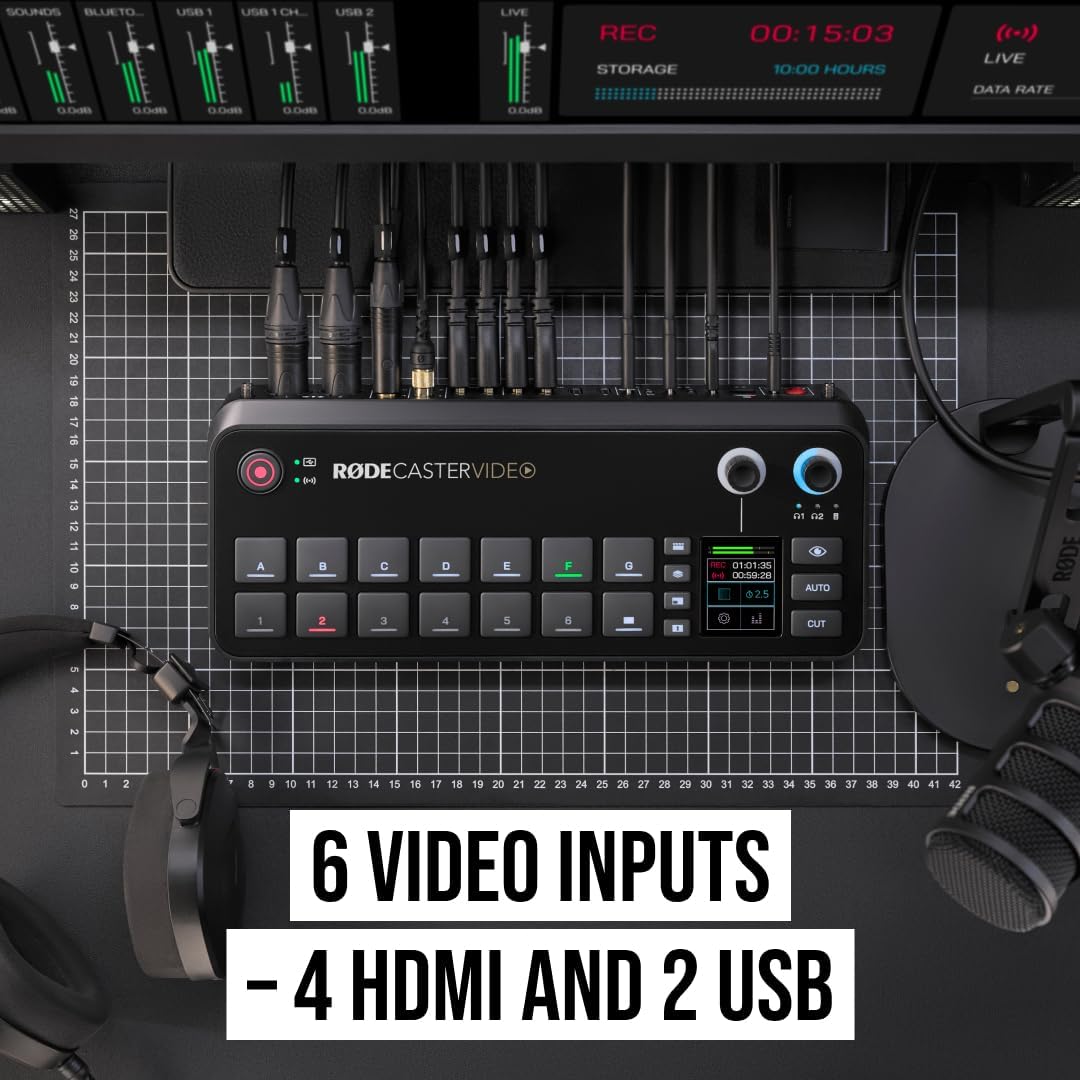
Most podcasters who dip into video face a tangle of gear: audio interfaces, switchers, capture cards, mixers, and more. The RØDECaster Video consolidates all of that. It handles up to four HDMI camera feeds, multiple USB-C sources, and high-quality XLR mic inputs, all while processing and recording the audio professionally.
Broadcast-Quality Audio
Podcasters know that poor audio kills viewer retention. The RØDECaster Video comes equipped with RØDE’s Revolution Preamps and APHEX audio processing, which means your voice sounds clean, warm, and professional—no post-production needed.
Easy Scene Switching and Overlays
With customizable scenes and live switching, podcasters can effortlessly toggle between camera angles, slide decks, split-screens, or branded overlays. Whether you’re recording solo episodes or interviews, your video looks dynamic and polished.
Live Streaming, Built In
No extra software needed. The RØDECaster Video streams directly to platforms like YouTube, Facebook, or Twitch. This is perfect for podcasters who want to go live with audience Q&As, guest panels, or real-time commentary.
ISO Recording for Post-Production
Want to repurpose your content for YouTube Shorts, TikTok, or Instagram Reels? The RØDECaster Video records isolated audio and video tracks for each source, so you can edit clean cuts and clips later without compromise.
Key Feature Comparison
| Feature | RØDECaster Video | Traditional Setup (Audio + Switcher + Software) |
|---|---|---|
| Audio Inputs | 2 x XLR/TRS combo, 2 x USB-C, Bluetooth, Wireless GO | XLR to USB interface (e.g., Focusrite) + external mixer |
| Video Inputs | 4 x HDMI, 2 x USB-C | Separate switcher (e.g., ATEM Mini) |
| Audio Processing | Built-in APHEX FX, EQ, compression, gating | DAW or third-party plugin chain |
| Video Scene Switching | Yes (touchscreen or software-controlled) | Manual or OBS/Ecamm Live |
| Streaming Capabilities | Direct to YouTube, Twitch, etc. (no OBS needed) | Requires third-party software |
| Multitrack Recording | Audio + ISO Video (to USB or microSD) | Separate audio and video files, manual sync |
| Wireless Mic Support | Built-in for RØDE Wireless GO/PRO | Requires receiver + adapter |
| Touchscreen Interface | Yes, full-color 7″ touchscreen + rotary encoder | Varies (usually none; dependent on laptop control) |
| Built-In Storage | No internal; records to USB or SSD | External drive or computer needed |
| Size & Portability | All-in-one, compact | Multi-device rig |
Technical Specs Snapshot
Audio:
- 2 x Neutrik combo XLR/TRS inputs
- Revolution Preamps™: ultra-low noise, high gain
- APHEX audio processing suite
- 2 x 1/4″ headphone outs, 2 x 1/4″ line outs
Video:
- 4 x HDMI inputs (1080p60)
- 2 x HDMI outputs (for multiview/program)
- 2 x USB-C inputs (camera or device input)
- 7 customizable scenes with chroma key
Connectivity:
- Dual-band Wi-Fi and Gigabit Ethernet
- USB-C for computer integration or SSD recording
- Direct RTMP streaming
Recording:
- Multitrack audio + ISO video
- Records to USB SSD or external storage (not included)
Other Highlights:
- 2 internal wireless mic receivers (Series IV compatible)
- 7” touchscreen with real-time scene control
- Chroma key and graphic overlay engine
Who It’s Best For
- Podcasters adding a video component to their show
- Creators producing interviews, livestreams, or webinars
- Audio-focused creators looking to maintain quality when transitioning to video
Whether you’re going solo or managing a team, the RØDECaster Video simplifies production and helps you deliver content that looks and sounds professional.
Final Thoughts
If you’ve been hesitant to make the jump into video podcasting because of the tech hurdles, the RØDECaster Video removes those barriers. With its intuitive design, all-in-one workflow, and creator-first features, it’s a game-changer for anyone serious about podcasting
Unmeasurable Metrics: Seeking Serendipity as a Podcaster
The Trap of the Dashboard You’re obsessively checking download numbers, and they’re… fine. Not great, not terrible. Just fine. But somehow, it doesn’t feel like enough. You start to question whether your podcast is making any difference at all.
Here’s the truth: some of the most powerful results of podcasting can’t be found in a chart or graph. Let’s explore the hidden value of podcasting — the impact you can’t measure but absolutely should recognize.
What Unmeasurable Metrics Really Mean There’s more to success than downloads, listens, and subscriptions. Unmeasurable metrics include things like:
- The emotional impact you have on your listeners
- The sense of purpose you feel after a great interview
- The unexpected DM from someone who felt seen because of your episode
- The confidence you’ve built simply by showing up every week
These are the experiences that validate your efforts in deeper, longer-lasting ways.
The Power of Serendipity in Podcasting Some of the best outcomes in podcasting happen by accident — or at least, outside your control:
- A former guest introduces you to a business partner
- A niche listener becomes a long-time fan who shares every episode
- You get invited to speak, teach, or collaborate because of something you said in a recent show
- An episode unexpectedly resonates with a new audience and goes semi-viral in a niche subreddit
These moments often lead to greater opportunities than anything you could’ve planned.
How to Notice and Track the Wins You Can’t Measure You don’t need analytics to track meaning. Try these:
- Keep a “Serendipity Log” — jot down any surprising wins, emotional moments, or affirming feedback
- Save screenshots of listener messages or social mentions
- Use voice notes to reflect after publishing — how do you feel about what you just put out?
- Set a monthly reminder to journal about what’s resonating, not just what’s ranking
These small habits help you build awareness of your true progress.
Why Depth Matters More Than Reach Chasing numbers often leads to burnout. But seeking connection leads to sustainability.
A small but loyal audience that trusts you is worth more than a large, disengaged one. Depth is where creativity thrives. It’s where real conversations happen. And often, it’s what leads to those very serendipitous opportunities that move your podcast forward.
You’re Not Alone — Real Stories, Real Impact Many podcasters have shared that their biggest breakthroughs came from moments they couldn’t have predicted:
“One episode landed me a consulting gig I didn’t even know I wanted.” “Someone wrote in to say our mental health series helped them finally go to therapy.” “My tiny audience helped me sell out my first digital product.”
These stories don’t show up in your analytics, but they’re the reason you keep going.
You’re Doing Better Than You Think So here’s your reminder: You don’t have to be charting to be winning. You don’t have to go viral to be valuable. The work you’re doing matters, and sometimes the biggest impact is the one you never see coming.
Keep a record. Celebrate your invisible wins. And above all, keep showing up.
What’s your favorite unmeasurable podcasting win? Write it down — and let it fuel your next episode.
Unmeasurable Metrics: Tracking the Intangibles of Podcasting Success
Podcasting success isn’t just about downloads, subscriber counts, or retention graphs. Some of the most powerful indicators of growth and influence are things you can’t measure easily—like trust, emotional impact, and word-of-mouth momentum. In this post, we’ll dive into how to identify and nurture these intangible metrics so you can build a podcast that truly matters.
Why Intangibles Matter in Podcasting
Metrics like downloads and listens only tell part of the story. They don’t capture the listener who binged your entire archive during a tough time, or the entrepreneur who pivoted their business after hearing your advice. Real podcast impact lives in connection, transformation, and how deeply your message resonates. Sponsors and superfans alike value depth, not just reach.
Unmeasurable But Valuable: What to Look For
Here are some of the signals that your podcast is making a lasting impact:
-
Listener trust: When people say, “I feel like I know you,” you’ve built something real.
-
Guest feedback: Guests telling you they enjoyed the conversation or recommending others to be on the show.
-
Unexpected messages: Emails or DMs saying, “That episode changed something for me.”
-
Organic shares: People quoting you on social without being asked.
-
Listener action: Subscribing to your list, joining a community, or buying a product—without you pushing.
Signs You’re on the Right Track (Even Without Big Numbers)
-
A handful of loyal listeners who show up every week.
-
Fans who refer back to specific episodes or quotes.
-
Guests sending follow-up praise—or pitching other guests to you.
-
Reviews that mention feelings: “inspired,” “motivated,” “finally understood.”
-
Listeners using your language in their own conversations or content.
Tools That Help You Track the Intangibles
You can’t graph “impact,” but you can track the patterns. These tools help:
-
SpeakPipe – Lets listeners send voice messages you can keep and feature.
-
PodInbox – A place to collect and highlight fan feedback.
-
ConvertKit / Substack – Email tools that encourage replies, giving you direct feedback loops.
-
Instagram DMs / Twitter mentions – Valuable for gauging how your content spreads and sticks.
-
Google Alerts / Brand24 – Keep tabs on where your name or show pops up unexpectedly.
How to Encourage and Grow These Intangibles
Intangibles don’t grow by accident. Here’s how to nurture them:
-
Ask open-ended questions and invite listener replies.
-
Share personal stories—let people see the human behind the mic.
-
Acknowledge fan messages on-air.
-
Use listener feedback to guide future episodes.
-
Create a “Listener Hall of Fame” or shoutout section.
Answering the Big Questions Podcasters Have
“How do I know it’s working if I can’t measure it?”
Track quotes, stories, shares, and conversations—these are your qualitative KPIs.
“Can I grow without big numbers?”
Absolutely. A loyal audience of 500 can outperform a passive audience of 5,000.
“Will sponsors care about intangibles?”
Many care more about engagement and niche influence than volume. Show them you move people.
Conclusion
Your podcast’s true value may never show up in an analytics dashboard—and that’s okay. If your voice is creating real moments for your listeners, changing their mindset, or helping them feel seen, then you’re already succeeding. Don’t just chase downloads. Chase depth.
How To Turn Your Podcast Audio Into Social Media Content
You’ve already transcribed your podcast and generated show notes — great! But what if you could turn those same audio files into high-performing content for Twitter, LinkedIn, Instagram, and TikTok?
This guide will walk you through how to repurpose podcast audio into engaging social media content — using the same local-first, no-subscription-required approach we covered in our show notes automation guide and local transcription tutorial.
🧰 Tools You’ll Need
| Tool | Purpose |
|---|---|
| Whisper (OpenAI) | Transcribe audio to text |
| GPT-4, Claude, or local LLM | Summarize and stylize text for social |
| ffmpeg | Extract audio clips |
| CapCut / Headliner / Descript | Make audiograms or reels |
| Optional: Python, Notion API, n8n | Automate workflow steps |
🪜 Step-by-Step Workflow
Step 1: Transcribe Your Podcast
Use Whisper to turn your episode into a transcript.
whisper my_episode.mp3 --model large
Step 2: Identify Key Moments
Break your transcript into smaller, digestible sections. Use:
- Natural topic transitions
- Timestamped speaker changes
- Highlighted insights or quotes
💡 Tip: Use a script to detect long pauses or keyword mentions for fast scanning.
Step 3: Generate Platform-Specific Copy
Send each chunk into GPT or your preferred LLM with platform-targeted prompts:
📌 Tweet Thread Prompt
Turn this podcast transcript into a 6-8 tweet thread. Each tweet should:
- Focus on 1 insight
- Use simple, engaging language
- Include 1 emoji per tweet
- End with a CTA to listen to the episode
📝 LinkedIn Post Prompt
Create a professional LinkedIn post from this podcast excerpt. Include:
- Bold hook
- Key takeaway in 2–3 short paragraphs
- Soft CTA or question for engagement
💬 Instagram Caption Prompt
Write an inspirational or emotional Instagram caption based on this podcast clip. Use short, bold lines and end with a question or comment prompt.
🎥 YouTube Shorts / Reels Prompt (for Clip Narration or Captions)
Summarize this audio moment as a captioned quote for a vertical video. Include a 1-line headline, 1–2 supporting lines, and call to action.
Step 4: Extract Audio or Video Clips (Optional)
Use ffmpeg to grab clips by timestamp:
ffmpeg -ss 00:05:00 -to 00:05:45 -i my_episode.mp3 -c copy clip1.mp3
Then style in:
- Headliner
- CapCut
- Descript
Step 5: Automate the Reuse (Optional)
Want to streamline this every week?
- Build a script to:
- Transcribe via Whisper
- Parse highlights
- Auto-prompt GPT/Claude
- Save output to Notion, Google Docs, etc.
- Or use n8n to chain services together
🎯 Content Strategy Matters Too
It’s not just about creating content — it’s about creating content with purpose. Once you’ve turned your audio into social-ready posts, your next move should be to give your audience a reason to go deeper:
What to Link To From Your Social Post:
- 🎁 A free resource, like a checklist or template
- 🧾 Full episode show notes or transcript on your website
- 🧠 A blog post expanding on a key insight from the clip
- 🎧 Your podcast’s episode page (with embedded player)
This turns a quick scroll into a high-value interaction — helping you build trust, grow your list, and move casual viewers toward becoming subscribers or customers.
How to Position the Social Post:
- Hook with a problem or bold statement
- Use emotion, curiosity, or a surprising stat
- Include a CTA like “Read the full notes,” “Get the free download,” or “Watch the full clip”
This is how your social clips stop being just “content for content’s sake” and start becoming assets in your funnel.
🧠 Final Tip
Before you go — if you want to turn your podcast into a revenue-generating asset, don’t miss our free guide:
👉 Download the Podcast Monetization Guide
It includes step-by-step tactics, tools, and revenue models that go way beyond sponsorships.
Start with one platform and scale up. Your podcast already has all the ingredients — this process simply remixes them into formats the algorithms favor.
If you’d rather not DIY the whole process, you can always use this shortcut — it does all of the above in a few clicks (no coding required).
How to Automate Podcast Show Notes Locally
If you’re a podcaster or content creator looking to cut costs without sacrificing quality, you don’t need expensive subscriptions to automate your workflow. In this guide, we’ll show you how to create a lightweight, local setup that transforms your podcast episodes into:
- Transcripts
- Show notes
- Summaries
- Social media posts
Whether you’re privacy-conscious, budget-minded, or just love tinkering with tools, this DIY stack will help you repurpose long-form content into multiple formats — right from your computer.
🧠 Why Build It Yourself?
With a DIY solution, you get:
- ✅ Full control over your data
- ✅ No recurring fees
- ✅ Flexibility to customize every output
The trade-off? A little more setup time and experimentation.
🧰 Tools You’ll Need
| Tool | Purpose | Notes |
|---|---|---|
| OpenAI Whisper | Audio transcription | Fast, accurate, local-only |
| GPT-4 / Claude API (or local LLM) | Content generation | API is easier, local models are free |
| ffmpeg | Audio conversion | Optional but useful |
| Python / Langchain / n8n | Automation scripting | Optional depending on your stack |
Step 1: Transcribe Audio with Whisper
🖥️ Installation by OS
macOS
- Install Homebrew if you haven’t:
/bin/bash -c "$(curl -fsSL https://raw.githubusercontent.com/Homebrew/install/HEAD/install.sh)"
You can also grab the URL from their site: https://brew.sh/
- Install
ffmpegand Python (if needed):
brew install ffmpeg python3- Install Whisper:
pip install git+https://github.com/openai/whisper.gitLinux (Ubuntu/Debian)
- Update your system:
sudo apt update && sudo apt upgrade- Install dependencies:
sudo apt install ffmpeg python3-pip- Install Whisper:
pip install git+https://github.com/openai/whisper.gitWindows
- Install Python (include it in PATH)
- Install ffmpeg for Windows and add to system PATH
- Open Command Prompt and install Whisper:
pip install git+https://github.com/openai/whisper.gitWhisper is an open-source model from OpenAI that runs locally and gives you high-quality transcripts.
Installation:
pip install git+https://github.com/openai/whisper.gitTranscribe Your File:
whisper your_episode.mp3 --model large --language EnglishThis outputs a .txt file you can feed into any AI model.
Step 2: Generate Show Notes with AI
You now need to turn that transcript into:
- Episode summaries
- Timestamped bullet points
- Guest intros
- Tweet threads
- Blog post outlines
Option A: Use GPT-4 or Claude (via API)
These models offer the highest-quality results. Simply send your transcript and a well-structured prompt like this:
Prompt Example:
You're a podcast content editor. Based on this transcript, create:
1. A 3-sentence episode summary
2. Timestamps with key discussion points
3. A guest bio
4. A Twitter thread for promo
5. A blog post outline
Option B: Run a Local LLM
If you prefer no external API calls, you can run:
- LLaMA 3
- GPT4All
- Mistral
These may require fine-tuning or more prompt engineering for accuracy.
Step 3: Automate the Workflow (Optional)
To streamline future episodes:
- Use
n8norMake.comto chain steps - Create a Python script to:
- Run Whisper
- Send transcript to an API
- Format outputs into Markdown/Google Doc/Notion
🎬 Bonus: Want Audiograms or Reels?
For that, you’ll need creative tools like:
- Headliner
- Descript
- Manual editing with tools like CapCut or Premiere
There’s no simple local-only method (yet), but you can clip and repurpose audio snippets with ffmpeg.
❓ Frequently Asked Questions (FAQ)
Can I use this method offline?
Yes. Whisper runs locally, and if you use a local LLM (like GPT4All or LLaMA 3), the entire process can be done without an internet connection.
What formats does Whisper support?
Whisper supports a variety of audio and video formats, including .mp3, .m4a, .mp4, .wav, and more.
How long does transcription take?
Depending on your machine and the Whisper model used (base, medium, or large), transcription speed will vary. On modern CPUs/GPUs, real-time or faster is common.
Do I need a GPU to run Whisper?
No, but having one speeds things up significantly. Whisper works fine on CPU, especially for shorter files.
Can I automate this entire pipeline?
Yes. Tools like n8n, Make.com, or custom Python scripts can automate everything from transcription to AI prompting and file output.
What if I want to use OpenAI or Claude via API?
You’ll need an API key from OpenAI or Anthropic, and you can use tools like langchain, openai, or requests in Python to send and process your transcript.
Are there privacy concerns with cloud APIs?
If privacy is a concern, stick to local models. Cloud APIs process your data externally, so always review their terms of service.
🚀 Prefer a Done-For-You Option?
If you’d rather skip the setup and get everything — transcripts, show notes, blog posts, tweet threads, and audiograms — in a few clicks, there’s a platform that handles all of this automatically.
You can try it free, with no credit card required:
👉 Click here to start your free trial
Final Thoughts
With a bit of setup, you can build a robust local system to automate podcast transcripts, show notes, summaries, and more — without giving up control or racking up monthly costs.
How to Transcribe Your Podcast Locally Using OpenAI Whisper
If you’re a podcaster looking to generate accurate, private, and cost-free transcripts of your episodes, OpenAI’s Whisper model might be exactly what you need. In this post, we’ll walk you through how to transcribe your podcast locally using Whisper—no API key or subscription required.
🎓 Why Use Whisper?
OpenAI Whisper is a powerful open-source automatic speech recognition (ASR) system. It supports multiple languages and is incredibly accurate, especially with high-quality audio. Best of all, you can run it on your own computer without relying on third-party services or cloud infrastructure.
Key Benefits:
- 100% free and open-source
- No internet or API required
- Supports dozens of languages
- Generates .txt, .srt, and .vtt output

Click Here For a No-Code Transcription Service
🔧 What You Need
| Tool | Purpose |
|---|---|
| Python 3.8+ | To run Whisper |
| FFmpeg | To decode audio formats |
| openai-whisper | Whisper model via pip |
| Audio file (MP3, WAV, etc.) | Your podcast episode |
| Decent computer | For processing (faster CPU/GPU = better) |
💪 Step-by-Step Setup
1. Install Python
Visit python.org and download the latest version. After installing, verify with:
python --version
2. Install FFmpeg
- Mac:
brew install ffmpeg - Windows: Download from ffmpeg.org and add to PATH
- Linux:
sudo apt install ffmpeg
3. Install Whisper
Run this command in your terminal:
pip install -U openai-whisper
📁 Transcribe Your Podcast
4. Place Your Audio File
Move your audio file (e.g., episode1.mp3) into an easy-to-find folder.
5. Run Whisper
In your terminal, navigate to the folder and run:
whisper episode1.mp3 --model medium
Model Options:
baseorsmall: Faster but less accuratemedium: Good balancelarge: Best accuracy, slower processing
6. View Output
Whisper generates the following files:
episode1.txt— Plain text transcriptepisode1.srt— Subtitles for videoepisode1.vtt— Web-compatible captions
🛠️ Advanced: Transcribe Multiple Episodes
Want to transcribe all your episodes at once?
Mac/Linux:
for file in *.mp3; do whisper "$file" --model medium; done
Windows (PowerShell):
Get-ChildItem *.mp3 | ForEach-Object { whisper $_.Name --model medium }
🧪 Pro Tips for Podcasters
- Use high-quality audio recordings
- Add
--language Englishif Whisper guesses wrong - Use
--task translateto convert non-English audio to English - Batch process files overnight with the “large” model for best results
🎮 Prefer a GUI?
If you don’t like the command line, try:
- MacWhisper — Mac app with a simple interface
- Whisper.cpp GUIs — Lightweight versions for all systems
📄 Ready to Take Control?
With Whisper, you’re not only saving money—you’re also gaining full control of your podcast’s content. Whether you’re preparing for repurposing, SEO, or accessibility, a great transcript is just a few commands away.
Or skip the DIY process and get it done faster with tools built for busy podcasters.
Explore the easier path here → Click Here To Try CastMagic Free
🧠 Want the Easy Button?
If you’d rather not install Python, run terminal commands, or manage files manually — there’s a powerful tool we recommend that:
- Transcribes your episodes fast with studio-grade accuracy
- Auto-generates show notes, timestamps, highlights, and repurposed content
- Supports multiple formats, languages, and speaker labeling
❓ FAQ: Whisper Transcription for Podcasters
1. Do I need an internet connection to use Whisper?
No. Once Whisper and its dependencies are installed, it runs entirely offline on your local machine. Your podcast files stay private and never leave your computer.
2. Is Whisper really free?
Yes! OpenAI released Whisper as an open-source project. There are no license fees or subscription costs. Your only investment is in the time to set it up and your own hardware.
3. How long does transcription take?
It depends on your computer and the model you use:
- On a modern laptop with no GPU, a 60-minute episode may take ~15–30 minutes with the
mediummodel. - On a machine with a good GPU, it’s significantly faster.
- The
smallandbasemodels are quicker but less accurate.
4. What audio formats does Whisper support?
Whisper supports:
.mp3.wav.m4a.mp4.webm.mov
Thanks to FFmpeg, most common podcast formats are compatible.
5. Can I use Whisper to translate podcasts to English?
Yes! Add the --task translate flag to your command:
whisper episode1.mp3 --model medium --task translate
This will detect non-English audio and output English translations.
6. Will Whisper automatically add punctuation and speaker labels?
- Punctuation: Yes, Whisper adds intelligent punctuation based on context.
- Speaker Labels: No. Whisper does not do speaker diarization (labeling different speakers). You would need a separate tool like pyannote-audio or use a platform like Descript for that feature.
7. Can I use Whisper on Windows?
Yes! Whisper runs on Windows, Mac, and Linux. On Windows, you’ll need:
- Python installed
- FFmpeg added to your PATH
- Terminal access (PowerShell or Command Prompt)
8. Does Whisper work for noisy recordings?
It handles background noise better than many other tools, but for best accuracy:
- Use a good mic
- Minimize reverb and background sounds
- Consider using the
largemodel for tough recordings
9. Is there a GUI version of Whisper?
Yes, you can use:
- MacWhisper (for Mac users): drag-and-drop interface
- Whisper.cpp GUIs: lighter versions with cross-platform support
10. How do I add the transcript to my podcast site or blog?
Once Whisper generates the .txt file, copy it into your WordPress post, show notes, or use a plugin like:
- Simple Podcast Press
- Fusebox
- Or embed it manually with HTML/CSS for custom styling
Castmagic Pricing Explained: Is It Worth It for Podcasters & Content Creators?
If you’re a podcaster, YouTuber, or digital agency constantly battling the post-production grind, Castmagic might already be on your radar. This AI-powered tool is changing the game by turning your audio content into ready-to-publish assets: show notes, blog posts, social media threads, transcripts, and more.
But how much does Castmagic cost — and is it worth it?
This post breaks down the current pricing tiers (as of 2025), what you get at each level, and how you can try it for free to find the right fit.
What Is Castmagic?
Castmagic is a content automation platform that uses AI to repurpose spoken audio into:
- Transcripts
- Blog posts
- Show notes
- Tweet threads
- Newsletters
- Audiograms and reels
- SEO-ready articles
It’s like having a virtual assistant, editor, and marketer — all rolled into one. Designed for podcasters, creators, coaches, and agencies, Castmagic takes a 30-minute conversation and spins it into dozens of high-quality content pieces.
Castmagic Pricing Plans (2025)

Castmagic offers flexible plans and allows you to upgrade or downgrade anytime. Every tier comes with a free trial, and all features can be explored before committing.
| Feature | Hobby Plan ($19/mo)* | Starter Plan ($39/mo)* | Rising Star Plan ($179/mo)* |
|---|---|---|---|
| Included Minutes | 300 mins/month | 800 mins/month | Unlimited |
| Additional Minutes | $0.20/min | $0.15/min | Unlimited |
| User Seats Included | 1 seat | 1 seat | 5 seats |
| Add’l Team Members | $11 per seat | $11 per seat | $11 per seat |
| Languages Supported | 60+ | 60+ | 60+ |
| Magic Chat | Yes | Yes | Yes |
| Pages (Longform AI) | 2000+ word outputs | 2000+ word outputs | 2000+ word outputs |
| Prompt Re-Generations | Unlimited | Unlimited | Unlimited |
| Studio Tools | Unlimited clips, audiograms, sharing | Same | Same |
| Team Tools | Invite, roles, dark mode | Same | Same |
| Integrations | Zoom, Drive, Zapier, YouTube, TikTok, Instagram | Same | Same |
| Media Storage | Unlimited uploads, 10GB max file size, 5 concurrent uploads | Same | Same |
| Support | Slack, Live Chat | Slack, Live Chat | Slack, Chat, Onboarding Call |
*Annual billing rate. Monthly billing available at higher prices.
Curious which plan fits your workflow? Try Castmagic free here
Is Castmagic Worth It?
Let’s put it in perspective:
- Hiring a podcast editor: $100–$300 per episode
- Hiring a writer for SEO posts: $50–$200+ per article
- Hiring a VA for notes, quotes, and summaries: $15/hour+
With Castmagic, even the Starter Plan ($39/month annual) can replace hundreds in freelance costs — and generate content faster.
Plus, it works 24/7, never misses a deadline, and speaks over 60 languages.
🔄 Want to test that ROI for yourself? [Click here to upload your first episode free]
How to Try Castmagic (No Credit Card Required)
You can try every Castmagic plan for free. Just sign up, upload a podcast or meeting recording, and test all the AI-powered content tools.
There’s no commitment — and you’ll instantly see how much time and effort it can save.
🚀 Ready to turn your recordings into content gold? Start your free Castmagic trial now
Frequently Asked Questions (FAQ)
❓ Can I try Castmagic without entering payment info?
Yes! Castmagic offers a free trial on all plans — no credit card required.
❓ Can I switch plans later?
Absolutely. You can upgrade, downgrade, or cancel your plan anytime through your dashboard.
❓ What happens if I go over my minutes?
You’ll be charged the per-minute rate for your plan ($0.20/min for Hobby, $0.15/min for Starter). Rising Star users have unlimited minutes.
❓ Do I need to download anything?
Nope! Castmagic is a web-based tool. You can access it from anywhere with your browser.
❓ Can I collaborate with my team?
Yes. All plans include team collaboration tools. The Rising Star plan includes 5 seats by default, and extra seats can be added to any plan for $11/month.
❓ What kinds of files can I upload?
You can upload audio or video files (MP3, MP4, M4A, etc.), import from Zoom, Google Drive, YouTube, or even Instagram and TikTok URLs.
Final Thoughts
Castmagic pricing is straightforward, scalable, and surprisingly affordable for what it offers. Whether you’re producing one episode a week or managing dozens of client recordings, there’s a tier that fits — and you can try them all first.
If you’re ready to save time, cut costs, and grow your content output, Castmagic might be your new best tool.
🔗 Try Castmagic Free → Try It Now
Betting on Bits for Better Podcasting
In podcasting, it’s not the biggest budgets or fanciest studios that win—it’s the smartest systems. What separates hobbyists from high-performers is often a series of small, intentional choices: tiny tools, workflows, and optimizations that create big results.
We call them “bits”—and when you bet on the right ones, your podcast gets better across the board: sound, reach, insights, and revenue.
Let’s explore how to stack these bits in your favor.
🎙️ Bit 1: Clean, Confident Production Tools
A well-edited podcast isn’t just a luxury—it’s the first impression that keeps listeners coming back. Thankfully, you don’t need a sound engineer to achieve it. These tools put high-quality editing in your hands:
| Tool | Key Features | Why It’s Worth Betting On |
|---|---|---|
| Descript | Edit audio like a doc, remove filler words, generate transcripts | Speeds up editing and lets you easily clip repurposable content |
| Adobe Podcast (Enhance Speech) | AI removes background noise, enhances clarity | Makes rough recordings sound studio-quality instantly |
| Hindenburg | Designed for narrative audio, auto-levels sound, exports loudness-normalized episodes | Ideal for storytellers and interview shows needing polish |
Quick Win: Run your next episode through Adobe Enhance before uploading—your listeners will notice the difference.
📈 Bit 2: Smarter Analytics & Attribution
Without feedback, it’s easy to waste effort. The right analytics tools show what’s working and what’s not—so you can double down on what moves the needle.
| Tool | Tracks | Best For |
|---|---|---|
| Chartable | Listener sources, attribution, SmartLinks | Measuring which promotions lead to real listens |
| Podkite | Global charts, cross-platform reviews, smart links | Understanding where your show ranks and what audiences are saying |
| Spotify for Podcasters | Audience age, gender, retention curves, episode popularity | Demographics and drop-off points for smarter content planning |
Pro Tip: Use Chartable’s SmartLinks for every promo. Over time, you’ll see which platforms drive real growth.
📣 Bit 3: Promotion Through Micro-Content
A full episode might be 30–60 minutes—but your audience’s attention span isn’t. Micro-content lets you tease, promote, and engage across channels like Instagram, TikTok, and YouTube Shorts.
| Tool | Creates | Perfect For |
|---|---|---|
| Headliner | Audiograms with captions and waveform | Easy Instagram and Twitter shares |
| Opus Clip | AI finds viral clips from long-form video/audio | TikTok/YouTube Shorts to draw new eyes |
| Recast Studio | Custom-branded audiograms and short videos | On-brand social content for episode drops |
Quick Win: Clip a powerful 30-second quote from your next guest and post it with captions—engagement > static graphics every time.
💰 Bit 4: Tools That Help You Monetize
Monetization isn’t just for the top 1% of podcasters anymore. With the right stack, you can start earning—whether it’s $50/month or $5,000—from a dedicated audience.
| Tool | Monetization Method | Ideal For |
|---|---|---|
| Buzzsprout | Dynamic ads, affiliate tools, episode promotion | Beginners and intermediate creators |
| Podbean | Ad marketplace + listener support + live shows | Flexible monetization with hosting |
| Supercast | Paid subscriptions, exclusive episodes, Stripe integration | Building a premium tier for fans |
Revenue Hint: Use dynamic ad insertion to rotate affiliate offers based on episode content—you’ll earn more over time.
🧩 Putting It All Together: The Stack
Here’s what a modern, efficient podcast workflow might look like:
| Stage | Tool |
|---|---|
| Record | Zoom, Riverside, or SquadCast |
| Edit | Descript or Hindenburg |
| Enhance | Adobe Podcast |
| Host & Monetize | Buzzsprout or Podbean |
| Promote | Headliner or Opus Clip |
| Analyze | Chartable + Spotify for Podcasters |
This is the “stack” that turns time spent podcasting into a content engine.
🔚 Final Thoughts: Stack Bits, Win Big
Podcasting success rarely comes from one big change. It comes from small, consistent improvements—stacking “bits” of leverage until the flywheel spins. Production. Promotion. Data. Monetization. Each bit multiplies the next.
Don’t try to master all of them at once. Instead:
✅ Pick one area that feels weakest
✅ Adopt a tool that fits your workflow
✅ Give it 30 days and measure the results
🎁 Want to Monetize Smarter?
Grab our free Podcast Monetization Guide, including 2 exclusive video trainings to help you start earning from your podcast—even if your audience is small.
Be Where Today’s Podcast Listeners Expect You To Be
Podcasting has moved into a new era. It’s no longer enough to just publish your episodes and hope the right listeners find them. With content overload and fierce competition for attention, your visibility across multiple platforms is what can make or break your growth.
Modern podcast listeners expect you to be everywhere they are — not just in audio apps, but in their social feeds, on YouTube, inside their email inboxes, and even in their Google search results.
This post breaks down everything you might be missing as a podcaster today and offers practical, actionable steps to meet your audience where they expect to find you.
1. Distribute Beyond the Standard Apps
Most podcasters know to be on Apple Podcasts and Spotify. But stopping there limits your reach. Consider expanding your distribution to places that cater to both audio-first and multi-format consumers.
| Platform | Why It Matters | Missed Opportunity If Absent |
|---|---|---|
| Spotify, Apple | Still the top destinations for audio | Core audience can’t find your show |
| YouTube | 2nd-largest search engine in the world | Misses Gen Z + visual learners |
| Amazon/Audible | Integrates with Alexa + audiobook crowd | Can’t tap into passive listeners |
| Podcast Index & Apps | Supports open podcasting ecosystem | Misses privacy-conscious users |
| iHeartRadio, Stitcher, Pandora | Available through podcast hosts like Libsyn | Miss out on older and non-tech audiences |
Action Tips:
- Use a podcast host that syndicates widely
- Claim and customize your profiles across each platform
- Use consistent cover art and metadata for branding
2. Turn Your Podcast Into Visual Content
With the rise of TikTok and YouTube Shorts, listeners increasingly expect a visual layer to go with audio. Even if your show isn’t a video podcast, you can still adapt your content visually.
What to do:
- Record video during your audio sessions (even if only one camera)
- Post full-length episodes to YouTube
- Share 30–60 second highlight clips on TikTok, Instagram Reels, and YouTube Shorts
- Use apps like Headliner or Descript to turn audio into animated audiograms
Why it works:
- Visuals boost engagement and discovery
- Many users follow creators visually first before becoming audio subscribers
3. Build Your Podcast’s SEO Footprint
Google is increasingly indexing podcasts. This means your episodes can show up in search results — but only if they’re properly optimized.
Steps to take:
- Publish each episode with a full title, show notes, and transcript
- Use H2s and bullet points in your show notes
- Link to other episodes and relevant resources
- Add schema markup for podcast episodes (use tools like Yoast or RankMath)
Pro Tip: Target searchable questions in your episode titles, e.g., “How to Start a Side Hustle While Working Full-Time.”
4. Own Your Audience (Don’t Rent It)
Social media and podcast apps are rented platforms. If they shut down or change the algorithm, you lose access to your followers. Build your email list and community to future-proof your connection.
What to offer:
- Lead magnet (free guide, checklist, bonus audio)
- Weekly newsletter or behind-the-scenes commentary
- Early access to episodes or Q&A sessions
Tools to use:
- ConvertKit, MailerLite, Beehiiv, or Substack
- Link opt-ins from all podcast platforms and social bios
5. Embrace Platform-Native Behavior
Each social platform has unique norms and attention spans. Reposting the same content everywhere rarely works.
| Platform | Best Format | What Listeners Expect |
| TikTok | Short vertical videos with hooks | Entertainment, personality, fast pace |
| YouTube | Long-form + searchable Shorts | Visual podcast or highlight clips |
| Reels, Stories, carousels | Personal connection, DMs, discovery | |
| Twitter/X | Threads, live reaction tweets | Ideas, engagement, controversial takes |
Customize content per platform, but keep your message consistent.
6. Don’t Sleep on Google Search
Many listeners start their journey on Google, not podcast apps. Even if they ultimately listen on Spotify, the discovery may happen in search.
How to capitalize:
- Create content around common listener questions
- Embed your podcast episodes into blog posts
- Use YouTube to own both video and search discovery
Example: If you podcast about dog training, an episode titled “How to Train a Puppy Not to Bite” might rank on Google if embedded in a blog with good SEO.
7. Use Smart Cross-Promotion
Appearing on other shows remains one of the best ways to grow your own.
Effective tactics:
- Guest on shows with aligned audiences
- Mention your podcast in other creators’ newsletters or Substack swaps
- Repurpose top-performing content into:
- Blog posts
- Twitter/X threads
- LinkedIn articles
- Email series
Mention guest names in your titles, episode notes, and hashtags. It helps you show up in their search traffic.
8. Monitor Listener Behavior Trends
Don’t assume your audience habits are fixed. Consumption trends shift fast.
Track:
- Which apps your episodes are being downloaded from
- Where social traffic is coming from
- What format your followers share or comment on most
Tools:
- Apple & Spotify podcast dashboards
- Chartable, Podsqueeze, Rephonic, or Castos
- Google Analytics for your site
Adapt your content schedule and formats accordingly.
9. Make It Easy to Subscribe Anywhere
Don’t expect listeners to go searching for your show. Guide them with clear, easy access.
Must-have links:
- Apple
- Spotify
- YouTube
- Google Podcasts (while still active)
- Amazon Music
Tools to help:
- Podpage
- Pod.link
- Linktree or custom landing pages
Add your subscribe links to:
- Website header/footer
- Podcast outro
- Social bios
- Email signatures
Bonus: Underrated Channels to Consider
Pinterest:
- Post vertical pins of episode graphics
- Link back to show notes or transcripts for evergreen SEO
Reddit & Quora:
- Search for niche-specific questions and answer them
- Add value first, then link your podcast subtly
Medium/Substack:
- Turn your episodes into reader-friendly articles
- Reach people who prefer to skim over listen
🎯 Ready to Grow and Monetize Smarter?
Grab our free Podcast Monetization Guide + video trainings and learn how to turn your content into a business.
You don’t just need more listeners — you need the right listeners. Let’s help them find you wherever they already are.
Be discoverable. Be strategic. Be everywhere.
Live Up to the Hype: How Podcasters Can Actually Deliver on Their Promises
Every week, thousands of new podcast episodes drop—and most make big promises. “This will change your business.” “Our guest drops pure gold.” “You won’t believe tip #3.”
But listeners are tired of clickbait. If your content doesn’t actually deliver, they’re out. And with so many choices, they may never return.
In this guide, we’re breaking down exactly how podcasters can “live up to the hype,” win trust, and turn casual listeners into loyal fans (and eventually, paying supporters).
Why Hype Is a Promise, Not a Marketing Trick
When a listener hits play on your episode, they’re making a small investment of trust and time. Your title, intro, and promotion created an expectation. Failing to meet it damages trust.
Consistently delivering on that promise leads to:
- Higher episode completion rates
- More organic word-of-mouth
- Better reviews and ratings
- Increased monetization opportunities
Bottom line: Podcast growth doesn’t come from flashy hooks. It comes from earning repeat attention.
Common Ways Podcasters Overpromise (and How to Fix Them)
| Problem | What It Looks Like | Why It Fails | How to Fix It |
|---|---|---|---|
| Clickbait Titles | “How to Make $10K in 10 Days” | Sets unrealistic expectations | Use specific, grounded outcomes based on real experience |
| Rambling Intros | 12-minute cold opens | Wastes attention span | Get to the value fast; deliver what was promised in the first 2–5 minutes |
| Surface-Level Content | “Just be consistent!” | Too vague or generic | Share frameworks, examples, scripts, data |
| Misleading Guest Claims | “This guest is legendary” | Hype without context | Explain why the guest matters—highlight their unique angle or achievement |
Five Key Strategies to Live Up to the Hype
1. Hype Honestly
Craft compelling titles and episode descriptions, but make sure the content justifies them. Instead of saying “game-changing,” say what actually changes.
Bad: “This episode will blow your mind”
Better: “You’ll learn the 3 outreach scripts I used to land $5K in sponsorships last quarter.”
Pro Tip: Write the title after you finish editing the episode. Make sure it reflects what you actually delivered.
2. Start with the Payoff
Listeners decide in the first few minutes whether to keep listening.
Use a cold open or hook that:
- States the main benefit of the episode
- Teases a key result or insight
- Addresses a pain point or question directly
Then jump right into the substance.
“In today’s episode, you’ll hear how I turned one interview into 8,000 downloads using a referral trick most podcasters ignore.”
3. Deliver Depth, Not Just Volume
Many podcasts struggle because they stay too high-level. Hype fails when listeners walk away saying, “Yeah, but how do I do that?”
Instead of this:
- “Find sponsors that align with your brand”
Say this:
- “Search LinkedIn using ‘[your niche] + marketing manager,’ then use this 3-line cold outreach template.”
Depth = trust. The more specific and applicable your content, the more valuable it becomes.
4. Use a Clear Episode Structure
Good structure keeps your show focused and fulfilling. A simple but powerful format:
- Hook / Cold open
- Re-state the promise (“Here’s what you’ll learn today…”)
- Deliver point-by-point value
- Recap (helps reinforce memory)
- Call-to-action (only if relevant)
Bonus: Add timestamps to your show notes to make key insights easier to access.
5. Reinforce the Promise at the End
Circle back to your opening promise.
“So to recap, those are the 3 tactics that helped me land $5K in podcast sponsorships in under 30 days. I hope you’ll try at least one of them this week.”
That “wrap-around” structure gives listeners a feeling of closure and satisfaction—and increases the likelihood they’ll recommend the episode to others.
BONUS: Ask Yourself These 5 Questions Before You Hit Publish
- Does the title match the actual value delivered?
- Is the “big takeaway” clear by the 3-minute mark?
- Did I include at least one concrete example or resource?
- Could a listener take action after hearing this?
- Would I share this if I stumbled on it myself?
If the answer to any of these is “no,” revise.
Final Thoughts: Consistency Builds Trust
You don’t need to tone down your hype. You just need to earn it. When your content matches your messaging, you become a reliable source—and people don’t unsubscribe from creators they trust.
🎁 Want to Monetize Your Podcast the Right Way?
If you’re serious about growing and monetizing your podcast, we put together something to help:
👉 Visit PodcastPontifications.com to grab our free monetization guide.
Inside, you’ll get:
- Proven monetization frameworks for independent creators
- Real-world examples of podcasters earning income
- Free video trainings to help you grow faster (without selling out)
Start turning your content into a business—without breaking listener trust.
- StreamYard Business Plan Review: Is It Worth $299/Month for Teams?
- Synology DS1525+ for Podcasters: What You Need to Know Before You Buy
- StreamYard Pricing (2026): Full Comparison of Plans, Differences, Features & Discounts
- Podbean Pricing: The Best Podcast Hosting Platform for Getting Started?
- SquadCast Pricing Explained: Every Plan, Feature, and Trade-Off Worth Knowing