Matt
Zoom PodTrak P4 – The Podcast Recorder’s Dream Device
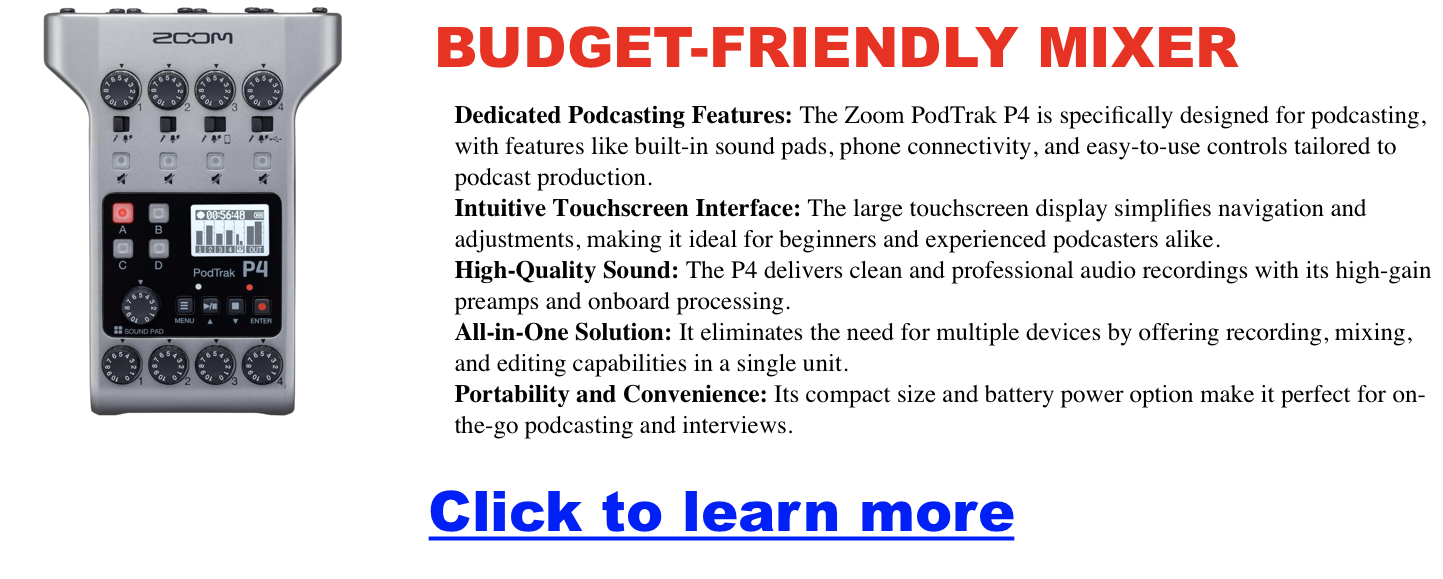
Podcasting is a fantastic way to share your voice with the world, but setting up a professional-sounding recording can be daunting. Juggling multiple devices, cables, and software can quickly turn a creative endeavor into a technical headache. That’s where the Zoom PodTrak P4 comes in. This compact yet powerful audio interface / recorder is specifically designed to streamline podcasting workflows and deliver exceptional sound quality all in one convenient package.
Who is the Zoom PodTrak P4 Ideal For?
The Zoom PodTrak P4 is a versatile tool that caters to a variety of podcasters:
- Beginner Podcasters: The user-friendly interface and streamlined workflow make it easy to get started, even if you have no experience with audio mixing.
- Podcasters on the Go: Its compact size and battery power option offer unparalleled portability, allowing you to record anywhere, anytime.
- Interview-Style Podcasts: The dedicated phone input and mix-minus feature make it ideal for easily conducting remote interviews.
- Multi-Host Podcasts: You can comfortably accommodate multiple hosts and guests with four microphone inputs.
- Podcasters Seeking Simplicity: The P4 is a convenient device that combines everything you need for recording, mixing, and basic editing, simplifying your setup and workflow.
Key Features & Benefits of the Zoom PodTrak P4
Click here to see my favorite podcast recording device
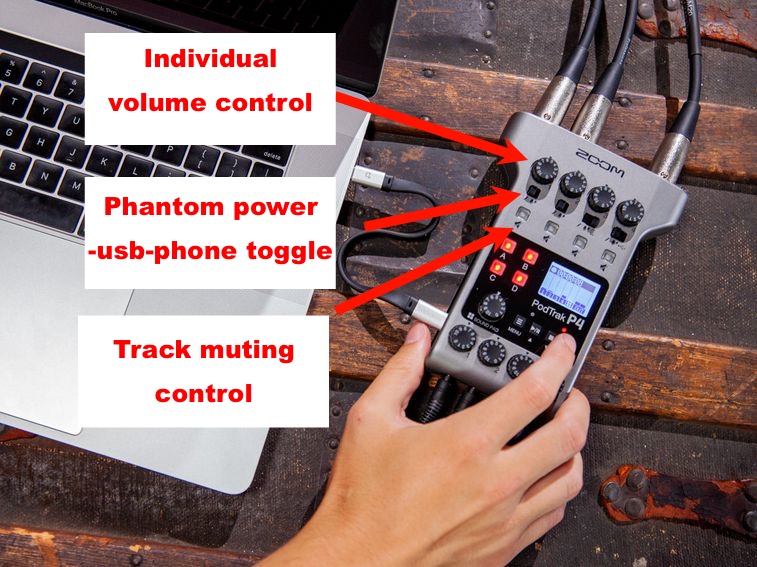
Intuitive Touchscreen Interface
The P4’s large, full-color touchscreen makes navigation and adjustments a breeze. Whether you’re a seasoned podcaster or just starting, you’ll appreciate the ability to easily access menus, change settings, and trigger sound effects with simple touch gestures. No more fumbling with confusing knobs and dials – the Zoom P4 puts everything at your fingertips.
Four High-Quality Microphone Inputs
The P4 boasts four XLR microphone inputs, each equipped with high-gain preamps to ensure clean and professional-sounding recordings. You can comfortably host multi-host podcasts or interviews, and the P4 even supports both dynamic and condenser microphones, giving you flexibility in your microphone choices.
Built-in Sound Pads
Say goodbye to clunky external soundboards! The P4 features six customizable sound pads that let you trigger sound effects, jingles, and intro/outro music with a single touch. You can choose from the pre-loaded sounds or upload your custom creations, adding a touch of personality and professionalism to your podcast.
Phone Connectivity & Mix-Minus
Remote interviews are a breeze with the P4’s dedicated phone input and mix-minus feature. Connect your phone via TRRS cable or Bluetooth and effortlessly bring in remote guests with crystal-clear audio. The mix-minus function prevents echo and feedback, ensuring a smooth and professional interview experience.
Onboard Recording & Editing
The P4 eliminates the need for external recording devices by offering direct recording to SD cards or your computer via USB. You can also perform basic editing tasks like trimming and splitting tracks directly on the device, saving you time and streamlining your workflow.
Battery-Powered Option
Take your podcasting on the road! The P4 can be powered by AA batteries for up to 4 hours, allowing you to record outdoors, on location, or wherever inspiration strikes.
Addressing Potential Concerns
While the Zoom PodTrak P44 offers a wealth of features and benefits, it’s important to consider its limitations:
- Limited Advanced Features: If you require complex audio processing or multitrack recording, the P4 might not be the best fit. Consider a more advanced mixer or digital audio workstation.
- No Built-in Effects: While the P4 offers basic EQ and compression, it doesn’t have built-in effects like reverb or delay. You may need additional software or hardware for advanced effects processing.
Comparison with Other Podcast Mixers
The Zoom PodTrak P4 stands out in the crowded market of podcast mixers. Here’s a quick comparison with two other popular options:
- Rode RODECaster Pro: The Rodecaster Pro offers features similar to the P4, focusing on professional sound quality and touch-screen controls. It’s a great choice for podcasters who prioritize audio fidelity and are willing to invest more.
- Tascam Mixcast 4: The Tascam Mixcast 4 is another dedicated podcasting solution with built-in sound effects and voice changers. It offers a fun and engaging experience but might not be as intuitive for beginners as the Zoom P4.
Conclusion
The Zoom PodTrak P4 is a powerful, versatile audio mixer that simplifies podcast production and delivers exceptional sound quality. Whether you’re a seasoned podcaster or just starting, the P4’s intuitive interface, dedicated features, and portability make it a valuable addition to your toolkit. Consider your specific needs and budget when making a decision. Still, if you’re looking for an all-in-one solution that empowers you to easily create professional-sounding podcasts, the Zoom PodTrak P4 is an excellent choice. If for whatever reason you feel you need a bit more real-estate to play with, then you might want to look at the Zoom LiveTrak L-8, which we dive into here.
Choosing the Right Audio Mixer for a Podcast
In podcasting, where captivating content reigns supreme, audio quality is indispensable. A crisp, clear, professional sound can significantly elevate a podcast, keeping an audience engaged and returning for more. This is where an audio mixer steps in, offering an audio interface for podcast producers looking for control and versatility to fine-tune their sound and create a truly immersive listening experience.
Tips for finding the best podcast audio mixer/interface
- Number of Microphones & Guests: Are you a solo podcaster or regularly host multiple guests? Having enough microphone inputs to accommodate everyone is essential. Also, consider potential future growth and leave room for expansion.
- Additional Audio Sources: Will you incorporate music, sound effects, or pre-recorded segments into your podcast? Do you need to connect instruments or bring in remote guests via phone or online platforms? Ensure your mixer has the flexibility to handle various audio sources.
- Recording & Output: How will you record your podcast? Directly to your computer or via an external recorder? Understand the output options available on the mixer to ensure compatibility with your recording setup.
- Desired Features: Do you want built-in effects, sound pads for jingles or sound effects, or phone connectivity for interviews? Consider any specific features that could streamline your workflow and enhance your podcast.
Key Factors to Consider When Choosing an Audio Mixer
- Number of Channels & Inputs: Channels represent individual audio sources you can control independently, while inputs are the physical connections on the mixer. Match the number of channels and inputs to your anticipated needs, leaving room for future growth.
- Sound Quality & Preamps: Preamps are crucial for amplifying microphone signals and significantly impact the overall audio quality. Look for mixers with clean and transparent preamps that accurately capture the nuances of your voice and instruments.
- Ease of Use & Interface: An intuitive and user-friendly interface is vital, especially if you’re new to audio mixing. Consider mixers with dedicated podcasting features, clear controls, and straightforward navigation.
- Budget & Value: Audio mixers range in price from budget-friendly to professional-grade. Set a realistic budget and prioritize features that align with your needs and level of experience.
Top Audio Mixer Recommendations for Podcasters
Budget-Friendly Audio Mixers
Compact and affordable 8-channel mixer
- Ideal for solo podcasters and small setups
- Xenyx mic preamps for decent sound quality
- Built-in USB interface for direct recording
- 3-band British EQ for basic tone shaping
Mackie Mix5
Simple and portable 5-channel mixer
- Two Mackie Onyx mic preamps for good sound quality
- Durable build for on-the-go podcasting
- Compact size for limited space
- Basic features for beginners
Budget-Friendly Audio Recorder / Interface
Dedicated podcast production studio with four microphone inputs
- Built-in sound pads for jingles and effects
- Record calls and music directly to the device
- Easy-to-use interface with touch screen
- Perfect for solo podcasters and interviews

Mid-Range Audio Mixers
- Yamaha MG10XU: This 10-channel mixer balances affordability and advanced features. It boasts studio-grade D-PRE mic preamps, onboard effects, and a USB interface for seamless recording. It’s a versatile option suitable for a wide range of podcasting needs.
- Rode RODECaster Pro: This dedicated podcast production studio combines four high-quality XLR microphone inputs with built-in sound effects, Bluetooth connectivity, and intuitive touch-screen controls. It’s perfect for podcasters who want an all-in-one solution focusing on ease of use.
- Zoom LiveTrak L-8: With eight channels, onboard effects, and the ability to mix, record, and stream simultaneously, the Zoom LiveTrak L-8 is a powerful tool for podcasters who want to improve their production.
Premium Audio Mixers
- Allen & Heath ZEDi-10FX: This compact 10-channel mixer boasts exceptional sound quality, high-quality preamps, and a range of built-in effects. Its USB interface allows for multitrack recording, making it a great choice for podcasters who demand professional-level audio.
- Soundcraft Signature 12MTK: Featuring 12 channels and iconic Ghost mic preamps, the Soundcraft Signature 12MTK delivers pristine audio quality and offers extensive routing options. It’s an excellent choice for podcasters who value superior sound and flexibility.
Additional Tips for Choosing the Right Mixer for a Podcast
- Read Reviews & Compare: Research different mixers and read user reviews to understand their performance and usability.
- Consider Future Growth: Choose a mixer that can accommodate your current needs and potential future expansion, such as adding more microphones or audio sources.
- Compatibility with Existing Equipment: Ensure the mixer matches your existing microphones, headphones, and recording software.
Investing in a good audio mixer is crucial in creating a professional and engaging podcast. You can find the perfect mixer to elevate your podcasting journey by carefully considering your needs and exploring available options. Clear and captivating audio will keep your audience hooked and reflect your commitment to delivering high-quality content. So, choose wisely and let your podcast shine!
Can I Transfer My Website to Another Host
Considering a switch of web hosts for your WordPress site? Perhaps you’re eyeing better performance, more features, or improved customer support. Whatever your motivation, the prospect of migrating your site might initially seem daunting. But remember, this is a journey towards a better digital home for your site, filled with potential for enhanced user experience and improved search engine rankings. With the right approach, it can be a smooth and exciting process.
This comprehensive guide will walk you through every step of the WordPress migration journey, from choosing the right method to ensuring a seamless transition.
Why Migrate Your WordPress Site?
Before we get into the how-to, let’s briefly explore why you might want to migrate your WordPress site in the first place. Some common reasons include:
- Improved Performance: A faster host can lead to a better user experience and improved search engine rankings.
- Enhanced Features: Some hosts offer specialized features like staging environments, automatic backups, or advanced security tools.
- Better Customer Support: Responsive and knowledgeable support can be invaluable when encountering issues.
- Cost Savings: You might find a more affordable hosting plan with similar or better features.
Key Considerations Before Migrating
Before you embark on your migration journey, there are a few crucial things to consider:
- Backup: Always create a full WordPress site backup before starting any migration. This ensures you have a safety net in case anything goes wrong.
- Compatibility: Check that your new host supports your current WordPress version and any essential plugins. Also, confirm PHP version compatibility.
- Domain Name: If you’re also changing your domain name, you must update DNS settings and set up redirects.
- Downtime: There might be a brief period of downtime during the transfer. To minimize disruption, plan your migration during a low-traffic time.
Methods for Migrating Your WordPress Site
- Migration Plugins
This is the easiest and most recommended method, especially for those less familiar with technical aspects. Popular plugins like All-in-One WP Migration or Duplicator handle the entire process, from exporting your site’s files and database to importing them into the new host. Some hosts also offer their migration plugins or services.
- Manual Migration
This method involves more technical steps, including:
- Exporting your WordPress database from the old host.
- Copying all your WordPress files (including themes, plugins, and uploads) to the new host via FTP.
- Creating a new database on the new host and importing the exported database.
- Editing the wp-config.php file to connect WordPress to the new database.
This method requires some understanding of FTP, databases, and file management.
Host-Assisted Migration
Many web hosting providers offer free or paid website migration services. You typically provide your old host’s details, and the new host handles the transfer for you. This is a convenient option, especially for those with limited technical knowledge. However, it’s important to check the host’s specific migration process and any potential limitations, such as the size of your site or the number of databases, to ensure a smooth transition.
Web Hosts with Migration Services
| Host | Free Migration | Notable Features |
|---|---|---|
| SiteGround | Yes | Expert team handles transfer, minimal downtime |
| Bluehost | Yes (1 website) | User-friendly, WordPress focus |
| Hostinger | Yes | Budget-friendly, automated tools |
| DreamHost | Yes | Unlimited migrations, automated plugin |
| WP Engine | Yes (for eligible sites) | Premium managed WordPress hosting, expert support |
| A2 Hosting | Yes | No downtime guarantee, expert team |
Troubleshooting Common Migration Issues
Even with careful planning, some issues might arise during the migration process. Here are a few common ones and how to address them:
- Downtime: If your site experiences extended downtime, contact your new host’s support for assistance.
- Data Loss: If you encounter data loss, restore your site from the backup you created before migrating.
- Broken Links or Images: Some links or images might break if file paths change during the transfer. Use a plugin like Broken Link Checker to identify and fix these issues.
- Database Connection Errors: Double-check your database credentials in the wp-config.php file.
Post-Migration Checklist
Once the migration is complete, there are a few last steps to go through:
- Test Thoroughly: Check your new host’s pages, links, and functionalities.
- Update DNS Settings: If you changed your domain name, update your domain’s nameservers to point to the new host.
- Set Up Redirects: If you changed your domain or any URLs, implement 301 redirects to preserve SEO value and avoid 404 errors.
- Monitor Performance: Monitor your site’s speed and uptime on the new host.
Podcast Advertising Platforms: How to Choose One
With millions of engaged listeners tuning in regularly, podcasts offer a unique opportunity to reach your target audience intimately and authentically. But with so many podcast advertising platforms, how do you choose the right one?
Why Podcast Advertising?
Podcast advertising is experiencing explosive growth for good reasons:
- Highly Targeted Audience: Podcasts cater to specific niches and interests, allowing reach into a highly relevant audience.
- Engaged Listeners: Podcast listeners are actively involved, often multitasking while listening, making them receptive to brand messaging.
- Brand Building: Podcasts provide an opportunity for authentic storytelling and building meaningful connections with your audience.
- Measurable Results: Track impressions, clicks, and conversions to evaluate campaign performance.
According to recent statistics, podcast advertising revenue is projected to surpass $4 billion by 2024, highlighting its massive potential. However, with this growth come many platforms vying for your attention. That’s where this guide comes in!

Key Features to Look for in a Podcast Advertising Platform
When evaluating podcast advertising platforms, consider these essential features:
- Self-Serve vs. Managed Service: Self-serve platforms offer control and flexibility, while managed services provide expert guidance and support.
- Targeting Options: Ensure the platform allows you to target your target audience based on demographics, interests, and listening behavior.
- Ad Formats: Depending on your message and budget, you can choose from pre-, mid-, post-, or host-read ads. Dynamic ad insertion offers even more flexibility.
- Measurement and Analytics: To track campaign performance, access detailed reports on impressions, clicks, conversions, and more.
- Additional Features: Consider brand safety measures, ad-serving capabilities, integrations with other tools, and the platform’s user experience.
Top Podcast Advertising Platforms in 2024
Here’s a curated list of some of the leading podcast advertising platforms to consider:
| Platform | Description |
|---|---|
| Midroll | Leading platform with a vast network of premium shows and advanced targeting. |
| AdvertiseCast | Self-serve platform offering flexibility and a marketplace of podcasts. |
| ART19 | Full-service solution with diverse podcast network and advanced targeting. |
| Megaphone | Comprehensive platform for podcast creation, hosting, and monetization. |
| Acast | Global platform with a focus on brand safety and innovation. |
| Authentic | Connects advertisers with premium podcast content from leading networks. |
| Audacy | Major audio platform offering various podcast advertising solutions. |
| Spotify | Popular streaming platform with podcast sponsorships and audio/video ads. |
| Podcorn | Marketplace connecting brands directly with podcasters for sponsorships. |
| Chartable | Podcast analytics platform offering targeted ad campaigns and performance tracking. |

- Midroll: A popular choice with access to a vast network of podcasts across various genres.
- AdvertiseCast: A self-serve platform offering flexibility and targeting options.
- ART19: Provides advanced ad targeting and dynamic ad insertion capabilities.
- Megaphone: Offers a comprehensive suite of tools for podcasters and advertisers.
- Acast: A global platform with a focus on brand safety and innovation.
Remember to research each platform’s pricing, target audience, and specific features to find the best fit for your needs.
Choosing the Right Platform for Your Needs
With various options available, selecting the right platform can be overwhelming. Focus on these critical factors to simplify your decision:
- Budget: Determine your advertising budget and choose a podcast platform with pricing options that align with your financial goals.
- Goals: Define your campaign objectives (brand awareness, lead generation, sales) and select a platform that supports those goals.
- Target Audience: Identify your ideal listener demographics and choose a platform with relevant podcast inventory and targeting capabilities.
- Features: Prioritize the features most important to you, such as ad formats, targeting options, and analytics.
Don’t hesitate to request quotes and demos from multiple platforms to get a firsthand look at their capabilities and user experience.
Creating Effective Podcast Ads
Once you’ve chosen a platform, focus on crafting compelling podcast ads that resonate with your audience:
- Keep it concise and engaging.
- Use a clear call to action.
- Tailor your message to the podcast’s audience.
- Consider a host-read ad for authenticity.
- Test different ad formats and messaging.
Some platforms offer creative services or resources to help you produce high-quality ads.
Measuring Success & Optimizing Campaigns
Track critical metrics regularly and analyze campaign performance to optimize your results. Use insights to refine targeting, adjust messaging, and experiment with different ad formats. Continuous improvement is critical to maximizing the return on your podcast advertising investment.
Podcasting & Bitrate
So, you’re ready to launch your podcast into the world, or maybe you’re a seasoned podcaster looking to up your audio game. Either way, you’ve probably stumbled upon the term “bitrate” and wondered, What is a good bitrate for a podcast? Don’t worry, you’re not alone. Bitrate can be a bit of a head-scratcher, but understanding it is key to ensuring your listeners enjoy a crystal-clear audio experience.
In this post, we’ll explain everything you need to know about podcast bitrate, from the technical jargon to practical tips for choosing the perfect setting for your show. By the end, you’ll be armed with the knowledge to deliver top-notch audio quality without any headaches.
Understanding Bitrate: Beyond the Tech Jargon
Let’s start with the basics. In simple terms, bitrate refers to the data representing one second of audio. The higher the bitrate, the more data is packed into each second, resulting in better sound quality. It’s like the difference between a standard definition and a high-definition video—more data means more detail and clarity.
You might have also come across the terms CBR (Constant Bitrate) and VBR (Variable Bitrate). So, what’s the difference between CBR and VBR? CBR maintains a consistent bitrate throughout the entire audio file, while VBR adjusts the bitrate depending on the complexity of the audio at any given moment. VBR is generally more efficient as it allocates more data to complex sections (like music) and less to simpler ones (like speech), resulting in smaller file sizes without compromising overall quality.
Of course, there’s a trade-off. Higher bitrates mean better audio quality but result in larger file sizes. This can impact storage requirements and download times for your listeners. So, finding the right balance is key.
Factors to Consider When Choosing Your Bitrate
Choosing the ideal bitrate for your podcast isn’t a one-size-fits-all situation. Several factors come into play, and it’s important to consider them carefully:
- Content-Type: Are you recording mostly speech, or is your podcast music-heavy? Music generally requires higher bitrates to capture the full range of frequencies and nuances.
- Target Audience and their Listening Habits: Consider your listeners’ internet connections and devices. A lower bitrate might be more suitable if they primarily listen on mobile devices with limited bandwidth.
- Storage & bandwidth for hosting: Higher bit rates mean larger files require more storage space on your hosting platform. Additionally, higher bitrates can consume more bandwidth when listeners download or stream your episodes.
- Industry Standards & Recommendations: While there are no strict rules, there are general guidelines for podcast bitrates. We’ll delve into those later.
Considering these factors can help you make an informed decision about the best bitrate for your podcast.
Finding the Sweet Spot: Bitrate Recommendations
So, what is a good bitrate for a podcast? Here’s a general breakdown based on content type:
- Speech-heavy podcasts: 96-128 kbps (mono) or 128-192 kbps (stereo)
- Podcasts with some music and sound effects: 128-192 kbps (mono) or 192-256 kbps (stereo)
- Music-heavy podcasts: 192-320 kbps (stereo)
Remember, these are just guidelines. You might find that a slightly lower or higher bitrate works better for your specific podcast. Don’t be afraid to experiment and listen to the results on different devices to find the sweet spot.
Now, you might wonder, Is there a point of diminishing returns with higher bitrates? Yes, there is. At a certain point, the improvements in audio quality become less noticeable to the average listener while the file size continues to increase. It’s about finding the right balance between quality and practicality.
Bitrate & Your Podcast Host: A Match Made in Heaven?
Before you finalize your bitrate, it’s crucial to check with your podcast hosting platform. Some platforms have limitations on the maximum bitrate they support. So, do podcast hosting platforms have limitations on bitrate? Yes, they can. Choosing a platform that aligns with your desired bitrate is essential to avoid any issues down the line.
Also, remember that bitrate can impact your bandwidth usage and hosting costs. Higher bitrates mean larger files, which can lead to increased bandwidth consumption when listeners download or stream your episodes. Some hosting platforms might charge based on bandwidth usage, so it’s something to consider.
Troubleshooting: When Bitrate Goes Wrong
Even with the perfect bitrate, you might encounter audio quality issues from time to time. Here are a few common problems linked to bitrate and how to fix them:
- Distorted or Muffled Audio: This can happen if the bitrate is too low, especially for music-heavy podcasts. Try increasing the bitrate slightly and see if it improves the clarity.
- Large File Sizes: If your podcast files are too large due to a high bitrate, consider reducing them slightly or using VBR to optimize file size without sacrificing quality.
- Inconsistent Audio Quality: This might indicate issues with your recording or editing process rather than bitrate. Double-check your settings and ensure consistent audio levels are used throughout your episodes.
Remember, bitrate is just one piece of the puzzle regarding audio quality. Other factors like recording equipment, editing techniques, and mastering can also play a significant role.
Bonus: Bitrate & the Tech Behind It
Let’s briefly touch on sample rate and audio codecs for the tech-savvy among you. These are closely related to bitrate and can further impact your podcast’s audio quality and file size.
- Sample Rate: This refers to how often the audio is sampled per second. Higher sample rates capture more detail but also result in larger files.
- Audio Codecs: These are algorithms that compress and decompress audio data. Different codecs offer varying levels of compression and quality.
If you want to dive deeper into the technical aspects of audio production, plenty of resources are available online. But for now, just remember that these factors all work together to shape the final listening experience of your podcast.
Do You Need Headphones for a Podcast?
Headphones are crucial in podcasting, especially when preventing audio feedback and echo. Imagine you’re recording an interview with a guest, and the sound from your speakers leaks into your microphone, creating a distracting echo. Or worse, it causes that dreaded high-pitched squeal of feedback. Headphones act as a barrier, ensuring that the microphone picks up only your voice (or your guest’s).
Another important function of headphones is real-time monitoring. As you’re recording, you can listen to yourself and your guest to ensure the audio levels are balanced and there are no unexpected background noises. This allows you to catch any problems on the spot and fix them before they ruin your recording.
Finally, headphones are indispensable during the editing and mixing process. They allow you to hear every audio detail, making it easier to adjust levels, remove unwanted sounds, and add effects to create a polished final product.
When You Might Not Need Headphones
While headphones are recommended for most podcasting scenarios, there are a few situations where you might be able to get away without them:
- Solo recording in a quiet environment: If you’re recording alone in a soundproofed room with no distractions, you might not need headphones. However, even in this scenario, headphones can still help monitor your audio levels and ensure you’re not picking up any unwanted background noise.
- Minimal budget: If you’re just starting and have a limited budget, you might prioritize investing in a good microphone over headphones. But remember that headphones are a valuable tool that can significantly improve the quality of your podcast.
- Very casual or informal podcasts: If you’re creating a podcast where sound quality isn’t a top priority, like a casual chat with friends, you might choose to forgo headphones. But remember, good audio can make a big difference in the listener’s experience, even for informal podcasts.
Types of Headphones for Podcasting
If you’ve decided to invest in headphones for your podcast, there are a few things to consider:
- Closed-back vs. open-back: Closed-back headphones isolate you from your surroundings and are ideal for recording in noisy environments. Open-back headphones have a more natural sound but may let in some ambient noise.
- Over-ear vs. on-ear vs. in-ear: Over-ear headphones are generally more comfortable for long recording sessions, while on-ear and in-ear headphones are more portable.
- Wired vs. wireless: Wired headphones offer a more reliable connection, while wireless headphones provide greater freedom of movement.
There are plenty of great headphone options available at different price points. Some popular choices for podcasting include the Audio-Technica ATH-M50x, Sony MDR-7506, and Beyerdynamic DT 770 Pro.
Alternatives to Headphones
If you’re looking for alternatives to headphones, you might consider studio monitors (speakers) for editing and mixing. However, speakers can be problematic for recording, as they can cause audio feedback and bleed into your microphone.
Still Need a Decent Headphone Set
Headphones help prevent audio feedback and echo, allow real-time monitoring, and are essential for editing and mixing. While there are some situations where you might not strictly need them, investing in a good pair of headphones is a wise decision for any podcaster who wants to create a high-quality listening experience for their audience.
How To Upload Podcast To All Platforms
Manually uploading your podcast to each platform can be time-consuming and tedious. Fortunately, podcast hosting services offer a streamlined solution, allowing you to effortlessly distribute your podcast to all major platforms from a single location.
How To Upload a Podcast to All Platforms
Create and Finalize Your Podcast
Ensure your podcast episodes are in MP3 format with a bitrate between 96kbps and 128kbps for optimal audio quality and file size. Follow consistent file naming conventions for easy organization. Create eye-catching cover art that adheres to platform specifications and accurately represents your podcast’s brand.
- Record and edit your podcast using Audacity, GarageBand, or Adobe Audition.
- Prepare and finalize your Podcast.
- Export your episodes as high-quality audio files (usually MP3).
Choose a Podcast Hosting Service
Selecting the right podcast hosting service is crucial for a smooth distribution process. Consider pricing, features, ease of use, and distribution options. Research and compare different services before ensuring they align with your needs and budget.
- Select a hosting service such as Buzzsprout, Anchor, Podbean, or Libsyn. These services store your podcast files and generate an RSS feed that you will use to submit your podcast to different platforms.
Upload Your Podcast to the Hosting Service
Once you’ve chosen a hosting service, upload your podcast episodes and associated metadata (title, description, episode number, etc.). Most hosting services offer intuitive interfaces for uploading and managing your podcast content. For detailed instructions, refer to the specific platform’s documentation or tutorials.
Submit Your Podcast to Major Platforms
Here’s how to submit to the most popular platforms:
Create an RSS Feed
- Your podcast host provides an RSS feed URL. This feed is crucial as it allows platforms to automatically receive new episodes when you upload them to your hosting service.
Podcast Platforms
| Podcast Platform | Description |
|---|---|
| Apple Podcasts | The largest podcast directory, essential for reaching a wide audience. |
| Spotify | One of the fastest-growing platforms for podcast consumption. |
| Google Podcasts | Google’s podcast platform integrated with Android and Google Assistant. |
| Amazon Music/Audible | A podcast platform integrated with Amazon’s music and audiobook services. |
| Stitcher | A long-established podcast app with a large user base. |
| iHeartRadio | Popular for both radio shows and podcasts, reaching a broad audience. |
| TuneIn | A streaming service for live radio and podcasts, supported on various devices. |
| Pandora | Curates podcasts alongside its music streaming service. |
| Pocket Casts | A user-friendly podcast app with a loyal following. |
| Castbox | Offers cross-platform distribution and a vibrant podcast community. |
| Overcast | A simple and powerful podcast player with offline listening. |
| Deezer | Primarily a music streaming service but also hosts podcasts. |
| Podbean | A podcast hosting platform that also acts as a directory for listeners. |
- Apple Podcasts: Sign up on Apple Podcasts Connect and submit your RSS feed.
- Spotify: Use Spotify for Podcasters by logging in and submitting your feed.
- Google Podcasts: Submit your podcast feed using Google Podcast Manager.
- Amazon Music/Audible: Use Amazon Music for Podcasters to submit your RSS feed.
- Stitcher: Visit Stitcher’s podcast portal and sign up to submit your show.
- iHeartRadio: Check your podcast host’s integration or apply via iHeartRadio.
Submit to Other Podcast Directories
Consider distributing to smaller platforms such as TuneIn, Deezer, Pocket Casts, Overcast, and Castbox. Some hosts have automatic submission features, or you may need to submit your RSS feed manually through the platform’s submission page.
- Optimize Your Podcast’s Metadata
- Ensure your podcast title, description, category, and episode tags are optimized for searchability. Include keywords that are relevant to your niche and the content.
- Monitor Your Podcast’s Performance
- Use your hosting service’s analytics to track performance across platforms, including listener numbers, downloads, and geographic locations.
- Adjust the marketing strategy based on these insights to reach a broader audience.
- Promote Your Podcast
- Share the episode on social media, your podcast’s website, and through email newsletters.
- Consider creating video snippets for platforms like YouTube or short clips for social media to drive traffic.
Monitor and Optimize Your Podcast
Track your podcast’s performance using analytics provided by your hosting service or third-party tools. Analyze listener demographics, download statistics, and engagement metrics to understand your audience and identify areas for improvement. Use this data to refine your content, promotion strategies, and podcast experience.
Understanding Podcast Hosting Services
Podcast hosting services are specialized platforms that store your podcast’s audio files and generate an RSS feed, a centralized source of information for all podcast directories. These services often include features like multi-platform distribution, analytics tracking, and customizable podcast websites.
Some popular podcast hosting services to consider include:
- Anchor: Offers free hosting and automatic distribution to major platforms.
- Buzzsprout: User-friendly with various distribution options.
- Podbean: Another option with simple distribution and additional features.
- Libsyn: Established platform with wide distribution and customization options.
What is a Preamp & How Can They Help a Podcast with Professional Audio
Clear, professional audio is crucial in podcasting. A preamp enhances vocal quality by amplifying weak signals, making your voice sound richer and more dynamic.
What Is a Preamp?
A preamp, or preamplifier, is a device that amplifies weak audio signals from a microphone or instrument to a level that can be processed by recording equipment or speakers. In podcasting, a microphone generates a very low-voltage signal that is too weak to be directly recorded or transmitted. The preamp boosts this signal to “line level,” which is strong enough for further processing or amplification.
Key Functions:
- Signal Boosting: Ensures the audio signal is strong enough for recording.
- Noise Reduction: Helps reduce unwanted noise by amplifying the signal cleanly.
- Tone Shaping: Some preamps add warmth or color to the sound, enhancing vocal quality.
A preamp is the first step in the audio signal chain, ensuring that the original sound is captured clearly and at an optimal level for further processing. This can make it a required component for podcasters who want to achieve professional-quality audio. You will need to test your setup and decide if a preamp is necessary.

Types of Preamps for Podcasters
- USB vs. XLR Preamps: USB preamps are convenient for beginners with plug-and-play simplicity, while XLR preamps offer higher sound quality and flexibility, ideal for professional setups.
- Compact Preamps: Perfect for podcasters on the go, these preamps offer portability without compromising on sound quality.
Benefits of Using a Preamp in Podcasting
- Improved Voice Clarity: Preamps reduce noise and enhance the warmth of your voice, making your podcast sound more polished.
- Noise Reduction: High-quality preamps can filter out unwanted background noise, ensuring your voice is the focal point.
How to Choose the Right Preamp
- Recording Environment: Choose a preamp that suits your recording space, whether it’s a quiet home studio or a noisier environment.
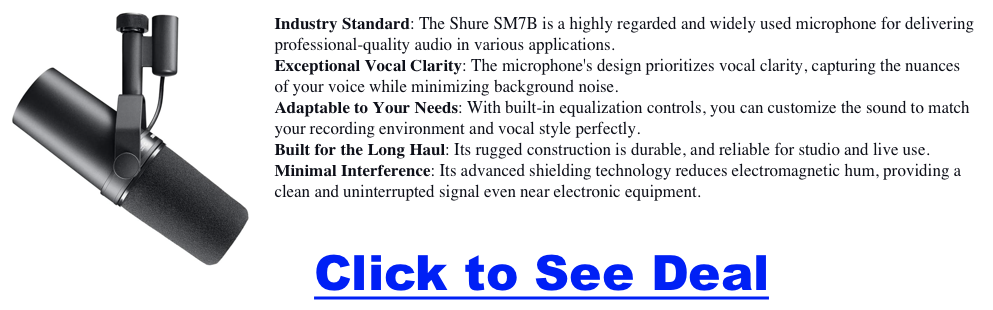
- Microphone Compatibility: Ensure your preamp matches your microphone type, especially if you’re using popular podcasting mics like the Shure SM7B or Rode NT1.
Joe Rogan’s Podcast Studio’s 4 Person Podcast Setup
The Joe Rogan Experience (JRE) isn’t just a podcast; it’s a cultural phenomenon. With millions tuning in to hear Joe Rogan’s conversations with a diverse range of guests, the show’s production quality is as captivating as its content. Rogan’s move to a sprawling Texas studio sparked curiosity about the behind-the-scenes tech.
Capturing Crystal-Clear Audio on a 4 Person Podcast Setup
- Microphones: The Heart of the Conversation The iconic Shure SM7B dynamic microphones are a staple on the JRE. These mics are renowned for their rich, warm sound and ability to handle loud voices without distortion. They’re a favorite among podcasters and broadcasters for their versatility and reliability. Backing up these workhorses are additional Shure SM7dBs, ensuring redundancy and flexibility for different recording scenarios. Blue Yeti and Raspberry USB mics offer plug-and-play convenience for remote guests or secondary setups.
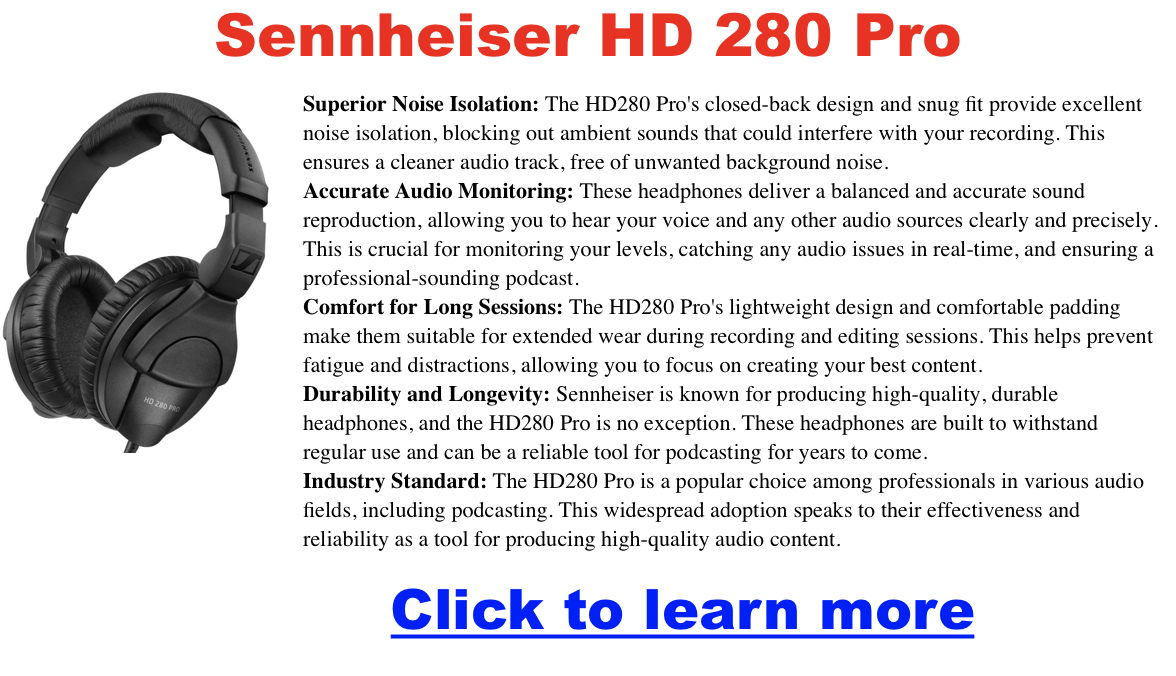
- Headphones: Monitoring in Isolation Sennheiser HD280PRO headphones provide Joe and his guests with clear, detailed audio monitoring while blocking distractions. Their closed-back design ensures isolation, allowing everyone to focus on the conversation.
- Microphone Arms: Flexibility and Stability Gator Frameworks and O.C. White microphone booms provide the flexibility and stability needed to position the mics perfectly. These arms allow for easy adjustments, ensuring optimal sound quality and comfort for the hosts and guests.
Audio Control Mixing and Mastering
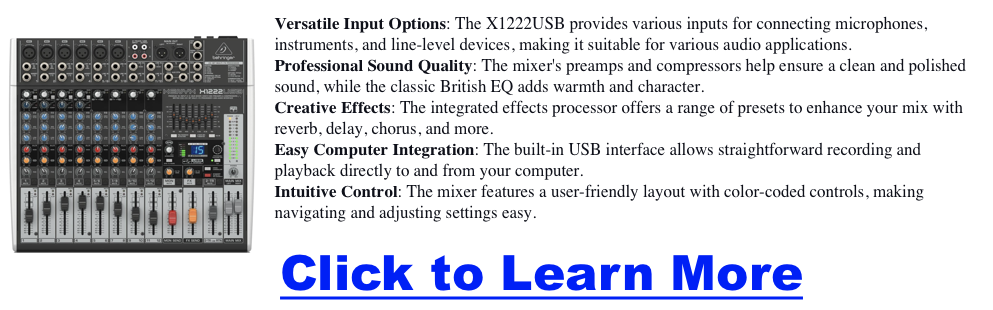
- The Behringer XENYX X2442USB and X1222USB mixers are the nerve centers of the JRE’s audio setup. These powerful mixers handle multiple audio sources, allowing Rogan to blend microphones, music, and sound effects seamlessly. The Universal Audio Apollo interface hints at the potential for high-end audio processing and recording, adding another layer of polish to the final product. To ensure everyone can hear clearly, the Behringer POWERPLAY HA8000 headphone amp powers multiple headphones for everyone in the studio.
- Audio Backup: Never Miss a Beat The TASCAM DR-100 portable digital recorder is a crucial backup, capturing every word in case of hiccups with the primary recording system. Redundancy is key in producing this scale, and the DR-100 ensures that no valuable audio is ever lost.
The Visual Experience
- Multi-Camera Setup: Capturing Every Angle The JRE’s visual style is dynamic and engaging, thanks to multiple Canon VIXIA HF G40 camcorders capturing the action from different angles. This multi-camera setup allows for creative shots, capturing guest reactions and adding visual interest to the podcast.
The Best Computers For Podcasting
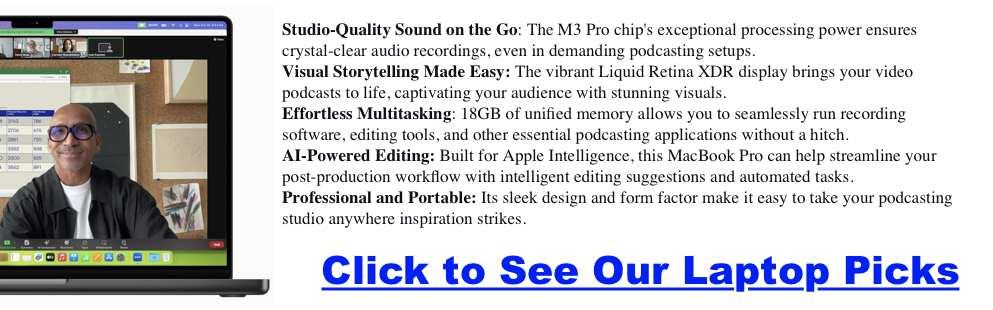
- Powerhouse Computers: Editing and Processing Behind the scenes, powerful Apple Mac Pro and MacBook Pro computers handle the heavy lifting of audio and video editing, processing, and file management. These machines ensure smooth workflows and enable the team to deliver high-quality content consistently.
- Networking and Connectivity: Keeping it Connected A robust network infrastructure is essential for live streaming, remote guests, and seamless file transfers. While the specifics of the networking gear remain undisclosed, it’s safe to assume that the studio boasts a high-bandwidth set up to handle the demands of a modern podcasting operation.
Studio Design and Comfort
- Ergonomics and Acoustics: A Productive Environment While the technical gear is essential, a comfortable and acoustically treated environment is equally crucial for a productive podcasting studio. The HAG Capisco chairs provide ergonomic support for active sitting, while the custom-built Wrightsmith desk adds a touch of style and functionality. Although not explicitly detailed, acoustic treatments likely play a significant role in optimizing the sound quality within the studio.
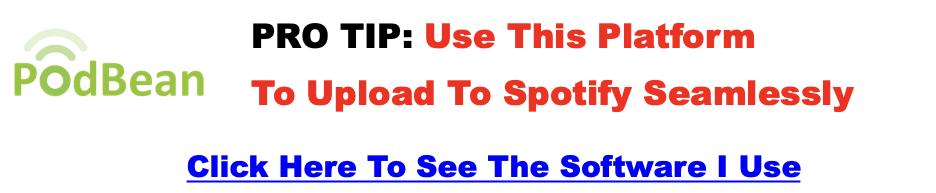
How to Upload Podcast to Spotify
You’ll need to use a third-party podcast hosting platform to upload your podcast to Spotify. Here’s the general process:
- Choose a podcast hosting platform. Many options are available, each with different features and pricing plans. Some popular choices include Anchor, Buzzsprout, Podbean, and Libsyn.
- Create an account on the chosen platform. Follow the platform’s instructions to sign up and create your podcast account.
- Upload your podcast episodes. Follow the platform’s instructions to upload your audio files (MP3 format is usually recommended) and add episode details like titles, descriptions, and artwork.
- Generate your RSS feed. Once your episodes are uploaded, the hosting platform will generate the RSS feed for your podcast. This is the link you’ll need to submit to Spotify.
- Submit your RSS feed to Spotify for Podcasters. Go to Spotify for Podcasters and log in with your Spotify account. Follow the instructions to add your podcast by submitting your RSS feed.
- Wait for Spotify to review and approve your podcast. This process can take a few days. Once approved, the show will be available on Spotify.
To Upload to Spotify via Podbean
Steps:
- Log in to your Podbean account.
- Go to your “Podcast Dashboard”.
- Navigate to “Distribution” -> “Podcast Apps”.
- Click on the “Add” button next to Spotify.
- Agree to Spotify’s terms and conditions.
- Wait for Spotify to review and approve your podcast. Podbean will automatically submit your podcast once you meet the minimum requirements and agree to the terms. You’ll receive an email with the corresponding URL when your podcast is live on Spotify.
- StreamYard Business Plan Review: Is It Worth $299/Month for Teams?
- Synology DS1525+ for Podcasters: What You Need to Know Before You Buy
- StreamYard Pricing (2026): Full Comparison of Plans, Differences, Features & Discounts
- Podbean Pricing: The Best Podcast Hosting Platform for Getting Started?
- SquadCast Pricing Explained: Every Plan, Feature, and Trade-Off Worth Knowing