helpful-info
Aweber vs Mailchimp
Choosing the right email marketing platform is essential for any business looking to engage customers effectively. AWeber and Mailchimp are two of the most popular platforms, each with unique features and strengths. In this post, we’ll dive deep into a comparison of the two to help you decide which is best for your business.
Aweber vs Mailchimp Comparison Table
| Feature | AWeber | Mailchimp |
|---|---|---|
| Free Plan | Up to 500 subscribers, 3,000 emails/month, includes automation | Up to 500 subscribers, 1,000 emails/month, limited automation |
| Paid Plans | Starts at $19.99/month (unlimited sends) | Starts at $13/month (price increases with features) |
| Ease of Use | Simple, user-friendly for beginners | Modern but can be overwhelming for beginners |
| Email Templates | 7,000+ templates, some outdated | ~100 templates, modern and visually appealing |
| Automation | Basic, easy to set up | Advanced, but only available on higher-tier plans |
| A/B Testing | Flexible (subject lines, content, etc.) available on all paid plans | More options but restricted to higher-tier plans |
| Deliverability | Strong deliverability rates | Slightly better in tests but with occasional spam issues |
| AMP for Email | Supported (dynamic and interactive content) | Not supported |
| Integrations | 750+ third-party integrations | Extensive integrations with major platforms (e.g., Facebook Ads, Google Ads) |
| Customer Support | Phone, live chat, and email (even on free plan) | Limited support on free plan, phone support on highest tier only |
| Landing Pages | More templates, fewer analytics | Limited templates, but includes performance tracking |
| Best For | Small businesses, beginners, budget-conscious users | Larger businesses, advanced users, multi-channel marketing |
Introduction to AWeber and Mailchimp
- AWeber: Known for simplicity and ease of use, AWeber has been a staple in the email marketing world since 1998. It offers core email marketing features and excellent customer support, making it a go-to for small businesses and entrepreneurs.
- Mailchimp: Founded in 2001, Mailchimp has evolved into a comprehensive marketing platform. It is well-suited for larger businesses or those needing more advanced features, including automations and integrations with multiple platforms.
- Pricing Comparison: Which Platform Offers Better Value?
- Free Plans:
- AWeber: AWeber offers a more generous free plan, providing core features, automation, and 3,000 email sends per month to up to 500 subscribers. This makes it a solid option for businesses needing essential features without immediate investment.
- Mailchimp: Mailchimp’s free plan allows up to 500 contacts but limits email sends to 1,000 per month and restricts features like advanced automations. While it’s useful for beginners, the free plan is more limited compared to AWeber’s.
- Paid Plans:
- AWeber: More affordable for lists under 50,000 subscribers, AWeber’s paid plans offer unlimited email sends and start at $19.99/month, providing value for businesses with growing email lists.
- Mailchimp: While Mailchimp’s “Essentials” plan starts at a lower $13/month, pricing becomes steeper as lists grow and more advanced features are required. The pricing structure can also be confusing due to feature limitations at different tiers.
- Feature Comparison: Automation, Templates, and Testing
- Email Automation:
- AWeber: Offers straightforward automation with its “Campaigns” tool, ideal for businesses needing basic drip campaigns. The system is simple to use, even for beginners.
- Mailchimp: Provides more sophisticated automation tools that allow complex workflows and triggers. However, these features are only available on higher-tier plans, making them less accessible for budget-conscious businesses.
- Templates:
- AWeber: Boasts a larger library of over 7,000 templates, offering a range of design options. However, some users find them less modern compared to competitors.
- Mailchimp: Features around 100 templates, which are generally praised for their clean, modern design. While the quantity is smaller, the quality of these templates is often viewed as higher.
- A/B Testing:
- AWeber: Allows for flexible split testing on all paid plans, enabling businesses to test subject lines, content, and sender names simultaneously. This flexibility is a key advantage for those looking to optimize their campaigns quickly.
- Mailchimp: Offers more sophisticated A/B testing but reserves many options for higher-tier plans. For small businesses on lower-tier plans, testing options are limited.
- Deliverability and Spam Prevention
Ensuring that emails land in your customers’ inboxes is crucial for any email marketing campaign’s success.
- AWeber: Known for strong deliverability rates, AWeber ensures emails are properly managed to avoid spam filters. Its user-friendly tools for list management help businesses maintain a clean, healthy email list.
- Mailchimp: While Mailchimp is slightly better in independent deliverability tests, it has been criticized for occasional issues with emails going to spam folders. However, its sophisticated spam prevention tools help mitigate these issues.
- Ease of Use: User Interface and Learning Curve
- AWeber: Known for its simplicity, AWeber’s user interface is ideal for beginners and small business owners who want a streamlined experience. Its traditional menu-driven design makes navigation intuitive for users at any skill level.
- Mailchimp: While Mailchimp’s interface is modern and visually appealing, its vast feature set can make it overwhelming for beginners. The learning curve is steeper for users who want to take advantage of more advanced features like automation and reporting.
- Integration and Additional Features
- Integrations:
- AWeber: Supports over 750 third-party apps, including major platforms like WordPress, Shopify, and PayPal, making it versatile enough for most small business needs.
- Mailchimp: Offers a wider array of integrations, including major eCommerce, marketing, and CRM tools. Its compatibility with platforms like Facebook Ads and Google Ads gives businesses more flexibility for multi-channel marketing.
- Landing Pages:
- AWeber: Provides more landing page templates, allowing businesses to easily create pages without additional tools. However, the platform lacks advanced performance tracking.
- Mailchimp: Includes basic analytics with its landing pages, offering better tracking of performance and conversion rates compared to AWeber. This feature is particularly useful for businesses focused on growth and data-driven decision-making.
- AMP for Email:
- AWeber: AWeber’s support for AMP (Accelerated Mobile Pages) emails allows businesses to create dynamic and interactive emails, offering more engaging experiences for recipients.
- Mailchimp: Does not yet support AMP emails, which limits the platform’s ability to create interactive content within emails.
- Customer Support: AWeber Takes the Lead
- AWeber: Offers comprehensive customer support, including phone, live chat, and email, even on its free plan. This makes it ideal for businesses that value hands-on assistance and quick problem resolution.
- Mailchimp: Offers limited support, especially on the free plan, and reserves phone support for its highest-tier customers. Many users rely on the platform’s extensive knowledge base and email support, but it may not be enough for those who need immediate help.
- Which Platform Is Best for Your Business?
- Choose AWeber if:
- You have a small or growing email list and prioritize affordability.
- Simplicity and ease of use are essential, especially if you’re just getting started with email marketing.
- You value flexible split testing, dynamic AMP email capabilities, and reliable customer service.
- Choose Mailchimp if:
- You need advanced automations, integrations, and multi-channel marketing features.
- You prefer a modern interface and are comfortable with a steeper learning curve.
- You want more sophisticated analytics and reporting to track campaign performance.
Conclusion
Both AWeber and Mailchimp are powerful email marketing platforms with their own strengths. AWeber is perfect for small businesses and users who prioritize ease of use, flexibility, and affordability, while Mailchimp’s advanced features and integrations make it a better fit for larger businesses or those with complex marketing needs.
Testing both platforms’ free plans can also help determine which is the right fit for your email marketing strategy.
Podcast Website Builder: Podcast Page Review
A website for your podcast is a smart move. Think of it as your podcast’s central hub – a dedicated space where listeners can access all your episodes, show notes, and connect with you directly.
But what if you’ve never built a site, and have no idea where to start? In this article, I’ll review a platform called Podcast Page and step through what it takes to get a podcast website up and running.
If that sounds interesting to you, please read on!
Quick Intro: Why a Podcast Website Matters
A website boosts your podcast’s discoverability, helping new listeners find you through search engines. It also allows you to build a community, fostering engagement through comments, exclusive content, or even a forum. And don’t forget the potential for monetization – you can showcase sponsors, sell merchandise, or offer premium content. Plus, with built-in analytics, you’ll gain insights into your audience to further refine your content. In essence, a website is a powerful tool to elevate your podcast’s professionalism, reach, and potential for growth.
Getting Started with Podcast Page
Disclosure: Podcast Page reached out to see if I’d be interested in reviewing their product. They have zero say in my review, and this is my honest take on it.
Signup Process
The signup process was very easy. They just need a good email address, you import your podcast (or manually do it later, and choose from a selection of themes available.


 The Purple Theme…
Once you pick the theme, you’re brought right into the site builder. This is where you set up the basics for the website like name, logo. I found it very easy to navigate through their system. If you’ve ever used WordPress (80% + of the internet’s websites are built on WordPress) and this feels similar.

It has all the stuff you’d need to get started — since I’m on the free plan, I couldn’t set up the analytics, but you can configure emails, team members, custom code (if you want to drop Google Analytics code in…. all good stuff.
I didn’t want to mess around with the look too much, because the theme already looks really good from the jump. I just customized it out a little bit with a test logo, title, etc.
Page Customization
Building a website for your podcast takes a little bit of strategy that isn’t talked about very often. See, if you build a website without a strategy, you may never end up with traffic on the page…. So while the home page of the site is important, the real importance is to point visitors where you want them to go. In my case, I made a couple test buttons to point people to my homepage. 
Blog Work
The Podcast Page blog is going to be the strength behind your podcasts website, which is why I made a test post.
To be honest I was a little surprised the background color is set to be so dark, I would prefer a more standard color scheme of black on white. But like anything it depends what you plan to use it for.

If you’re a podcast and happen to upload your videos to YouTube, it might look better with a video embed at the top of the page, along with a transcript of the episode, and resources relating to the episode. Thankfully, Podcast Page has the ability to connect to your videos in their backend!

What Else Goes On The Podcast Blog Post?
So if your show had an expert on relating to plumbing, you could provide an episodic blog post (a post per episode) with a rundown of the episode, a link out to the episode on your favorite provider, along with a PDF download showing people how to deal with simple plumbing issues.
Why Podcast Page’s Blog Is Powerful
Here at Podcast Pontifications, we are very conscious and focused on SEO (search engine optimization) for podcasters. Generally this is an afterthought where it comes to podcasting — and while that is understandable — it is also a reason why so many podcasts struggle to get listeners, growth, and making money with their show. Above all else you should be passionate about whatever it is you’re producing, and fusing that passion with a strategy is where you’ll see sparks fly.
Podcast Microphone Setup: How to Setup a Mic & Record High Quality Audio
Podcasting has become a powerful tool for communication, entertainment, and education. However, a crucial factor that often separates amateur podcasts from professional ones is audio quality. A good microphone setup can dramatically enhance the listening experience for your audience, making your content more engaging and enjoyable. This comprehensive guide will help you achieve professional-level audio, even if you’re just starting your podcasting journey.
Choosing the Right Microphone
The foundation of a good podcast recording lies in the microphone itself. Two main types of microphones exist:
- Condenser Microphones: Highly sensitive, capturing a wide range of frequencies and nuances. Ideal for studio settings with controlled environments.
- Dynamic Microphones: Less sensitive, better at handling loud sounds and background noise. Suited for live recordings or less-than-ideal recording spaces.
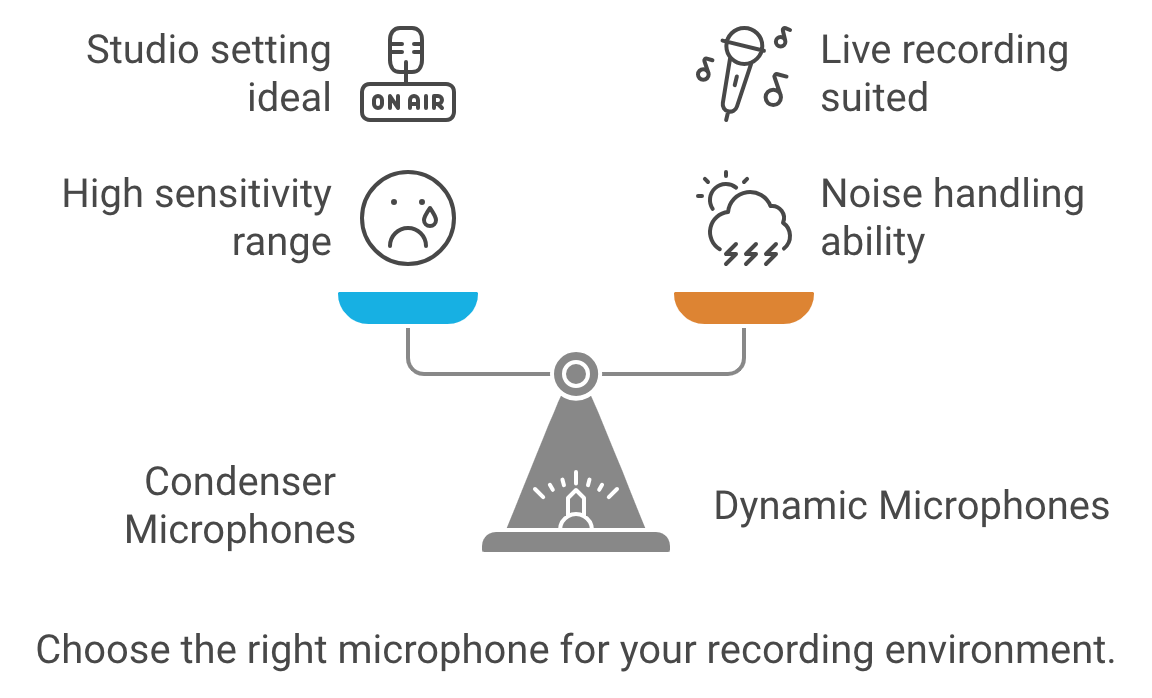
Condenser Microphones
- Sensitivity: Condenser mics are more sensitive and capture a wider range of frequencies and detail, making them ideal for studio environments where sound control is strong.
- Audio Quality: They provide crisp, clear, and detailed sound, making voices sound rich and natural.
- Best For: Quiet, treated rooms without much background noise. If you’re in a professional or home studio, a condenser mic may be an excellent choice.
- Power: Condenser microphones require phantom power (48V) to operate.
- Example: Audio-Technica AT2020, Blue Yeti.
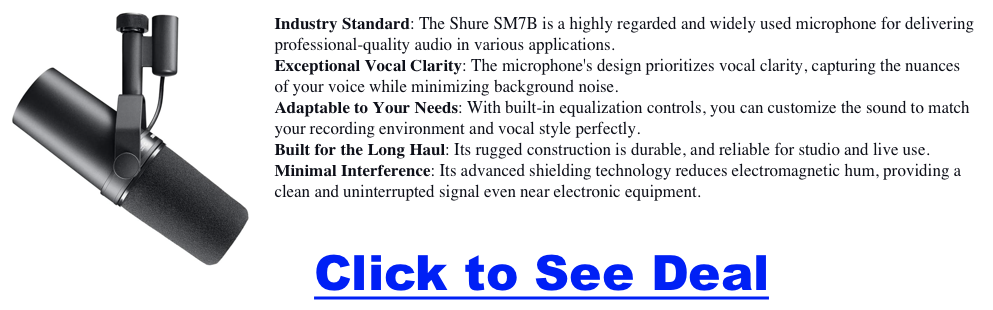
Dynamic Microphones
- Durability: Dynamic mics are rugged and can handle higher sound pressure levels, suitable for live environments.
- Noise Rejection: They are less sensitive to background noise, ideal for less controlled environments like home studios, shared spaces, or noisy areas.
- Audio Quality: While they might not capture the same level of detail as condenser mics, they offer a warm and natural tone, which is more forgiving in untreated rooms.
- Best For Rooms with background noise or for those who need a plug-and-play option without a lot of setup.
- Power: No external power is required.
- Example: Shure SM7B, Electro-Voice RE20.
If you’re unsure where to start, USB microphones offer a plug-and-play solution, perfect for beginners or those with limited setups. As you gain experience, consider upgrading to an XLR microphone for greater control and flexibility.
Best Podcast Microphone Setups
| Microphone | Type | Connectivity | Key Features |
|---|---|---|---|
| Samson Q2U | Dynamic | USB/XLR | Versatile, perfect for beginners, good sound quality, future upgrade flexibility. |
| Audio-Technica ATR2100x-USB | Dynamic | USB/XLR | Similar to Samson Q2U, adaptable to various recording setups. |
| Blue Yeti | Condenser | USB | Multiple polar patterns, versatile for solo or group recordings, easy to use. |
| Rode NT-USB Mini | Condenser | USB | Compact, clear audio quality, minimalist setup. |
| Shure SM7B | Dynamic | XLR | Professional-grade, rich sound quality, commonly used in studios. |
| Rode PodMic | Dynamic | XLR | Broadcast-quality, internal pop filter, durable metal build. |
| Shure MV7X | Dynamic | XLR | Voice Isolation Technology, optimized for spoken word, affordable alternative to SM7B. |
| Dynamic Microphone Kit | Dynamic | USB/XLR | Includes boom arm, gain knob, and mute function for a full setup. |

Creating an Optimal Recording Environment
Your recording space significantly impacts your audio quality. Focus on minimizing background noise and echo:
- Find a Quiet Space: Choose a room away from traffic, appliances, and other noise sources.
- Create a Makeshift Booth: If a quiet room isn’t available, use blankets, pillows, or acoustic panels to dampen sound reflections.
- Use a Pop Filter: This inexpensive tool helps reduce plosive sounds (“p” and “b” sounds) that can cause audio clipping.
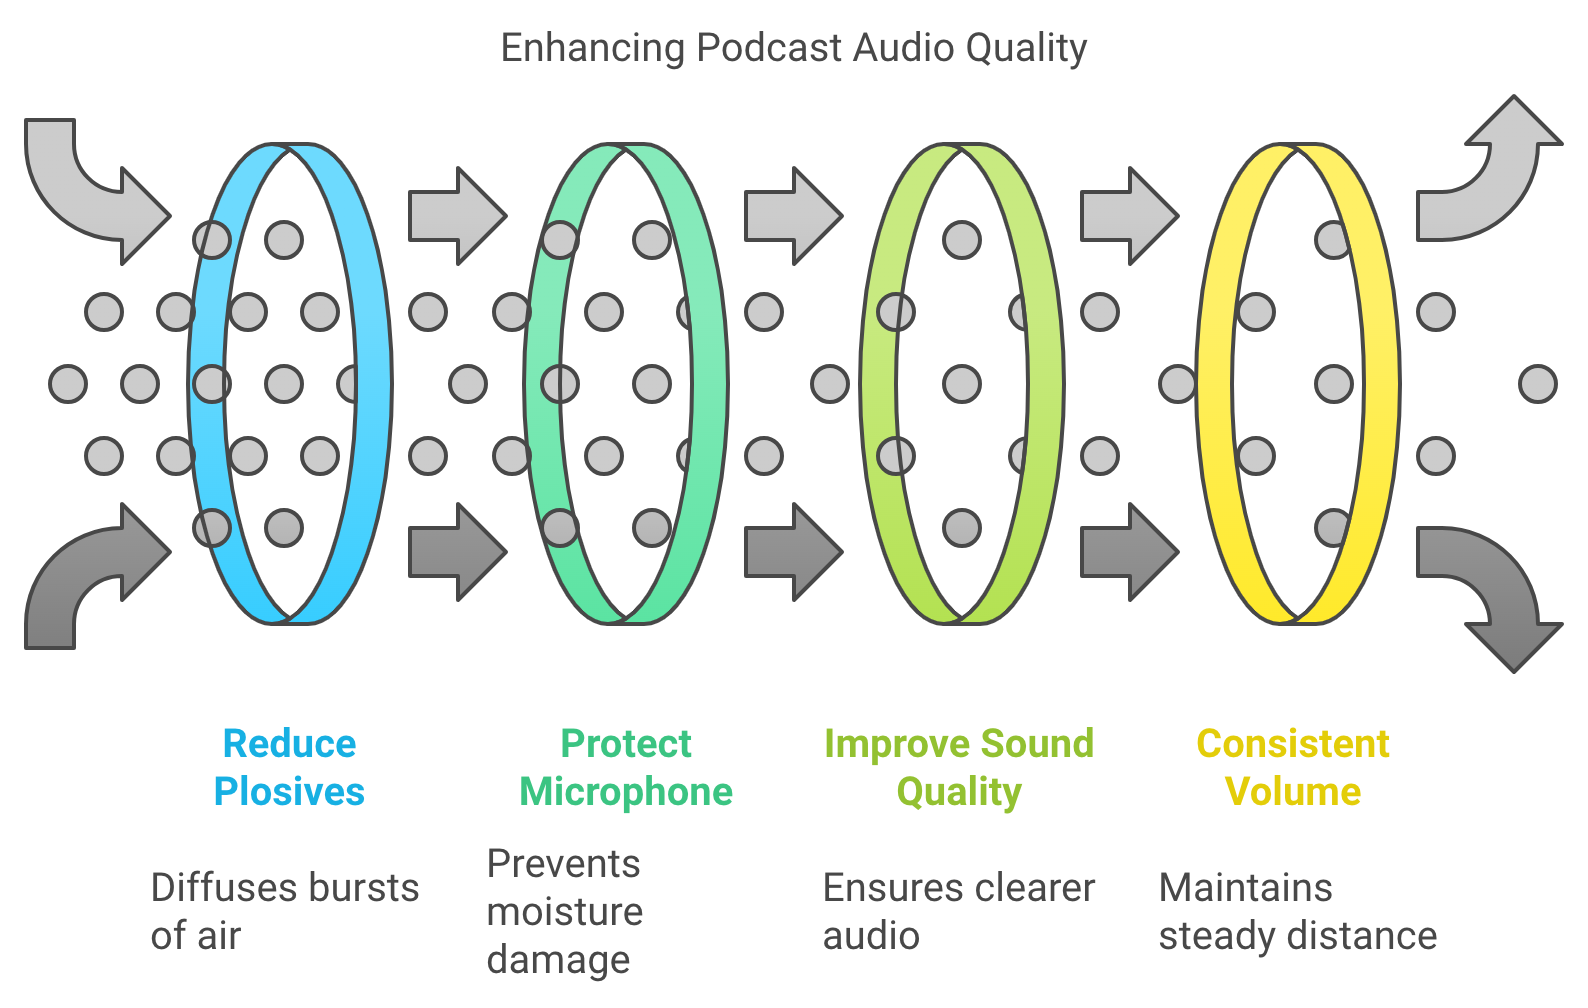
Benefits of Using a Pop Filter
Using a pop filter is highly recommended for both condenser and dynamic microphones during podcasting. Here’s why:
- Reduces Plosives: Plosive sounds (like “P,” “B,” or “T”) can cause bursts of air that hit the microphone and create unwanted “popping” sounds. A pop filter helps diffuse this air before it hits the mic.
- Protects the Microphone: The filter also prevents saliva or moisture from reaching the microphone, which can damage sensitive components over time, especially for condenser mics.
- Improves Sound Quality: By reducing harsh sounds, a pop filter contributes to cleaner and more professional audio.
- Helps with Consistent Volume: It encourages you to maintain a consistent distance from the microphone, helping to avoid accidental loudness spikes when speaking too closely.
Placement Tips:
- Position the pop filter about 2–3 inches from the microphone.
- Place your mouth 4–6 inches behind the pop filter to get the best sound balance and prevent distortion from speaking too close to the mic.
A pop filter is an inexpensive but valuable tool for achieving professional-sounding audio, regardless of which type of microphone you’re using for podcasting.
Setting Up Your Microphone
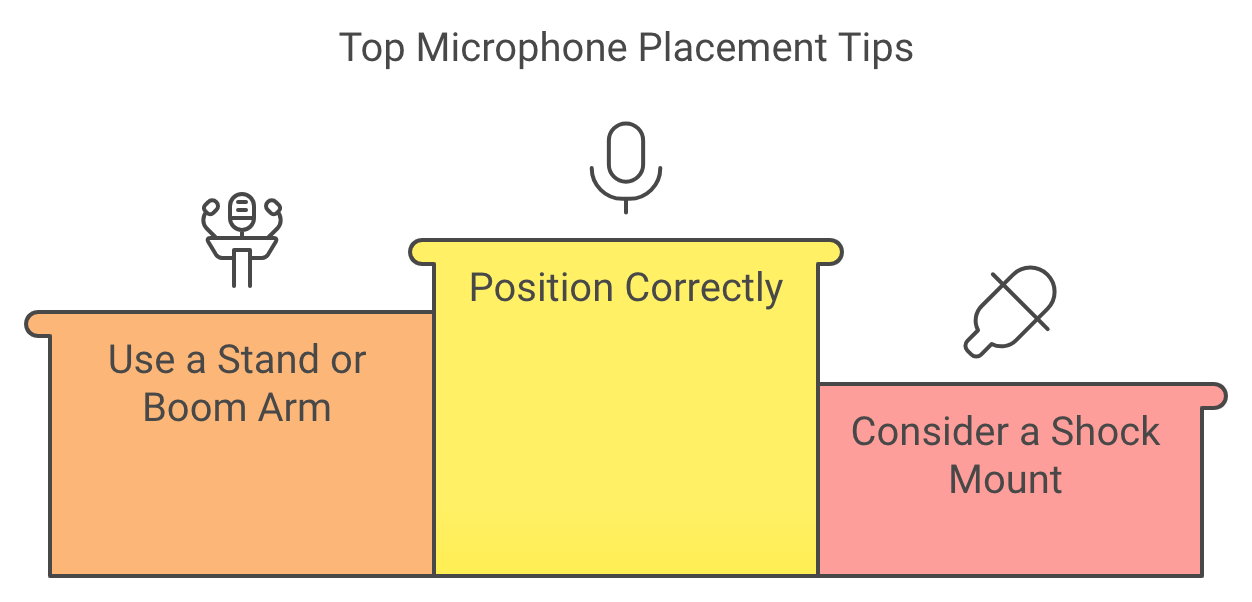
Microphone placement plays a critical role in how your voice sounds.
- Position Correctly: For solo recordings, place the microphone 6-12 inches away from your mouth, slightly off-center to avoid breathing directly into it.
- Use a Stand or Boom Arm: This helps maintain consistent microphone placement and frees up your hands.
- Consider a Shock Mount: These reduce vibrations from handling or bumps, keeping your audio clean.
Connecting Your Microphone
Connecting your microphone depends on its type:
- USB Microphones: Simply plug into your computer’s USB port.
- XLR Microphones: Require an audio interface to connect to a computer. They provide better sound quality and more control over recording levels.
- Use Quality Cables: Invest in good cables to ensure a clean signal transmission.
- Monitor with Headphones: Headphones allow you to hear exactly what your microphone is capturing, helping you identify any issues in real-time.
Recording and Editing Your Podcast
Several user-friendly recording software options exist, including Audacity (free), GarageBand (Mac), and Adobe Audition. Once you’ve recorded your audio:
- Edit for Clarity: Remove any unwanted noise, mistakes, or long pauses.
- Adjust Levels: Ensure your audio is balanced and at an appropriate volume.
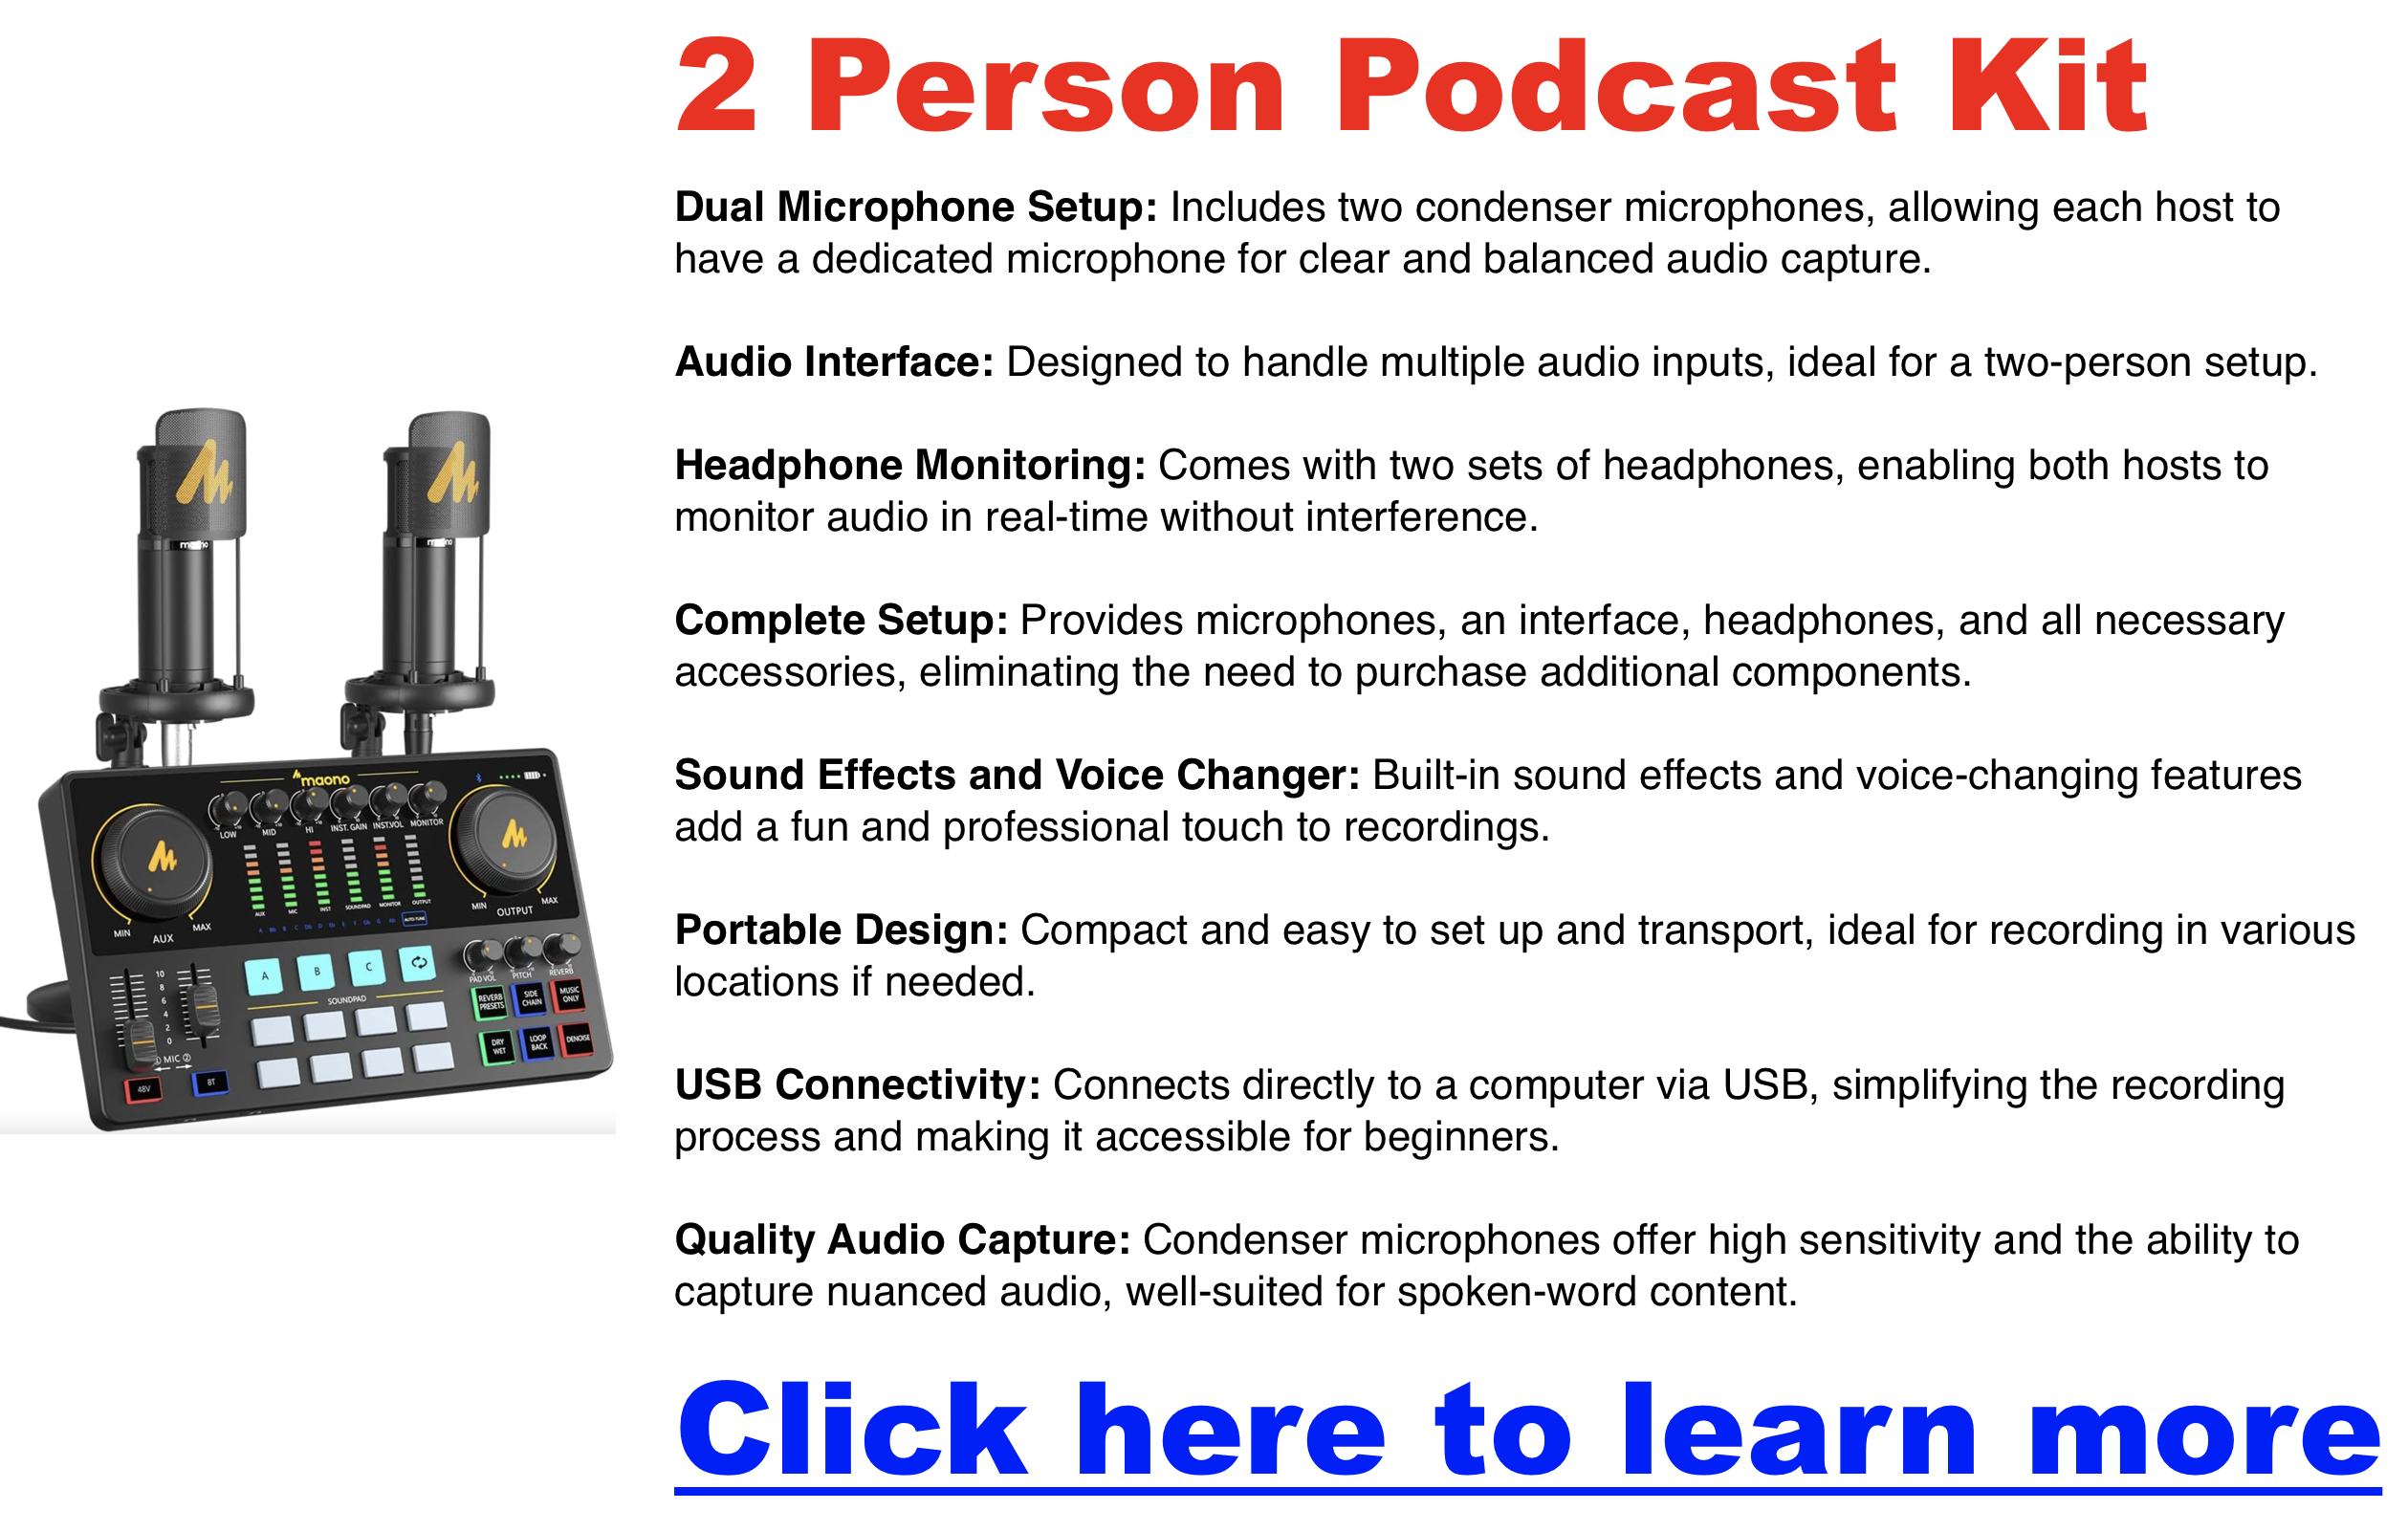
2-Person Podcasting Setup
Click here for my favorite 2 person podcasting kit
Recording a podcast with two people is straightforward and allows for conversational flow without overwhelming technical requirements. Here’s a guide to setting up a two-person podcast with essential equipment and techniques to create a professional-quality recording.
Equipment Essentials
- Microphones:
- XLR Microphones: Consider XLR microphones like the Samson Q2U or Behringer XM8500 for high-quality audio. These microphones allow you to record each speaker on a separate track, crucial for easy editing and better sound quality.
- USB Microphones: If simplicity and portability are priorities, USB mics like the Blue Yeti are great for beginners. However, they may lack the control and audio fidelity of XLR mics when recording in shared spaces.
- Recommended Kits: All-in-one kits like the Hayner-Seek Bundle and Movo PodKit2AH include microphones, headphones, and audio interfaces, providing an easy setup for two-person podcasting.
- Audio Interface:
- Dual-Input Interface: An audio interface with two XLR inputs, such as the Focusrite Scarlett 2i2, allows you to connect two microphones to your computer while maintaining clear audio quality for each speaker.
- Headphones:
- Closed-Back Headphones: Both speakers should use closed-back headphones to monitor audio without feedback. Options like the Audio-Technica ATH-M20X are budget-friendly and effective for real-time monitoring.
- Recording Software:
- Multi-Track Recording Software: Free software like Audacity or paid options like Adobe Audition provide robust tools for multi-track recording, making editing easier by allowing separate tracks for each speaker.
Recording Space
- Quiet Room: Select a quiet room with minimal background noise to ensure clear audio. Using blankets, foam panels, or other acoustic treatments, especially in smaller spaces, helps reduce echo and improve sound quality.
Recording Techniques
- Microphone Placement:
- Position each microphone about 6–12 inches away from the speaker, slightly off-center to avoid direct breath sounds hitting the mic, which reduces plosives and improves audio clarity.
- Separate Audio Tracks:
- Record each speaker on their own track to simplify editing. Separate tracks allow you to control each speaker’s volume, cut out background noise, and make individual adjustments.
Conversation Management
- Encourage Pauses:
- Remind participants to pause briefly before speaking. This prevents overlap and makes editing smoother.
- Remote Recording:
- Platforms like Podbean, Podcastle, Zoom, or Riverside.fm offer high-quality remote recording options if recording remotely. These platforms support separate tracks for each participant, allowing for better control during post-production.
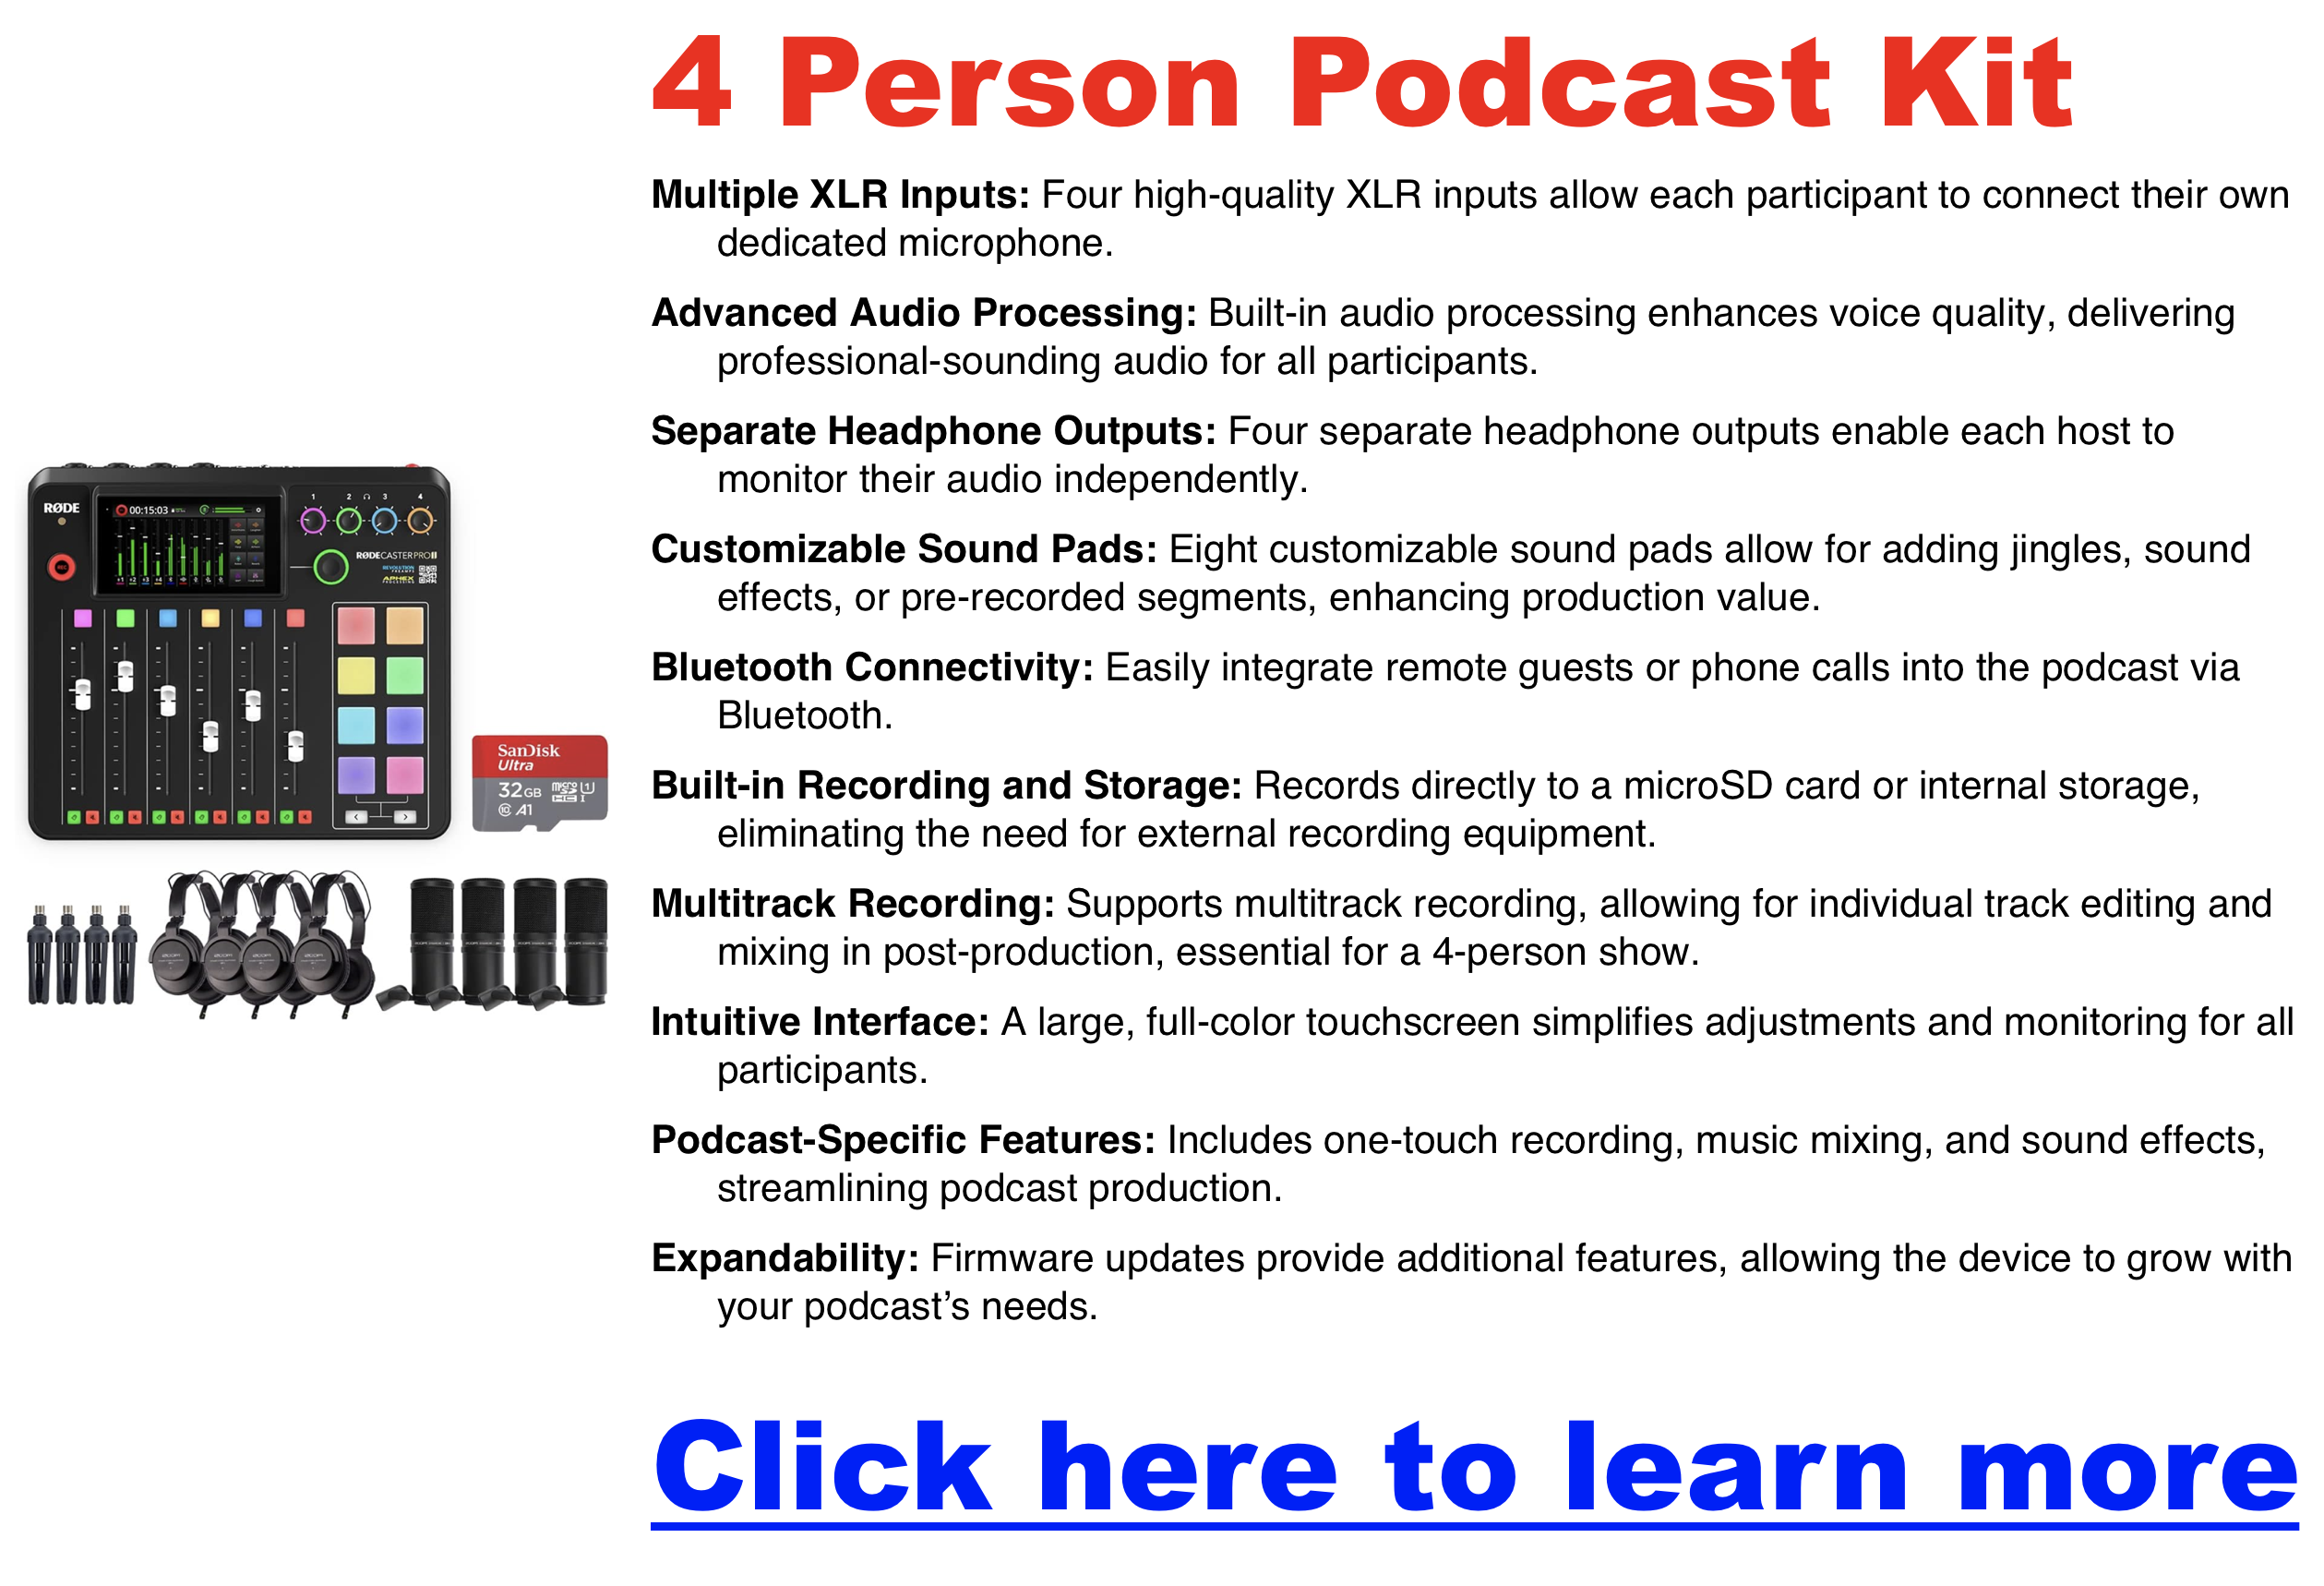
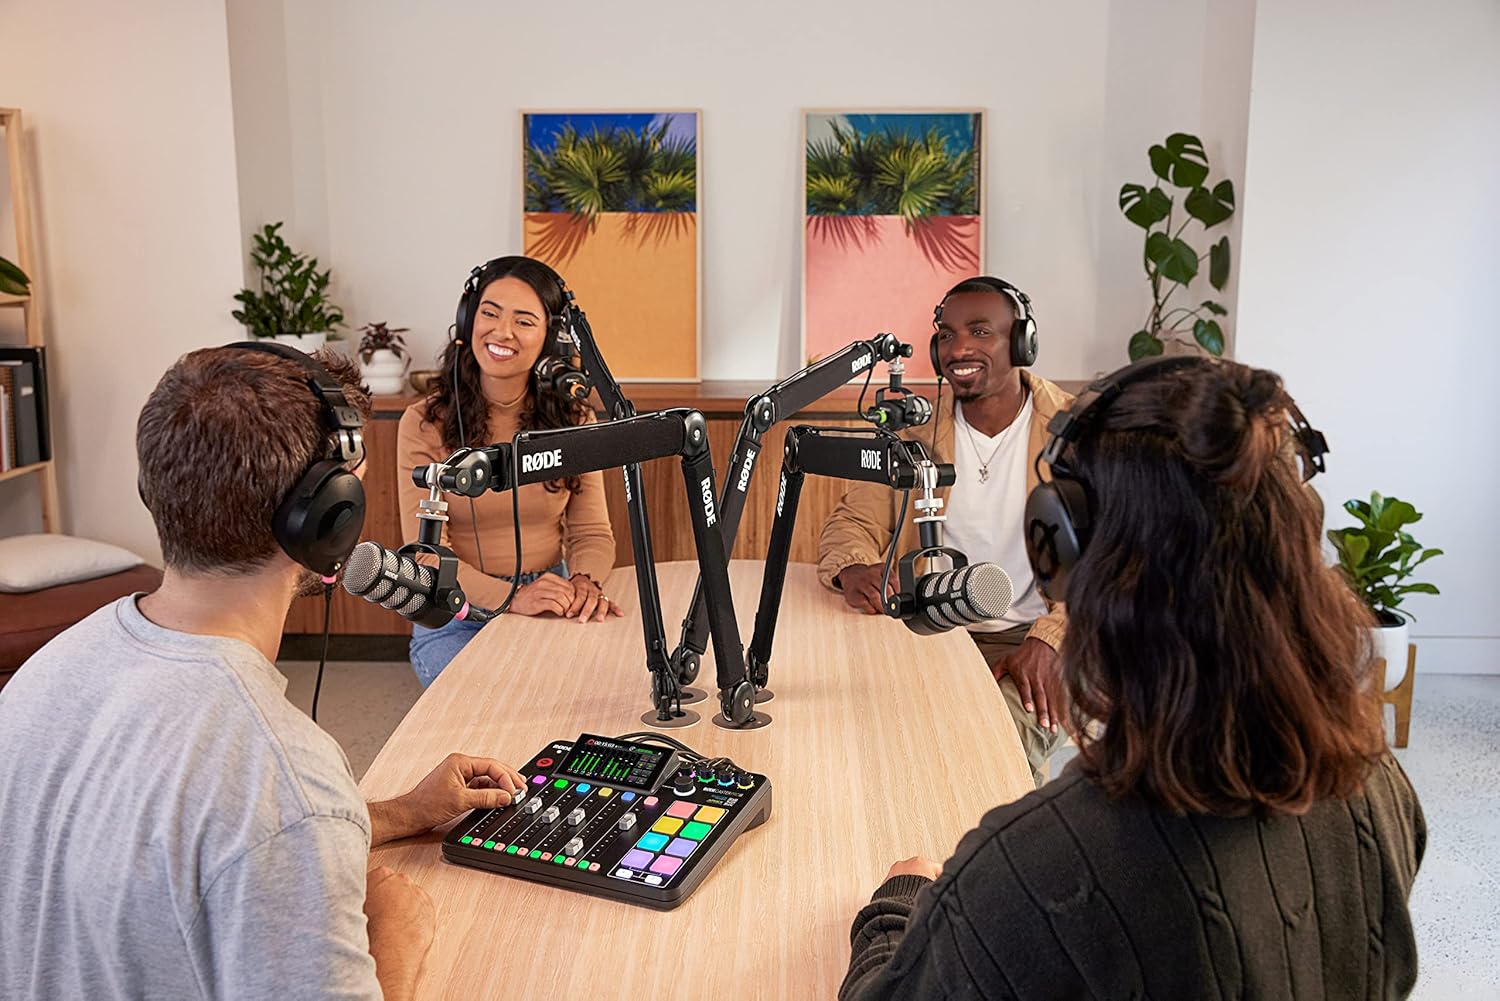
4-Person Podcasting Setup
Click here for my favorite 4 person podcasting kit
Recording a podcast with four people requires specific equipment and careful planning to capture each voice clearly and avoid crowding the audio.
Equipment Essentials
- Microphones:
- Individual Microphones for Each Speaker: Each participant should have their own microphone to capture clear, isolated audio for each voice.
- XLR Microphones: For professional sound quality, consider XLR microphones like the Shure SM58 or Audio-Technica AT2020, which provide superior sound and individual track recording.
- Recommended Kits: Kits like the Zoom PodTrak P4 provide an integrated solution with multiple inputs, ideal for four-person setups.
- Audio Interface:
- Four-Input Audio Interface: An interface like the Focusrite Scarlett 18i8 or Zoom PodTrak P4 is essential for connecting multiple microphones, each with its own input. This ensures that each microphone records on a separate track, simplifying editing.
- Headphones:
- Closed-Back Headphones for Each Speaker: Every participant should wear headphones to monitor their own audio and the group’s, preventing audio bleed and background noise.
- Recording Software:
- Multi-Track Recording Software: Use software like Audacity (free) or Adobe Audition (paid), which supports multiple audio tracks, making editing each person’s audio easier.
- Mixer (Optional):
- Real-Time Audio Control: A mixer, such as the Rode RODECaster Pro, can help adjust each speaker’s audio levels in real-time, useful for live shows or those looking for more advanced sound management.
Recording Space
- Spacious Room with Acoustic Treatment: Choose a space large enough to comfortably accommodate four people. Use foam panels, curtains, or carpets to reduce echo and improve sound quality, creating a balanced acoustic environment for all voices.
Recording Techniques
- Visual Contact:
- Arrange seating so that all participants can maintain eye contact. This improves the natural flow of conversation and enhances non-verbal communication.
- Separate Audio Tracks:
- Record each speaker on an individual track to simplify editing. Separate tracks make it easier to balance sound, reduce background noise, and control each voice’s volume.
- Noise Reduction:
- Use directional (cardioid) microphones to reduce background noise. This ensures that each mic focuses on the speaker’s voice and minimizes ambient sound, creating a cleaner audio result.
Conversation Management
- Appoint a Moderator:
- Designate one person to lead the discussion and guide conversation flow. This ensures that everyone has a chance to speak and helps manage pacing.
- Encourage Pauses:
- To avoid overlapping dialogue, encourage participants to pause briefly before responding.
- Use Names:
- When addressing someone specifically, use their name. This helps listeners follow the conversation and understand who is speaking.
- Limit Side Conversations:
- Keep the focus on group discussion rather than splitting into smaller side conversations, which can be distracting and hard to follow.
Remote Recording Options
If all participants cannot be in the same location:
- Remote Platforms: For remote recording, use platforms like Podbean, Podcastle, Riverside.fm, Zoom, or Zencastr. These platforms support high-quality, multi-track recording, allowing each participant’s audio to be recorded separately for easy editing.
- Stable Connection and Equipment: Each participant should have a reliable internet connection and their own microphone and headphones to maintain consistent audio quality across all speakers.
How Much Does It Cost to Start a Podcast? (And What You Can Skip)
Studio microphones. Cameras. Lights. Software stacks. Monthly subscriptions.The truth is far simpler: you can start a podcast for almost nothing,
then grow into it only if you enjoy the process.
This guide breaks down the real costs of starting a podcast — what you actually
need, what you definitely don’t, and when spending money starts to make sense.
The Short Answer: What Most Podcasts Actually Cost
- $0–$50 → Testing the idea
- $100–$300 → Committed beginner
- $500+ → Intentional investment (optional)
Most people overspend because they assume podcasting is a gear problem.
It isn’t. It’s a consistency problem.
What You Actually Need to Start a Podcast
Audio-Only (The Simplest and Most Common Path)
If you can make a phone call, you can record a podcast.
- A phone or computer
- A quiet room
- A free recording app
- Free podcast hosting
Audio-only podcasts are still the default for most listeners.
As explored in this look at podcasting’s voice-only future,
listeners care more about clarity and substance than production spectacle.
Video Podcasting (Optional, Not Required)
Video adds complexity, not credibility.
- Built-in webcam or phone camera
- Natural window light
- Free tools like Zoom, OBS, or Riverside’s free tier
Video can help with distribution later, but starting audio-first keeps friction low.
If you’re curious about platform tradeoffs, see
whether YouTube is really a podcast platform.
Podcast Gear You Don’t Need (At Least Not Yet)
This is where most beginners waste money.
- XLR microphones
- Audio interfaces
- Mixers
- Studio headphones
- Paid editing software
- Music licenses
- Cameras and lighting kits
None of these make your podcast successful.
They only make it more expensive.
As argued in podcasting like a pro without sounding like one,
improvement comes from repetition — not hardware.
Free vs Paid Platforms: What Beginners Worry About
Can You Start on Free Platforms?
Yes — and many people should.
- YouTube
- Spotify for Podcasters
- Podbean’s free tier
Free platforms are excellent for testing ideas.
They fall short when control, analytics, or long-term ownership matter.
If you want a deeper breakdown, see
this guide to free podcast hosting.
When Paid Hosting Makes Sense
Paid hosting isn’t about sounding more legitimate.
It’s about control.
This becomes relevant once you care about:
- Reliable analytics
- Feed ownership
- Monetization flexibility
- Platform independence
If you’re weighing options, comparisons like
Podbean vs Buzzsprout
or Buzzsprout pricing
help clarify tradeoffs without pressure.
Is It Scary to Start With Zero Audience?
It feels scary — but it isn’t risky.
Zero audience means:
- No expectations
- No pressure
- No consequences
Early episodes are private practice.
Nobody is judging. Nobody is ranking you.
As explained in
starting a podcast with no audience,
most shows fail not because they were bad — but because they stopped.
Ongoing Costs to Expect (So Nothing Sneaks Up on You)
- Podcast hosting (optional at first)
- Editing tools (optional)
- Website costs (optional)
- Marketing (completely optional)
Most podcasts never exceed a modest monthly spend.
Growth costs are elective — not mandatory.
Start Cheap, Then Grow (The Smart Path)
Phase 1: Try It
Record with what you have.
Publish a few episodes.
See if you enjoy it.
Phase 2: Improve It
Upgrade when friction becomes annoying.
Not before.
Phase 3: Invest in It
Spend money only when the podcast supports a larger goal —
a business, a brand, or a long-term project.
As noted in
incremental vs overhaul upgrades,
gradual improvement beats dramatic reinvention.
Final Takeaway: Start With What You Have
If you wait until your setup is perfect, you’ll never start.
If you start with what you have, you’ll discover what’s actually worth upgrading.
Podcasting isn’t expensive.
Quitting before you begin is.
What is a Preamp & How Can They Help a Podcast with Professional Audio
Clear, professional audio is crucial in podcasting. A preamp enhances vocal quality by amplifying weak signals, making your voice sound richer and more dynamic.
What Is a Preamp?
A preamp, or preamplifier, is a device that amplifies weak audio signals from a microphone or instrument to a level that can be processed by recording equipment or speakers. In podcasting, a microphone generates a very low-voltage signal that is too weak to be directly recorded or transmitted. The preamp boosts this signal to “line level,” which is strong enough for further processing or amplification.
Key Functions:
- Signal Boosting: Ensures the audio signal is strong enough for recording.
- Noise Reduction: Helps reduce unwanted noise by amplifying the signal cleanly.
- Tone Shaping: Some preamps add warmth or color to the sound, enhancing vocal quality.
A preamp is the first step in the audio signal chain, ensuring that the original sound is captured clearly and at an optimal level for further processing. This can make it a required component for podcasters who want to achieve professional-quality audio. You will need to test your setup and decide if a preamp is necessary.

Types of Preamps for Podcasters
- USB vs. XLR Preamps: USB preamps are convenient for beginners with plug-and-play simplicity, while XLR preamps offer higher sound quality and flexibility, ideal for professional setups.
- Compact Preamps: Perfect for podcasters on the go, these preamps offer portability without compromising on sound quality.
Benefits of Using a Preamp in Podcasting
- Improved Voice Clarity: Preamps reduce noise and enhance the warmth of your voice, making your podcast sound more polished.
- Noise Reduction: High-quality preamps can filter out unwanted background noise, ensuring your voice is the focal point.
How to Choose the Right Preamp
- Recording Environment: Choose a preamp that suits your recording space, whether it’s a quiet home studio or a noisier environment.
- Microphone Compatibility: Ensure your preamp matches your microphone type, especially if you’re using popular podcasting mics like the Shure SM7B or Rode NT1.
Joe Rogan’s Podcast Studio’s 4 Person Podcast Setup
The Joe Rogan Experience (JRE) isn’t just a podcast; it’s a cultural phenomenon. With millions tuning in to hear Joe Rogan’s conversations with a diverse range of guests, the show’s production quality is as captivating as its content. Rogan’s move to a sprawling Texas studio sparked curiosity about the behind-the-scenes tech.
Capturing Crystal-Clear Audio on a 4 Person Podcast Setup
- Microphones: The Heart of the Conversation The iconic Shure SM7B dynamic microphones are a staple on the JRE. These mics are renowned for their rich, warm sound and ability to handle loud voices without distortion. They’re a favorite among podcasters and broadcasters for their versatility and reliability. Backing up these workhorses are additional Shure SM7dBs, ensuring redundancy and flexibility for different recording scenarios. Blue Yeti and Raspberry USB mics offer plug-and-play convenience for remote guests or secondary setups.
- Headphones: Monitoring in Isolation Sennheiser HD280PRO headphones provide Joe and his guests with clear, detailed audio monitoring while blocking distractions. Their closed-back design ensures isolation, allowing everyone to focus on the conversation.
- Microphone Arms: Flexibility and Stability Gator Frameworks and O.C. White microphone booms provide the flexibility and stability needed to position the mics perfectly. These arms allow for easy adjustments, ensuring optimal sound quality and comfort for the hosts and guests.
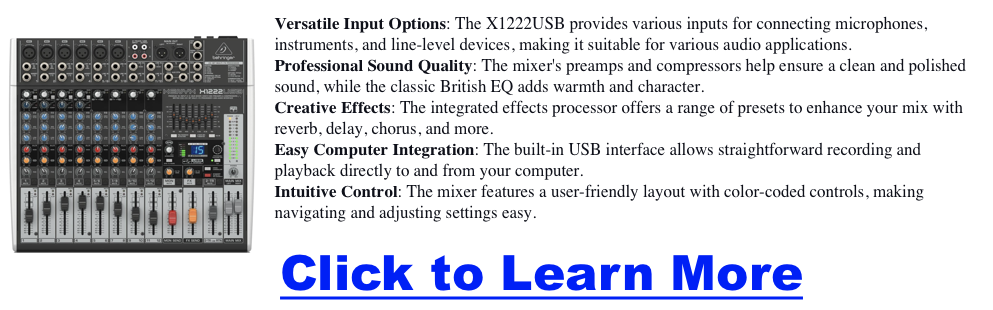
Audio Control Mixing and Mastering
- The Behringer XENYX X2442USB and X1222USB mixers are the nerve centers of the JRE’s audio setup. These powerful mixers handle multiple audio sources, allowing Rogan to blend microphones, music, and sound effects seamlessly. The Universal Audio Apollo interface hints at the potential for high-end audio processing and recording, adding another layer of polish to the final product. To ensure everyone can hear clearly, the Behringer POWERPLAY HA8000 headphone amp powers multiple headphones for everyone in the studio.
- Audio Backup: Never Miss a Beat The TASCAM DR-100 portable digital recorder is a crucial backup, capturing every word in case of hiccups with the primary recording system. Redundancy is key in producing this scale, and the DR-100 ensures that no valuable audio is ever lost.
The Visual Experience
- Multi-Camera Setup: Capturing Every Angle The JRE’s visual style is dynamic and engaging, thanks to multiple Canon VIXIA HF G40 camcorders capturing the action from different angles. This multi-camera setup allows for creative shots, capturing guest reactions and adding visual interest to the podcast.
The Best Computers For Podcasting
- Powerhouse Computers: Editing and Processing Behind the scenes, powerful Apple Mac Pro and MacBook Pro computers handle the heavy lifting of audio and video editing, processing, and file management. These machines ensure smooth workflows and enable the team to deliver high-quality content consistently.
- Networking and Connectivity: Keeping it Connected A robust network infrastructure is essential for live streaming, remote guests, and seamless file transfers. While the specifics of the networking gear remain undisclosed, it’s safe to assume that the studio boasts a high-bandwidth set up to handle the demands of a modern podcasting operation.
Studio Design and Comfort
- Ergonomics and Acoustics: A Productive Environment While the technical gear is essential, a comfortable and acoustically treated environment is equally crucial for a productive podcasting studio. The HAG Capisco chairs provide ergonomic support for active sitting, while the custom-built Wrightsmith desk adds a touch of style and functionality. Although not explicitly detailed, acoustic treatments likely play a significant role in optimizing the sound quality within the studio.
Small Podcast, Smart Network: The Best Indie Podcast Networks for Beginners
Launching a podcast is exciting, but growing an audience can feel overwhelming if you’re working alone. For small and beginner shows, joining a smaller podcast network can offer support, visibility, and community without giving up creative control.
In this guide, we’ll cover the indie and niche podcast networks that actually welcome smaller shows, what they offer, and how to decide if one is right for you.
Why Consider a Small Network?
Pros
-
Built-in cross-promotion with other indie shows
-
Credibility from being “part of a network”
-
Access to community, mentorship, or production tips
-
A chance to reach niche audiences (geek culture, sports, paranormal, family, etc.)
Cons
-
Limited ad sales or marketing resources
-
Modest audience bump compared to big networks
-
Monetization often remains DIY (Patreon, affiliate links, etc.)
Small networks are best for shows with consistent publishing but modest download numbers, and for creators who value collaboration as much as growth.
Click here for my favorite podcast network for small podcasts
Quick Comparison Table
| Network | Niche/Focus | Accepts Indies? | What You Get | Monetization | Best For |
|---|---|---|---|---|---|
| The Oracl3 Network | Diverse indie voices, lots of true crime | Yes | Cross-promo, community, social media boosts | DIY (Patreon, sponsors) | Indie storytellers wanting peer support |
| GonnaGeek Network | Geek culture: comics, gaming, sci-fi | Yes, selective | Listing, promo swaps, geek community cred | DIY | Tech/geek hobby podcasts |
| Belly Up Sports | Sports talk, fan culture | Yes | Website features, cross-promo feeds | Some ads, DIY Patreon | Passionate sports fans |
| Saturday Morning Media | Family-friendly, kids shows | Limited | Brand credibility, cross-promo with other family shows | Patreon, merch | Children’s or family creators |
| Atlantic Transmission | NYC indie collective | Invite only | Hands-on production help, community | DIY | Local creatives, comedy shows |
| Anomalist Radio Network | Paranormal, fringe, indie artists | Yes | Live streams, eclectic audience | DIY | Paranormal and fringe enthusiasts |
| Podcast Advocate Network | Creative, compassionate indies | Yes | Editing help, newsletter, cross-promo | DIY + Patreon | Fiction, history, audio drama |
| Bliss Life Press | Spirituality, wellness | Yes | Brand alignment, support hub | Indirect (courses, products) | Self-help/wellness podcasters |
| The Outpost FM | Geek, pop culture | Small circle | Simple hosting hub, cross-promo | DIY | Cult fandoms, UK creators |
| Gaming Podcast Alliance | Video game podcasts | Yes (informal) | Roundtables, collabs, promo swaps | DIY | Indie gaming podcasters |
| Sports Radio Detroit | Detroit local sports | Local only | Local press access, cross-promo | Small ads | Regional sports fans |
| Washed Up Network | Sports, pop culture | Yes | Social pushes, cross-overs, “Washed Up Radio” | DIY | Young/up-and-coming voices |
| Cast Junkie (Community) | All indie, esp. fiction | Yes | Discord community, promo swaps, blog features | DIY Patreon | Audio drama & narrative indies |
| Fable and Folly | Audio fiction, dramas | Selective | Ad sales, premium F&F Plus, cross-promo | Ads + subscription | Ambitious narrative shows |
| That’s Not Canon | Australian indie collective | Yes | Training, cross-promo, Patreon support | Minimal, DIY | Global indies wanting community |
Mini Profiles: What You’ll Actually Get
The Oracl3 Network
A diverse, inclusive collective. Pros: full creative freedom, supportive peers. Cons: no monetization built in. Best for storytellers seeking community.
GonnaGeek Network
Geeky podcasts by and for geeks. Pros: great production standards, organic guest swaps. Cons: selective entry, no ad sales. Best for hobbyists in tech or comics.
Belly Up Sports
“The Internet’s Sports Bar.” Pros: community vibe, cross-promo feeds. Cons: mid-sized reach, extra content workload. Best for passionate sports fans wanting camaraderie.
Podcast Advocate Network
Mission-driven indie network. Pros: editing help, kind community, newsletters. Cons: small scale, modest visibility. Best for creative audio drama/history projects.
Cast Junkie
More community than network. Pros: active Discord, indie fans ready to listen. Cons: no ad sales or formal infrastructure. Best for fiction podcasts and indies willing to engage.
How to Know If a Small Network Is Right for You
Green Flags
-
They clearly accept indie/new shows
-
Active on social or newsletters promoting members
-
Evidence of cross-promo or roundtables
-
Transparent about who runs it
Red Flags
-
Vague promises of “huge growth” with no specifics
-
Demands ownership of your RSS feed
-
Pay-to-join without clear benefits
How to Pitch (Template)
What to include:
-
Show logline (20 words or less)
-
Niche fit with the network’s audience
-
Publishing cadence + consistency proof
-
Audio sample link
-
Cross-promo ideas (guesting, trailer swaps)
-
Cover art + promo assets
-
Download stats (even small ones, show growth trend)
Sample Subject Line:
“[Show Name]: Indie [niche] podcast, consistent schedule, looking to join [Network]”
Monetization Reality for Small Networks
-
Mostly DIY: Patreon, Ko-fi, affiliate links
-
Occasional Ad Sales: Belly Up, Fable & Folly, Headgum (but selective)
-
Indirect Models: Bliss Life Press (courses/products), Saturday Morning Media (Patreon/merch)
-
Community Growth → Monetization Later: Cast Junkie, Podcast Advocate
Final Thoughts
Small podcast networks won’t make you famous overnight. What they can do is give you community, collaboration, and incremental growth—things that are hard to find when podcasting alone. For many beginners, that’s the right next step.
If your goal is credibility, peers, and cross-promo, start with a small network. If your goal is big sponsorship dollars right away, keep building your show first. You also might want to pickup our free monetization methods ebook + traffic training.
Anchor Podcast Hosting: What It Can and Cannot Do
Thinking of starting a podcast and curious about Spotify’s podcasting platform, previously known as Anchor? Spotify for Podcasters is a go-to for many beginners and hobbyists due to its free hosting and easy-to-use tools. But is it the right fit for podcasters looking to grow a serious show? In this review, we’ll explore its strengths and weaknesses, comparing how it stacks up against paid services and what you need to know if you’re aiming for more professional podcast. NOTE: Anchor is no longer in business. Here’s What You Should Be Using Instead…
Anchor Podcast Hosting: Key Features
Now a part of Spotify, Anchor has revolutionized podcasting by providing creators with free and intuitive tools. Since its acquisition by Spotify in 2019, Anchor has become deeply integrated into Spotify’s ecosystem, making it easier than ever to create, host, and distribute podcasts seamlessly. Despite these advancements, some limitations might make it less suitable for podcasters seeking advanced features. Below, we’ll examine the pros and cons of using Anchor.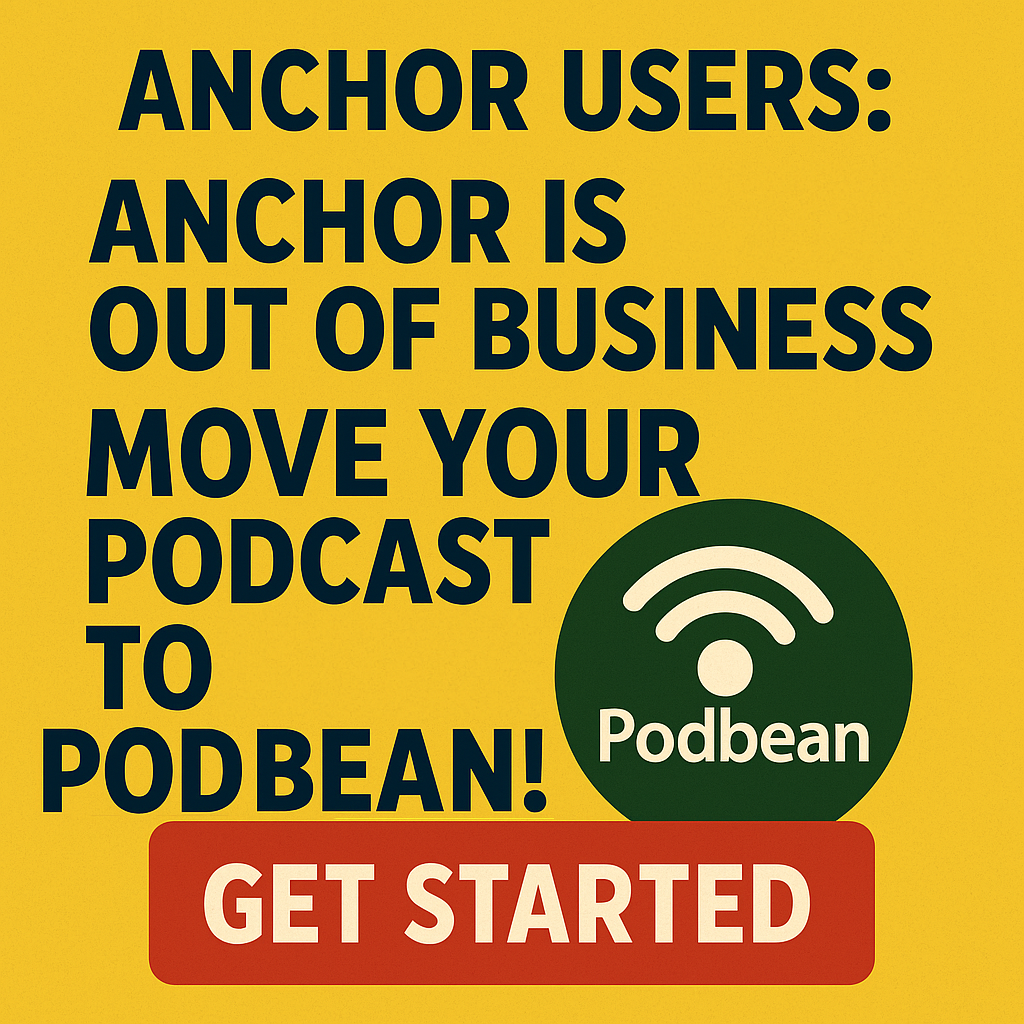
🚀 Favorite Podcast Host: Try Podbean Now
1. Free Unlimited Hosting
Anchor offers unlimited free hosting, with a 250MB per episode file size limit. While this is generous, it’s important to keep in mind that larger, higher-quality audio files (like those encoded at 256kbps) might run into this limit if your episodes are longer than an hour. For typical talk podcasts recorded at 128kbps, this limit won’t be an issue, but podcasters focused on sound design or high-fidelity audio may find this cap restrictive.
2. Easy Distribution
One of Anchor’s standout features is its automatic distribution to major platforms like Spotify, Apple Podcasts, and Google Podcasts. However, be cautious when letting Anchor submit to Apple Podcasts on your behalf. Doing so means that your show will be listed under Anchor’s account, which limits your ability to access detailed Apple Podcast analytics. To keep full control over your podcast, it’s recommended to manually submit your RSS feed to Apple and other directories.
3. Built-in Creation Tools
Anchor provides built-in tools for recording, editing, and producing your podcast directly from their website or mobile app. This makes it easy to create professional-sounding episodes without needing additional software.
While Anchor’s built-in recording tools make it convenient to record episodes on the go, they come with limitations. Recording through Anchor’s app saves files in M4A format at a bitrate of 32kbps, which may result in a lower audio quality compared to other platforms that support higher bitrates or uncompressed formats like WAV or AIF. For podcasters who prioritize high-fidelity audio, it’s recommended to record externally and upload edited files to Anchor rather than relying solely on the app.
4. Monetization Options
Anchor makes monetizing your podcast simple with built-in sponsorship and advertising options. However, most creators find the payouts from Anchor’s ads to be relatively low, especially since its main sponsor is often Anchor itself. For more profitable monetization, podcasters will need thousands of downloads per episode to earn even modest sums. Consider pairing Anchor’s ads with other monetization strategies, such as affiliate marketing, premium content, or listener donations through platforms like Patreon.
5. Analytics
The platform offers basic analytics to track your podcast’s performance. While not as advanced as some paid services, these insights can help you understand your audience and how your podcast is performing.
6. Collaborative Features
Anchor supports up to 5 users collaborating on a single podcast. This is great for teams or co-hosts who want to work together seamlessly.
7. Listener Interaction The “leave a message” feature allows listeners to send voice messages to podcast hosts, fostering a sense of community and engagement.
Potential Drawbacks to Using Anchor
Click here for my favorite Anchor replacement podcast host platform
1. Limited Customization
Compared to paid hosting services, Anchor offers fewer customization options. If you’re looking for a highly personalized podcasting experience, you might find this limiting.
2. Data Ownership Concerns
Some users have expressed concerns about data ownership and potential difficulties in migrating to other platforms. Understanding the terms of service regarding your content is essential.
3. Privacy Limitations
Anchor doesn’t offer an option to make podcasts private. If you plan to use the platform for educational purposes or sensitive content, this could be a concern.
4. Analytics Limitations
While Anchor provides basic analytics, it is not IAB certified. This might limit its usefulness for serious monetization efforts and in-depth audience analysis.
5. Potential for Account Issues
There have been rare reports of unexpected account deletions. Although uncommon, it’s something to be aware of when considering your hosting options.
🚀 Best Free Podcast Host: Try Podbean Now
Anchor vs Podbean vs Buzzsprout
| Feature | Anchor (Spotify for Podcasters) | Podbean | Buzzsprout |
|---|---|---|---|
| Cost | Free | $0 (Basic), $9, $29, $99/month | $12, $18, $24/month |
| Hosting Limits | Unlimited | Unlimited on paid plans | 2-12 hours/month depending on plan |
| File Size Limit | 250MB per episode | No limit on paid plans | 250MB per episode |
| Distribution | Automatic to major platforms | Automatic to major platforms | Automatic to major platforms |
| Built-in Creation Tools | Yes (recording, editing, production) | Yes (basic editing tools) | Yes (basic editing tools) |
| Monetization Options | Yes (sponsorship and ads) | Yes (ads, premium content, donations) | Yes (sponsorship, affiliate marketing) |
| Analytics | Basic | Advanced | Advanced |
| Collaborative Features | Yes (up to 5 users) | Yes | No |
| Listener Interaction | Yes (leave a message feature) | Yes (comments and community features) | No |
| Customization | Limited | Extensive customization options | Moderate customization options |
| Data Ownership | Some concerns | Full ownership | Full ownership |
| Privacy Options | No private podcasting option | Yes (private and password-protected podcasts) | No private podcasting option |
| Support | Mixed experiences | 24/7 customer support | Email support, community forum |
| Migration Ease | Potential difficulties | Easy to migrate | Easy to migrate |
User Insights on Anchor
- Free and Easy to Use
- Many users appreciate Anchor for being free and user-friendly, making it an excellent starting point for beginners.
- File Size Limits
- While Anchor claims unlimited hosting, there is a 250MB per episode limit. This generally isn’t a concern unless your episodes are very long.
- Monetization
- Anchor’s primary advertiser is Anchor itself, which offers lower payouts compared to traditional CPM advertisers. This might be a limitation if you aim for higher revenue through ads.
- RSS Feed Control
- Users cannot control their RSS feed, which can complicate advanced tracking and management. This is a significant consideration for podcasters who want more control over their content.
- Support and Stability
- Experiences with support and platform stability are mixed, though major downtime is rare. Anchor has been stable for many users, with few instances of significant issues.
- Alternatives
- Some users recommend platforms like archive.org, RedCircle, and paid services like Libsyn for more control and features. These alternatives offer better customization, control, and advanced features.
- Professional Use
- Larger podcasts or those in networks often prefer other platforms for better analytics and management tools. Anchor is great for getting started, but many podcasters transition to paid services as they grow.
🚀 Favorite Podcast Host: Try Podbean Now
FAQ
Wrapping Up
Anchor (now Spotify for Podcasters) is an excellent platform for hobbyists, beginners, and those testing the waters of podcasting. Its free hosting, ease of use, and built-in tools make it perfect for small-scale podcasts. However, podcasters serious about long-term growth, advanced analytics, or high-quality audio may eventually need to transition to paid services like Buzzsprout or Podbean for more control, better monetization options, and stronger support.
Async (Podcastle) Pricing Plans: Find the Best Plan for Your Podcast
Podcastle has officially rebranded to Async to reflect its expansion beyond just podcasts into video and AI voice tools. Whether you know it as Podcastle or Async, the platform remains a go-to for creators who want broadcast-quality production. But with the name change comes questions: Did the pricing change? Is the “Free” plan still free? This guide breaks down the new Async tiers so you can choose the right fit.
⚠️ Important Update: Podcastle is now Async
As of late 2025, Podcastle has rebranded to Async. Your account, projects, and pricing remain the same, but you will see the new logo and “Async” branding on your dashboard. This change reflects the platform’s move into broader AI video and voice cloning tools. If you want to learn more about why they rebranded, we have a small post on it here.
Click here to see Async’s latest pricing and plans now
Detailed Breakdown: Async (Podcastle) Pricing Plans
Click here to try Async’s premium features for free
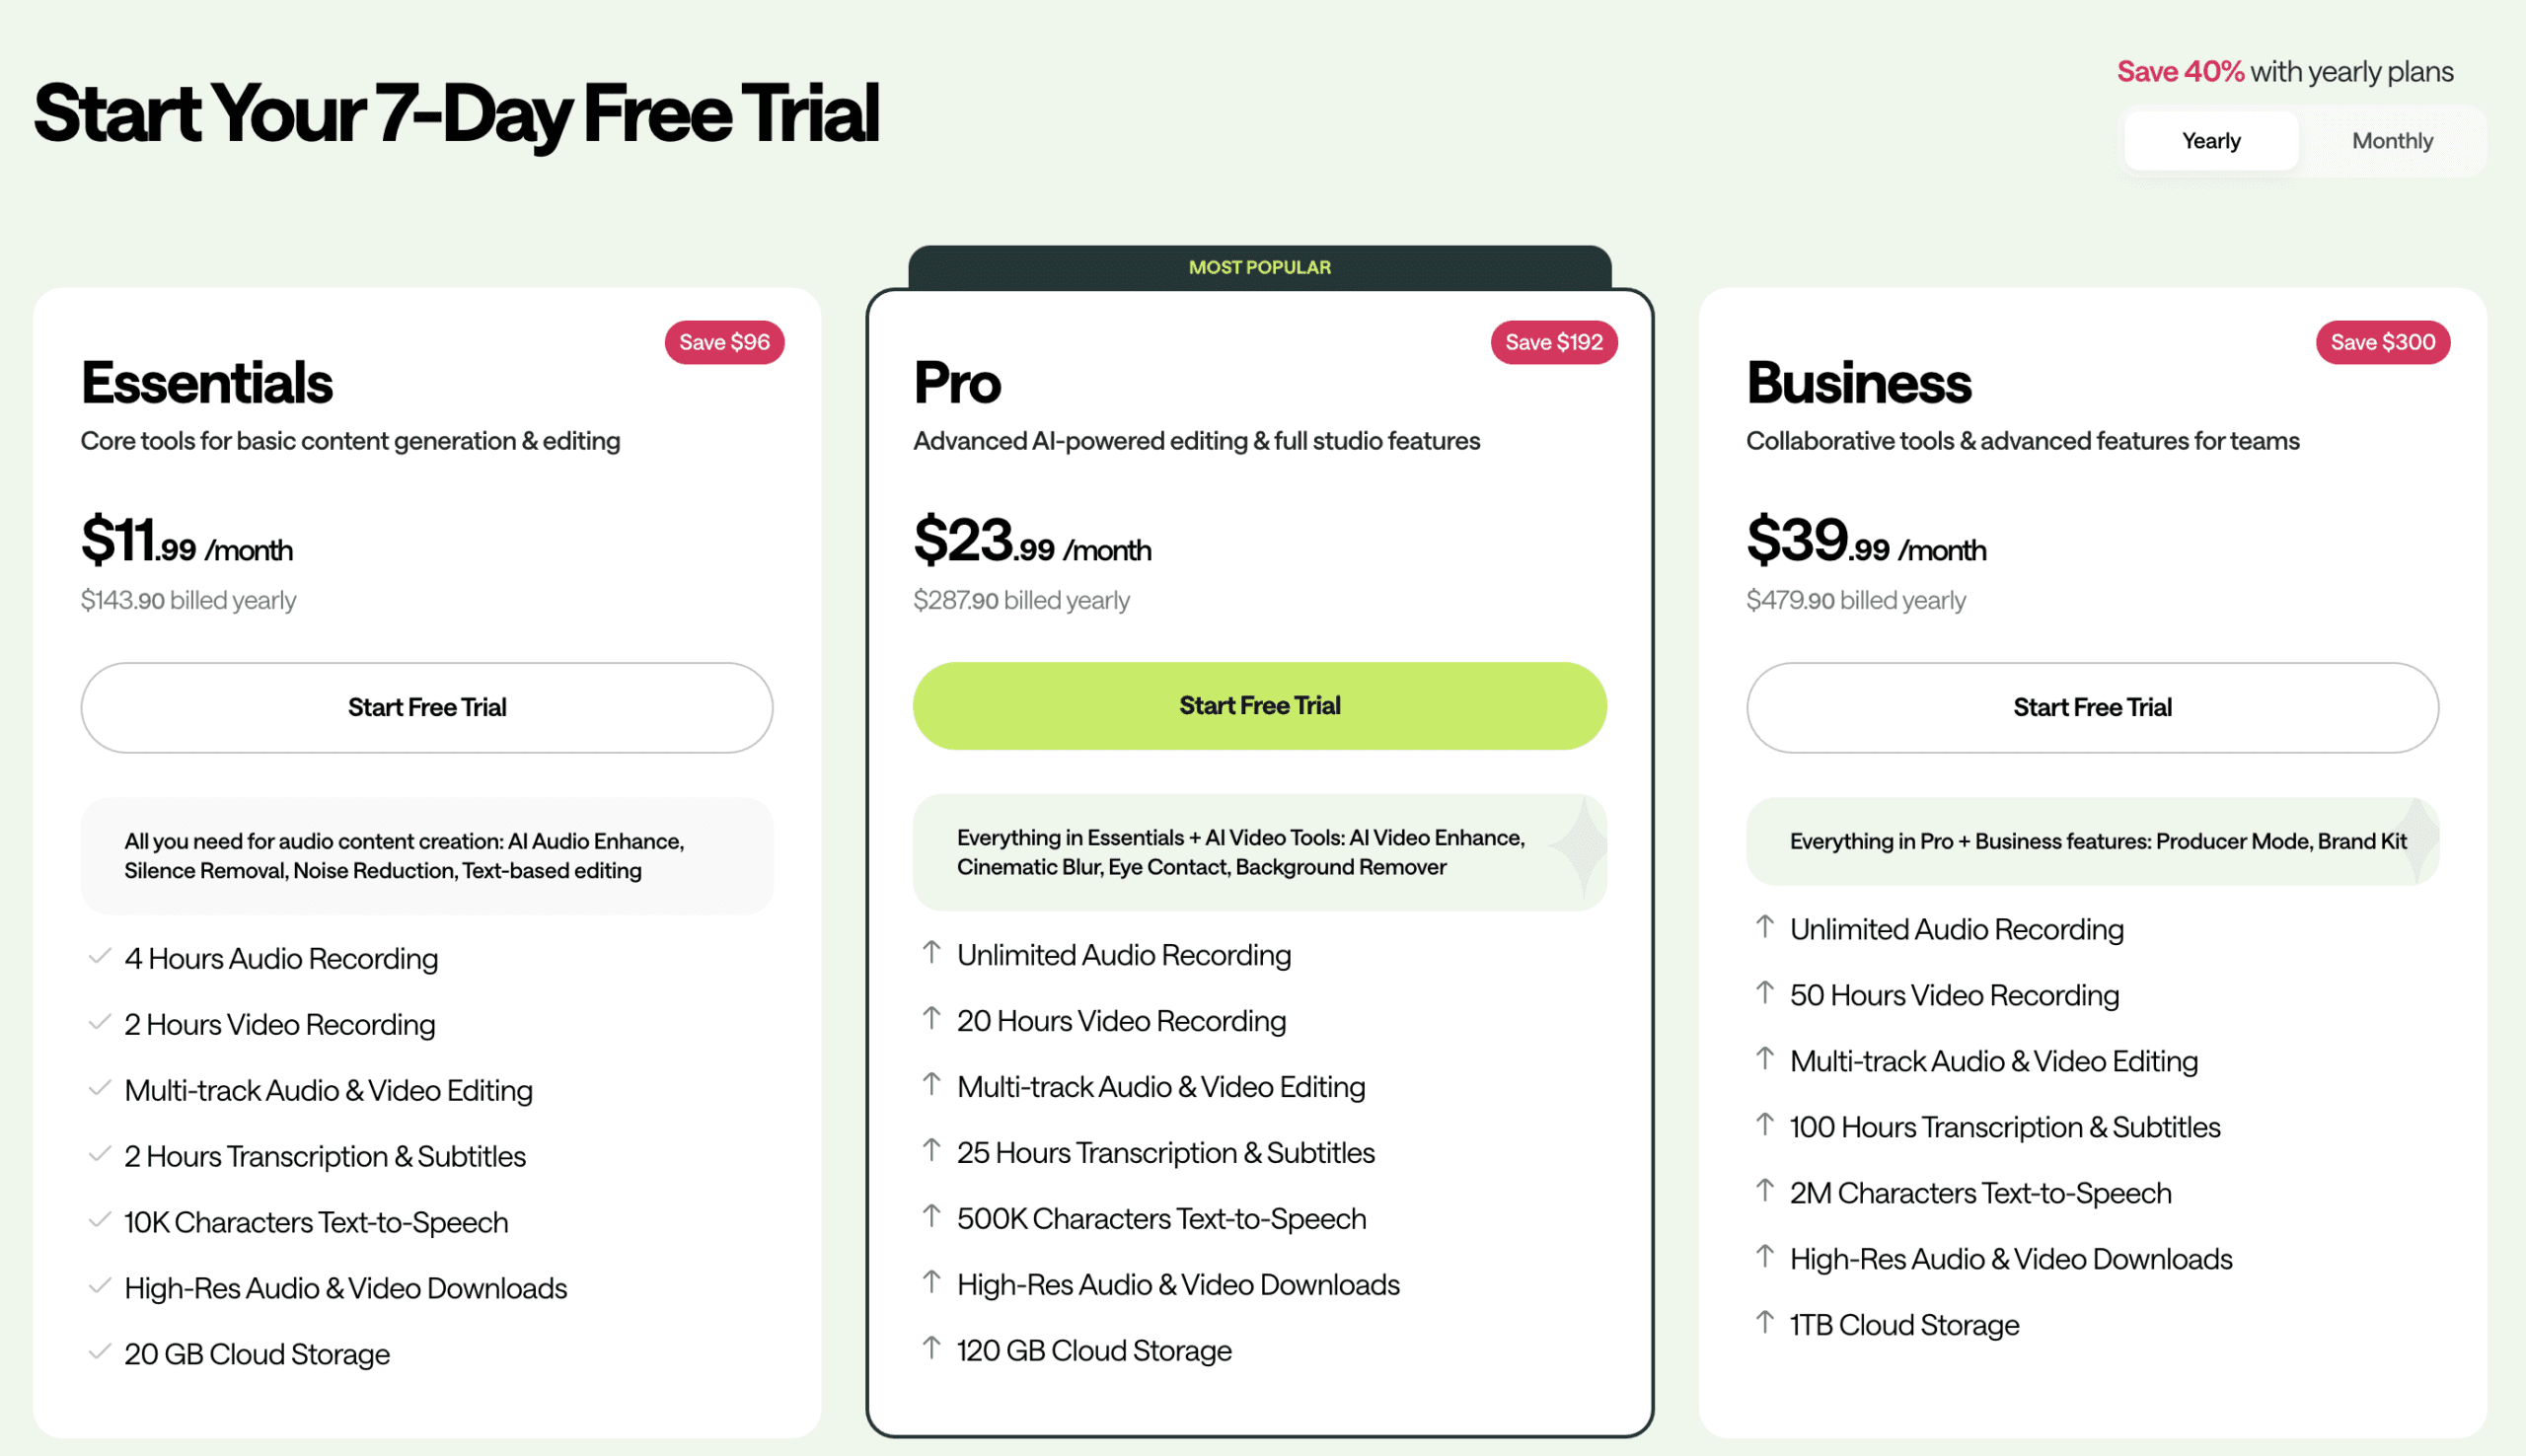
1. Basic Plan (The “Forever Free” Tier)
- Cost: $0 / Forever.
- The Reality:
- Unlimited Audio: You can record as many multi-track audio sessions as you want (MP3 160kbps).
- Video Limits: You get unlimited local video recording, but exports are watermarked and limited to 720p.
- The “Gotcha”: Transcription is limited to 1 hour lifetime (total), not per month. Once you use it, it’s gone.
- Who It’s For: Perfect for hobbyists testing the waters. If you don’t need transcription or 4K video, this plan is genuinely usable for long-term recording.
2. Essentials Plan (Formerly Storyteller)
- Cost: $14.99/month or $11.99/month billed annually.
- Why Upgrade?
- High-Fidelity: Unlocks uncompressed WAV audio (lossless) and 4K video downloads.
- Magic Dust: You get unlimited use of the AI noise cancellation (Magic Dust) and Silence Remover.
- Transcription: 10 hours per month (refreshes monthly).
- AI Voices: Access to the digital voice skins (1M characters/mo).
- Who It’s For: Serious solo creators. If you are publishing weekly and care about sound quality (WAV) or hate editing out silence manually, this pays for itself immediately.
3. Pro Plan (The AI Powerhouse)
- Cost: $24.99/month or $19.99/month billed annually.
- The Big Differences:
- Async Revoice (Voice Cloning): This is the killer feature. You can clone your own voice to fix mistakes in your recording just by typing text.
- Heavy Usage: Transcription limits jump to 25 hours/month and video recording to 20 hours/month.
- AI Video Tools: Includes “Eye Contact” fix and cinematic blur.
- Who It’s For: Professional editors and video-first podcasters. If you need to fix audio mistakes without re-recording (Revoice) or produce a lot of video clips for social media, you need this tier.
4. Teams / Business Plan
- Cost: Custom pricing (approx $39.99/mo).
- Key Features:
- Includes all Pro features plus dedicated “Producer Mode” (manage recording without being in it).
- Centralized billing and project permissions.
- Who It’s For: Production agencies managing multiple shows or networks.

Hidden Perks & Discounts
- The Trial Hack: All paid plans include a 7-day free trial. Use this to test the “Revoice” feature before committing to Pro.
- Student Discounts: Async (Podcastle) offers education pricing—you just need to contact support to unlock it.
- Annual Strategy: Paying yearly saves you ~20%, essentially giving you two months free.
Final Verdict: Essentials vs. Pro?
Click here to try Async’s premium features for free
Most users struggle to decide between these two. Here is the cheat sheet:
- Stay on Free if: You already have a good microphone and edit in GarageBand/Audacity. You just need a reliable way to record remote guests.
- Get Essentials (Storyteller) if: You want “Magic Dust” to fix bad audio automatically and need automatic transcripts. This is the best value for 90% of podcasters.
- Get Pro if: You make mistakes! The Revoice feature allows you to “type” audio fixes using your cloned voice, saving you from re-recording segments.
FAQ: Async (Podcastle) Questions
Before you swipe your card, check these common limitations:
- “Did Podcastle change its name?” Yes. As of 2026, Podcastle is now Async. The tools are the same, but the platform has expanded to include more video and developer API features.
- “Does the transcription limit rollover?” No. If you have the Essentials plan (10 hours), it resets every month. Unused hours do not stack.
- “Can I really clone my voice?” Yes, but only on the Pro plan. Essentials/Storyteller gives you generic AI voices, not your voice.
Still unsure? Grab the 7-day free trial and test the Magic Dust feature on an old recording to see the difference.
How to Create a Podcast Website
How to Create a Podcast Website
Watch the video below where I show you how to build a podcast website in under 10 minutes.
What Goes On The Website Now?
Click here to get access to video 2!
- The Ultimate Guide to Choosing Cameras and Lenses for Podcasting
- StreamYard Business Plan Review: Is It Worth $299/Month for Teams?
- Synology DS1525+ for Podcasters: What You Need to Know Before You Buy
- StreamYard Pricing (2026): Full Comparison of Plans, Differences, Features & Discounts
- Podbean Pricing: The Best Podcast Hosting Platform for Getting Started?