helpful-info
Dirt Cheap NAS Storage – Podcasting & Video Creation
As a content creator who runs multiple mini-shows, clips, ads, and more — I have a huge need for rock solid storage, and more importantly, storage I can expand. Too many times have I put everything onto a single drive, only to have it crash, delete, or lose various parts of my files. This is ultimately why I put the money into a storage device.
I put this together for the people who need cheap storage, who want something that’s good with electricity.
Just a quick rundown of the things I’ve used….
- Windows Server (at least 4 different builds)
- Linux Server(s)
- Synology 1522+ NAS
Why I Dropped Windows & Linux Boxes
There’s nothing wrong with building your own computer, shoving a bunch of drives into it, and using hardware RAID, or some kind of software RAID hybrid, but I dropped these approaches because they were annoying to maintain, and they use a lot of power considering it’s just sitting there idle 24/7.
I actually got off all of the storage-pooling stuff for a few years and just raw-dogged an external drive with extremely careful backups.
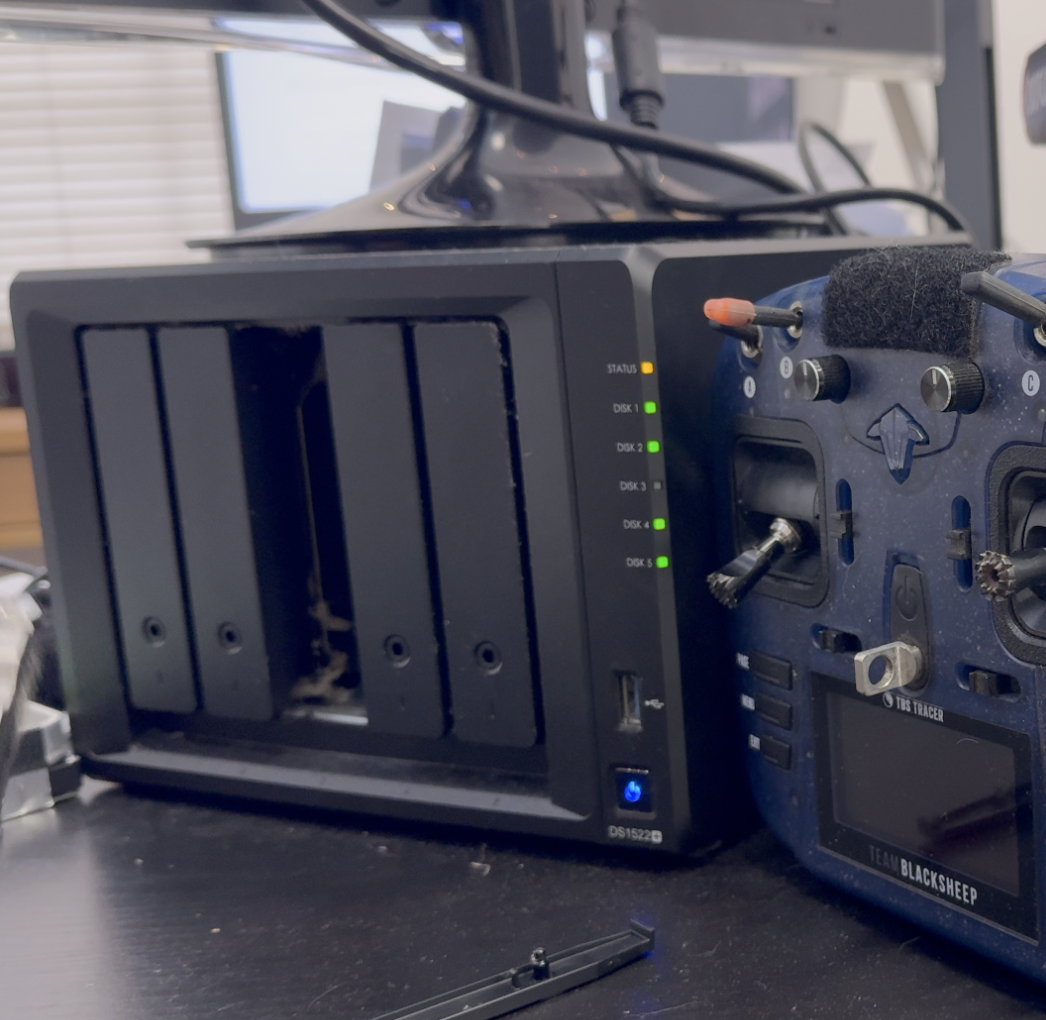
But as my needs shifted, and the scariness of losing everything in the blink of an eye….I bought a Synology 1522+ last year.
And if you’re a podcaster, video creator, of a collector of stuff…you should get one

How I Sourced My Drives
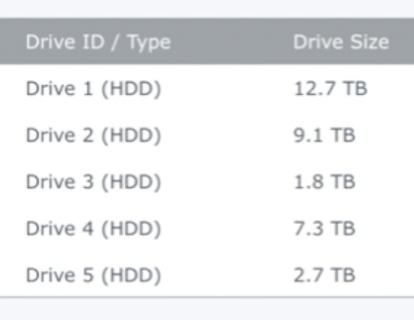
I basically used spare drives I already had to start the pool. Then I started to slowly swap in newer drives.
I had a 2tb drive manufactured in 2013, and it also was the smallest drive in the pool and it was time to swap it out.
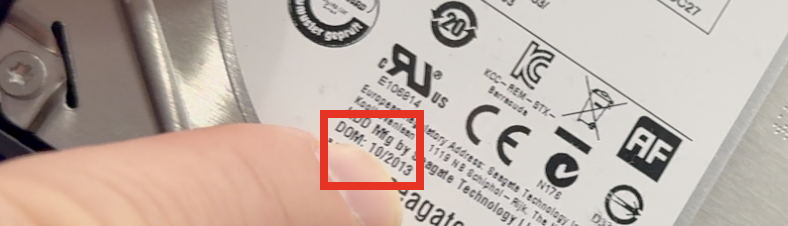
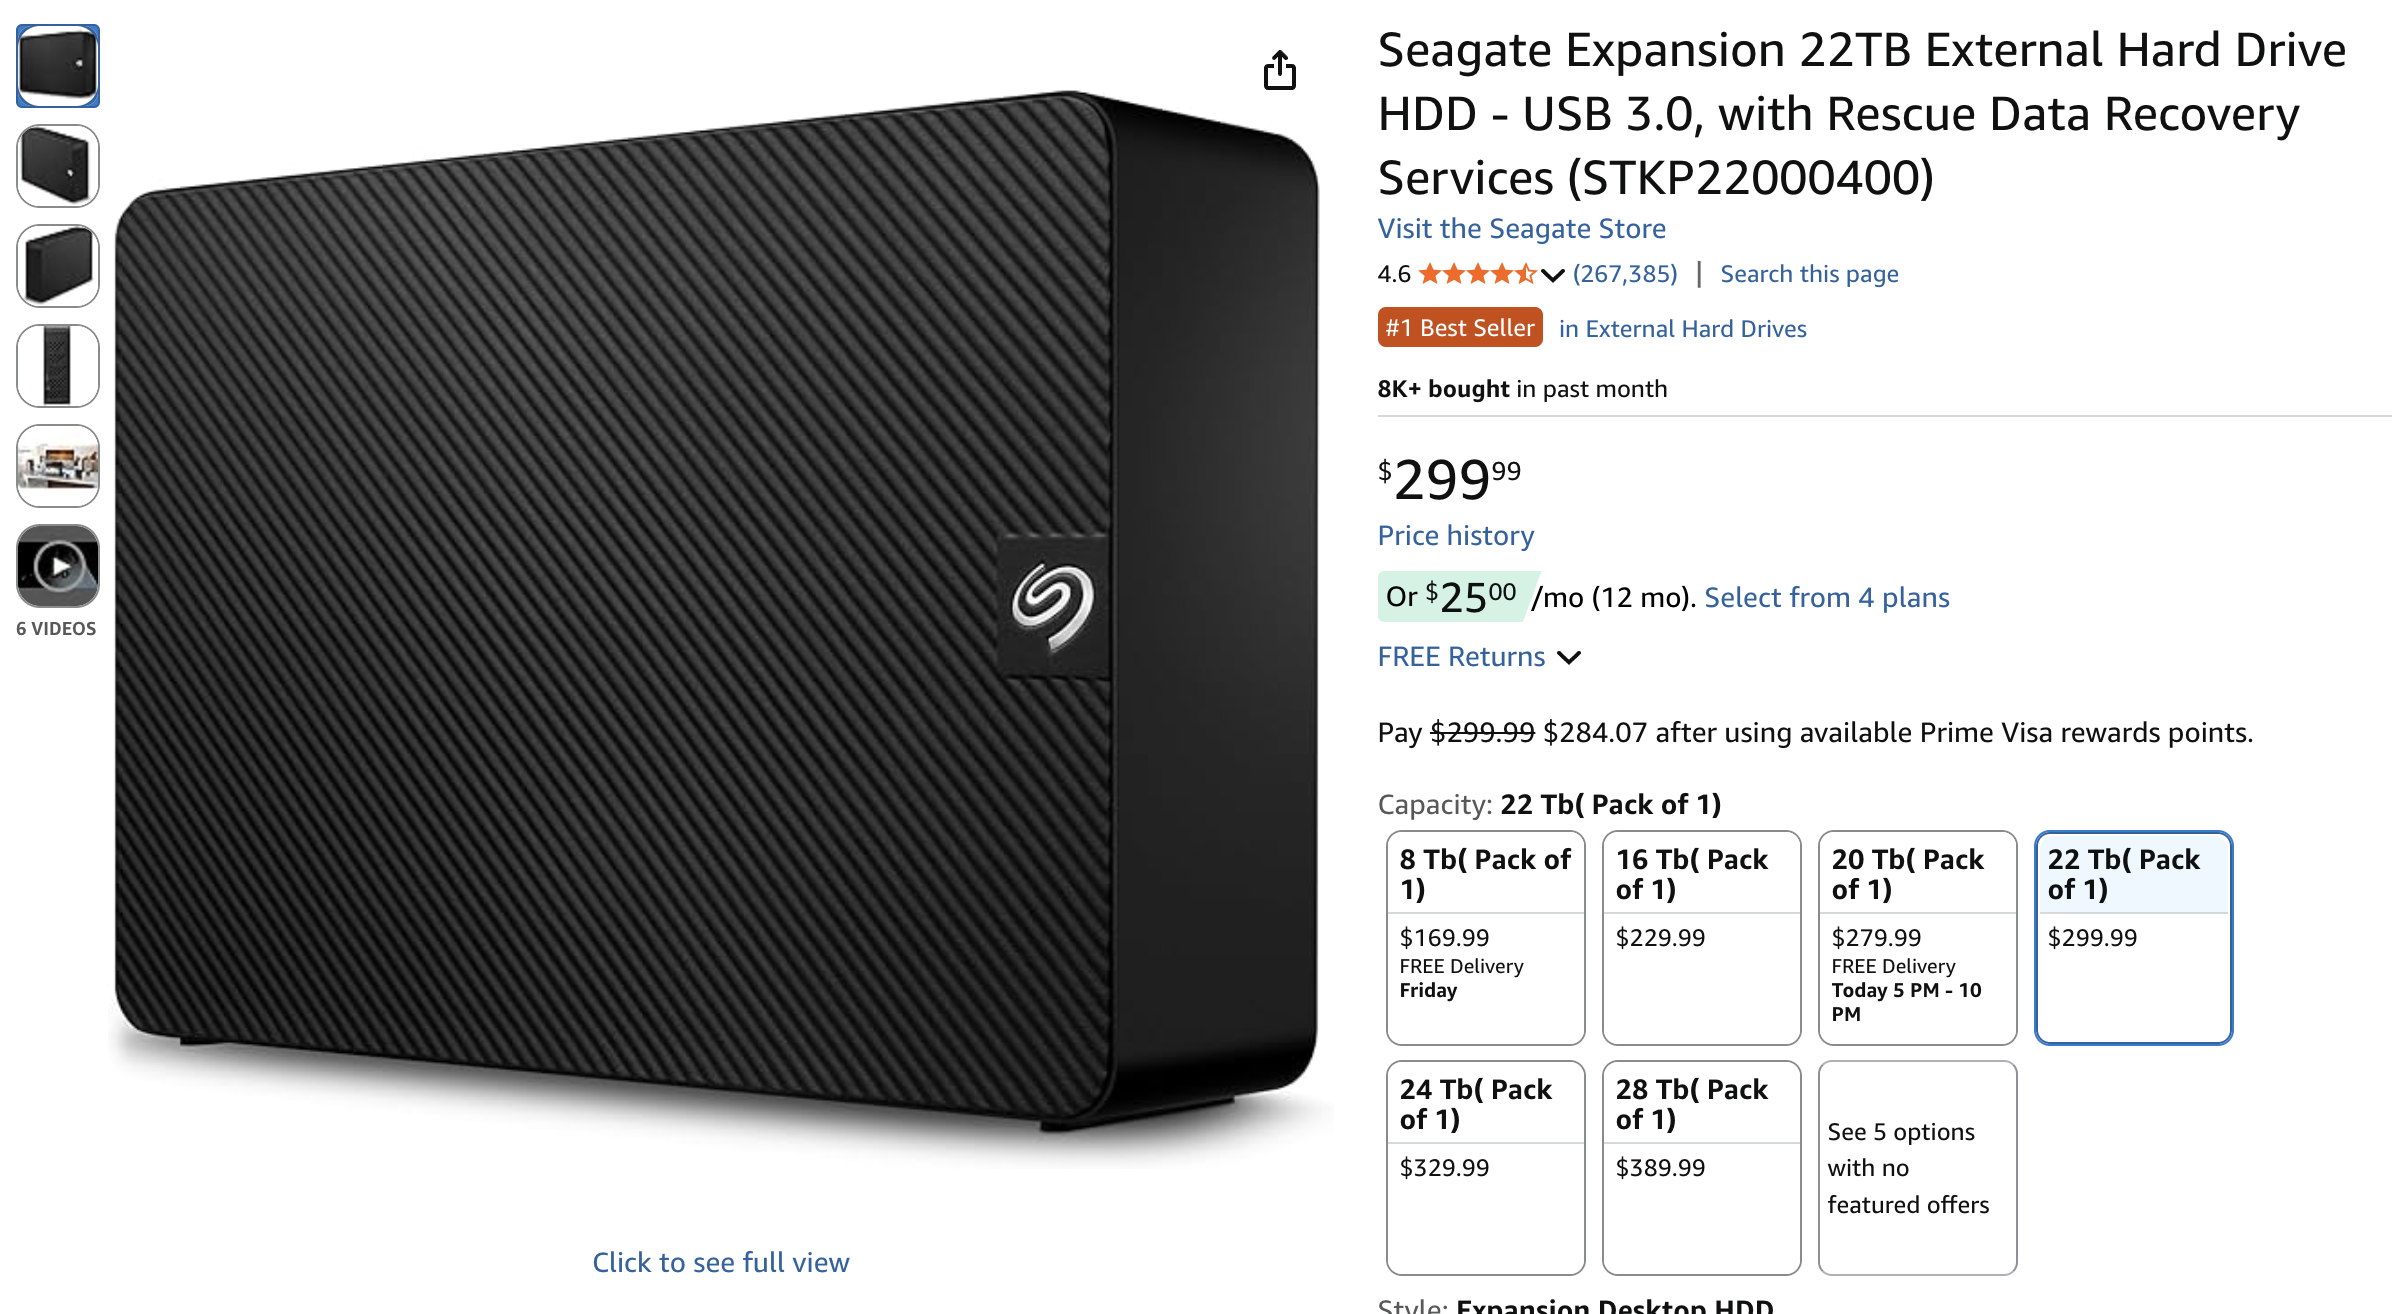
The Drive I Bought…
Truth be told I wanted to get the 28tb drive on their Black Friday sale (it was $100 off) but it sold out before I could grab it. So I opted for the next best thing… the measily 22tb monster. It’s technically a Seagate stkp22000400 shucked if you need to know how to shuck it, watch the video at the top of the page. I show you how to do it.
 Why An External Drive?
This is not always the route to take – this is just the route that I take — I like to buy external drives because you can get much more storage at a discount when you compare the prices to similar-sized drives that don’t come in an enclosure. I don’t know why the pricing works out this way, but you can look for yourself and see how prices compare. It’s usually $100 difference for the same amount of space!
I am also less particular about “which drive to get” because as long as it’s Seagate, Western Digitial, Hitachi, or some other known brand — you’re probably going to be okay. I just wouldn’t get an off-brand drive… no thanks!
Also — I’m comfortable ripping these cases open, because after the tsunami of 2011 in Thailand…. hard drive prices went through the roof because that’s where they make most of them. So at the time I needed to fill one of my servers and that’s how I discovered this little price hack 😉

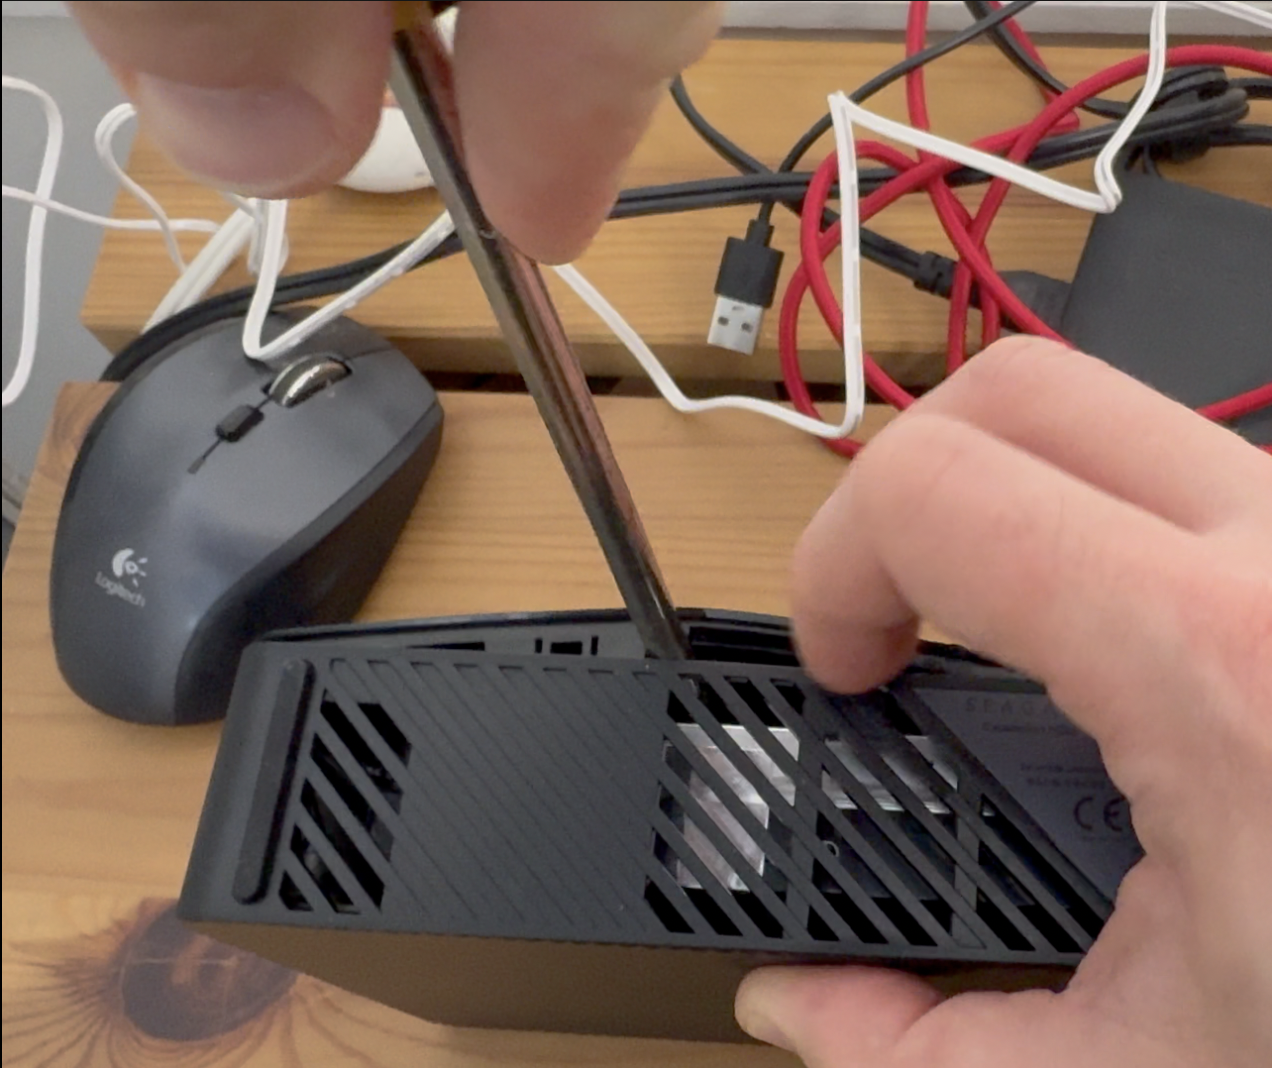
Shucking The Drive
All you need is a screwdriver and a little patience. I would encourage you to watch my video because I show you how to do it simply. And you’re in luck, because most of these drives are made the same way and open the same way.
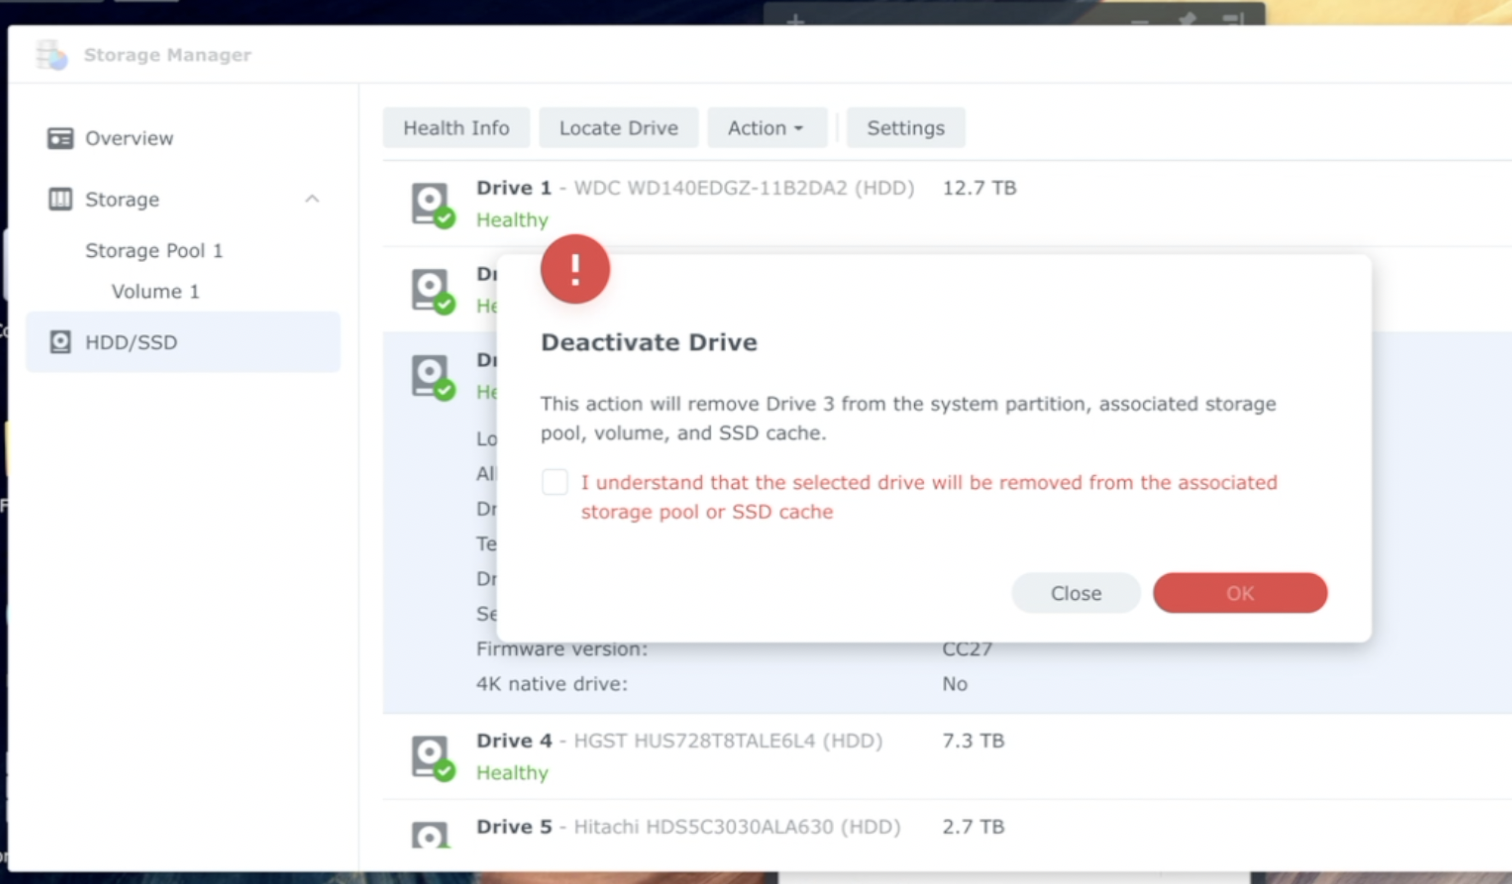
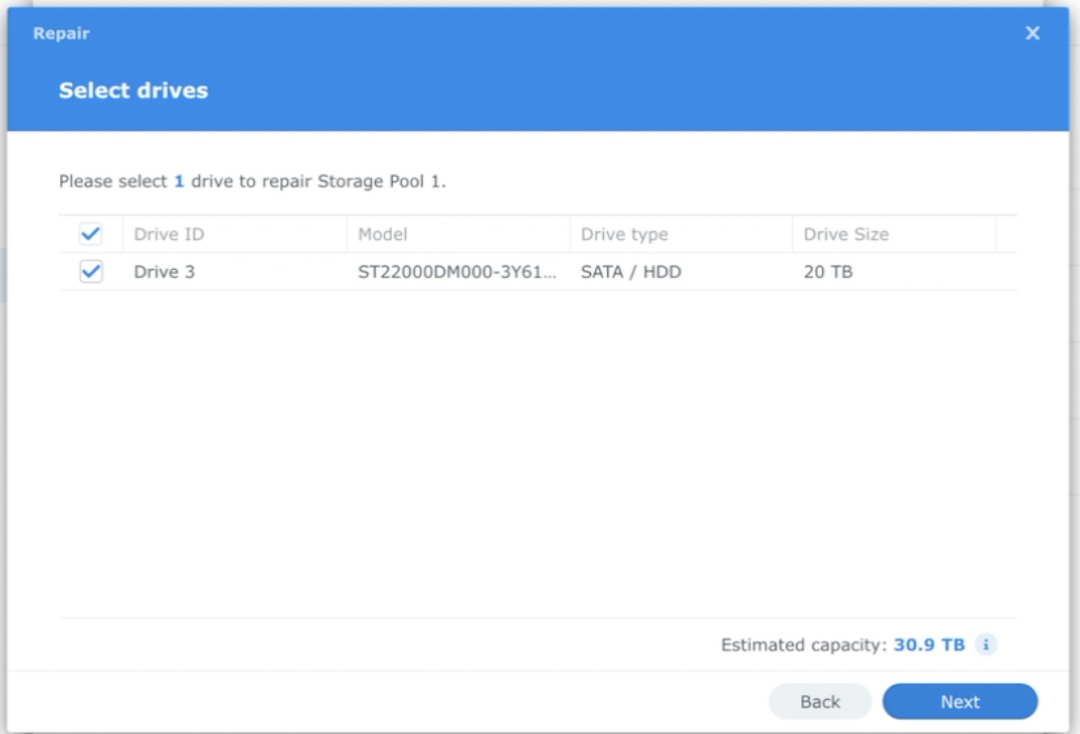
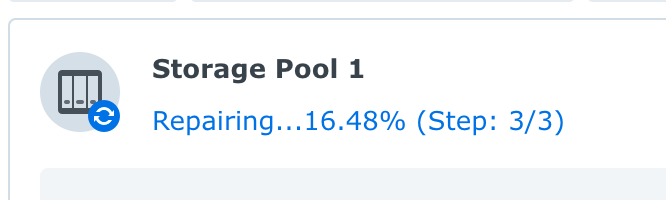
Adding The Drive To The Pool
Again…watch the video I made! But it’s very simple, you deactivate the drive, you pop the new drive in, add it to the pool, and boom you’re off to the races. I can still work while the pool adds the new drive in!
Data Protection On Steroids
This is hands down the best way to back up a small podcast, YouTube channel, graphics designer….whatever you do. I have about 30tb of storage, I can add more as I grow, and it’s super fast too.
I always advocate for the 3-2-1 back up solution…. so while this thing is fantastic, you will want to back up your stuff to another medium in another location — and the software in Synology makes that super simple to do.
Lastly, I also use CrashPlan Pro which is technically a business-level backup solution, but this is a business, and if you’re making money with your stuff you can write it off. The reason why I use these guys is because it allows for devices like this to be backed up without any restrictions, and it’s unlimited storage too!
Best Tripods for Podcasters: The Complete Buyer’s Guide

If you’re filming a podcast this year—whether a solo talking-head, a two-person interview, a product review show, or a mobile travel podcast—your tripod plays a massive role in how professional your content looks.
A tripod isn’t just a stand. It affects:
-
How stable your camera is
-
How sharp your video looks
-
How easy it is to frame your shots
-
Whether your setup stays consistent every episode
-
How quickly you can shoot, travel, and reset
And the right choice depends entirely on the kind of podcaster you are.
Below is the definitive, simplified guide that helps podcasters choose the perfect tripod based on their filming style, setup, and budget—without the confusion.
What Type of Podcaster Are You? (And Which Tripod You Need)
Tripods aren’t one-size-fits-all. Podcasters fall into a handful of distinct categories, and each category requires a different style of support.
Here’s how to match your tripod to your podcast.
Solo Desk Podcasters (Talking-Head at a Desk)
If you film seated at a desk, with the camera 1–3 feet away, you want something compact, stable, and height-adjustable.
Best tripod type:
Desktop Tripod
Why:
-
Perfect for eye-level framing
-
Doesn’t take up floor space
-
Simple, stable, and fast to adjust
-
Ideal for podcasters who rarely reposition the camera
Top choices:
-
Ulanzi MT-44
-
Manfrotto PIXI Evo
-
SmallRig Tabletop Tripod
Perfect for: teachers, coaches, solo YouTube podcasters, creators filming in small rooms.
Two-Person Podcasts & Interview Setups
If you podcast with a co-host or guests, you need a wider shot and more distance between the camera and set.
Best tripod type:
Full-Size Floor Tripod
Why:
-
Reaches eye level from 4–8 feet away
-
More stable than tabletop solutions
-
Great for seated or standing episodes
-
Works well in living rooms, studios, or rented spaces
Top choices:
-
Amazon Basics 60” (budget)
-
Ulanzi Zero Y
-
Manfrotto Befree Advanced
Great for: interview shows, multi-host podcasts, coaching duos.
Podcasters Who Shoot Product Reviews or Overhead Shots
If you film podcast episodes that include unboxings, tabletop demos, B-roll, or top-down overhead shots, you need more flexibility than a standard tripod offers.
Best tripod type:
Multi-Angle Center-Column Tripod
Why:
-
Lets you swing the camera out horizontally
-
Allows true overhead shots
-
Perfect for tech reviews, cooking, hand demos, or gear showcases
-
More stable than makeshift overhead rigs
Top choices:
-
Vanguard Alta Pro 2+
-
Manfrotto 055 XPRO
-
SmallRig FreeBlazer with center column
Ideal for: reviewers, educators, hybrid podcasters who mix video + podcasting.
Podcasters Who Travel or Film On Location
If you shoot in hotels, Airbnbs, events, conferences, coworking spaces, or outdoors, you need something extremely portable but strong enough to hold real cameras.
Best tripod type:
Lightweight Travel Tripod (preferably carbon fiber)
Why:
-
Packs small into backpacks
-
Lighter for travel days
-
Strong enough for mirrorless cameras
-
Fast setup and teardown
Top choices:
-
Peak Design Travel Tripod
-
Manfrotto Befree Live
-
Ulanzi Zero F/Y
Perfect for: vlog pods, journalists, digital nomads, multi-location creators.
Studio Podcasters With Permanent Setups
If your camera doesn’t move much—or you run multiple angles—you want long-term durability, repeatability, and stability.
Best tripod type:
Heavy-Duty Studio Tripod or Fluid Head
Why:
-
Ultra-stable foundation
-
Supports heavier lenses, teleprompters, and monitors
-
Smooth movement if you pan or tilt
-
Built to last for years of episodes
Top choices:
-
Manfrotto 190 / 290
-
SmallRig Heavy-Duty
-
Sachtler Ace M / flowtech 75
Great for: dedicated podcast studios, 2–4 camera setups, high-quality video pods.
Smartphone-Only Podcasters
If you’re filming on an iPhone or Android, you don’t need a full-size tripod unless you plan to upgrade your camera soon.
Best tripod type:
Mini Tripod + Phone Clamp
Why:
-
Simple
-
Affordable
-
Incredibly portable
-
Works for both horizontal and vertical content
Top choices:
-
Joby GripTight One
-
Ulanzi MT-08
-
Manfrotto PIXI (with phone clamp)
Perfect for: beginner podcasters, coaches, creators filming social-friendly podcasts.
Top Tripod Picks for Podcasters in 2026
Here are the best overall tripods across all categories.
⭐ Best Overall Tripod for Podcasters: Peak Design Travel Tripod
(Lightweight, stable, excellent for travel and studio use)
Why creators love it:
-
Packs smaller than almost anything else
-
Very sturdy for mirrorless cameras
-
ARCA-Swiss compatibility
-
Lifetime warranty
-
Works for desk, floor, and travel setups
⭐ Best Budget Tripod for Podcasters: Ulanzi MT-44
(The perfect affordable desk pod tripod)
Why it’s great:
-
Taller than most desktop tripods
-
Strong enough for phones + lightweight cameras
-
Great for beginners and small spaces
-
Under $40
⭐ Best Tripod for Two-Person Podcasts: Manfrotto Befree Advanced
Why it’s great:
-
Eye-level height
-
Quality leg locks
-
Durable + travel-friendly
-
Available with fluid head version for movement
⭐ Best Tripod for Overhead & Review Pods: Vanguard Alta Pro 2+
Why it’s great:
-
Multi-angle center column
-
Easy overhead shots
-
Great rigidity and height
-
Strong value for the price
⭐ Best Professional Studio Tripod: Sachtler Ace M / flowtech 75
Why it’s great:
-
Industry-standard broadcast stability
-
Smoothest pan/tilt in this category
-
Can handle heavy lens setups
-
Built for daily studio use
Should You Mount Your Microphone on Your Tripod? (No.)
Podcasters often ask if they can mount their main microphone on the same tripod as the camera.
The answer: Never.
Here’s why:
-
Touch the tripod → vibration → ruined audio
-
Pan the camera → vibration → ruined audio
-
Adjust height → vibration → ruined audio
Always use:
-
A boom arm (for desk setups)
-
A floor mic stand (for larger studios)
-
A C-stand (for shotgun mics)
Your tripod should be camera-only.
Tripod Buying Checklist for Podcasters
Before clicking buy, make sure your tripod checks these boxes:
Payload:
Choose a model that can handle 1.5× your camera setup’s weight.
Height:
-
Desk podcasters: 6–20 inches
-
Seated/interview podcasters: 55–65 inches
-
Standing podcasters: 65–72 inches
Material:
-
Aluminum = cheaper but heavier
-
Carbon fiber = lighter + better vibration dampening
Head type:
-
Fluid head = best for movement
-
Ball head = easiest & fastest for static framing
-
Pan-tilt = most precise
Quick Release:
Choose ARCA-Swiss for compatibility across brands.
Final Recommendations
If you’re unsure which to buy, use this simple rule:
-
Filming at a desk? → Desktop tripod
-
Filming with a co-host? → Full-size floor tripod
-
Doing product content or overhead shots? → Multi-angle tripod
-
Traveling often? → Lightweight carbon fiber travel tripod
-
Running a full studio? → Heavy-duty tripod with a fluid head
How Podcasters Can Recover a Failed Drive (Our Real-World Rescue Story)
Podcasters live and die by their recordings. Losing raw interviews, DAW session files, or a full season of edited episodes can set you back weeks — or permanently erase irreplaceable content.
We learned this the hard way. An older transfer drive of ours failed with live data on it, and the backup copy turned out to be corrupted. The drive would still mount, but transfers slowed to a crawl and eventually it would drop off mid-copy. Normal methods just didn’t work.
Thankfully, with the help of GNU ddrescue and some patience, we got everything back. This post shares that recovery process, the requirements for attempting it, and what podcasters should do to avoid being in this situation at all.
1. Recognizing the Signs of Drive Trouble
Our drive didn’t make the dreaded “click of death.” It mounted normally, and the file tree looked fine. But:
-
Transfers slowed to near-zero.
-
The drive would disconnect mid-copy.
-
A “backup” we tried to fall back on turned out to be unreadable.
👉 Takeaway: Even a drive that looks fine can be failing. If you see extreme slowdowns, failed copies, or unmounting — stop using it immediately.
2. What We Did First (and What You Shouldn’t Do)
-
We didn’t run Disk Utility First Aid (Mac) or chkdsk (Windows). These can write changes that make recovery harder.
-
We didn’t reformat or initialize the drive.
-
Instead, we disconnected it and researched recovery methods that don’t write anything back to the failing drive.
3. The Recovery Process That Worked
Here’s how we saved our podcast files:
-
Cloned the failing partition with ddrescue → created a sector-by-sector
.imgfile. It took days to accomplish this. Be prepared! -
Used a map file → ddrescue kept track of good vs. bad areas, so we could pause/resume without losing progress.
-
Wrote the image back to a healthy drive → this gave us a clean copy of the original.
-
Mounted the image → from there, we copied files normally at full speed.
Result: 100% of our data recovered. Thankfully, we took note of the file sizes before the transfer, so we knew exactly how much data was on the drive. Once we finished with ddrescue, we were able to verify the file sizes.
4. Our Rescue Script
This is the script we used.
What it does:
-
Reads from the failing partition (
/dev/disk2s2in this example). -
Clones it into an image (
drive.img). -
Uses a map file (
drive.map) to track progress and retries.
⚠️ You must change DISK_NUM, SLICE, and file paths for your system.
5. Requirements (Besides a Healthy New Drive)
If a podcaster wanted to try this approach, here’s what they’d need:
-
Computer: macOS or Linux with Terminal access.
-
GNU ddrescue installed:
-
macOS →
brew install ddrescue -
Ubuntu/Debian →
sudo apt install gddrescue
-
-
Enough free space → as large as the entire partition (e.g., 1.5TB partition = 1.5TB free space). If you need a reliable storage solution, consider our recommended multi-use, multi-drive NAS.
-
Correct partition identification → run
diskutil list(macOS) orlsblk(Linux). -
Sudo privileges → raw disk access requires admin rights.
-
Time & patience → recovery can take hours or days.
Optional but helpful: a good USB/SATA dock, smartctl for health checks, and a UPS to avoid power cuts mid-run.
6. When This Works (and When It Doesn’t)
This method is best if:
-
The drive still spins and mounts.
-
File copies fail, but the partition is visible.
-
You need everything cloned, not just a few cherry-picked files.
It won’t help if:
-
The drive is clicking, grinding, or not recognized at all.
-
The electronics are dead.
-
The data is on an encrypted partition without the password.
Those cases require professional clean-room recovery.
7. The Lessons We Learned
-
A drive can “look fine” but still be in serious trouble.
-
Standard copy methods often choke on bad sectors.
-
ddrescue’s mapfile-based approach was the key to full recovery.
-
A bad backup is as bad as no backup — test them regularly.
-
The only real protection is redundancy (3-2-1 backup rule), which is why we recommend a multi-drive setup for redundancy.
Conclusion: Recovery vs. Prevention
Recovering our failed transfer drive with ddrescue was a relief, but it also showed how fragile podcast production workflows can be. If you’re a podcaster, think of recovery as your last resort — and backups as your insurance policy.
Because when you’re in the middle of a season, the last thing you want is to be Googling “how to rescue a failed drive” at 2 a.m.
DJI Mic 3 vs DJI Mic 2: A Real-World Comparison for Podcasters
When you’re producing a podcast, audio quality isn’t just “nice to have”—it’s your brand. Listeners forgive a lot, but muffled voices, clipping, or dropouts will send them looking for another show. That’s why wireless microphone systems like DJI’s Mic series have become a go-to choice for podcasters who want professional results without a complex studio setup.
With the launch of the DJI Mic 3 in August 2025, creators are asking: how does it stack up against the already-excellent Mic 2? After reviewing multiple hands-on tests and real-world usage reports, here’s what podcasters need to know.
Audio Quality: Subtle but Meaningful Upgrades
Both the Mic 2 and Mic 3 capture pristine 24-bit/48kHz and 32-bit float audio. But the Mic 3 introduces a few features that podcasters will notice in editing and production:
-
Adaptive Gain Control (AGC): The Mic 3 automatically balances levels to avoid clipping when guests suddenly raise their voice—a common headache in interview shows.
-
Voice Tone Presets: Choose “warm” for a radio-style low end or “bright” for crisp detail. Podcasters who want less post-production tweaking will appreciate this.
-
Dual-Stage Noise Cancellation: Instead of a simple on/off switch, the Mic 3 lets you pick between Basic and Advanced ANC, making it easier to tame room noise without sacrificing clarity.
For podcasters recording in imperfect environments (coffee shops, home offices, convention floors), these upgrades make the Mic 3 a safer bet.
Design & Ease of Use
Podcasters juggle gear, guests, and scheduling. A mic system that just works is worth its weight in gold.
-
Smaller, lighter transmitters (16 g vs 28 g): Less visible on camera and more comfortable for long interviews.
-
Magnetic clips with rotatable design: Lets you aim the capsule directly toward your mouth, improving vocal pickup.
-
Redesigned charging case: Finally, the furry windshields and cables fit inside. No more forgetting wind muffs at home.
Trade-off: The Mic 3 removed the 3.5 mm input jack for lavalier mics. If you rely on plugging in an external lav, the Mic 2 may still have an edge.
Battery Life & Reliability
Nothing kills a podcast faster than a dead battery mid-recording. Here, the Mic 3 shines:
-
Battery Life: ~8 hours per transmitter, ~10 hours per receiver, and up to 28 hours total with the charging case (vs 18 hours total for the Mic 2). That’s an extra 10 hours of confidence on remote days.
-
Wireless Range: 400 m line-of-sight compared to 250 m on the Mic 2. You won’t need that much range in a podcast studio, but in event coverage or outdoor interviews, it means fewer dropouts.
Storage & On-Board Recording
Backups are non-negotiable in podcasting. The Mic 3 quadruples onboard memory:
-
32 GB per transmitter (vs 8 GB on the Mic 2).
-
Dual-File Recording: Save both a processed and raw safety track.
That means you’ll have peace of mind knowing your podcast episode won’t be lost to interference or a recorder glitch.
Compatibility & Workflow Features
Podcasters are increasingly recording across platforms: video podcasts, livestreams, or hybrid events.
-
Multi-Device Support: Works with cameras, phones, laptops, and even streams directly via Bluetooth.
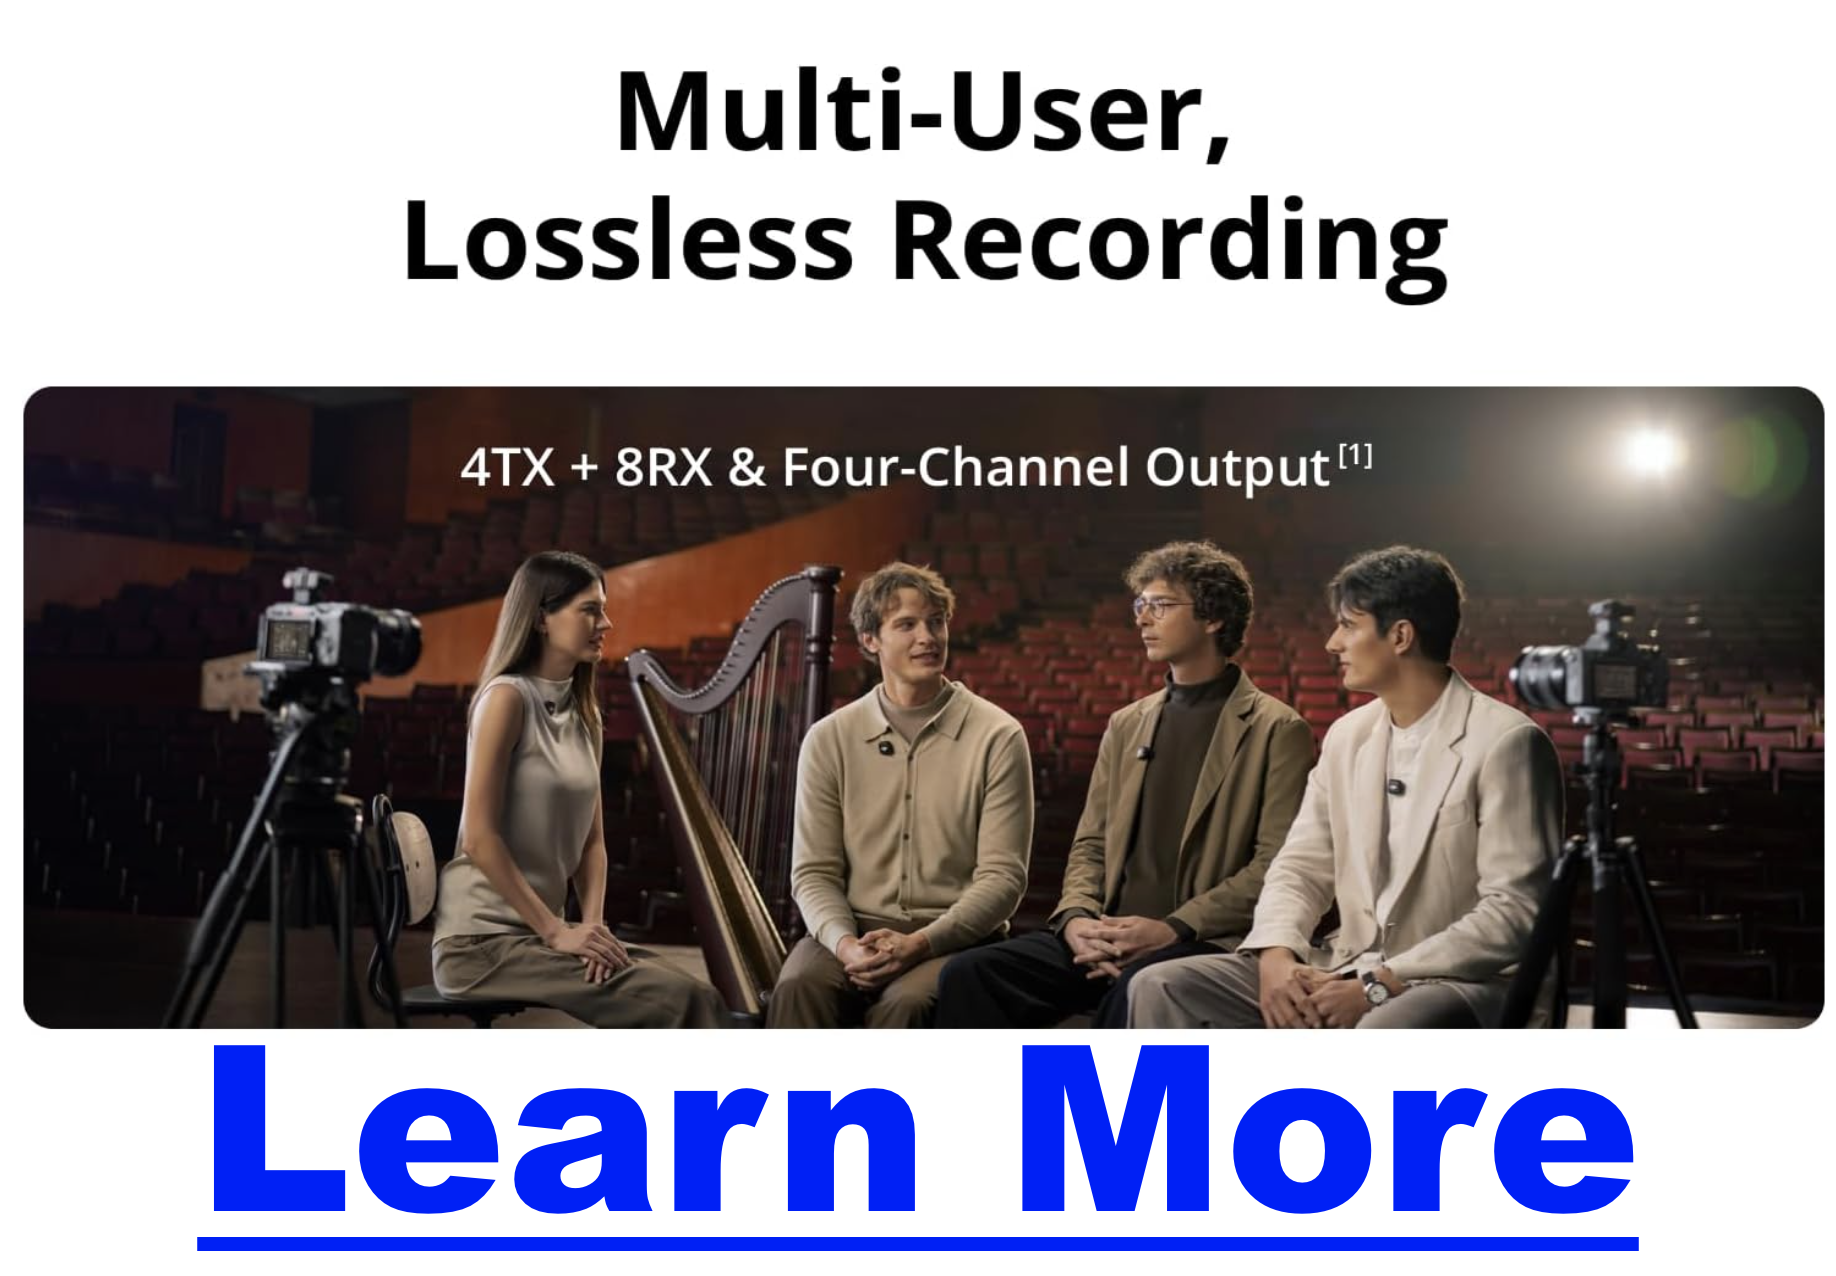
-
Timecode & Multi-Channel Support: Up to 4 transmitters and 8 receivers with built-in sync—a huge advantage for panel shows or multi-guest formats.
-
DJI Ecosystem Integration: If you already use DJI cameras (like the Osmo Action 5 Pro), the Mic 3 slots right in.
Quick Comparison: Mic 3 vs Mic 2
| Feature | DJI Mic 3 | DJI Mic 2 |
|---|---|---|
| Weight (TX) | 16 g | 28 g |
| Noise Cancelling | 2 levels (Basic/Advanced) | Single level |
| Voice Presets | 3 tone presets | None |
| Adaptive Gain Control | Yes (auto & dynamic) | Basic limiting |
| On-board Storage | 32 GB | 8 GB |
| Battery Life (total w/ case) | ~28 h | ~18 h |
| Wireless Range | ~400 m | ~250 m |
| Multi-Channel | Up to 4 TX / 8 RX | 2 TX / 1 RX |
| Charging Case | Fits mics + windscreens | Windscreens don’t fit |
Which One Should Podcasters Buy?
-
Choose the Mic 3 if: you want the best possible all-in-one system for podcasting, especially if you record outside a studio or need backups, long battery life, and advanced noise handling.
-
Choose the Mic 2 if: you need an analog lavalier input or want to save some money while still getting excellent audio quality.
For most podcasters, the Mic 3 is the safer long-term investment. It combines reliability, flexibility, and audio enhancements that reduce post-production work—a critical factor when you’re publishing episodes on a tight schedule.
Final Thoughts
Podcasters don’t need more complexity—they need tools that make recording easier and audio more reliable. DJI’s Mic 3 delivers that in spades. While the Mic 2 remains a solid option, especially for lav mic users, the Mic 3’s improvements in battery life, noise control, onboard recording, and ergonomics make it the standout choice for most creators.
In real-world use, the Mic 3 feels like the system that podcasters asked for: compact, dependable, and tuned for modern content creation.
11 Best Podcasting Books That Will Instantly Level Up Your Show (Organized by What You Want to Learn)
Podcasters are everywhere these days — but only a fraction of shows ever stand out. Why? Because great podcasting takes more than just hitting record. You need to master storytelling, sharpen your interview skills, grow an audience, and yes, even learn how to monetize your hard work.
The problem? Most lists of “best podcast books” are just random dumps. This one is different. I’ve organized the best podcasting books by what you want to learn, so you can grab the resource that actually solves your biggest challenge right now.
What Podcasters Usually Need to Learn
- Fundamentals — how to start, what gear you need, and how distribution works.
- Technical & Production — improving sound quality, editing, and workflows.
- Storytelling — creating episodes that people can’t stop listening to.
- Interviewing — asking better questions and connecting with guests.
- Growth & Marketing — attracting and keeping listeners.
- Monetization — turning your podcast into a revenue stream.
- Creative Confidence — developing your voice, presence, and style.
Best Books for Each Learning Goal
🎙️ Fundamentals of Podcasting
- Podcast Launch (John Lee Dumas) — A step-by-step beginner’s guide from one of podcasting’s most recognized names.
- Podcasting for Dummies (Evo Terra, et al.) — Accessible, broad coverage of everything you need to start.
🛠️ Technical & Production Skills
- Sound Reporting (Jonathan Kern) — NPR’s guide to audio journalism and production. A must for anyone serious about professional sound.
- Podcast Solutions (Michael Geoghegan & Dan Klass) — Hands-on workflows and setups to simplify the tech.
🎧 Storytelling & Content Creation
- Out on the Wire (Jessica Abel) — Learn storytelling secrets from Ira Glass and other audio legends.
- Make Noise (Eric Nuzum) — Find your creative voice and craft shows that connect deeply.
- Reality Radio (John Biewen, ed.) — Essays from veteran audio storytellers who shaped the medium.
🗣️ Interviewing
- The Art of the Interview (Lawrence Grobel) — Classic strategies for building trust and drawing out meaningful stories.
- Sound Reporting — Includes practical interviewing insights for journalists and podcasters alike.
📢 Growth & Marketing
- The Audience Is Listening (Tom Webster) — Research-backed strategies for finding and keeping listeners.
- Earn It (Steve Pratt) — Bold, creative approaches to marketing your podcast.
💵 Monetization
- Profit from Your Podcast (Dave Jackson) — Practical monetization tips from one of podcasting’s earliest educators.
- Podcasting for Promotion, Positioning & Profit (Kris Gilbertson) — A more entrepreneurial spin on how to leverage a podcast into authority and income.
🎭 Creative Voice & Confidence
- Permission to Speak (Samara Bay) — Helps you unlock authenticity and power behind the mic.
- Make Noise (Eric Nuzum) — Not just storytelling, but the courage to create your own lane.
Quick Comparison Table
| Topic | Best Books | Why Read Them |
|---|---|---|
| Starting Out | Podcast Launch, Podcasting for Dummies | Clear, structured foundations |
| Sound & Production | Sound Reporting, Podcast Solutions | Learn to sound professional |
| Storytelling | Out on the Wire, Make Noise | Build stronger narratives |
| Interviewing | The Art of the Interview | Master guest conversations |
| Growth | The Audience Is Listening, Earn It | Attract and keep listeners |
| Monetization | Profit from Your Podcast | Turn episodes into income |
| Voice & Confidence | Permission to Speak | Sound authentic and powerful |
How to Choose the Right Book for You
- If you’re brand new: Start with Podcast Launch or Podcasting for Dummies.
- If your audio sounds rough: Dive into Sound Reporting and Podcast Solutions.
- If you want to hook listeners: Out on the Wire and Make Noise are non-negotiable.
- If your format is interviews: The Art of the Interview will transform your approach.
- If you’re stuck on growth: Go with The Audience Is Listening or Earn It.
- If you’re ready to monetize: Grab Profit from Your Podcast.
Remember: don’t just read these — apply them episode by episode. Podcasting is a craft you build over time.
Conclusion
The difference between a podcast that fades out and one that builds a loyal audience often comes down to learning faster and applying smarter. These books give you direct access to the wisdom of podcasting pros who’ve already figured it out.
👉 Pick the book that matches your current challenge and put it into practice this week. You’ll be amazed how quickly your podcast levels up.
If you want even more guidance, check out my free resource: How to Make Money With a Podcast — video training that takes you beyond learning and into earning.
How to Record a Podcast Remotely (High Quality Guide)
How to Record a Podcast Remotely (High Quality Guide)
Click For Our Favorite Remote Podcast Recording Software
Recording a podcast with a remote guest doesn’t mean you have to sacrifice audio quality. If you have ever listened to a show where the guest sounds “robotic” or “underwater,” it’s likely because they were recording over a standard connection like Skype or Zoom.
The video above demonstrates how to solve this using StreamYard, my preferred remote podcasting software. It uses a technique called “local recording.”
Why local recording matters: Instead of recording the audio after it travels over the internet (where it gets compressed), software like StreamYard records the audio directly on your guest’s computer. It then automatically uploads the high-quality file to the cloud. This means even if your internet glitches during the call, your final recording sounds like you were in the same room.
It makes it insanely simple to record at the highest quality. Plus, because it automatically hands the files to the host, there’s no waiting for the remote person to process or upload the files — if you’ve ever chased someone for files, then you know what I mean! Check it out here.
1. What You Need Before Recording Remotely
Before you invite a guest, ensure you have the hardware basics covered to prevent common issues like echo and audio drift.
- Stable Internet Connection — A wired ethernet connection is best for stability, but strong Wi-Fi works if you are close to the router.
- Headphones for Everyone — Mandatory. If your guest doesn’t wear headphones, their microphone will pick up your voice coming out of their speakers, creating a nasty echo that is hard to fix.
- External Microphones — USB mics like the ATR2100x or XLR setups sound significantly better than laptop built-in mics. Explore mic options here.
- Quiet Recording Space — Avoid kitchens or tiled rooms. Carpeted rooms with soft surfaces (like a bedroom or closet) are ideal for dampening sound.
Want an all-in-one setup? Check out podcast equipment bundles.
2. Best Remote Podcast Recording Software (2025 Comparison)
When choosing software, look for “Double-Ender” tools that support:
- Local recording: Records to each participant’s device independently.
- Separate audio tracks: Essential for editing; allows you to cut a guest’s cough without deleting your own question.
- Ease of guest access: No complex downloads or accounts for them to manage.
Here’s a quick comparison of the top players:
| Platform | Local Recording | Video Support | Separate Tracks | Live Streaming |
|---|---|---|---|---|
| Riverside.fm | ✅ | 4K | ✅ | ✅ |
| StreamYard | ✅ | 4K | ✅ | ✅ |
| SquadCast | ✅ | 1080p | ✅ | 🚫 |
| Zencastr | ✅ | 1080p | ✅ | ✅ |
| Zoom | 🚫 | 720p | 🚫 | ✅ |
Need help choosing? See this full comparison guide.
Best All-in-One Choice: StreamYard
3. Setting Up Your Remote Recording Session
Here’s how to prep for a clean, hiccup-free session:
- Do a “Tech Check” 5 minutes early — Check internet speed, latency, and ensure the correct microphone is selected in the settings (browsers often default to the webcam mic!).
- Control the Environment — Turn off noisy appliances, fans, and silence phone notifications.
- Record Backups — Tech fails. Have each person record their own audio locally using QuickTime or Voice Memos as a “just in case” safety net.
- Monitor Audio — Watch the wav forms on screen. If you see a flat line, stop and fix it immediately.
Learn more about mic positioning and gain control.
4. Audio Best Practices for Remote Guests
Your guest likely isn’t an audio engineer. Send them these quick tips:
- Mic Technique: “Stay close to the mic—about one fist width (3–6 inches) away.”
- Plosives: “Angle the microphone slightly to the side of your mouth to avoid popping sounds on P’s and B’s.”
- Headphones: “Please wear wired headphones. Bluetooth headsets often lower the audio quality to save battery.”
If you hear echo during the call, here’s how to fix it.
5. Editing & Post-Production Tips
Remote files can sometimes drift out of sync or have different volume levels. Here is how to polish them:
- Loudness Normalization: Use tools like Auphonic to ensure both you and your guest are at the same volume (usually -16 LUFS for stereo).
- Drift Correction: If your guest’s audio slowly de-syncs from yours, you may need to stretch/shrink the track slightly in your editor. Dedicated software like Riverside/StreamYard handles this automatically.
- Silence Removal: Remove awkward pauses or lag caused by internet latency. Here’s how.
Want software picks? Check out this roundup.
6. Going Beyond Audio: Video Podcasting Tips
If you’re also recording video for YouTube or Spotify:
- Camera: Use a quality webcam or DSLR (see our picks).
- Lighting: Face a window or use a soft light. Never have a bright window behind you, or you will look like a silhouette.
- Eye Contact: Look at the camera lens, not at the screen, to simulate eye contact with the viewer.
Final Checklist Before You Hit Record
Make sure every episode starts strong:
- ✅ All participants have headphones plugged in
- ✅ Correct microphone input selected in settings
- ✅ Notifications/Do Not Disturb turned on
- ✅ Backup recorders are running
- ✅ Water is nearby (no dry throats!)
Conclusion
Remote podcasting doesn’t need to sound remote. With the right software, solid prep, and a few pro tips, you can record studio-quality shows from anywhere.
Recommended next steps:
- Try StreamYard or Riverside.fm for pro-level results. If you’re curious about StreamYard’s pricing click here.
- Browse the full Podcast Equipment Guide to level up your setup.
FAQs
Can I record a podcast remotely for free?
Yes! Free options like Zoom or QuickTime exist, but audio quality is often compressed and tracks are mixed together. For professional results, a dedicated tool is recommended.
How do I record remote guests with separate tracks?
Use StreamYard, Riverside, Zencastr, or SquadCast. These platforms record each person’s audio independently, allowing for cleaner editing.
What if my guest has bad internet?
Choose a tool that supports local recording (like StreamYard). The recording happens on their computer, so even if the internet drops, the file remains high quality.
What’s the best mic for remote podcasting?
A dynamic USB mic like the ATR2100x or the Shure MV7 is a solid starting point because they reject background noise better than condenser mics.
The Podcast Videographer’s Guide to Long-Term Project Archiving
For podcast videographers and content creators, the journey doesn’t end when you hit export. Archiving your project properly ensures that your work remains protected, accessible, and usable for years to come. Whether you’re working solo or managing a large production studio, this guide walks you through the best long-term storage options, comparing cost, reliability, and usability—plus, it gives you actionable workflows tailored to your needs.
🧠 Start Here: The 3-2-1 Video Backup Strategy
Before we talk hardware or cloud providers, you need a rock-solid backup philosophy. Enter the 3-2-1 backup rule—an industry-standard approach popularized by photographer Peter Krogh.
Here’s the breakdown:
-
3 copies of your data
Your original file + two separate backups. -
2 different types of storage media
Example: a hard drive and a cloud service, to reduce risk from hardware-specific failures. -
1 off-site backup
This protects your data from local disasters like fire, flood, or theft.
A modern take for video professionals might look like:
-
Copy 1 (Active Work): Your fast SSD or NAS for editing.
-
Copy 2 (Local Backup): An external hard drive or second NAS, preferably stored in a different building.
-
Copy 3 (Off-Site): Cloud storage (like Backblaze, Crashplan Pro) or an LTO tape stored at a remote location.
💾 Compare Your Options: Storage Types Breakdown
Here’s how the most common storage solutions stack up:
| Feature | Cloud Storage | NAS (Network Attached Storage) | Physical Media (LTO / HDD) |
|---|---|---|---|
| Best For | Off-site backups, easy access, team sharing | Active projects, collaboration | Deep archival, cold storage |
| Initial Cost | Low to none | Moderate to high | High (especially LTO systems) |
| Recurring Cost | Subscription + possible egress fees | Electricity + maintenance | None (except tape cost) |
| Accessibility | Anywhere with internet | Fast local, slower remote | Requires hardware access |
| Data Integrity | High (managed) | High (RAID, scrubbing) | Extremely high (30+ year lifespan) |
| Security | Network-dependent | Full control, can be air-gapped | Fully air-gapped, immune to cyber threats |
☁️ Option 1: Cloud Backup Services (Simple, Set-and-Forget)
These are designed for ease of use and automated protection, not daily collaboration or asset delivery. Ideal for archiving projects once they’re complete.
🔹 Backblaze Personal Backup
-
Use Case: Personal computers, photographers, solo editors
-
Cost: ~$9/month per computer (unlimited storage)
-
Pros:
-
Truly unlimited storage
-
Auto-backups of external drives
-
Easy restore via web or shipped hard drive
-
-
Cons:
-
Can’t backup NAS devices
-
Limited control over folder-level retention
-
🔹 CrashPlan Pro / Small Business
-
Use Case: Solo creators or small studios
-
Cost: ~$10/month per device (unlimited)
-
Pros:
-
Business-grade security and versioning
-
Works on Windows, Mac, Linux
-
-
Cons:
-
Not ideal for high-speed restoration of huge files
-
Less common in video workflows compared to Backblaze
-
🔹 iDrive / Acronis / Carbonite
-
Similar to the above: All-in-one backup services with interfaces that prioritize simplicity over deep configurability.
-
Good for off-site copies but less ideal for direct archive access or media pipelines.
✅ Best For:
Automated off-site backups with minimal setup.
💾 2. Cloud Object Storage (Advanced, Pay-as-You-Go)
These are enterprise-grade platforms built for developers, media professionals, and IT teams who want granular control over their storage architecture. They offer:
-
APIs for automation
-
Scalability into petabytes
-
Different storage tiers (standard vs archive)
-
Fine-grained pricing (storage, egress, PUT/GET requests)
🔹 Amazon S3 (Simple Storage Service)
-
Use Case: High-reliability storage for web delivery, archiving, or backup
-
Cost:
-
~$0.023/GB/month (Standard)
-
~$0.004/GB/month (Glacier Deep Archive)
-
Egress fees: ~$0.09/GB out
-
Requests: Charged per API call (can add up)
-
-
Pros:
-
Battle-tested infrastructure
-
Lifecycle policies (automatically move files to archive)
-
Integrates with AWS ecosystem
-
-
Cons:
-
Confusing pricing
-
Costly if you need frequent access or restores
-
Requires knowledge of buckets, policies, IAM roles
-
🔹 Backblaze B2 Cloud Storage
-
Use Case: Budget-friendly alternative to Amazon S3
-
Cost:
-
~$0.005/GB/month (storage)
-
$0.01/GB (download)
-
Minimal API call charges
-
-
Pros:
-
Clear pricing
-
Compatible with many S3 tools
-
Excellent for archive-style use cases
-
-
Cons:
-
Slower feature rollout compared to AWS
-
Not optimized for hot storage or web delivery at scale
-
🔹 Wasabi Hot Cloud Storage
-
Use Case: Low-cost S3-compatible storage with no egress fees
-
Cost:
-
~$5.99/TB/month
-
No egress or API call fees
-
-
Pros:
-
Flat-rate pricing (no surprises)
-
S3-compatible
-
Good for video archival and access
-
-
Cons:
-
90-day minimum storage duration
-
Occasional lag in feature parity with AWS
-
🔹 Google Cloud Storage
-
Use Case: Media storage with advanced access control and global redundancy
-
Cost:
-
~$0.02/GB/month (Standard)
-
~$0.004/GB/month (Coldline/Archive)
-
Egress and request costs similar to AWS
-
-
Pros:
-
Powerful analytics and ML integration
-
Globally distributed
-
-
Cons:
-
Complicated billing
-
Egress can kill your budget if misconfigured
-
🔹 Microsoft Azure Blob Storage
-
Similar use cases to Amazon S3 and Google Cloud.
-
Offers Archive tier (
$0.00099/GB) and Hot tier ($0.018/GB) -
Complex lifecycle management but enterprise-grade features.
🧠 TL;DR – Which Should You Use?
| Use Case | Recommended Option |
|---|---|
| Automated, no-fuss backup of computers | Backblaze or CrashPlan Pro |
| Cost-effective cloud archive with some tech comfort | Backblaze B2 or Wasabi |
| Max control, scalability, and automation | Amazon S3 or Google Cloud Storage |
| Deepest archive with lowest cost per TB | Amazon Glacier Deep Archive or Azure Archive |
💡 Bonus Tip: Mixing Storage Tiers
If you’re using something like S3 or Google Cloud, you can configure lifecycle policies to automatically move old video files to cheaper archive tiers after X days:
-
0–30 days: Hot/Standard (for frequent access)
-
30–90 days: Nearline
-
90+ days: Archive / Glacier
This ensures you only pay premium rates for the files you’re actively using.
💾 Option 2: Network Attached Storage (NAS)
A NAS is your local file powerhouse, ideal for ongoing projects and team access.
Pros:
-
Fast Local Access – Edit straight from the NAS.
-
Redundancy – RAID protects from drive failure.
-
Control – You own your storage environment.
Cons:
-
Cost – Initial setup can be pricey.
-
Upkeep – You’ll need to handle security, drive replacements, etc.
Popular Picks:
-
Synology DS923+ or DS1522+
-
QNAP TVS-h674 for high-end 10GbE performance
📼 Option 3: LTO Tape Storage
The gold standard in Hollywood. LTO is unmatched for ultra-long-term archiving.
Pros:
-
Archival Lifespan – 30+ years is standard.
-
Low Cost per TB – Perfect for massive libraries.
-
Offline Protection – Immune to ransomware.
Cons:
-
Expensive Hardware – LTO drives start around $4,000.
-
Slower Access – Tapes are sequential, not random-access.
-
Tech Lock-In – New LTO drives may not support old tape formats.
🛠 Recommended Workflows
🧑💻 For Solo Creators / Small Studios
-
Working Files: Fast SSD or 4-bay NAS
-
Local Backup: External HDD
-
Off-Site: Backblaze B2 or Wasabi for peace-of-mind cloud storage
🏢 For Production Studios / Large Teams
-
Active Projects: High-speed NAS with RAID and 10GbE
-
Recent Projects: Slower NAS or high-capacity external drive
-
Long-Term Archive: LTO system with 2 copies – one on-site, one stored off-site
🔐 Final Thoughts: Protect Your Legacy
Archiving isn’t just about saving space—it’s about preserving your creative legacy. With the right mix of speed, redundancy, and cost-efficiency, your content will remain safe and accessible long after the final cut.
Live Streaming for Podcasters: The Best Platforms to Grow Your Audience & Engage Live
Podcasting is no longer limited to audio-only content released once a week. Not only that, but in 2025, more creators are using video and live streaming to connect with listeners in real time, to expand their reach, and create repurposable content across multiple platforms.
Whether you want to interact with your audience mid-show, broadcast a behind-the-scenes look at your recording process, or simulcast to YouTube, Facebook, and LinkedIn all at once — the right live streaming platform can help you do it with ease.
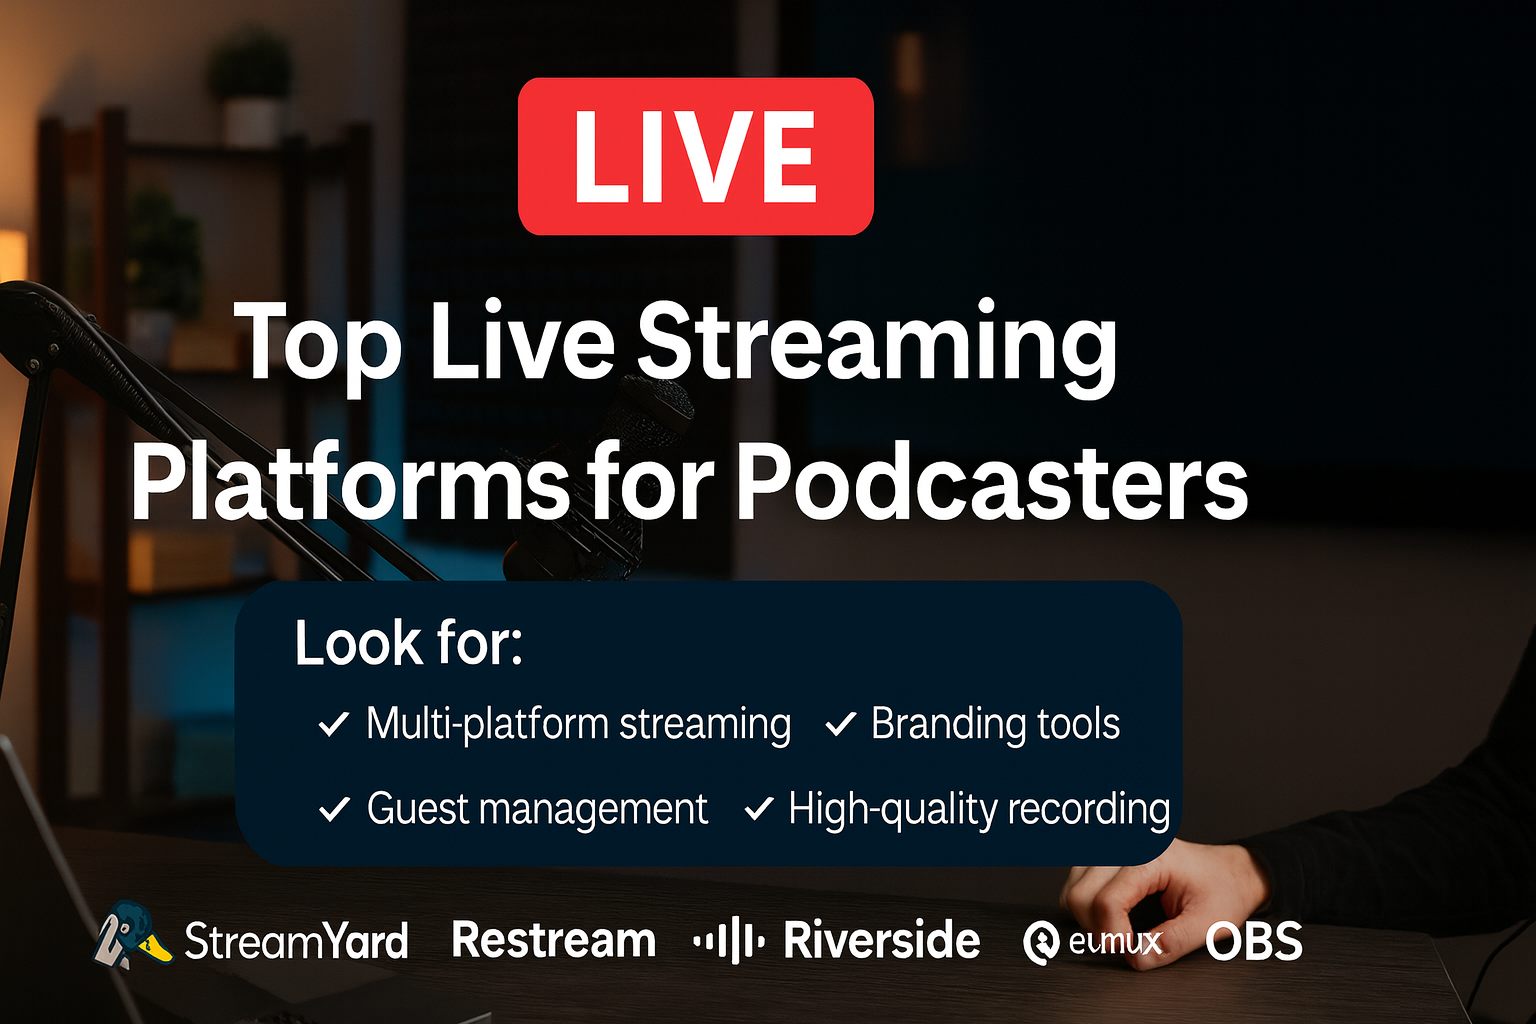
In this guide, we’ll explore why live streaming matters for podcasters, what features to look for, and review the top live streaming platforms — from beginner-friendly options like StreamYard to advanced tools like OBS.
Why Podcasters Should Consider Live Streaming
Live streaming offers unique advantages over traditional podcast production:
- Immediate audience feedback – See what resonates with your audience as it happens.
- Multistreaming reach – Broadcast to multiple platforms simultaneously for maximum visibility.
- Content repurposing – Turn a single live broadcast into an edited podcast episode, YouTube highlights, and social clips.
- Monetization opportunities – Enable tips, super chats, memberships, or even ticketed live events. Live streamed events also work as a fantastic way to bring in new audience members, who might be interested in behind the scenes, bonus content.
- Community building – Live interaction helps deepen listener loyalty and engagement.
Key Features to Look for in a Live Streaming Platform
Before you choose a tool, consider:
- Multi-platform streaming (YouTube, Facebook, LinkedIn, Twitch, etc.) – Where is your audience, and what is the best way to connect with them. It may be YouTube, Facebook, IG, TikTok, or all the above.
- Guest management (number of guests, ease of joining, backstage areas, moderation)
- Branding & customization (logos, overlays, backgrounds, custom layouts)
- Audience engagement (chat integration, polls, Q&A, on-screen comments)
- Recording quality (1080p+, separate audio/video tracks)
- Ease of use (learning curve, tech requirements)
- Pricing & free trial options
- Integrations (podcast hosts, editing software, CRM tools, monetization platforms)
The Top Live Streaming Platforms for Podcasters
1. StreamYard – Best for Beginners Who Want Ease & Reliability
Why podcasters love it: StreamYard is entirely browser-based and incredibly easy to use. Invite guests with a simple link, brand your stream with overlays and backgrounds, and stream to multiple destinations without technical headaches. This is a one-stop shop in a lot of ways because it bakes commonly needed tools right into the tool. For instance, it will record separate tracks, video files for optimum quality. It can also do transcriptions on the fly, and can reduce the amount of extra tools needed to get a podcast out.
- Strengths: Simple interface, up to 10 guests, unified chat, solid branding.
- Weaknesses: No built-in polls/Q&A, higher starting price than some competitors. We have Streamyard pricing here.
- Best for: Podcasters who want a plug-and-play streaming experience.
2. Restream – Best for Broad Audience Reach
Why podcasters love it: Restream supports streaming to 30+ platforms at once, plus unified chat from all destinations. It’s a powerhouse for reach and engagement.
- Strengths: Massive platform compatibility, unified chat, branding profiles, engagement tools.
- Weaknesses: Slightly more complex interface, prerecorded clip length limits on lower plans.
- Best for: Creators who want to stream everywhere at once and manage all chats in one place.
3. Riverside.fm – Best for High-Quality Recording & Post-Production
Why podcasters love it: Riverside records each guest locally in up to 4K video and lossless audio, ensuring top-tier quality for post-production while also streaming live.
- Strengths: Pristine local recording, integrated editing tools, audience call-ins.
- Weaknesses: More expensive for high recording hours, branding tools still maturing.
- Best for: Professional podcasters who want broadcast-quality source material.
4. Streamlabs Talk Studio (Melon) – Best Budget-Friendly Option
Why podcasters love it: Melon offers a StreamYard-like experience at a lower cost, with solid branding features and integration into the Streamlabs ecosystem (including donation alerts).
- Strengths: Affordable, up to 25 participants, built-in monetization alerts.
- Weaknesses: No separate audio tracks, fewer overlay themes.
- Best for: Podcasters on a budget who still want multi-streaming and branding.
5. EvMux – Best for Customization & Advanced Layouts
Why podcasters love it: EvMux gives you OBS-level layout control in the browser, letting you create multiple scenes and switch between them mid-show.
- Strengths: Full layout customization, scene transitions, split-track audio on Pro plan.
- Weaknesses: Higher learning curve, newer platform with evolving features.
- Best for: Tech-savvy podcasters who want a unique, TV-style live production.
6. Crowdcast – Best for Interactive, Community-Driven Shows
Why podcasters love it: Crowdcast is built for webinars and live events, with Q&A upvoting, polls, and attendee management built in.
- Strengths: Excellent audience interaction tools, event registration, private streaming options.
- Weaknesses: Higher price, limited multi-destination options on lower tiers.
- Best for: Podcasters who run interactive shows, workshops, or ticketed live events.
7. OBS Studio – Best Free, Advanced Option for Complete Control
Why podcasters love it: OBS (Open Broadcaster Software) is a free, open-source tool for streaming and recording. It offers complete flexibility in scene design, multi-camera setups, and advanced audio routing.
- Strengths: 100% free, unlimited customization, integrates with any platform via RTMP (most notably YouTube Live).
- Weaknesses: Steep learning curve, manual setup for guests (needs plugins like VDO.Ninja for remote interviews).
- Best for: Experienced podcasters or those willing to learn who want full creative and technical control without recurring software costs.
Quick Comparison Table
| Platform | Best For | Price Range | Max Guests | Multi-Stream | Recording Quality |
|---|---|---|---|---|---|
| StreamYard | Beginners, ease of use | Free – $89/mo | 10 | Yes | Up to 4K local |
| Restream | Maximum reach | Free – $39/mo+ | 10 | Yes (30+ platforms) | 1080p cloud, split-track |
| Riverside.fm | High-quality recording | Free – $29/mo+ | 9 guests + host | Yes | 4K local multi-track |
| Melon | Budget-friendly streaming | Free – $15/mo | 25 | Yes | 1080p mixed |
| EvMux | Custom layouts | Free – $49/mo | 12 | Yes | 1080p, split-track |
| Crowdcast | Interactive events | $34 – $136/mo | 4 presenters | Limited | 1080p mixed |
| OBS Studio | Complete control, free | Free | Unlimited (manual setup) | Yes (via RTMP) | Depends on settings (4K possible) |
How to Choose the Right Platform for Your Podcast
Ask yourself:
- Do I value ease of use or advanced control?
- Is multi-streaming reach or recording quality my bigger priority?
- Will my live shows be interactive events or broadcast-style episodes?
- What’s my budget for live streaming tools?
Our best advice: See which platforms have a free trial and give them a chance. The best thing you can do is make a private example episode of your podcast and see how everything works / doesn’t work – and to flesh out any workflow issues that may arise. For instance, you might realize you don’t like the chat interface of a specific platform because you can’t remove bad-faith users then decide if that’s okay with you or if it’s a deal breaker.
Tips for a Successful Live Podcast
- Promote your live event early via email and social media – a mailing list is a fantastic way to get people to come check out the livestream. This is especially true if the livestream is the same time every week, or on some kind of schedule because people will naturally check it out without needing an email blast to remember. But having the shoutout on social media is great too!
- Test your tech (mic, camera, internet) before going live.
- Use branding elements (logo, overlays) for a professional look.
- Actively engage with the chat and address viewers by name.
- Record at the highest possible quality for future editing and repurposing.
- Know that there will be bugs and that it’s part of the process. All you can do is try to fix it, and try to prevent issues for the next one.
Conclusion
Live streaming can transform a podcast from a one-way conversation into a real-time, interactive experience. It is also a fantastic way to grow your audience with new people, and a great way to keep a content schedule too. Whether you want the plug-and-play simplicity of StreamYard, the far-reaching power of Restream, the production quality of Riverside, or the complete control of OBS — there’s a platform to fit your needs.
Start with the one that matches your current skill level and goals, then expand your toolkit as your live streaming game grows. Hope this helps.
Best Free Podcast Hosting Platforms for Beginners
Want to launch a podcast without spending a dime? You can — but “free podcast hosting” comes with tradeoffs that can quietly box you in later.
In 2026, several podcast hosting platforms still offer ongoing free plans (not trials) that let you publish episodes, generate an RSS feed, and distribute to Apple Podcasts, Spotify, and the other big directories. The real difference is what happens after you publish a few episodes: storage caps, episode limits, monetization eligibility, and whether you can safely move your show later without headaches.
This guide compares the best free podcast hosting platforms for beginners based on:
- Storage and upload limits (monthly vs total)
- Distribution and RSS feed access
- Analytics tools
- Monetization options
- Lock-in risks and how to avoid them
Quick Picks: Best Free Podcast Hosting Platforms
| Platform | Best For |
|---|---|
| Spotify for Podcasters | Fastest start + unlimited hosting |
| RedCircle | Monetization experiments + one-show creators |
| Podbean | Testing a show before you invest |
| Pinecast | Simple indie-friendly publishing |
TL;DR (If You Want the Safest “Free Start”)
If you want a free plan that feels like a “real” host and gives you a clean runway to upgrade later, I recommend you take a look at Podbean — especially if you’re still validating your podcast idea and don’t want to overthink it.


What Most “Free Podcast Hosting” Pages Don’t Tell You
Free hosting can be a smart move — if you understand the hidden constraints that show up later. Here are the most common “gotchas” beginners run into:
- Storage caps that don’t reset: Some free plans give you a total storage bucket (not monthly uploads). When it’s full, you stop publishing unless you upgrade.
- Episode limits: Some hosts allow only a handful of episodes on the free tier (fine for a mini-series, rough for a real show).
- Monetization eligibility rules: Even if a host offers monetization, you may not qualify until you hit certain listener / geography / program requirements.
- Lock-in anxiety: The big fear: “If I start here, will I get trapped?” (We’ll cover exactly how to avoid that.)
If you’ve ever wondered why podcasting feels “simple” until you try to change something, it’s usually because of distribution + feed control. Related read:
Controlling Your Podcast’s Distribution
Will I Get Locked In? (The Beginner-Friendly Truth)
This is the #1 worry beginners bring up when choosing a free host, and it’s valid. The good news: you can almost always switch hosts later — but you should plan for it from day one.
How to avoid lock-in (simple checklist)
- Make sure you get an RSS feed you can submit to Apple/Spotify/etc. (Most legitimate hosts provide this.)
- Submit your show to directories yourself (so you control your listings). If you need help:
How to Distribute a Podcast
- Keep backups of your original audio files (not just what’s hosted). Here’s a practical guide:
How to Download Your Podcast Episodes
- Know what won’t migrate: Some analytics history, monetization settings, and “platform-native” features often don’t transfer cleanly.
If you’re worried about “platforms owning the relationship,” this is worth reading:
All Your Podcast’s Data Are Belong To Spotify
What Reddit Podcasters Usually Ask (Benefits, Objections, Worries)
After reviewing how beginners talk about free hosting in the real world, the same questions pop up repeatedly:
- “What’s the catch?” Usually: storage caps, episode limits, monetization restrictions, or upgrade pressure.
- “Can I switch later without losing listeners?” Usually yes — if you migrate correctly and keep your directory listings intact.
- “Is there a file size limit?” Some “unlimited” plans still cap per-episode file size (important if you publish long episodes).
- “Will they insert ads into my show?” Some platforms require participation in ad marketplaces to unlock unlimited uploads or advanced features.
- “What happens if the platform changes the rules?” This is why backups + RSS control matter.
What Is Podcast Hosting?
A podcast host is a service that stores your podcast audio files, generates your show’s RSS feed, and helps distribute your episodes to major platforms like Apple Podcasts and Spotify.
Without a podcast host, your audio files have nowhere to live. You can’t just upload episodes to your personal blog or Google Drive and expect Spotify to find them. Instead, a podcast host:
- Stores your audio on reliable servers with enough bandwidth to handle downloads
- Creates and maintains your RSS feed, the backbone that directories use to detect and display your episodes
- Pushes updates to listening platforms whenever you publish a new episode
In short: podcast hosting is the technical foundation that makes your show accessible to the world.
What to Look For in a Free Podcast Host
Click here to see my favorite free podcasting platform
- Storage & Upload Caps: Some hosts offer unlimited episodes, others cap you at a few hours or a handful of episodes. Check monthly and total limits.
- Distribution: Look for easy tools to get on Spotify, Apple Podcasts, and other top apps. RSS access is a must.
- Analytics: Basic stats come standard, but some free plans unlock deeper audience data.
- Monetization: Some hosts allow ads, listener support, or subscriptions — but check eligibility + revenue splits.
- Upgrade Pressure: “Free” often means nudges: caps, ads, missing features, or limits that only show up after you’ve posted a few episodes.
Free Podcast Hosting Platform Comparison Table (2026)
| Platform | Storage & Uploads | Distribution | Analytics | Monetization | Key Limitations |
|---|---|---|---|---|---|
Podbean |
5 hours total / 100GB monthly bandwidth | Manual submission to major directories | Basic stats | Paid plan for ads/advanced monetization | Total storage cap (does not reset); upgrade to scale |
 Spotify for Podcasters |
Unlimited hosting | Strong Spotify distribution + tools for other platforms | Robust listener analytics inside Spotify | Partner Program (eligibility-based) | Some monetization features depend on eligibility/markets; “platform gravity” can be real |
| RedCircle | Unlimited hosting (1 podcast); per-episode file size limits can apply | All major platforms | Standard stats | Ads + listener support options (varies) | Best for one-show creators; watch file size/encoding constraints |
 Acast |
Starter plan: up to 5 episodes (free) | Distribution + RSS feed | Analytics available | Ads available if you join programs/marketplaces | 5-episode cap on free Starter plan (great for mini-series, not ongoing shows) |
| Pinecast | Unlimited uploads; only 10 most recent episodes visible on free | RSS/manual submission | Basic stats | Tip jar (fees apply) | Back-catalog visibility limitation on free tier |
 Buzzsprout |
Limited monthly uploads; older episodes may expire on free | One-click distribution | Strong analytics on paid plans | Typically requires paid upgrade | Best “training wheels” host; free tier not ideal for long-term archiving |
| Spreaker | Limited total storage on free | Auto distribution | Basic analytics | Ads (eligibility-based) | Storage caps + mixed support reputation |
| Podomatic | Limited total storage/bandwidth on free | Manual submissions | Limited on free | Limited on free | Very restricted compared to modern “free unlimited” options |
| RSS.com | Typically trial-based (no permanent free tier) | Easy distribution | Advanced analytics (paid) | Paid features | Good platform — but not usually “free forever” |
Best Free Podcast Host by Use Case
- I want unlimited hosting and the fastest launch: Spotify for Podcasters
- I want to test monetization ideas early: RedCircle
- I want a “real host” feel with a clean upgrade path: Podbean
- I’m publishing a short mini-series (5 eps): Acast Starter
- I want simple indie hosting and don’t care about back-catalog visibility: Pinecast
Platform-by-Platform Breakdown (2026)
Spotify for Podcasters
- Unlimited free hosting is the main draw
- Strong Spotify-native analytics and audience engagement tools
- Monetization exists, but is eligibility-based and can vary by region/market
- If you’re thinking about video, Spotify has been expanding video monetization pathways
Related reads on your site:
Spotify Podcast Monetization
Spotify for Podcasters
RedCircle
- Free plan is built around one podcast and a straightforward publishing workflow
- Great if you want to test ads/support tools early
- Watch the per-episode file size constraints if your episodes run long
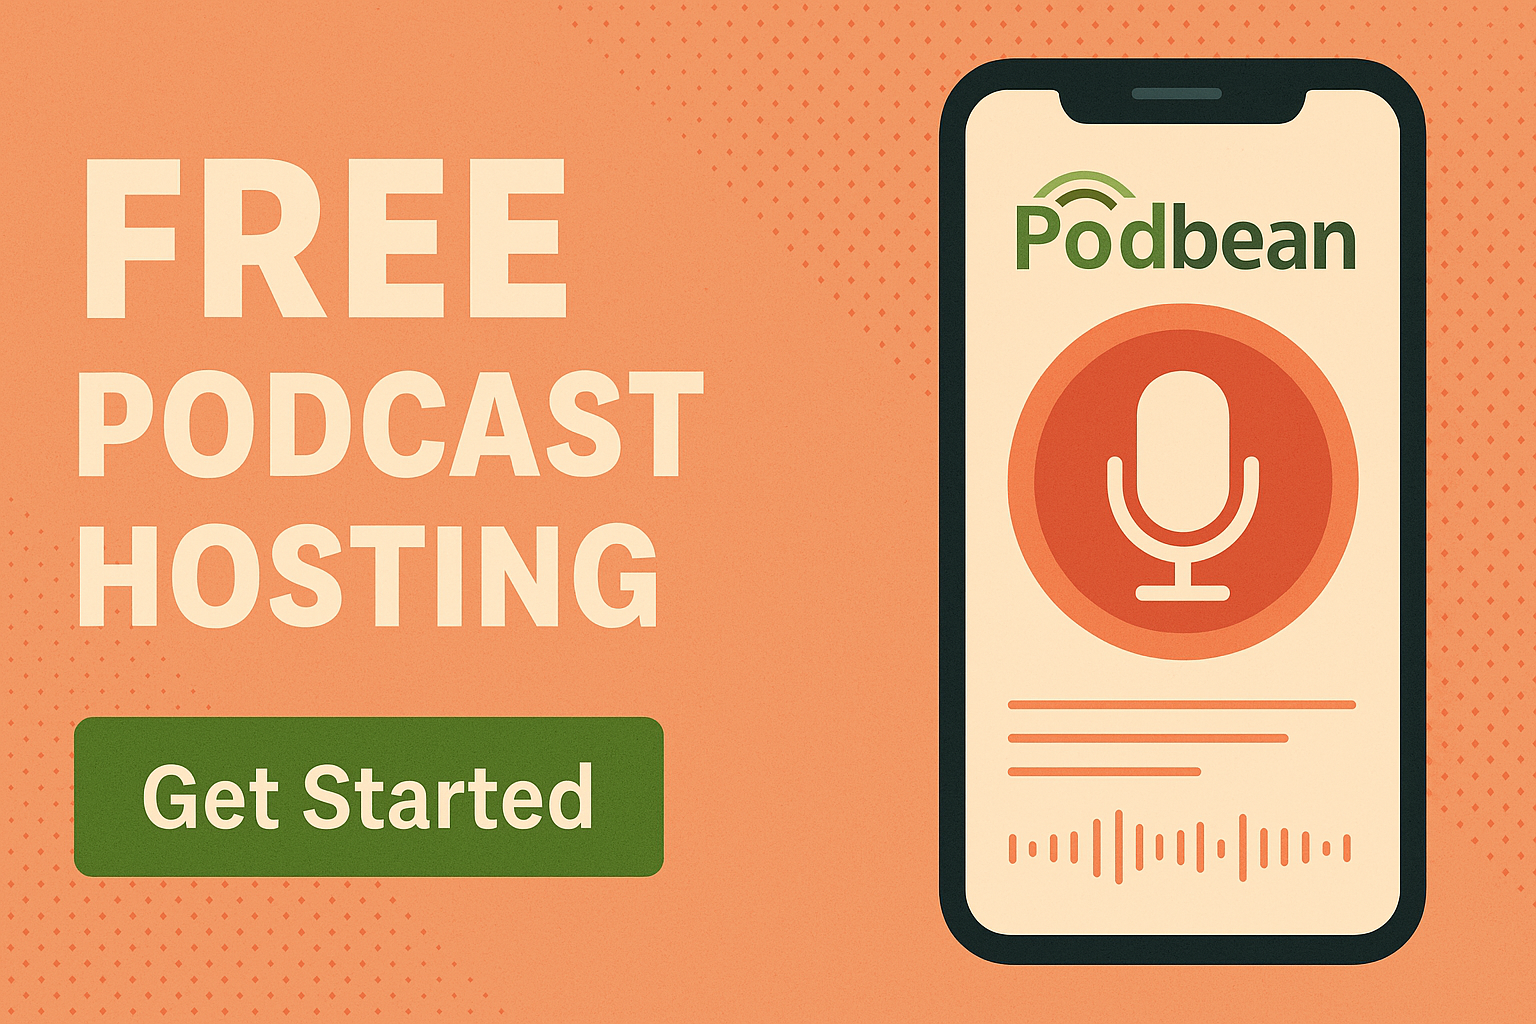
Podbean
- 5 hours total storage + 100GB monthly bandwidth on the free plan
- Simple publishing and a clean upgrade path if the show sticks
- Monetization + advanced analytics tend to live on paid tiers
More on Podbean (internal):
Podbean Pricing
Podbean vs Anchor
Buzzsprout
- Excellent beginner experience and support
- Free tier works best as a “test run” rather than a forever home
More on Buzzsprout (internal):
Buzzsprout Pricing
Buzzsprout vs Anchor
Pinecast
- Simple interface and indie-friendly vibe
- Free tier is great if you don’t care about a deep back-catalog being publicly visible
Acast
- Free Starter plan is best for a short run: up to 5 episodes
- Solid for mini-series, experiments, and proof-of-concept shows
FAQs About Free Podcast Hosting
What’s the catch with free podcast hosting?
Usually one of these: total storage caps, episode limits, monetization restrictions, or upgrade pressure once you hit traction.
Can I monetize my podcast on a free plan?
Sometimes — but monetization is often eligibility-based and may vary by country, audience size, or program requirements.
Will I lose my podcast if I switch hosts?
Typically no. Most podcasters migrate by moving the RSS feed and setting up proper redirects. The main risk comes from not owning backups of your original audio.
What happens when I run out of space?
You’ll either stop uploading, remove old episodes, or upgrade. If you value a long back-catalog, avoid free plans that limit total storage or episode visibility.
Do I “own” my audience if I use a free host?
You own your content — but the more your show relies on platform-native features, the more “gravity” that platform has. A simple way to hedge: build an email list and keep backups.
Final Thoughts
Free podcast hosting is a great way to validate an idea, publish your first episodes, and learn the mechanics of podcast distribution without paying upfront. The best “free” platform depends on what you value most right now:
- Speed + unlimited hosting: Spotify for Podcasters
- Monetization experiments: RedCircle
- Clean upgrade path: Podbean
- Mini-series: Acast Starter
Nothing is permanent. You can switch hosts later — and if you plan for it early (RSS control + backups), you’ll avoid the lock-in stress entirely.
We also compare these platforms:
Spreaker vs Podbean
Podbean vs Anchor
Podbean vs Libsyn
Buzzsprout vs Captivate
📬 Want to learn more about making money from podcasting? Check out our
Podcast Monetization Guide
How to Safely Convert MP4 to MP3 (Without Sketchy Websites)
If you’ve ever needed to extract audio from an MP4 video, you’re not alone. Whether you’re a podcaster pulling clips, a student saving lectures, or a creator working with voiceovers, converting MP4 to MP3 is a common need. But many online tools that claim to do this are loaded with ads, trackers, or worse. So, how can you do it safely?
Here’s a breakdown of the most secure, reliable, and free ways to convert MP4 files to MP3 without touching shady websites.
✅ Best Safe Tools to Convert MP4 to MP3
1. FFmpeg (Command Line Tool)
Platforms: Windows, macOS, Linux
Why it’s great: Free, open-source, used by professionals
ffmpeg -i input.mp4 -vn -c:a libmp3lame -q:a 2 output.mp3This command removes the video stream (-vn) and converts the audio to high-quality MP3. FFmpeg is trusted worldwide, and most other converters actually use it under the hood.
For lossless conversion (if the audio in your MP4 is already AAC), try this:
ffmpeg -i input.mp4 -c:a copy output.m4a2. HandBrake (Beginner-Friendly GUI)
Platforms: Windows, macOS, Linux
Why it’s great: Easy to use, supports batch conversions
HandBrake is another open-source tool that allows you to extract and convert audio easily. It has presets and a nice GUI if command lines aren’t your thing.
3. fre:ac Audio Converter
Platforms: Windows, macOS, Linux
Why it’s great: Lightweight, portable, batch processing
fre:ac is a no-nonsense audio converter that supports tons of formats and is actively maintained. Great for drag-and-drop batch conversions.
4. VLC Media Player
Platforms: All major platforms
Why it’s great: Already on your computer, safe, no extras
VLC isn’t just a media player—it can also convert media. Use:
- Media > Convert/Save
- Choose your MP4 file
- Set the Profile to MP3
It’s slower and clunkier than FFmpeg, but very accessible.
5. MediaHuman Audio Converter
Platforms: Windows, macOS
Why it’s great: Freeware, user-friendly GUI
While not open-source, MediaHuman is widely praised for being clean, effective, and not bloated with adware.
⚠️ Why You Should Avoid Online Converters
Many sites like FreeConvert, OnlineVideoConverter, or similar might seem easy, but:
- You’re uploading private files to unknown servers
- They may retain files or add watermarks
- Popups, malware, and fake buttons are common
If you must use a web-based tool, go with well-reviewed services like CloudConvert or Adobe Express, but still be cautious.
📊 Tool Comparison Table
| Tool | Platform(s) | Batch Support | GUI Option | Fully Free/Open Source |
|---|---|---|---|---|
| FFmpeg | Win / Mac / Linux | ✅ | ❌ CLI only | ✅ |
| HandBrake | Win / Mac / Linux | ✅ | ✅ | ✅ |
| fre:ac | Win / Mac / Linux | ✅ | ✅ | ✅ |
| VLC Media Player | Multi-platform | ⚠️ Limited | ✅ | ✅ |
| MediaHuman Audio Converter | Win / Mac | ✅ | ✅ | ❌ Freeware only |
🔎 Final Recommendation
If you’re comfortable with a little command-line work, FFmpeg is by far the most powerful and safest option. If you prefer a GUI, HandBrake or fre:ac are excellent alternatives.
Avoid mystery websites. Keep your files secure. And enjoy clean, ad-free MP3s from your original MP4s.
- The Ultimate Guide to Choosing Cameras and Lenses for Podcasting
- StreamYard Business Plan Review: Is It Worth $299/Month for Teams?
- Synology DS1525+ for Podcasters: What You Need to Know Before You Buy
- StreamYard Pricing (2026): Full Comparison of Plans, Differences, Features & Discounts
- Podbean Pricing: The Best Podcast Hosting Platform for Getting Started?