helpful-info
Podcast Lighting Setups: The Ultimate Guide for a Professional Studio

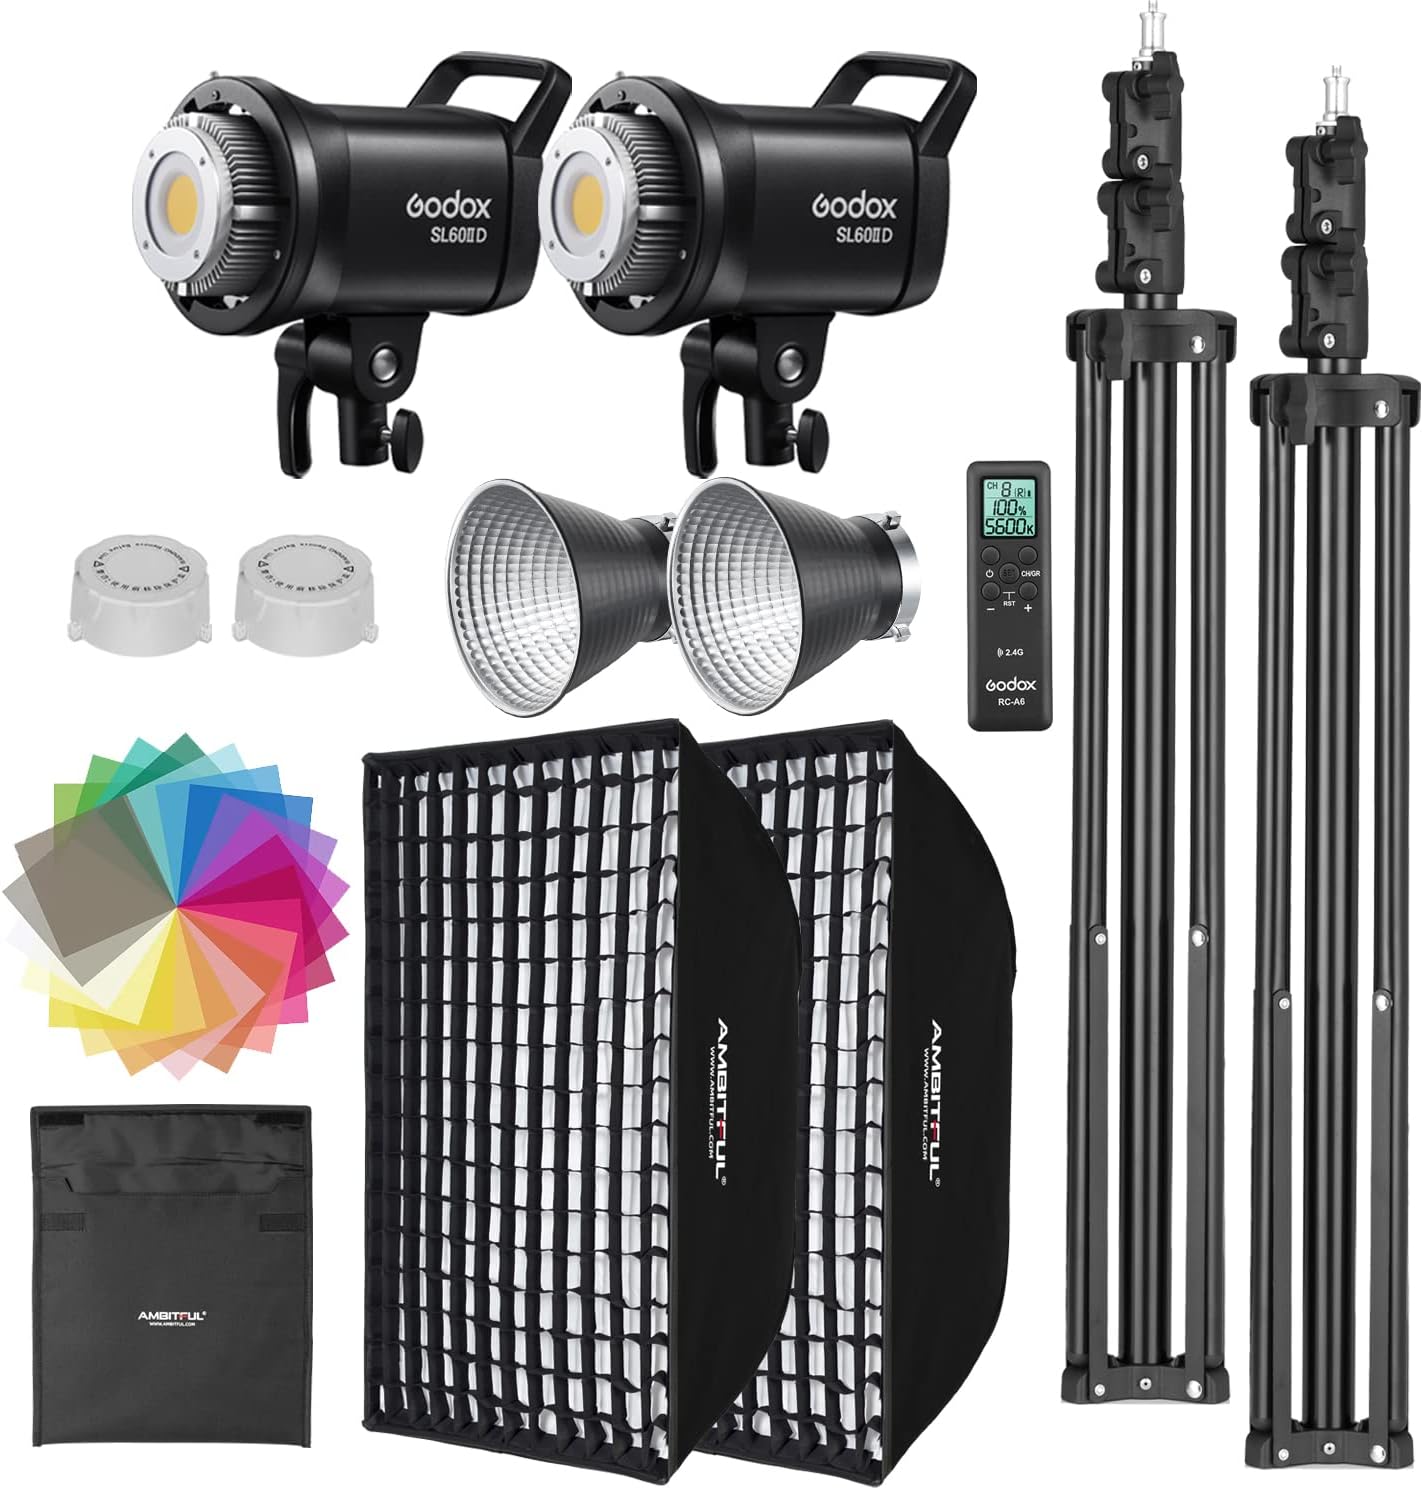
Podcasting has evolved beyond just audio—video podcasts are now a key part of content creation, offering greater engagement and brand-building opportunities. While audio quality remains a top priority, proper lighting is essential for a professional, polished look. Poor lighting can make even the best camera look bad, while a well-lit setup enhances clarity, improves skin tones, and adds depth to your video. If you want to jump right into our favorite kit — take a look at this lighting setup.
 Click here to learn more about this lighting kit
In this guide, we’ll break down the essentials of podcast lighting, from beginner-friendly setups to advanced techniques, so you can create a studio that looks as good as it sounds.
Understanding the Basics of Podcast Lighting
Lighting isn’t just about brightness—it’s about controlling shadows, highlights, and color balance. The right lighting setup can:
✔ Improve video clarity and reduce harsh shadows.
✔ Make skin tones look natural and professional.
✔ Create depth and separation between the subject and background.
Click here to see my favorite beginner light
Common Lighting Mistakes (And How to Fix Them)
| Mistake | Fix |
|---|---|
| Shadows under the eyes | Use a fill light or adjust key light angle. |
| Flat or dull-looking subject | Add a backlight to create depth. |
| Too much glare on glasses | Adjust lighting angles or use a polarizing filter. |
| Unnatural skin tones | Use lights with adjustable color temperature (5000K–6500K). |
Three-Point Lighting: The Gold Standard for Podcasts
Click here for our favorite three-point setup
The three-point lighting setup is the industry standard for professional video production. It consists of:
Key Light (Main Light)
- Purpose: The primary light source that illuminates the subject.
- Placement: Positioned at a 45-degree angle from the front of the speaker.
- Best Options:
- SmallRig RC 100B COB LED (high CRI, adjustable temperature)
- Elgato Key Light MK.2 (Wi-Fi controlled, compact)

Fill Light (Shadow Reduction)
- Purpose: Softens shadows created by the key light.
- Placement: Opposite the key light at a lower intensity (50–70% of key light brightness).
- Best Options:
- Neewer Softbox Kit (budget-friendly softbox)
- Elgato Key Light Air (Wi-Fi dimmable, ideal for small spaces)
Backlight (Separation & Depth)
- Purpose: Creates a halo effect to separate the subject from the background.
- Placement: Positioned behind the subject, slightly above or to the side.
- Best Options:
- GVM 800D-RGB Kit (RGB backlight for customizable colors)
- Nanlite PavoTube (tube lighting for a cinematic look)
📌 Pro Tip: Use RGB lighting for creative backdrops and branding elements!
Best Lighting Equipment for Podcasting
Here’s a quick comparison of the best lighting options based on budget and use case:
| Lighting Option | Best For | Key Features | Price |
|---|---|---|---|
| Godox SL60II-D | Multi-person podcasts | Softbox compatible, high CRI | $$ |
| Logitech Litra Glow | Solo podcasters, beginners | Compact, USB-powered | $ |
| Elgato Key Light MK.2 | Professional setups | Wi-Fi controlled, 2800 lumens | $$ |
| Neewer Softbox Kit | Budget setups | Soft, diffused lighting | $ |
| GVM 800D-RGB Kit | Custom branding & effects | RGB color options | $$ |
Setting Up Your Lighting for Different Podcast Formats
The ideal lighting setup depends on your podcast format. Here’s how to optimize for solo, interview, and panel podcasts:
Solo Podcast Setup
✅ 1 Key Light (main light source)
✅ 1 Ring Light or Softbox (fill light for balance)
✅ Optional RGB Background Light
🎯 Best For: YouTube creators, single-host shows, at-home studios.
Interview/Two-Person Setup
✅ 2 Key Lights (one for each subject)
✅ 1 Shared Fill Light (softens shadows)
✅ 1 Backlight (adds depth)
🎯 Best For: Sit-down interviews, guest-focused podcasts.
Multi-Person Panel Podcast Setup
✅ Overhead Softbox Grid or Multiple Key Lights
✅ Distributed Fill Lights (reduce uneven lighting)
✅ RGB or Accent Background Lights
🎯 Best For: Roundtable discussions, group podcasts.
Advanced Lighting Techniques for a Cinematic Podcast Look
High Key vs. Low Key Lighting
- High Key Lighting: Bright, minimal shadows. Best for educational or upbeat podcasts.
- Low Key Lighting: Darker, high-contrast shadows. Great for true crime, deep discussions.
Background Lighting Strategies
- Solid Backdrops: Use RGB lights to create gradients or patterns.
- Green Screens: Ensure uniform lighting to prevent chroma key issues.
- Practical Lights: Dim lamps, LED strips, or Edison bulbs add ambiance.
📌 Pro Tip: Keep subjects 5–8 feet from the background to minimize unwanted shadows.
Additional Factors to Consider
Color Temperature & CRI
- 5000K–6500K: Ideal daylight-balanced lighting.
- CRI (Color Rendering Index) > 95: Ensures natural skin tones.
Room Acoustics & Light Reflection
- Use matte-finish panels to prevent light bouncing.
- Adjust softbox angles to avoid harsh reflections.
Smart & AI-Driven Lighting
- Philips Hue Play Bars: Smart lighting for real-time color control.
- AI-powered lighting: Adjusts brightness based on movement and ambient conditions.
Final Checklist & Setup Recommendations
✔ Choose the right key, fill, and backlight for your space.
✔ Use dimmable, adjustable lighting for flexibility.
✔ Experiment with RGB and backlights for creative branding.
✔ Ensure consistent color temperature for a professional look.
✔ Avoid common mistakes like harsh shadows and poor reflections.
Perfecting Your Podcast’s Visuals
A well-lit podcast studio isn’t just about brightness—it’s about controlling light to create depth, clarity, and professionalism. It also means you’ve got a great podcasting camera and a great podcasting microphone too. Whether you’re starting with a simple ring light setup or building a multi-camera studio with RGB backdrops, the right lighting can elevate your production and boost audience engagement.
Need Help Monetizing the Podcast?
📩 Drop an email on the homepage for our FREE monetization guide which will blow your mind!
How to Promote a Podcast on Social Media (While Driving Traffic to Your Website)
Social media is one of the most effective tools for growing a podcast audience, but many podcasters fail to use it strategically. While platforms like Instagram, TikTok, and YouTube can generate engagement, the real key to long-term success is funneling social media traffic to your podcast website.
By making your website the central hub, you gain more control over your audience, improve SEO discoverability, and open up monetization opportunities beyond what social media platforms allow. This guide covers the best social media strategies for promoting your podcast while ensuring your website remains the primary destination.
Optimizing Your Podcast’s Social Media Presence
Why Your Website Should Be the Central Hub
Relying solely on social media or podcast directories like Spotify and Apple Podcasts limits your control. Directing listeners to your website offers several advantages:
- You Own the Audience – Social media algorithms change, but your website remains a stable platform where listeners can always find you.
- SEO Benefits – Podcast show notes, transcripts, and additional content can rank in Google searches, bringing in organic traffic.
- Email List Growth – Capturing emails allows you to communicate directly with listeners, notify them about new episodes, and build a community.
- Monetization Control – Unlike social media, your website allows you to promote sponsorships, merchandise, affiliate products, and premium content on your terms.
- Better Listener Experience – Show notes, timestamps, bonus content, and downloadable resources create a richer experience for visitors.
Optimizing Your Social Media Profiles for Traffic Conversion
- Profile Picture & Branding – Keep your branding consistent across all platforms. Use your podcast logo or a recognizable image.
- Bio & CTA – Every social media bio should have a clear call-to-action that directs followers to your website. Example:
“🎙️ Full episodes + exclusive content at [yourwebsite.com]” - Link in Bio Strategy – Instead of linking directly to Spotify or Apple, use a landing page (Linktree, Solo.to, or a custom page) that prioritizes your website while still offering links to other platforms.
Click here to learn more about site traffic & monetizing
Platform-Specific Podcast Promotion Strategies
Instagram (Visual + Engagement-Driven, High Discovery)
Why It Works: Instagram offers high engagement and discoverability through Reels, Stories, and Carousels.
Best Strategies:
- Reels & Short Clips – Share 30-60 second highlights with captions and an overlay CTA: “Full episode at [yourwebsite.com]!”
- Audiograms – Convert compelling audio snippets into short, engaging videos.
- Stories with Stickers – Use polls, countdowns, and Q&A to interact with your audience.
- Carousel Posts – Create multi-slide posts summarizing key takeaways and direct users to your website.
- Instagram Live & Collabs – Go live with guests and cross-promote the full discussion on your website.
Website Funnel CTA Example:
“This clip is just a taste! Get the full episode breakdown at [yourwebsite.com] – link in bio!”
YouTube (Long-Form Video + SEO Powerhouse)
Why It Works: YouTube provides evergreen search traffic and high retention.
Best Strategies:
- Full-Length Video Podcast – Upload full episodes and optimize them for search engines.
- YouTube Shorts – Repurpose key moments into short, high-engagement clips.
- SEO Optimization – Use keyword-rich titles, detailed descriptions, and timestamps that link back to your website.
- Community Tab & Polls – Engage subscribers with Q&A and polls that direct them to your latest episode.
Website Funnel CTA Example:
“Want exclusive resources from this episode? Get them at [yourwebsite.com] – link in description!”
TikTok (Viral Potential + Short-Form Storytelling)
Why It Works: TikTok’s algorithm-driven content discovery allows for organic reach.
Best Strategies:
- Micro-Clips – Post 15-30 second moments that spark curiosity.
- Trend-Based Content – Use trending sounds and challenges to increase visibility.
- Q&A & Stitching – Respond to listener questions and direct them to your website for deeper insights.
- Behind-the-Scenes – Showcase podcast setup, bloopers, or workflow.
- TikTok Live – Engage in real-time conversations and redirect viewers to your website.
Website Funnel CTA Example:
“If this resonated with you, watch the full episode and get extra resources at [yourwebsite.com]!”
Twitter/X (Real-Time Engagement + Thought Leadership)
Why It Works: Great for discussions, quotes, and networking with industry experts.
Best Strategies:
- Tweet Highlights – Share key takeaways in thread format, linking back to your website for full insights.
- Polls & Discussions – Encourage engagement with opinion-based questions.
- Quote Graphics – Share visually appealing episode quotes with a website link.
- Hashtags – Use relevant hashtags (#Podcast, #YourNiche) to reach a wider audience.
Website Funnel CTA Example:
“This takeaway from our latest episode will change the way you think about [topic]. Full discussion here: [yourwebsite.com]”
Facebook (Community Building + Shareability)
Why It Works: Facebook supports long-form posts, groups, and interactive engagement tools.
Best Strategies:
- Facebook Groups – Join or create niche groups and share valuable insights.
- Facebook Reels – Repurpose short clips for quick engagement.
- Live Streams – Host Q&A sessions and direct viewers to your website for more content.
- Event Pages – Promote new episode launches with dedicated Facebook events.
Website Funnel CTA Example:
“New episode is live! Join the conversation and get the full breakdown at [yourwebsite.com]”
LinkedIn (For Business & Industry-Focused Podcasts)
Why It Works: Ideal for professional networking and thought leadership.
Best Strategies:
- Article-Style Posts – Share key takeaways as LinkedIn articles linking back to your website.
- Short Video Clips – Post insightful moments from guest interviews.
- Professional Quotes – Create shareable quote graphics directing to your website.
- Networking & Tagging – Engage with industry professionals and tag guests.
Website Funnel CTA Example:
“Great insights from [guest] on [topic]! Read more and listen at [yourwebsite.com]”
Funneling Social Media Traffic to Your Website
Key Funnel Strategies Across All Platforms
- All post captions should contain a CTA directing to your website.
- Pinned Comments & Descriptions – Always add your website link in YouTube descriptions, Twitter/X pinned tweets, and Instagram captions.
- Link in Bio Optimization – Use a landing page (or direct link) that makes your website the first option.
- Exclusive Content Offers – Encourage people to visit your website for free resources, transcripts, or bonus content.
Repurpose & Cross-Promote Across Platforms
A single podcast episode should generate multiple pieces of content across platforms:
- YouTube video → Cut into Instagram Reels & TikTok clips.
- Twitter thread summary → Repurposed as LinkedIn article.
- Full show notes on your website → Linked back from all social media posts.
Paid Ads & Retargeting
- Use Facebook, Instagram, and TikTok ads to promote your best-performing clips.
- Retarget website visitors with podcast-related ads to bring them back.
Tracking Performance & Improving Your Strategy
- Monitor Social Media Analytics – Engagement rates, shares, and click-through rates (CTR).
- Use Google Analytics – Track referral traffic from social media to your website.
- A/B Test Different CTAs – Experiment with different hooks and promotional styles.
Click here to learn more about site traffic & monetizing
Conclusion
Promoting a podcast on social media isn’t just about engagement—it’s about funneling traffic to your website, where you control the experience, capture leads, and build a lasting audience.
Action Step: Start making your website the hub for all podcast traffic. Update your CTAs today and track how much traffic shifts from social media to your site! 🚀🎙️
How to Promote a Podcast on Instagram
Instagram is a powerful tool for podcast promotion, but many podcasters miss opportunities to fully leverage it. The platform offers high engagement, visual storytelling, and multiple content formats that can help grow a podcast’s reach. This guide covers the best strategies for promoting a podcast on Instagram while driving traffic to the podcast’s website—a crucial step for audience control, SEO benefits, and monetization.
Optimizing Your Instagram Profile
A strong Instagram profile sets the foundation for podcast growth.
Profile Picture
Use a recognizable image, such as your podcast logo or a professional headshot, to create brand consistency.
Username & Handle
Keep your username simple and relevant to your podcast. Avoid using unnecessary characters that make it hard to find.
Bio
Your bio should clearly describe your podcast’s topic, who it’s for, and what listeners can expect. End with a strong call to action, such as:
“🎙️ New episodes every Tuesday | Listen now ⬇️”
Link in Bio
Instead of linking directly to Spotify or Apple Podcasts, use a landing page (Linktree, Solo.to, or your own website) that allows visitors to choose their preferred platform or explore bonus content.
Content Strategies to Grow Your Podcast on Instagram
To maximize engagement, mix different content types that appeal to both new and existing listeners.
Reels & Short Videos
Short-form videos are one of the best ways to reach new audiences. Share:
- 30-60 second episode teaser clips
- Key takeaways from episodes
- Funny or insightful soundbites
Carousel Posts
Carousels encourage engagement and keep users swiping through valuable content. Use them for:
- “Top 5 Lessons from This Episode” (Slide 1: Title, Slides 2-5: Key insights)
- Guest introductions and memorable quotes
Instagram Stories
Stories provide an opportunity for ongoing engagement. They disappear after 24 hours but can be saved in Highlights. Use them to:
- Announce new episodes
- Share countdown stickers for upcoming releases
- Conduct Q&A polls or quizzes
- Feature behind-the-scenes clips
Audiograms
Audiograms transform podcast clips into visual posts, making them more engaging. Use tools like Headliner, Wave.video, or Audiogram to create:
- 30-second snippets of impactful quotes
- Mini episode previews
- Engaging soundbites with captions for accessibility
Memes & Relatable Content
Memes are shareable and increase visibility. Find humorous or insightful ways to connect with your niche.
Instagram Live & Collaborations
Going live before or after a new episode allows for real-time engagement. Invite guests, answer listener questions, and discuss key takeaways. Instagram Collabs also allow you to post with a guest, increasing reach.
Hashtags & SEO for Discoverability
Instagram’s search function relies on strong hashtags and keyword-optimized captions.
Using Effective Hashtags
Combine popular podcast hashtags with niche-specific ones to attract the right audience. Example combinations:
- #PodcastLife, #PodcastLovers, #PodcastHost
- #TrueCrimePodcast, #HealthPodcast, #MarketingTips
Optimizing Captions for SEO
Instagram captions should be keyword-rich to increase discoverability. Instead of vague descriptions, provide context and encourage action.
Example: “🎙️ In this episode, we explore the top habits of successful entrepreneurs. Full breakdown at [yourwebsite.com] – link in bio!”
Driving Traffic to Your Podcast Website
Many podcasters link to Spotify or Apple Podcasts, but directing listeners to a website offers greater control, SEO benefits, and monetization opportunities. In fact, there’a lot I can’t even write out here because it’s too much, so that’s why I put together a monetization guide + video training which talks more about how a website can super charge your podcast. Click here to get access, it is free for now.
Why Send Listeners to Your Website?
- You own the audience. Unlike podcast directories, your website allows you to control the user experience.
- SEO advantages. Show notes, transcripts, and episode breakdowns can bring in organic traffic.
- Email list building. Encouraging sign-ups allows for direct communication with listeners.
- Monetization. Websites provide space to promote affiliate products, sponsorships, and premium content.
- Better listener experience. Offer extras like timestamps, guest bios, additional resources, and interactive elements.
Creating Strong CTAs That Drive Clicks
The right call to action can significantly increase website traffic.
Link in Bio CTAs
Instead of a basic “Listen here,” make the CTA engaging:
“📢 Missed the latest episode? We’ve got a full breakdown & bonus content at [yourwebsite.com] – link in bio!”
Instagram Post CTAs
Incorporate website-driven CTAs into captions:
- “🎙️ Get all the episode highlights & key takeaways at [yourwebsite.com]!”
- “Want to dive deeper? We break it down on [yourwebsite.com] – link in bio!”
Reels & Stories CTAs
Use text overlays on videos: “Want more? Full episode at [yourwebsite.com] – link in bio!”
Encourage interaction with polls: “Where do you listen to podcasts? Vote below, then check out our latest episode at [yourwebsite.com]!”
Live & Collaboration CTAs
When engaging with an audience live, reinforce the CTA:
“We’re only scratching the surface here—get the full conversation and bonus clips at [yourwebsite.com]!”
Engagement & Community Building
Instagram rewards engagement, so actively building a community is crucial.
Boost Engagement to Increase Reach
- Reply to every comment and DM.
- Ask questions in captions to encourage discussions.
- Feature listener shoutouts and testimonials in Stories.
Leverage Collaborations & Cross-Promotion
- Ask podcast guests to share the episode on their Instagram.
- Cross-promote with podcasters and influencers in your niche.
Running Instagram Ads for Podcast Growth
For podcasters with a budget, Instagram Ads can expand reach.
- Boost high-performing posts to reach a targeted audience.
- Story ads with a direct “Swipe Up“ link (or “Learn More“ button) to your website.
- Retargeting ads to people who have previously engaged with your content.
Tracking & Improving Your Strategy
Growth requires constant refinement.
Analyze What Works
- Use Instagram Insights to check engagement metrics (likes, shares, comments).
- Track website traffic using Google Analytics.
- Test different CTA styles, post formats, and engagement techniques to see what drives the most traffic.
Conclusion
By optimizing your profile, creating engaging content, using strong CTAs, and driving traffic to your website, you can grow your podcast audience on Instagram. Consistency, interaction, and strategic promotion are key.
Start today by improving your CTA strategy and testing new content formats!
How to Promote a Podcast Guide to Promoting
How to Grow Your Audience and Increase Discoverability
The podcasting landscape in 2025 is more competitive than ever, with millions of active shows vying for listeners’ attention. To stand out, podcasters must adopt a strategic, multi-channel approach to promotion. This guide covers essential tactics for growing your audience, increasing discoverability, and ensuring long-term podcast success.
1. Optimizing Your Podcast for Discoverability
1.1 Podcast SEO & Metadata Optimization
- Use keyword-rich podcast titles, descriptions, and episode names to boost search rankings on platforms like Apple Podcasts and Spotify.
- Structure show notes with timestamps, key takeaways, and relevant links to improve engagement and SEO.
- Implement metadata best practices, including category selection and relevant tags.
1.2 Submitting to Podcast Directories & Aggregators
- Ensure your podcast is listed on all major platforms: Apple Podcasts, Spotify, Google Podcasts, Amazon Music, and Stitcher.
- Submit to niche directories such as Podchaser, Rephonic, and Listen Notes for additional discoverability.
1.3 Leveraging Podcast Transcripts
- Publish full transcripts of your episodes to enhance accessibility and SEO.
- Use transcription tools like Otter.ai or Descript to automate the process.
- Embed transcripts in blog posts to cater to text-based learners and search engines.
2. Leveraging Social Media for Podcast Growth
2.1 Choosing the Right Social Media Platforms
- Identify where your audience spends the most time:
- YouTube & TikTok: Best for video-based podcasts and short-form promotional clips.
- Instagram & Facebook: Effective for building communities and engaging visually.
- LinkedIn: Ideal for professional and industry-related podcasts.
- Twitter (X): Useful for sharing episode updates and engaging in trending discussions.
2.2 Creating Shareable Social Content
- Create audiograms and video snippets for TikTok, Instagram Reels, and YouTube Shorts.
- Share quote graphics and carousel posts highlighting key insights from episodes.
- Write Twitter threads summarizing the most valuable takeaways from each episode.
2.3 Hashtags & Engagement Strategies
- Use a mix of general and niche-specific hashtags: #Podcasting, #NewEpisode, #SelfImprovementPodcast.
- Encourage listeners to share episodes using a branded hashtag.
- Engage in discussions related to your podcast’s theme by responding to trending topics.
3. Cross-Promotion & Networking
3.1 Podcast Guesting & Interviews
- Appear as a guest on other podcasts within your niche to tap into new audiences.
- Pitch yourself effectively by highlighting your unique expertise and providing value to the host’s audience.
3.2 Show Swaps & Cross-Promotions
- Identify complementary podcasts and propose cross-promotional opportunities.
- Swap pre-roll ads or collaborate on a joint episode.
3.3 Leveraging Guests’ Audiences
- Provide guests with pre-made promotional materials, including graphics and suggested captions.
- Encourage them to share their episode in newsletters and on social media.
4. Repurposing Podcast Content
4.1 Turning Audio into Video
- Upload episodes to YouTube with engaging visuals and captions.
- Create YouTube Shorts & TikTok clips featuring highlights from the podcast.
4.2 Blog Posts & Articles
- Repurpose episodes into SEO-optimized blog posts to attract organic traffic.
- Publish LinkedIn articles summarizing guest interviews.
4.3 Email Marketing
- Send weekly newsletters with episode highlights and exclusive content.
- Offer bonus materials or behind-the-scenes insights to email subscribers.
5. Paid Advertising & Advanced Strategies
5.1 Running Social Media Ads
- Use Facebook, Instagram, and YouTube Ads to target potential listeners.
- Promote high-performing episodes with short teaser ads.
5.2 Podcast-Specific Ad Networks
- Run ads on Overcast, Podbean, and Spotify Ads to reach engaged listeners.
- Utilize retargeting campaigns to convert previous visitors into subscribers.
5.3 Programmatic & Dynamic Ad Insertion
- Use platforms like Acast, Megaphone, and Spreaker for dynamically inserted ads.
- Test A/B variations of ad creatives to improve conversion rates.
6. Engaging Your Audience for Retention
6.1 Encouraging Listener Interaction
- Ask for listener feedback through reviews, ratings, and social shares.
- Run Q&A segments, listener shoutouts, and community discussions.
6.2 Building a Podcast Community
- Create a Facebook Group, Discord server, or Patreon community.
- Offer bonus content, exclusive live Q&As, and early episode releases.
7. Tracking Performance & Improving Over Time
7.1 Measuring Podcast Growth
- Key metrics to track: Downloads, listener retention, engagement rates.
- Use analytics tools such as Spotify for Podcasters, Apple Podcasts Connect, and Chartable.
7.2 Adapting Based on Insights
- Analyze listener feedback and adjust content strategy accordingly.
- Experiment with different formats, guest appearances, and promotional tactics.
Promoting a podcast in 2025 requires a well-rounded approach that combines SEO, social media, cross-promotion, content repurposing, and audience engagement. By consistently refining your strategy and leveraging new tools, you can build a loyal and engaged listener base.
How to Add Transcriptions to Your Podcast on Buzzsprout
Buzzsprout makes it simple to include transcriptions for your podcast episodes, improving accessibility and making your content more discoverable. Here’s a detailed guide to help you get started:
1. Using Cohost AI for Automatic Transcripts
If you’re looking for an automated solution, Buzzsprout’s Cohost AI is the perfect option. Here’s how to set it up:
- Go to your Episodes tab and click on Cohost AI in your Buzzsprout dashboard.
- Enable transcription for your episodes.
- Once enabled, transcripts will be automatically generated for each new episode uploaded to Buzzsprout.
- The associated transcription cost will be added to your next invoice, making it a seamless and integrated process.
Tip: Cohost AI saves time by eliminating the need for manual transcription, allowing you to focus on content creation.
2. Uploading Transcripts Manually
Prefer to use your own transcription service? Buzzsprout allows you to manually add transcripts with ease:
- Select the episode you’d like to add a transcript to on your Episodes page.
- On the right-hand sidebar, click the Add a Transcript button.
- From here, you can:
- Copy and paste the transcript text directly into the editor.
- Upload a file from third-party transcription services like Otter.ai or Temi.
- Use the formatting toolbar to adjust the layout, ensuring your transcript looks clean and professional on your Buzzsprout public page.
Top Transcription Services Compatible with Buzzsprout
If you’re looking for transcription services, here are two highly recommended options:
- Otter.ai: Known for its accuracy and user-friendly interface, Otter.ai offers AI-generated transcriptions. Once you’ve completed your edits in Otter, export the transcript and upload it to Buzzsprout.
- Temi: A budget-friendly transcription option at just $0.25 per minute. Start by selecting Get Started with Temi on Buzzsprout’s Add a Transcript screen, then upload the finished file.
Why Use Transcriptions for Your Podcast?
Adding transcripts to your episodes can transform the way people engage with your content. Here are some key benefits:
- Boost SEO: Search engines like Google can index the text of your episodes, making it easier for new listeners to discover your podcast organically.
- Improve Accessibility: Transcripts provide a way for those with hearing impairments or people who prefer reading to enjoy your episodes.
- Enhance Listener Experience: A transcript acts as a reference guide, allowing listeners to revisit specific points or highlights from your podcast.
Buzzsprout and Apple Podcasts: The New Update
In Spring 2024, Apple Podcasts rolled out support for SRT and VTT files on devices running iOS 17.4 and later. This new feature means you can upload your transcript files via Buzzsprout, and Apple Podcasts will display them to your audience.
Currently, this feature supports English, Spanish, French, and German, expanding the accessibility of your content to a wider audience.
FAQs About Buzzsprout Transcriptions
1. Does Buzzsprout automatically create transcripts?
Yes! By enabling Cohost AI, Buzzsprout will automatically generate transcripts for your episodes.
2. Can I use my own transcription service?
Absolutely. Buzzsprout allows you to upload transcripts created with services like Otter.ai, Temi, or any other tool of your choice.
3. Does transcription improve podcast SEO?
Yes, transcriptions make your podcast searchable online, increasing your chances of being discovered by new listeners.
4. What formats are supported for Apple Podcasts?
Apple Podcasts supports SRT and VTT files. You can upload these formats to Buzzsprout, and they’ll display on Apple Podcasts for compatible devices.
Adding transcriptions to your podcast doesn’t just benefit your listeners—it also helps your show grow by making it more accessible and easier to find. Whether you use Cohost AI or upload your own, Buzzsprout gives you the tools to enhance your podcast’s reach and engagement.
How to Transcribe Your Podcast Episodes with Podbean
Transcripts and closed captions are vital for making your podcast more accessible, engaging, and discoverable. They allow your content to reach those with hearing impairments and non-native speakers, while also improving your podcast’s SEO. Podbean offers a straightforward solution for podcast transcription and closed captions, making it easier than ever to create accessible and searchable content. Here’s how you can use Podbean’s transcription features to enhance your podcast.
Step-by-Step Guide to Using Podbean’s Transcription Features
Click here to Learn More about Podbean
1. Log in to Your Podbean Account
- Begin by logging into your Podbean account.
- Access the Podcast Dashboard from your account homepage.
2. Add the Closed Caption Plugin
- Go to Settings on the left-hand menu and select Plugins.
- Click Get More Plugins and look for the Closed Caption plugin.
- Click Get the Plugin to activate it for your podcast channel.
3. Transcribe Your Podcast Episode
- Navigate to Episodes > Episode List.
- Hover over the episode you want to transcribe and click the Closed Caption button.
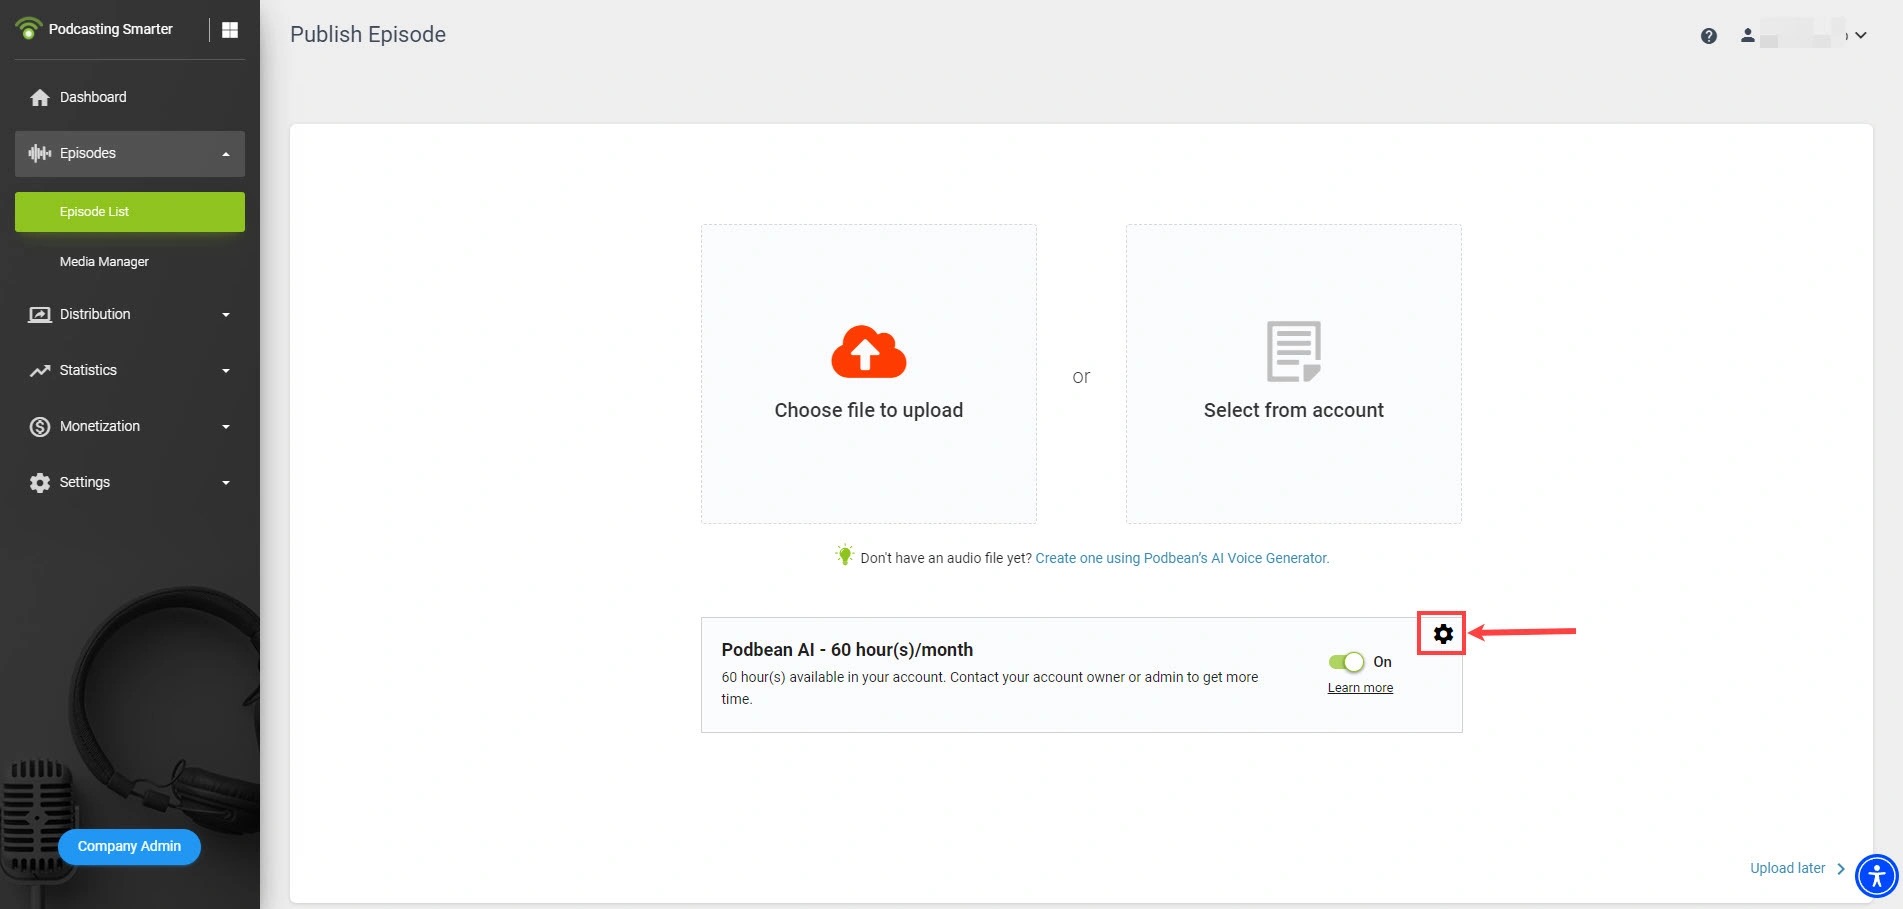
4. Upload an Existing Transcript (Optional)
- If you have an existing transcript in an .SRT format, you can upload it directly at this step.
5. Use Podbean’s Transcription Service
- Don’t have a transcript? Podbean offers transcription services for just $0.20 per minute.
- Click Transcribe, enter your billing information, and let Podbean handle the rest.
- Typical turnaround times:
- 30-minute podcast: ~20 minutes.
- 60-minute podcast: ~40 minutes.
6. Download and Edit Your Transcripts
- Once the transcription is ready, download it in your preferred format:
- SRT file: Perfect for closed captions.
- TXT file: Ideal for plain text editing and repurposing.
- You can also edit the transcript directly within the Podbean platform.
7. Supported Languages
- Podbean’s transcription service supports multiple languages. Check their official list of supported languages to ensure compatibility.
Benefits of Using Podbean’s Transcription Features
- Accessibility: Closed captions and transcripts ensure your podcast is inclusive for hearing-impaired audiences.
- SEO Benefits: Adding searchable text through transcripts can significantly improve your podcast’s discoverability on search engines.
- Multi-Platform Support: Your transcripts are seamlessly integrated across your podcast website, embedded players, and the Podbean Pro app.
- Efficiency: Podbean’s transcription service provides quick turnaround times, saving you time and effort.
FAQs About Podbean Transcription
Q: How much does it cost to transcribe a podcast with Podbean?
A: Podbean charges $0.20 per minute for its transcription service.
Q: What formats are available for download?
A: You can download transcripts as SRT files (for captions) or TXT files (plain text).
Q: Can I edit the transcript after it’s generated?
A: Yes, Podbean allows you to edit transcripts directly within its platform.
Q: What is the average turnaround time?
A: The average turnaround time is about 20 minutes for a 30-minute podcast and 40 minutes for a 60-minute podcast.
Q: Does Podbean support multiple languages for transcription?
A: Yes, Podbean’s transcription service supports several languages. Check the list of supported languages in their help documentation.
Conclusion
Using Podbean’s transcription features is a simple and cost-effective way to make your podcast more accessible and discoverable. Whether you upload your own transcripts or use Podbean’s affordable transcription service, the process is quick and seamless. Add value to your podcast with searchable content, improve engagement with your audience, and ensure inclusivity with closed captions.
Restream vs. StreamYard: A Podcasting Comparison
In the fast-paced world of live streaming, choosing the right platform can make or break your show’s reach. StreamYard and Restream are two of the most popular options, giving creators professional tools to broadcast live and connect with their audience.
While both are powerful, they serve slightly different needs. This guide breaks down their features, pricing, pros and cons, and unique strengths so you can choose the best platform for your streaming goals.
Quick Overview
StreamYard: The Easy-to-Use Live Streaming Studio
StreamYard is loved for its simplicity and polish. As a browser-based platform, it requires no downloads and makes it easy to run professional-looking broadcasts with branding, overlays, and guest interviews. It’s a favorite of podcasters, YouTubers, and businesses who want a hassle-free way to go live.
Restream: The Multistreaming Powerhouse
Restream’s biggest strength is reach. It can broadcast your stream to 30+ platforms at once, including YouTube, Twitch, Facebook, and LinkedIn. Alongside its live studio, it offers advanced analytics, scheduling tools, and integrations—making it the go-to choice for creators who want scale and data-driven insights.
Restream vs. StreamYard Features
| Feature | StreamYard | Restream |
|---|---|---|
| Multistreaming | Yes (to multiple platforms) | Yes (30+ platforms) |
| Guest Management | Up to 10 guests | Up to 10 guests |
| Branding | Logos, overlays, backgrounds | Custom branding, graphics |
| Ease of Use | Extremely easy, browser-based | Easy but more advanced |
| Video Quality | Up to 1080p | Up to 1080p + Restream Failsafe |
| Chat Aggregation | Unified feed | Unified feed |
| Analytics | Basic metrics | Advanced insights & performance tracking |
| Pre-recorded Streaming | Yes | Yes |
| Integrations | YouTube, Facebook, LinkedIn, Twitch, Restream, Ecamm | 30+ platforms, OBS, XSplit, Zoom, RTMP |
| Pricing | Free plan + paid from $20/mo | Free plan + paid from $16/mo |
Core Differences
-
StreamYard = beginner-friendly, polished, and all-in-one studio.
-
Restream = built for scale, analytics, and multistreaming power.
Unique Features
-
StreamYard: A backstage area for hosts and guests to prep privately before going live.
-
Restream: Advanced analytics for tracking cross-platform engagement and performance.
Pricing
-
StreamYard:
-
Free plan (20 hours/month, StreamYard branding)
-
Paid plans from $20/month with multistreaming, custom branding, and HD quality
-
-
Restream:
-
Free plan (2 platforms)
-
Paid plans from $16/month with 30+ platforms, analytics, and scheduling
-
Ease of Use
-
StreamYard: Dead-simple, anyone can go live in minutes.
-
Restream: Still beginner-friendly but slightly steeper due to advanced tools.
Video & Audio Quality
Both support 1080p streaming, but:
-
StreamYard is reliable and smooth with stable internet.
-
Restream adds Failsafe protection, keeping streams live if your connection drops.
Guest Management
-
StreamYard: Up to 10 guests via simple link invites; no account needed. Private backstage area adds polish.
-
Restream: Also up to 10 guests; Restream Studio provides a clean guest interface.
Integrations
-
StreamYard: Works with popular platforms and can even connect with Restream itself.
-
Restream: Direct integrations with 30+ destinations plus pro tools like OBS, XSplit, and RTMP inputs.
Customer Support
-
StreamYard: 24/7 live chat, knowledge base, community forums.
-
Restream: 24/7 live chat, help center, active user community.
Who Should Use Each?
-
StreamYard is best for:
✅ Beginners who value simplicity
✅ Podcasters & YouTubers who want polished live shows
✅ Businesses running professional events or interviews -
Restream is best for:
✅ Creators who want to maximize reach across many platforms
✅ Power users needing advanced analytics & scheduling
✅ Brands scaling across multiple social channels
Final Verdict
Both StreamYard and Restream are excellent—your choice depends on your priorities:
-
Pick StreamYard if you want a simple, all-in-one live studio with guests and branding tools.
-
Pick Restream if you want to multistream at scale with advanced analytics and integrations.
👉 Both offer free plans, so the best way to decide is to test each platform and see which fits your workflow.
Podcastle vs Riverside: Which Platform is Right for Your Podcast?
Choosing the right podcasting platform can make or break your production workflow. With so many options available, finding one that aligns with your specific needs is essential. Podcastle and Riverside are two popular platforms, each offering unique features for podcasters. Whether you’re a beginner looking for simplicity or a seasoned pro demanding high-quality output, this comparison will help you make an informed decision.
A Quick Introduction to Podcastle and Riverside
Click here to try my favorite podcasting host
Podcastle is an AI-powered platform designed for easy podcast production. It caters to podcasters at all skill levels, offering tools that streamline recording, editing, and publishing. It’s intuitive, and their affordable pricing make it ideal for hobbyists and small teams.
Riverside, on the other hand, is a professional-grade platform that delivers top-tier audio and video quality. It’s built for remote recording and is widely used by businesses and creators who need high-quality results. With features like local recording and live audience interaction, Riverside is perfect for ambitious podcasters.
Comparing Audio and Video Quality
When it comes to recording quality, both platforms excel, but in different ways.
- Podcastle enhances audio using AI-powered tools like noise cancellation and its signature “Magic Dust” feature. It supports high-quality audio recording (up to 48kHz) and basic video recording capabilities, making it a great choice for straightforward productions.
- Riverside offers uncompressed local audio recording in WAV format and video recording up to 4K resolution. Even if your internet connection falters, Riverside ensures that recordings remain crisp and professional, making it the go-to platform for creators who prioritize quality.
Editing Made Simple
- Podcastle simplifies the process with AI-powered transcription and text-based editing. Edit your audio by editing the transcript, which is perfect for beginners or those short on time. The platform also includes multitrack editing for more complex projects.
- Riverside provides separate audio and video tracks for each participant, giving professionals the flexibility to fine-tune recordings in external editing software. While it has fewer built-in editing tools than Podcastle, its raw recording quality makes it ideal for advanced post-production.
Collaboration and Remote Recording
Riverside shines in remote recording, but Podcastle holds its own for smaller teams.
- Podcastle offers straightforward remote recording features with automated transcription. It’s a practical choice for teams collaborating on simpler projects.
- Riverside supports up to 8 participants per session and includes features like live audience call-ins and a producer mode for managing recording quality. These tools make it an excellent choice for panel discussions, interviews, and live shows.
Unique Features to Consider
Both platforms come packed with features, but they cater to different needs:
- Podcastle includes AI voice cloning, multilingual transcription, and a royalty-free music and sound effects library. These tools make it a time-saver for podcasters who want to enhance their episodes quickly.
- Riverside boasts live streaming capabilities, screen sharing, and audience links that let live viewers tune into recordings. These features are perfect for podcasters looking to interact with their audience in real-time.
Pricing and Plans
- Podcastle offers a free plan with limited features and paid plans starting at $11.99 per month. Its affordable pricing makes it a great entry point for new podcasters.
- Riverside has a free plan that limits recording to 2 hours per month. Paid plans start at $15 per month, offering robust features for podcasters with professional needs.
The Pros and Cons of Each Platform
Podcastle Pros:
- Beginner-friendly with AI-powered editing tools.
- Affordable plans with a free option for smaller projects.
- Time-saving features like automatic audio enhancement.
Podcastle Cons:
- Video recording quality isn’t as advanced as Riverside’s.
- Fewer features for multi-participant sessions.
Riverside Pros:
- Studio-quality audio and video recording.
- Robust tools for remote collaboration and live interaction.
- Reliable local recording ensures high-quality results.
Riverside Cons:
- Steeper learning curve for new users.
- Higher pricing for advanced features.
Which Platform Should You Choose?
Your choice between Podcastle and Riverside depends on your priorities:
- Choose Podcastle if you’re a beginner or hobbyist looking for an affordable and easy-to-use platform. Its AI tools and editing features make podcast production a breeze.
- Choose Riverside if you’re a professional creator or business needing top-notch audio and video quality. It’s the better option for remote interviews, live shows, and multi-guest recordings.
Final Thoughts
Both Podcastle and Riverside are excellent platforms, but they serve different types of podcasters. Podcastle shines with its simplicity and AI tools, while Riverside delivers unmatched quality and versatility. If unsure, use their free plans to see which best suits your needs.
No matter which platform you choose, the key is to focus on creating great content that resonates with your audience. Happy podcasting!
Zendesk Pricing: Is It The Best Customer Support Solution for Podcasters?
As a podcaster, your audience is your lifeline, and offering great customer support can help you grow your listener base, manage inquiries, and keep your community engaged. Whether you’re handling sponsor requests, listener feedback, or questions about merchandise, Zendesk’s plans can provide a structured way to manage these interactions. This guide explores Zendesk pricing with a focus on how it can meet the unique needs of podcasters.
Zendesk Plans and Pricing Breakdown for Podcasters
Zendesk offers a range of plans designed to fit businesses of all sizes, including solo creators and podcast networks. Here’s how the pricing works:
- Suite Team ($55/agent/month, billed annually):
- Perfect for Independent Podcasters: Provides ticketing and multi-channel support to manage emails, social media messages, and listener inquiries in one place.
- Includes a help center where you can create FAQs about your podcast or products, reducing repetitive questions.
- Features prebuilt analytics to understand the most common audience concerns.
- Suite Growth ($89/agent/month, billed annually):
- Great for Growing Podcasts with Merchandise or Patreon Members: Adds customer satisfaction ratings (CSAT) and multilingual support, making it ideal for global audiences.
- Enables the creation of a self-service portal for your listeners and supporters, providing quick access to common answers about episode releases, bonus content, or support tiers.
- Suite Professional ($115/agent/month, billed annually):
- For Podcast Networks or Large Teams: Offers advanced analytics and skills-based routing to assign inquiries to team members based on expertise (e.g., sponsorship inquiries to your marketing lead).
- Includes integrated forums for creating community spaces where listeners can engage with each other.
- Suite Enterprise (Custom pricing):
- Tailored for Large Podcasting Networks or Agencies: Provides extensive customization, sandbox environments for testing new support workflows, and unlimited help centers for managing multiple shows under one umbrella.
- Add-Ons:
- Advanced AI ($50/agent/month): Automates responses for FAQs like “When does the next episode drop?” or “How do I join your Patreon?”
- Workforce Management ($25/agent/month): Helps schedule team members if you’re managing a podcasting team.
- Quality Assurance ($35/agent/month): Ensures professional responses to sponsors or high-value listener inquiries.

Which Zendesk Plan Fits Your Podcasting Needs?
Whether you’re an independent podcaster or managing a large network, Zendesk has a plan for you:
- Independent Podcasters:
- Suite Team provides the basics to streamline listener communication and reduce manual work.
- Growing Podcasts with Merchandise or Subscriptions:
- Suite Growth helps manage customer feedback and questions from a global audience.
- Podcast Networks or Multi-Show Creators:
- Suite Professional and Suite Enterprise offer robust tools for managing multiple brands and audience segments.
Why Podcasters Need Zendesk
Podcasters often juggle multiple communication channels, including email, social media, and Patreon. Zendesk consolidates these interactions into one platform, ensuring nothing falls through the cracks. You can:
- Create a help center for common listener questions.
- Automate responses to frequently asked inquiries.
- Assign sponsorship or advertising-related emails to your team.
- Analyze trends in audience feedback to improve your content.
Tips for Choosing the Right Zendesk Plan as a Podcaster
- Understand Your Audience Needs: If your podcast has an international audience, consider a plan with multilingual support.
- Factor in Team Size: For solo podcasters, Suite Team is sufficient, but larger teams will benefit from Suite Growth or Professional.
- Think Long-Term: Choose a plan that can scale as your podcast grows.
- Leverage Automation: Add AI tools to handle repetitive tasks, freeing up time for creative work.
How Zendesk Compares to Other Tools for Podcasters
While tools like Freshdesk and Intercom offer customer support features, Zendesk stands out for podcasters due to its advanced automation, multi-channel support, and scalability. It integrates seamlessly with tools like Slack, Shopify (for merchandise), and CRMs, making it ideal for podcasters who want to streamline their workflow.
Common Costs to Watch Out For
While Zendesk provides immense value, keep an eye on these potential costs:
- Add-Ons: Advanced features like AI and workforce management can add to your monthly fees.
- Training: If you’re part of a team, agents may need onboarding to use Zendesk effectively.
- API Usage: Complex integrations, like syncing with Patreon, may incur additional costs.
| Feature | Provide Support | SupportPal | Zendesk |
|---|---|---|---|
| Primary Focus | Real-time live chat for customer engagement. | Comprehensive ticketing system with automation and multi-channel support. | Full-suite customer service platform with advanced features for large teams. |
| Pricing |
– $24/month for 1 agent. – $53/month for 3 agents. – $108/month for 10 agents. |
– $24.95/month (base license). – Unlimited agents. – Optional $4.95/month to remove branding. |
– $55/month per agent (Suite Team). – $89/month per agent (Suite Growth). – $115/month per agent (Suite Professional). |
| Key Strengths |
– Easy to set up and integrate. – Visitor monitoring for proactive engagement. – Customizable chat widgets. |
– Self-hosted for data control. – Unlimited users and tickets. – Advanced automation and multi-channel support. |
– AI-powered tools for workflow automation. – Multi-channel support (email, chat, social media). – Advanced analytics and custom reporting. |
| Use Cases |
– Small businesses seeking affordable live chat. – Websites with high visitor interaction. |
– Growing businesses needing a robust ticketing system. – Organizations seeking cost-effective scalability. |
– Enterprises with large teams and complex workflows. – Businesses requiring advanced analytics and integrations. |
| Limitations |
– Focused only on live chat; no ticketing system. – Limited scalability for larger teams. |
– Requires self-hosting and server management. – Fewer integrations compared to Zendesk. |
– Higher cost per agent. – May include features unnecessary for small businesses. |
FAQs About Zendesk for Podcasters
Can Zendesk integrate with podcasting tools like Patreon or Shopify?
Yes, Zendesk integrates with platforms like Shopify for merchandise and can be customized to handle Patreon queries.
Is Zendesk suitable for solo podcasters?
Absolutely. The Suite Team plan is a great option for independent podcasters who want to manage audience communication efficiently.
Can I use Zendesk to manage sponsorship inquiries?
Yes, Zendesk’s ticketing system and automation can help you streamline sponsor communication, ensuring quick and professional responses.
Final Thoughts: Is Zendesk Right for Your Podcast?
Zendesk’s pricing structure and robust features make it a powerful tool for podcasters looking to manage audience interactions, sponsorships, and merchandise inquiries effectively. Whether you’re just starting out or running a large podcast network, Zendesk has a plan to fit your needs.
Choosing the Best Audio Format for Your Podcast: A Beginner’s Guide
Why Audio Format Matters for Your Podcast
The audio format you choose plays a crucial role in your podcast’s overall quality and listener experience. It affects the sound clarity, file size, and compatibility with podcast platforms. Whether recording, editing, or uploading your podcast, selecting the right format ensures you deliver a professional product without unnecessary complications.
The Best Format for Recording High-Quality Audio
When recording your podcast, it’s essential to prioritize quality. Formats like WAV or AIFF are ideal for this stage because they are uncompressed and retain all the original details of your audio. These formats are widely supported by editing software and provide a clean starting point for post-production.
For optimal recording, set your equipment to:
- Sample Rate: 44.1 kHz or 48 kHz (48 kHz is slightly better for podcasts).
- Bit Depth: 24-bit for richer sound and better dynamic range.
Although these files can be large (around 10 MB per minute), the quality makes them worth it for the recording phase.
Sharing and Editing: Finding the Sweet Spot
After recording, your focus shifts to sharing and editing the audio. While WAV files are perfect for editing due to their quality, their size can be impractical for sharing. For this reason, many podcasters export their episodes in MP3 format.
MP3 files strike a balance between size and quality, making them ideal for distribution. Here are some guidelines for MP3 settings:
- Bitrate:
- 128 kbps for voice-only podcasts (mono).
- 192-256 kbps for podcasts that include music or sound effects (stereo).
- Sample Rate: 44.1 kHz.
If you’re collaborating with editors or co-hosts, use WAV files during the editing process to preserve quality. For file sharing, use platforms like Google Drive, Dropbox, or WeTransfer.
Meeting Hosting Platform Requirements
Every podcast hosting platform has its own requirements, but most expect your files to be in MP3 format. Here’s why:
- MP3 files are small enough for quick downloads and easy streaming.
- All major podcast players and directories, like Spotify and Apple Podcasts universally support them.
Platforms often compress audio files further to optimize delivery, so starting with a high-quality export ensures your final product sounds its best.
For most platforms:
- File Format: MP3.
- Bitrate: 128-192 kbps.
- Maximum File Size: Check your hosting service, as limits can vary.
Balancing Quality with File Size
One of the challenges podcasters face is balancing audio quality with file size. Large files can slow downloads for listeners and increase your hosting costs, but overly compressed files can sound unprofessional.
For perspective:
- A WAV file is approximately 10 MB per minute of audio.
- An MP3 file at 128 kbps is about 1 MB per minute.
This significant size reduction makes MP3 the best choice for final uploads. To maintain a professional sound, use tools like Auphonic to optimize your files for loudness and add metadata before publishing.
Tips for Collaboration and Distribution
When working with others, file sharing becomes a priority. Here are some best practices:
- Use WAV files for collaboration to avoid losing quality.
- Share large files using cloud storage or transfer services like Dropbox or WeTransfer.
For distribution, always export your finished episodes as MP3 files. This ensures compatibility with hosting platforms and podcast directories. Tools like Auphonic or Audacity can make this process easier by allowing you to adjust audio settings and optimize your files.
Of course while the format matters it’s nothing without having great audio equipment to go with it, and if you’re doing a video podcast, having a great camera and lenses. After all, dark and crummy audio is a sure-fire way of getting people to tune out!
Common Questions About Podcast Audio Formats
Can I use WAV files for publishing my podcast?
While WAV files offer excellent quality, their large size makes streaming or downloading them impractical. Stick to MP3 for final uploads.
What’s the difference between mono and stereo audio?
Mono audio uses a single channel and is ideal for voice-only podcasts, reducing file size without affecting quality. Stereo uses two channels, making it better for music or sound-heavy podcasts.
Why do hosting platforms recommend MP3?
MP3 is universally supported, has smaller file sizes, and delivers good audio quality, making it perfect for online distribution.
How can I reduce file size without sacrificing quality?
Use lower bitrates (128 kbps for mono, 192 kbps for stereo) and tools like Auphonic to compress and optimize your audio.
Wrapping It Up
Choosing the right audio format for your podcast doesn’t have to be complicated. Record and edit in WAV for the highest quality, then export your episodes as MP3 for distribution. Following these tips’ll ensure your podcast sounds professional while staying within platform requirements.
Need Help Monetizing the Podcast?
📩 Drop an email on the homepage for our FREE monetization guide which will blow your mind!
- The Ultimate Guide to Choosing Cameras and Lenses for Podcasting
- StreamYard Business Plan Review: Is It Worth $299/Month for Teams?
- Synology DS1525+ for Podcasters: What You Need to Know Before You Buy
- StreamYard Pricing (2026): Full Comparison of Plans, Differences, Features & Discounts
- Podbean Pricing: The Best Podcast Hosting Platform for Getting Started?