uncategorized
What Equipment is Needed For a Podcast?
You don’t need a full studio setup to start podcasting—your phone, a quiet room, and some free software can get you going. In fact, you can launch your podcast with minimal investment. But if you’re aiming for a more polished sound, investing in some core gear makes a big difference—especially since audio quality directly impacts listener retention.
Starter Must-Have Equipment
Click here for my favorite podcast starter kit
- Microphone: Arguably the most important part of your setup.
- Headphones: Crucial for monitoring sound, reducing echo, and improving mic technique.
- Audio Interface: Needed for XLR mics; converts analog to digital. See our guide on mixers.
- Software: To record and edit your podcast cleanly.
Podcast Recording & Editing Software
- Free: Audacity, GarageBand (Mac)
- Paid: Adobe Audition, Logic Pro X, Hindenburg Journalist
Podcast Hosting: Your Launchpad
A podcast host distributes your episodes, stores them, and offers analytics and monetization tools.
Podcasting Starter Kits: Pros & Cons
Pros
- Convenience: Everything in one box.
- Compatibility: Components designed to work well together.
- Cost Savings: Bundled pricing is often cheaper.
- Quality Assurance: Often curated by trusted brands.
Cons
- Limited Customization: Not tailored to every use case.
- Overpay Risk: If you already own some items.
- Component Quality May Vary: Some parts may be better than others.
- Less Learning Opportunity: You miss learning-by-building.
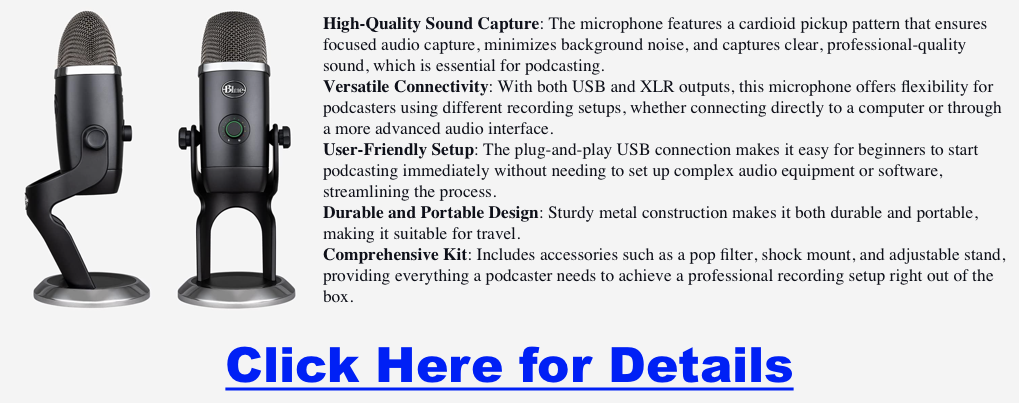
Microphones
- USB vs XLR: USB is plug-and-play. XLR offers superior quality but requires an interface.
- Dynamic vs Condenser: Dynamic mics are more durable; condensers are more sensitive.
- Recommended: Blue Yeti (USB), Shure SM7B (XLR)
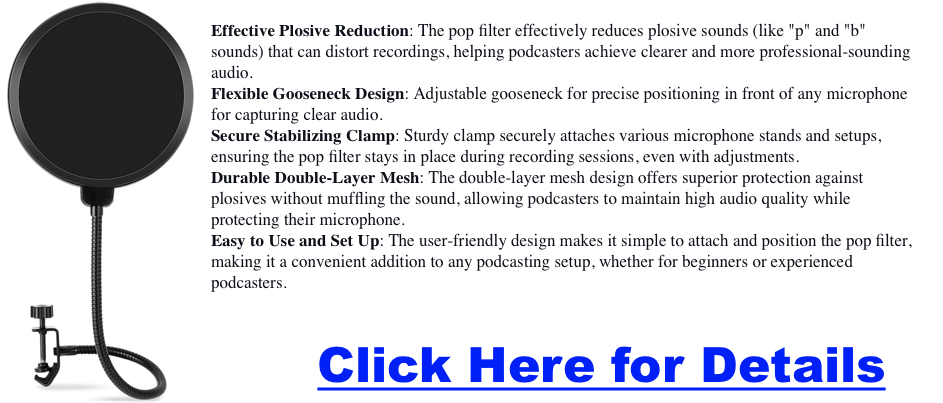
Pop Filters
- Materials: Nylon, metal, foam
- Mount Style: Clamp with gooseneck is most common
- Size: Larger filters offer better coverage
Audio Interfaces
- Choose based on number of mics you plan to use
- Look for quality preamps and low-latency support
- USB-C recommended for modern devices
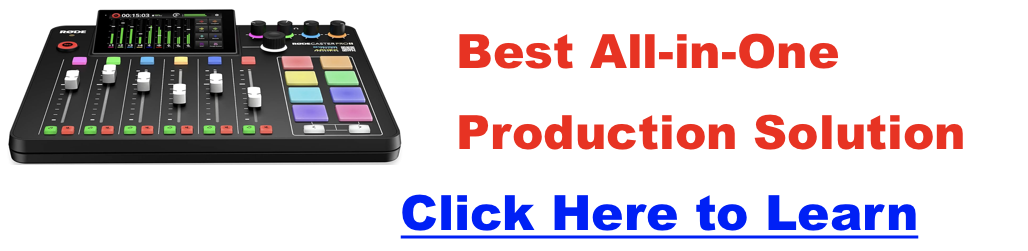
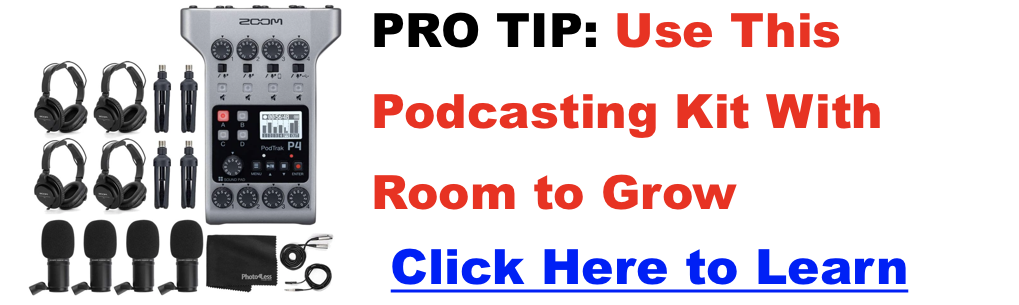
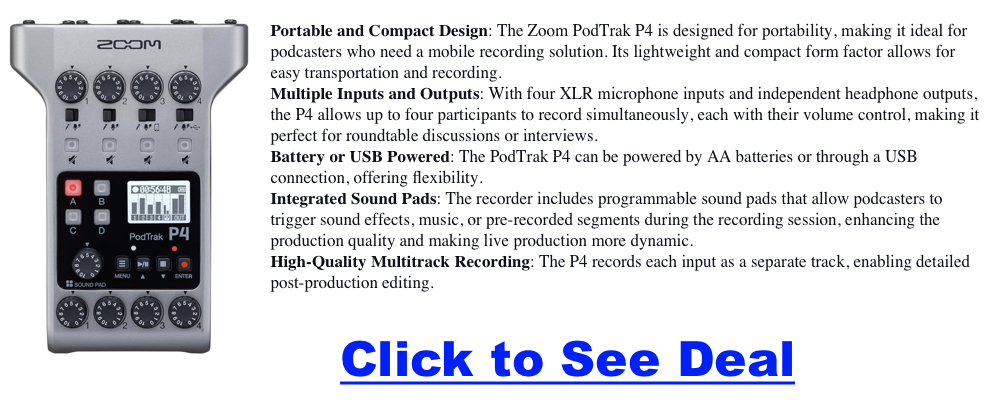
Zoom PodTrak P4 (Portable Recording)
Records up to 4 mics, built-in sound pads, SD card slot, and battery-powered. Ideal for mobile creators.
Headphones
- Closed-back: Prevents mic bleed
- Comfort: Choose soft ear cups for long sessions
- Sound Accuracy: Critical for editing

Improve Your Recording Space
- Use rugs, curtains, or acoustic foam to minimize echo
- Small padded spaces like closets are effective
Computers for Podcasting
- Minimum 16GB RAM
- SSD storage for faster processing
- Quiet fan, multiple ports, strong CPU
Check our laptop guide for podcasting.

Podcast Cameras & Lighting

Podcast Hosting Comparison
Best DAWs for Podcasting
- Audacity (Free)
- GarageBand (Mac)
- Logic Pro
- Reaper
- Pro Tools
- Ableton Live / FL Studio / Cubase
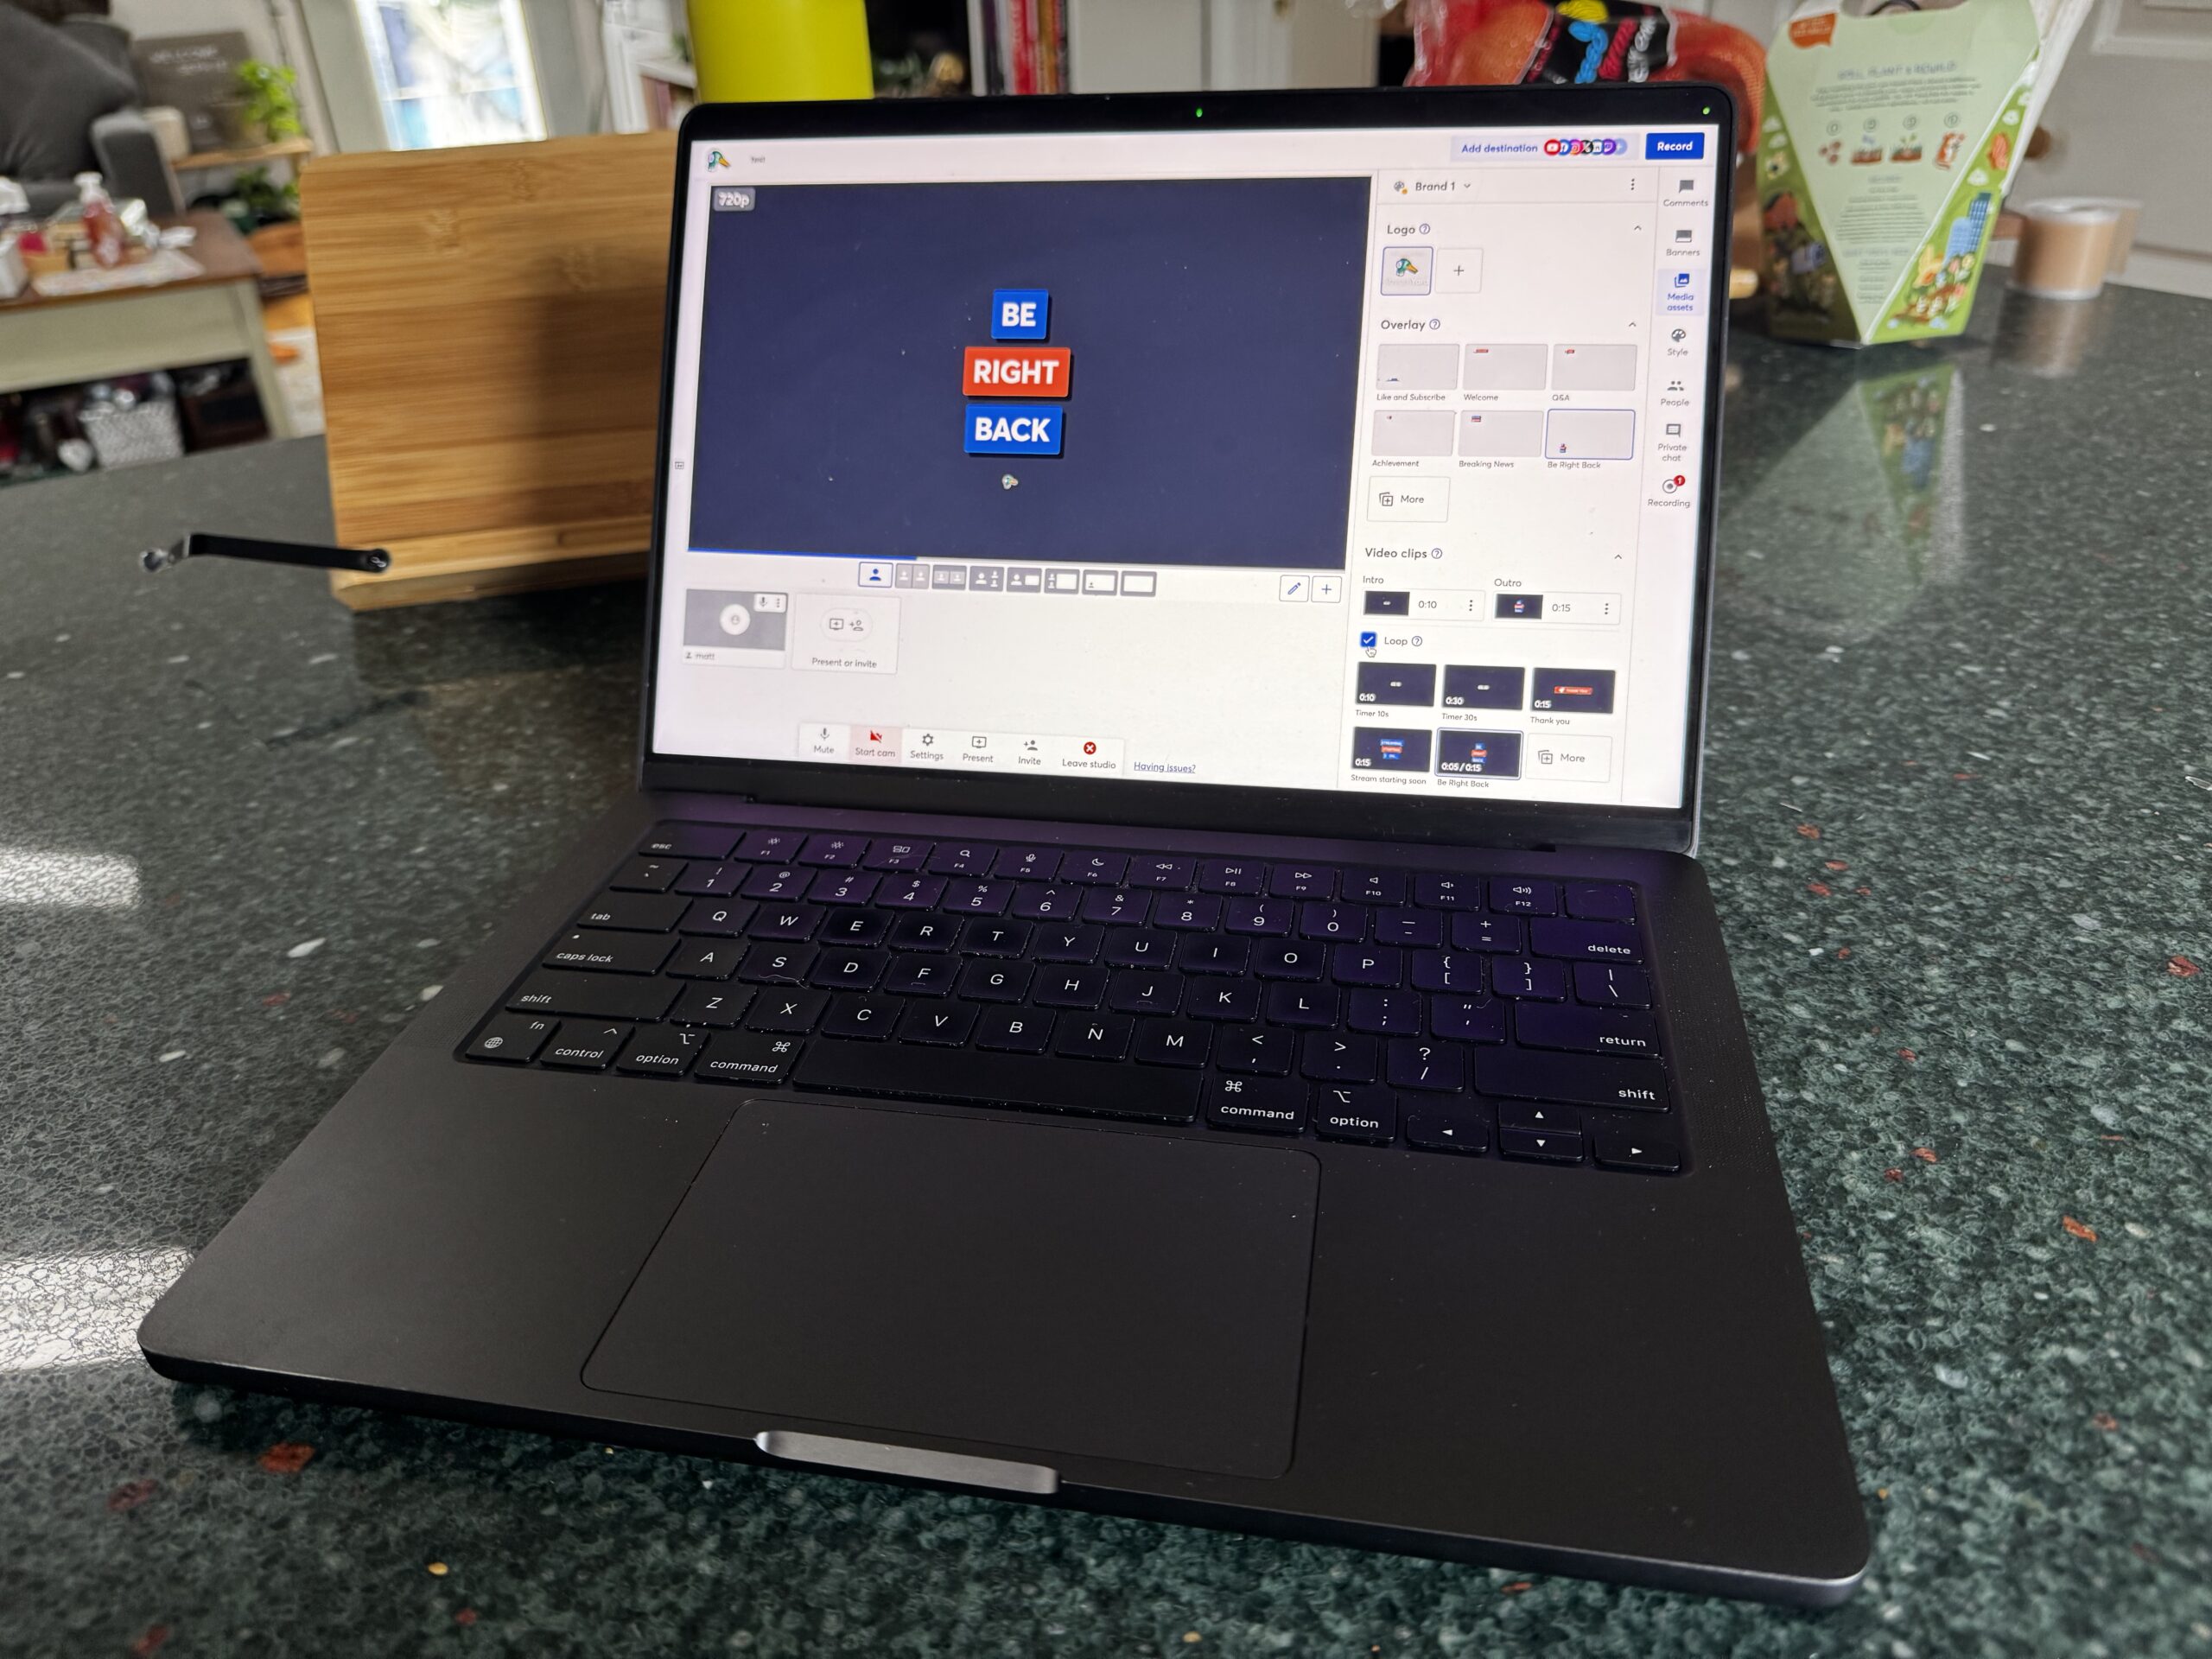
Anchor is Now Spotify for Podcasters — What Does That Mean?
If you’ve been a longtime Anchor user, you might have logged in recently and thought, “Wait, where did everything go?” The short answer: Anchor as a brand is gone — it’s now fully rebranded as Spotify for Podcasters. This isn’t just a name change. It represents a major shift in platform structure, editing tools, monetization features, and user interface.
In March 2023, Spotify officially sunset the Anchor name and integrated all its podcasting tools into the Spotify for Podcasters platform. While the goal was to streamline the podcasting experience under one Spotify-first hub, the transition has stirred mixed reactions across the creator community.
Key Changes: From Anchor’s Freeform to Spotify’s Structured Experience
Think of podcasting platforms like LEGO sets. Anchor gave you a pile of bricks and said, “Go wild.” Spotify for Podcasters, meanwhile, gives you pre-packaged kits — powerful and slick, but with more defined edges.
| Feature | Anchor (Legacy) | Spotify for Podcasters |
|---|---|---|
| Editing Interface | Basic but intuitive drag-and-drop editor | Streamlined UI tied closely to Spotify’s CMS |
| Monetization | Sponsorships, listener support, ad insertions | Expanded monetization — including video podcasts & subscriptions |
| Distribution Control | Manually edit where your podcast appears | Simplified workflow — Spotify retains more routing control |
| Community Features | User-generated Q&A, basic analytics | Enhanced analytics, Spotify audience insights, polls |
Audio Comparison: The Editor Evolution
If you lean on in-browser post-production, this one’s for you. We compared the old Anchor editor with Spotify’s newer interface:
- Anchor Editor: Intuitive drag-and-drop segments
- Spotify Editor: Sleeker interface, but fewer options for segment manipulation
Listen to this short before & after edit comparison:
Click for the best monetization platforms
User Sentiment on the Transition
The community is divided. We’re tracking the real-time pulse of podcasters just like you. Cast your vote and see what others think:
Interactive Quiz: What Type of Podcaster Are You Post-Anchor?
Things have changed — but so have you. Find out how your workflows align with Spotify’s tools now:
Download: Spotify Dashboard Adjustment Checklist
This free PDF download helps you migrate confidently:
- Where to find your episodes
- How to update monetization settings
- Where your audience analytics live now
Helpful Resources for Next Steps
Still deciding if Spotify for Podcasters is right for you? Here are deep-dive guides:
FAQs
Is Anchor still available as a standalone app?
No. Anchor has been fully incorporated into Spotify for Podcasters, and the legacy mobile app has updated accordingly.
Can I still use Anchor’s RSS feed to distribute my podcast elsewhere?
Yes, you still get an RSS feed. However, Spotify is nudging creators to use Spotify-first tools, and support for RSS customization has become more limited.
Do I need a Spotify account to manage my podcast now?
Yes. Your podcast management interface is now through Spotify for Podcasters, which requires a free Spotify account.
Final Thoughts
The Anchor-to-Spotify shift feels a bit like moving from your own art studio into a shared office. You’ve still got the tools — but some of the creative freedom feels, well… redirected. That said, Spotify’s ambition to centralize podcasting tools isn’t without advantages. If you’re ready to embrace what’s next — or explore alternatives — the path is wide open.
What Is Ad Tracking? A Podcaster’s Guide to Smarter Sponsorships and Monetization
If you’ve ever wondered how podcasters track which ads work, prove their influence to sponsors, or improve listener engagement—the answer is often ad tracking.
Whether you run a growing indie show or manage a branded podcast, understanding ad tracking can help you get better sponsors, refine your promotions, and build a smarter business.
In this guide, we’ll break down what ad tracking means for podcasters, how it works, why it matters, and how to use it responsibly.
What Is Ad Tracking (for Podcasters)?
Ad tracking is the process of measuring how your audience interacts with podcast-related ads—whether it’s hearing, clicking, or converting.
For podcasters, this might involve tracking:
- Who clicked a custom affiliate link
- How many listeners followed a SmartLink or CTA
- Whether ad mentions resulted in signups, sales, or downloads
- Which platforms, episodes, or placements performed best
It connects listener behavior to campaign outcomes so you can optimize what works.
How Ad Tracking Works in Podcasting
Unlike visual web ads, podcast ads often rely on creative tracking methods:
• SmartLinks (e.g., Chartable, Podsights)
Unique short links that redirect users and collect click/conversion data.
• UTM Parameters
Custom tags added to URLs that help you identify traffic sources and user actions in Google Analytics.
• Promo Codes
Custom discount codes allow you and sponsors to track sales driven by your ad mentions.
• Pixel Tracking
While not embedded in the audio, pixels placed on landing pages can help measure post-click conversions.
• Listener Analytics
Some podcast hosts offer IP-based stats (geolocation, device) and partial listener drop-off data.
These tools together help podcasters understand what happens after a listener hears an ad.
Why Podcasters Should Use Ad Tracking
Tracking isn’t just for big brands. Here’s how indie and pro podcasters benefit:
• Prove Your Value to Sponsors
Show real data: clicks, sales, signups, or traffic driven by your show. This makes your sponsorship packages more attractive and justifies higher rates.
• Test and Improve Ad Performance
Track which ad reads perform best, which placement (pre-roll vs. mid-roll) converts better, and what type of CTA your audience responds to.
• Monetize More Effectively
Whether you’re using affiliate links or selling your own products, knowing what converts helps you focus on the most profitable partnerships.
• Optimize Content Strategy
Learn what content drives traffic or action. Adjust your messaging and pacing to keep listeners engaged and responsive.
• Retain Sponsors
Reliable tracking data builds trust. When sponsors see your audience takes action, they’re more likely to renew.
Pros and Cons of Third-Party Ad Tracking Tools
✅ Pros:
- Easy to implement (SmartLinks, UTMs)
- Independent, trustworthy data for sponsors
- Works across platforms
- Enhances affiliate revenue tracking
❌ Cons:
- Privacy compliance (GDPR/CCPA) is your responsibility
- Some tools cost money
- Link redirects or promo codes rely on listeners acting manually
- Apple/Spotify limitations can affect visibility
Legal and Ethical Considerations
Podcast listeners are increasingly privacy-aware. You should:
- Clearly disclose if you use affiliate links or track clicks
- Offer value-first messaging to avoid “spammy” perception
- Use GDPR- and CCPA-compliant tools when necessary
Best Practices for Podcast Ad Tracking
- Use trackable links in your show notes and episode descriptions
- Align links or codes with specific episodes for clarity
- Shorten links with branded redirects (e.g., yoursite.com/tool)
- Review performance weekly or monthly
- Share results with sponsors in a simple, visual report
Final Thoughts
Ad tracking gives podcasters a competitive edge in monetization. It turns guesswork into strategy and makes it easier to grow both your revenue and your credibility with sponsors.
Whether you’re selling ad slots, promoting affiliate offers, or launching your own products, knowing what works puts you in control.
The Best Podcast Companies for 2026: A Complete Guide to Production, Networks, and More
Are you looking to launch a podcast or take your show to the next level? The world of podcasting has exploded, and with it, the number of companies offering everything from full-service production to marketing, distribution, and even podcast networks. Whether you’re a business, creator, or brand, this guide will help you understand the different types of podcast companies, compare the best options, and choose the right partner for your needs.
What Is a Podcast Company?
Podcast companies are businesses that help creators, brands, or organizations produce, market, distribute, or monetize podcasts. They come in several flavors, including:
- Production agencies: Handle everything from planning to recording, editing, and publishing your show.
- Marketing & distribution services: Focus on getting your podcast heard, growing your audience, and securing advertising or sponsorships.
- Podcast networks: Host a portfolio of shows, providing cross-promotion, ad sales, and sometimes production support.
- Hosting platforms: Manage the technical side—RSS feeds, analytics, and syndication to podcast directories.
Who uses podcast companies?
- Businesses wanting to launch branded content
- Independent creators who want professional quality
- Media companies and publishers
Why Work With a Podcast Company?
Benefits:
- Professional audio and editing quality
- Strategic guidance and project management
- Access to experienced producers, editors, and marketers
- Easier access to sponsorships and advertising
- Save time and reduce learning curve
When to Consider It:
- Launching your first show
- Upgrading production quality
- Needing audience growth or monetization support
- Scaling content output or marketing efforts
Types of Podcast Companies (Comparison Table)
| Type | What They Do | Best For | Pros | Cons |
|---|---|---|---|---|
| Production Agency | Plan, record, edit, launch, manage a podcast | Brands, busy creators | Hands-off, high-quality, strategic support | Can be costly |
| Marketing/Distribution Service | Promote, distribute, monetize shows | Podcasters seeking growth | Expand reach, handle sponsorship/ads | Less focus on creative control |
| Podcast Network | Hosts/showcases many podcasts, manages ads | Established creators, brands | Cross-promotion, ad sales, community | Can limit ownership/control |
| Hosting Platform | Technical hosting, syndication, analytics | DIY creators, all podcasters | Affordable, easy syndication | No creative or promo support |
Top Podcast Production & Full-Service Agencies (2026)
| Company | Services Offered | Notable Clients | Location | Target Clientele | Website |
| Quill | Strategy, production, editing, marketing | PwC, Expedia, BlackRock | Toronto, Canada | Brands, enterprises | quillpodcasting.com |
| Sweet Fish Media | B2B podcasting, full production, guest booking | B2B brands, SaaS firms | Florida, USA | Businesses, marketers | sweetfishmedia.com |
| Lower Street | Narrative podcasts, custom production, sound design | Startups, agencies | London, UK | Brands, agencies | lowerstreet.co |
| Pacific Content | Premium storytelling, strategy, audience growth | Dell, Slack, Ford | Vancouver, Canada | Large businesses | pacific-content.com |
| Mags Creative | Concept, production, branded content, distribution | Facebook, PayPal, M&S | London, UK | Consumer/corporate brands | magscreative.co.uk |
| Cue Podcasts | Event, brand podcasts, end-to-end production | Vice, UNICEF | Manchester, UK | Brands, orgs, agencies | cuepodcasts.com |
| Resonate Recordings | Editing, production, hosting, marketing | 10,000+ podcasts | Kentucky, USA | All podcasters | resonaterecordings.com |
Quick Descriptions:
- Quill – Award-winning agency for branded podcasts, offers strategy through distribution, ideal for enterprises.
- Sweet Fish Media – B2B podcasting specialists, helps companies become industry thought leaders.
- Lower Street – Story-driven production, perfect for brands wanting unique narrative podcasts.
- Pacific Content – High-end storytelling for major brands, deep focus on audience growth.
- Mags Creative – Known for creative branded podcasts for both consumer and corporate markets.
- Cue Podcasts – Creative, flexible agency with a track record in events and branded storytelling.
- Resonate Recordings – Scalable solutions for indie creators up to large organizations, includes hosting.
Best Podcast Marketing & Distribution Services
| Company | Services | Notable Stats / Clients | Target Audience | Website |
| Acast | Hosting, distribution, ads | 140,000+ shows, global reach | Podcasters, advertisers | acast.com |
| Libsyn | Hosting, analytics, ad network | 75,000+ shows, 6B downloads | All podcasters | libsyn.com |
| Podglomerate | Audience growth, monetization | Indie creators, networks | Growing podcasters | thepodglomerate.com |
| Sound That Brands | Branded podcast production/marketing | Trader Joe’s, NBC | Brands, marketers | soundthatbrands.com |
| Ad Results Media | Podcast ad placement, campaigns | Spotify, iHeart, Audacy | Brands, advertisers | adresultsmedia.com |
Quick Descriptions:
- Acast – Leader in podcast hosting/distribution and dynamic ad marketplace.
- Libsyn – One of the oldest and most reliable hosts; built-in ad marketplace.
- Podglomerate – Growth-focused marketing and monetization for indie and network shows.
- Sound That Brands – Full-service branded podcast agency, strategy through marketing.
- Ad Results Media – The go-to for large-scale podcast ad campaigns.
Leading Podcast Networks
| Network Name | Notable Shows/Hosts | Unique Strengths | Target Audience/Creators | Website |
| iHeartRadio | Stuff You Should Know, The Breakfast Club | Massive reach, radio integration | Broad, mass-market | podcasters.iheart.com |
| Wondery | How I Built This, Morbid, Business Wars | High production, immersive stories | Indies, true crime/business | wondery.com |
| Earwolf | Comedy Bang Bang, Office Ladies | Comedy focus, SiriusXM backing | Comedy creators/audiences | earwolf.com |
| NPR Podcasts | Planet Money, Up First | Journalism, trusted brand | News, education, culture | npr.org/podcasts |
| HubSpot | My First Million, Marketing Against the Grain | Business/marketing niche | Marketers, entrepreneurs | hubspot.com/podcast-network |
| PodcastOne | Jordan Harbinger, Kaitlyn Bristowe | Celebrity/influencer shows | Entertainment, influencers | podcastone.com |
Quick Descriptions:
- iHeartRadio – Crosses radio and podcasting, huge network, ideal for mainstream audiences.
- Wondery – Home of hit narrative series, strong support for indies.
- Earwolf – Comedy leader, great for talent wanting to join a fun, creative community.
- NPR – Gold standard for journalism and storytelling.
- HubSpot – The go-to for business, entrepreneurship, and marketing podcasts.
- PodcastOne – Perfect for established personalities and mainstream pop culture shows.
How to Choose the Right Podcast Company
- Define Your Goals: Are you launching, growing, or monetizing? Do you want to outsource everything, or just certain parts?
- Budget & Commitment: Production agencies and networks usually require higher spend; marketing/distribution can be more flexible or pay-as-you-grow.
- Level of Support: Do you need full-service help, or just distribution/hosting?
- Ownership & Control: Some networks may want exclusivity or revenue sharing. Production agencies often let you retain full rights.
- Type of Content: Narrative podcasts may need a storytelling agency (e.g., Lower Street), while interview or branded podcasts can work with B2B-focused firms (e.g., Sweet Fish Media).
Smart Questions to Ask:
- What’s included in the package? (editing, music, artwork, promotion)
- Who owns the show and intellectual property?
- What is the minimum contract length?
- What metrics are tracked and shared?
- Do you provide access to ad/sponsorship opportunities?
Podcast Industry Trends for 2026
- Branded podcasts are booming, with more businesses launching shows to reach niche audiences.
- International agencies and networks are growing—don’t overlook UK, Canadian, or European firms.
- Podcast ad spending continues to rise, fueling new networks and tech platforms.
- Video podcasting and multi-platform content are on the rise; some agencies now offer YouTube and TikTok integration as part of the package.
Frequently Asked Questions (FAQ)
Q: What’s the difference between a podcast network and a production agency? A: A production agency creates podcasts for clients. A network hosts and promotes shows, often in exchange for ad sales or exclusivity.
Q: How much does it cost to hire a podcast company? A: Prices range from a few hundred dollars (basic editing) to $10,000+ per month for full-service production or network representation.
Q: Can indie creators work with big networks? A: Some networks accept pitches, but most work with established shows or brands. Agencies, however, are more accessible.
Q: Do I need a podcast company to succeed? A: Not always! DIY is possible (especially with good hosting platforms), but companies accelerate quality, growth, and monetization.
Conclusion
Podcast companies make it easier than ever to produce, promote, and monetize your show—whether you’re a business, an independent creator, or a brand. From full-service agencies to global networks, there’s a solution for every need and budget. Compare your options, ask smart questions, and choose the partner that fits your podcasting goals!
Best Laptop for Podcasting in 2026
Podcasting continues to grow rapidly, and having the right laptop can streamline everything from editing to remote recording. Whether you’re a beginner or a seasoned creator, selecting a laptop that strikes a balance between performance, portability, and connectivity is crucial. This guide covers the best laptops for podcasting in 2026, including both macOS and Windows options, with a focus on real-world podcasting needs such as audio editing, battery life, and quiet operation. Now, with the newer M4 and soon-to-be M5 chips, along with all the Intel and AMD options, there are some really great options available!
Let’s get started:
Best Overall Laptop for Podcasting
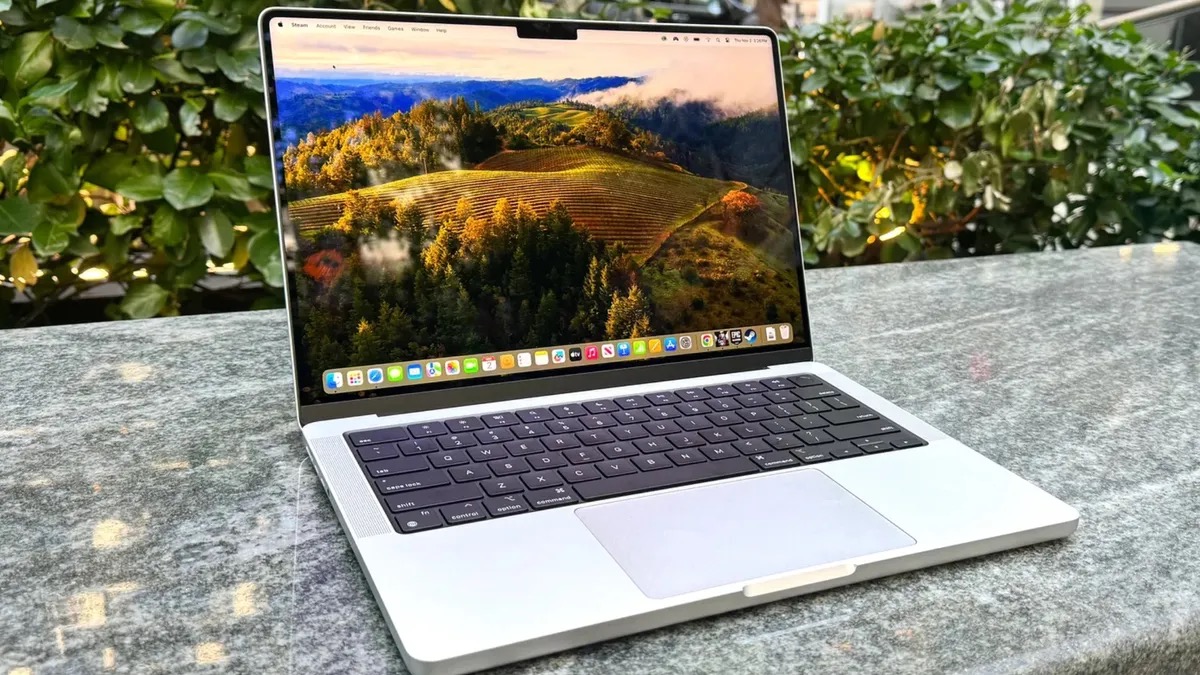
MacBook Pro M4 2026
A few months ago, I was still editing my podcast episodes on a 2012 MacBook Pro. It wheezed through multitrack sessions, crashed if I had too many plugins open, and exporting episodes took forever. Eventually, it just couldn’t keep up. I upgraded to a 14-inch MacBook Pro and the difference was night and day. Suddenly, my editing software opened instantly, exports were lightning-fast, and everything just worked. That upgrade was the single best thing I’ve done for my workflow!
With 1TB of super fast storage, a killer battery, 18 gigs of ram, and a screen that’d make any big screen jealous, the 14 inch MacBook is the perfect machine for cranking out new content.
Love:
- Powerful CPU & RAM for smooth editing in DAWs (Audacity, Logic Pro, Adobe Audition, etc.)
- Large and Fast Storage for saving high-quality audio and video files
- Quiet Performance for clean recordings (especially in fanless models)
- Long Battery Life for mobile sessions and travel
- Essential Ports (USB, Thunderbolt, audio jack, SD card) to support audio interfaces, mics, and accessories
Specs:
- CPU/GPU: M3 Pro or new M4 Pro chips (12-core CPU / 18-core GPU or higher)
- RAM: 18GB+ (up to 96GB configurable)
- Storage: 512GB to 8TB SSD
- Display: 14.2″ Liquid Retina XDR (3024×1964)
- Battery: Up to 18 hours
- Ports: 3x Thunderbolt 4, HDMI, SD card reader, MagSafe, 3.5mm jack
- Why It’s Great: Handles multitrack editing, plugins, and rendering with ease; quiet operation; amazing battery life; macOS is extremely stable with creative software.
- Price: Starting around $1,999
If you need maximum power and pro-level stability, the MacBook Pro 14″ is unmatched for podcasters.
💤 Best Silent Laptop for Mobile Podcasters
🔹 Apple MacBook Air 15-inch (M3, 2024)
Fanless and featherlight, this is perfect for podcasters who value silence and mobility.
- CPU/GPU: Apple M3 chip (8-core CPU / 10-core GPU)
- RAM: 8GB or 16GB (up to 24GB)
- Storage: 256GB to 2TB SSD
- Display: 15.3″ Liquid Retina
- Battery: 15–18 hours
- Ports: 2x Thunderbolt 4, MagSafe, 3.5mm jack
- Why It’s Great: No fan = no noise. Lightweight, long-lasting, and powerful enough for podcast editing and remote sessions.
- Price: Starting around $1,299
💪 Best Windows Laptop for Power Users
🔹 Dell XPS 16 (2024)
For creators who need raw power and premium hardware.
- CPU/GPU: Intel Core Ultra 7 or 9 (14-core), optional NVIDIA RTX 4050/4060/4070
- RAM: 16GB to 64GB LPDDR5x
- Storage: 512GB to 4TB SSD
- Display: 16.3″ FHD+ or 3.5K OLED touchscreen
- Battery: ~10 hours (real-world use)
- Ports: 3x USB-C/Thunderbolt 4, microSD, 3.5mm jack
- Why It’s Great: Desktop-class editing power in a laptop. Excellent display, strong battery, and quiet under load.
- Price: Starts around $1,899; higher specs can reach $2,500+
🔄 Best 2-in-1 for Remote Work and Interviews
🔹 HP Spectre x360 16 (2024)
Flexible, powerful, and packed with ports.
- CPU/GPU: Intel Core Ultra 7 (14-core), optional RTX 4050
- RAM: 16GB or 32GB
- Storage: 1TB SSD (upgradable)
- Display: 16″ 2.8K OLED touchscreen
- Battery: 10–18 hours depending on config
- Ports: 2x USB-C, 1x USB-A, HDMI 2.1, 3.5mm jack
- Why It’s Great: Excellent webcam + mic setup, 2-in-1 flexibility, strong speakers. Ideal for podcasters who travel, interview remotely, or need versatility.
- Price: Starts around $1,299; OLED/RTX models run higher
💸 Best Budget Pick for Beginner Podcasters
🔹 Acer Aspire 5 (2024)
A reliable starter laptop with all the essentials.
- CPU: Intel Core i5/i7 or AMD Ryzen 7
- RAM: 8GB to 16GB
- Storage: 512GB SSD
- Display: 15.6″ Full HD IPS
- Battery: ~8 hours
- Ports: USB-C, USB-A, HDMI, Ethernet, 3.5mm jack
- Why It’s Great: Affordable, upgradable, and works well for solo podcasters using Audacity or GarageBand. Has all the ports beginners need.
- Price: Starts at ~$499
📊 Podcasting Laptop Comparison Table
| Laptop | Best For | CPU/Chip | RAM | Display | Battery | Starting Price |
|---|---|---|---|---|---|---|
| MacBook Pro 14 (M4) | Pro audio editing | M4/M4 Pro | 18GB+ | 14.2″ XDR | 14 hrs | $1,999 |
| MacBook Air 15 (M4) | Silent, mobile work | M4 | 8–16GB | 15.3″ Retina | 15+ hrs | $1,299 |
| Dell XPS 16 | Power users & multitaskers | Intel Ultra | 16–64GB | 16.3″ OLED | 10 hrs | $1,899 |
| HP Spectre x360 16 | Remote interviews | Intel Ultra | 16–32GB | 16″ OLED | 12 hrs | $1,299 |
| Acer Aspire 5 | Beginners, low budget | Intel/AMD | 8–16GB | 15.6″ FHD | 8 hrs | $499 |
🔹 Tips for Picking the Right Laptop
- Mac vs. Windows: Macs are optimized for Logic Pro and GarageBand; Windows is great for flexibility and customization.
- Don’t ignore ports: USB-C is common, but you may need adapters for your mic/interface setup.
- Upgrade smart: Start with enough RAM (16GB is ideal), and make sure your SSD is fast and big enough for audio projects.
- Battery life matters: For mobile podcasters, long battery life = fewer interruptions.
📈 Final Thoughts
The best laptop for podcasting depends on your workflow, budget, and whether you prioritize silence, power, or portability. Whether you’re editing hours of audio, interviewing on the go, or launching your very first show, there’s a perfect machine for you.
Looking for podcasting mic recommendations or gear bundles next? Check out our guides on:
USB to XLR Adapters for Podcasters: Are They Worth It?
If you’ve ever wanted to upgrade your podcast audio without diving into the deep end of pro studio gear, you’ve probably stumbled across USB to XLR adapters. They promise to bridge the gap between professional microphones and your laptop—but are they actually worth it?
This guide breaks it all down: what they are, who should use them, what to avoid, and what gear works best.
What Is a USB to XLR Adapter?
At its core, a USB to XLR adapter lets you plug a professional XLR microphone into a USB port on your computer. This is ideal for podcasters who want better sound than a USB mic can provide but don’t want to invest in a full audio interface or mixer.
Note: Some people search for “USB to XLR” when they actually mean the reverse—plugging a USB mic into an XLR mixer. That usually doesn’t work unless the mic has both outputs.
Who Should Use One (and Who Shouldn’t)
Good Fit For:
- Beginner podcasters
- Solo hosts
- Mobile podcasters or travelers
- People testing out XLR mics before upgrading their setup
Not Ideal For:
- Multi-mic setups
- Gain-hungry mics like the Shure SM7B
- Podcasters planning to scale up
Pros and Cons of USB to XLR Adapters
Pros:
- Affordable (often $30–$100)
- Simple, plug-and-play setup
- Portable and lightweight
- Lets you use pro-level mics without bulky gear
Cons:
- Often weak preamps (can result in low volume or noise)
- Many lack phantom power for condenser mics
- Limited features (no gain knobs, EQ, or multi-track support)
- No direct headphone monitoring on cheaper models
- Can bottleneck your mic’s potential
What Podcasters Need to Watch Out For
1. Gain Problems
If you’re using a dynamic mic like the Shure SM7B, many cheap USB adapters won’t provide enough gain. Your recordings will sound too quiet or noisy.
2. Phantom Power
Condenser microphones require phantom power (48V). Not all adapters offer this, so check before you buy.
3. Latency and Monitoring
Without onboard headphone monitoring, you’ll experience lag in your headphones. For real-time feedback, this is a dealbreaker.
4. Audio Quality
Some adapters are capped at 16-bit/44.1kHz. That might be fine for casual use, but if you want studio-level clarity, aim for 24-bit adapters.
Better Option? USB Audio Interfaces
If you’re serious about your podcast, a USB audio interface might be a better long-term investment.
Recommended Interfaces:
- Focusrite Scarlett Solo – clean preamps, phantom power
- Rode AI-1 – podcaster-friendly with great sound
- Zoom U-22 – portable, versatile
These give you better gain control, phantom power, monitoring options, and cleaner audio. For just a bit more money, you avoid all the limitations of USB adapters.
Recommended USB to XLR Adapters
Budget Picks:
- Shure X2U – great preamp, headphone jack, phantom power
- Behringer XLR-to-USB – cheap starter option
- iRig Pre 2 – great for mobile podcasters
Tip: If you use a mic like the Samson Q2U or ATR2100x, these have both USB and XLR built-in—making them ideal for beginner to intermediate setups.
Mistakes to Avoid
- Buying an adapter for a condenser mic without phantom power
- Thinking all USB adapters are equal (they’re not!)
- Using an adapter long-term when a $99 interface would solve all your problems
Sample Podcasting Setups
| Podcaster Type | Recommended Setup |
|---|---|
| Budget Beginner | Samson Q2U (USB/XLR hybrid) |
| Traveling Podcaster | Rode VideoMic + iRig Pre 2 |
| Studio Solo Setup | SM58 + Scarlett Solo |
| YouTube & Podcast Mix | Rode PodMic + Rode AI-1 |
Final Verdict: Is It Worth It?
USB to XLR adapters are a helpful shortcut for podcasters who want to dip their toes into pro audio without spending hundreds. But they come with limitations.
If you just want to record solo and keep it simple, they work.
If you’re planning to grow, collaborate, or upgrade gear, get an audio interface instead.
Want help choosing your first mic or interface? [Click here to download our free gear guide for podcasters.]
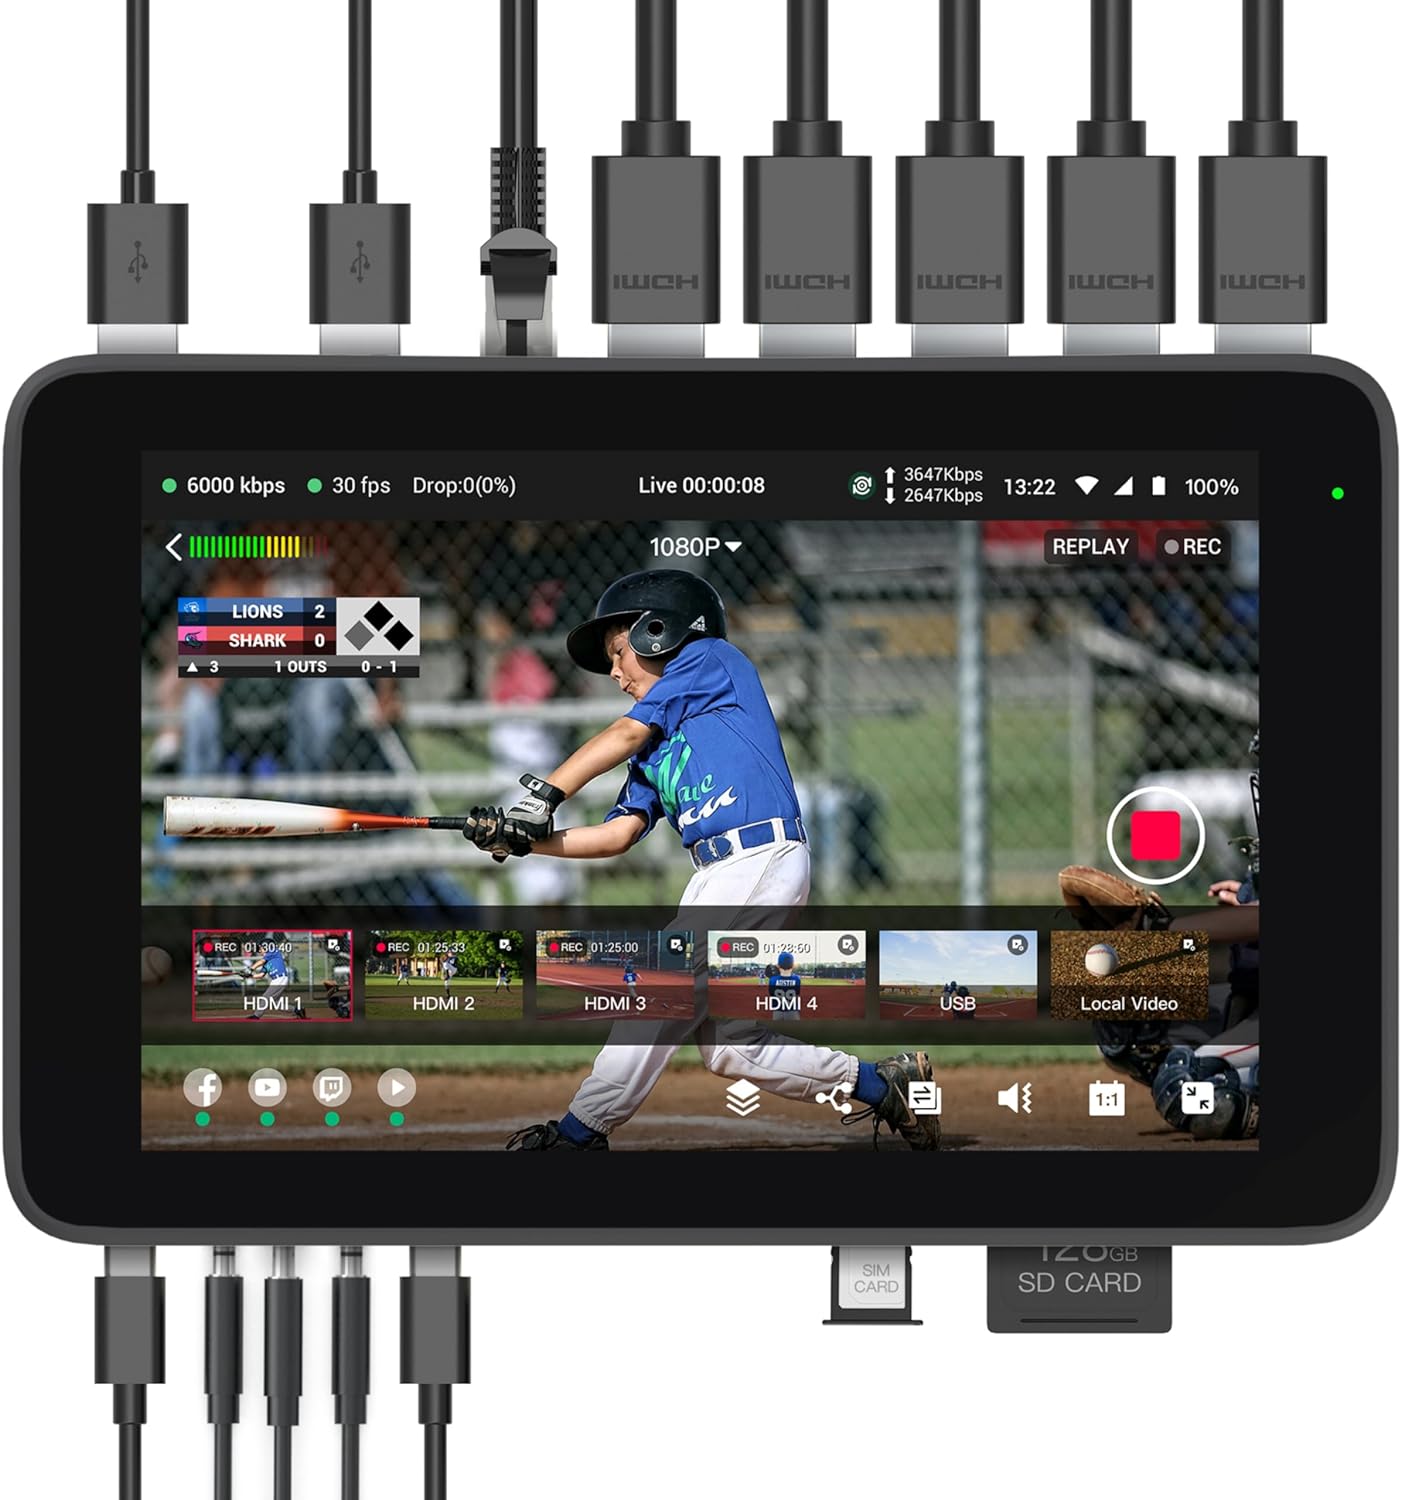
The Best YoloLiv Setup for Podcasters and YouTubers: YoloBox Ultra vs Pro vs Mini
If you’re a podcaster or YouTuber just starting out with live streaming, the YoloLiv YoloBox lineup offers a plug-and-play, professional-grade solution that replaces complex gear with a single, touchscreen device. Whether you want to broadcast a multi-camera podcast, livestream a behind-the-scenes vlog, or conduct interviews on the go, there’s a YoloBox for your needs.
In this guide, we’ll compare the YoloBox Ultra, Pro, and Mini, and walk you through the best gear, accessories, and real-world use cases so you can stream smarter—not harder.
 Click here to learn more about Yololiv Yolobox
Why YoloBox for Creators?
YoloBox devices combine a monitor, video switcher, encoder, recorder, and live streaming studio all in one. You don’t need OBS, a laptop, or extra software. With a YoloBox, you can:
- Stream directly to YouTube, Facebook, or custom RTMP destinations
- Switch between multiple cameras with a tap
- Add overlays, titles, timers, or even viewer comments
- Record everything to an SD card for easy repurposing
- Go live anywhere using Wi-Fi, Ethernet, or 4G LTE
That means faster content creation, more engagement, and a streamlined workflow.
Yololive YoloBox Comparison: Ultra vs Pro vs Mini
| Feature | YoloBox Mini | YoloBox Pro | YoloBox Ultra |
|---|---|---|---|
| Display | 5.5″ (500 nits) | 8″ (400 nits) | 8″ (650 nits) |
| HDMI Inputs | 1 (1080p60) | 3 (1080p60) | 4 (up to 4K60) |
| USB Inputs | 1 | 1 | 2 + USB-C |
| HDMI Output | Yes | Yes | Yes |
| Max Streaming Res | 1080p | 1080p | 4K30 |
| ISO Recording | No | No | Yes |
| Chroma Key | Limited | Yes | Yes |
| NDI Support | No | No | Yes (via license) |
| Battery Life | ~2–3 hrs | ~3 hrs | ~6.5 hrs |
| Weight | ~0.7 lbs | ~1.6 lbs | ~2.2 lbs |
| Est. Price (USD) | ~$699 | ~$999 | ~$1399 |
Best for:
- Mini: Solo creators, travel vloggers, minimal setups
- Pro: Podcasters with 2–3 cams, interview setups, standard streaming
- Ultra: Full 4K workflows, ISO recording, advanced networking, 4+ cam setups
Must-Have Accessories for YoloBox Setups
🎥 Mounts & Cages
- PK1 Cage – Mount accessories like lights, mics, wireless receivers
- SmallRig Monitor Mount – Tilt/swivel YoloBox on tripods or camera rigs
🔌 Cables & Power
- Short HDMI Cables – Reduce clutter and signal interference
- Right-angle HDMI Adapters – Clean connections for tight setups
- Portable Power Bank (e.g., Anker) – Extend streaming time on the go
📡 Wireless & Audio
- Hollyland Mars Wireless HDMI – Stream wirelessly from roaming cams
- Rode Wireless GO II / Hollyland Lark 150 – Reliable wireless audio
- USB/XLR Mics (Shure MV7, SM7B, Feelworld PM1) – Professional sound
💡 Lighting
- Aputure MC / Mini LED Panels – Small, bright, battery-powered
- Softbox or Ring Light – Flattering light for studio setups
📶 Networking
- 4G LTE SIM or Hotspot – Reliable on-the-go streaming
- Speedify / Network Bonding (Ultra only) – Combine Wi-Fi + LTE + Ethernet
How YoloBox Improves Creator Workflows
✅ Go Live Anytime, Anywhere
No more laptops, capture cards, or tangled wires. YoloBox makes streaming portable and spontaneous.
🎬 Record Once, Repurpose Everywhere
Record a clean, mixed stream to SD card. Upload full episodes, repurpose clips, or offer behind-the-scenes content to your audience.
🎨 Professional Look Without the Tech Headache
Add logos, names, countdowns, and transitions—all on-screen without needing a graphics team.
💰 Boost Engagement and Monetization
Multi-stream to multiple platforms, increase live viewer interaction, and improve sponsor appeal with high-quality production.
YoloLiv FAQ for Podcasters & YouTubers
Q1: Do I need a computer to use YoloBox?
No. All YoloBox models are standalone. You don’t need a laptop, OBS, or additional software. Just connect your camera(s), audio, and network, and you’re ready to go live.
Q2: Can I record and stream at the same time?
Yes. All YoloBox units let you record your stream to an SD card while broadcasting. The Ultra also allows ISO recording (individual camera feeds recorded separately).
Q3: Can I stream in vertical mode for TikTok or Instagram Live?
Only the YoloBox Ultra supports native vertical (9:16) mode. The Mini and Pro stream in standard horizontal (16:9) format.
Q4: Can I use wireless microphones?
Yes. Wireless mic systems like the Rode Wireless GO II or Hollyland Lark 150 are compatible via the 3.5mm mic input.
Q5: Can I use Zoom or Skype guests in my stream?
Yes. You can input a laptop via HDMI or USB (on the Pro/Ultra) and show your guest on-screen. Some creators also use a capture card into the USB port.
Q6: How many platforms can I stream to at once?
All YoloBox models support up to 3 simultaneous platforms (YouTube, Facebook, Twitch, or custom RTMP), built-in and free—no third-party service required.
Q7: Do I need internet to stream?
Yes. YoloBox supports Ethernet, Wi-Fi (2.4/5GHz), or 4G LTE SIM cards. You can also tether your phone or use a mobile hotspot.
Q8: Can I use DSLR or mirrorless cameras?
Absolutely. Any camera with an HDMI out can be used. You may need a mini- or micro-HDMI to full HDMI cable.
Q9: Is there audio delay correction?
Yes. YoloBox includes manual audio delay settings to sync video and sound if needed.
Q10: Is there a monthly fee?
No subscription is required. All key features (multistreaming, overlays, SD recording) are included. Some advanced features like NDI input require a one-time license on Ultra.
Q11: Can I update the software?
Yes. YoloBox devices receive regular firmware updates with new features and improvements.
Q12: What’s the warranty or support like?
YoloLiv offers a 1-year limited warranty. Their support team is known to be responsive and active in their user communities (Facebook, YouTube, forums).
Final Thoughts: What Should You Get?
- Just getting started? YoloBox Mini is all you need to launch a pro-quality livestream.
- Growing your show? YoloBox Pro hits the sweet spot with 3 camera inputs and great flexibility.
- Ready for top-tier production? YoloBox Ultra brings 4K, ISO recording, and future-proof power.
Whichever model you choose, YoloBox puts the control, creativity, and convenience back in your hands—so you can focus on content, not cables.
You’re About to Make a Big Mistake Choosing Buzzsprout — Here’s Why
Buzzsprout is a well-known podcast hosting platform, but is it really the best option for podcasters who want to grow, monetize, and avoid unexpected costs? If you’re leaning toward Buzzsprout, you might want to pause. There are hidden limitations and creeping costs that many podcasters don’t realize until it’s too late — and by then, switching can be a hassle. Before you lock in your plan, let’s look at why Buzzsprout could be a costly mistake — and why Podbean may actually be the smarter move.
Podbean Users Save Big on Hosting Costs.
Find Out How Switching Could Keep More Money in Your Pocket — Start Here →
The Buzzsprout ‘Free Plan’ Trap
Buzzsprout’s free plan might seem like a good starting point, but it’s more limiting than most new podcasters realize.
- Buzzsprout offers 2 hours of uploads per month, but episodes expire after 90 days. That means your content disappears unless you upgrade.
- No access to advanced tools like Magic Mastering or Cohost AI unless you pay extra.
- Additional storage costs $4 per extra hour, so over time, the ‘free’ plan can get expensive.
What Podbean Offers Instead:
- 5 hours of storage and 100GB of monthly bandwidth — a far more generous starter plan.
- Customizable podcast website included in the free plan.
- Basic podcast statistics to track your show’s growth without paying extra.
Monetization — Who Really Helps You Make Money??
Buzzsprout’s approach to monetization is limited and requires you to meet certain criteria before you can earn.
- Buzzsprout Ads: Only available on paid plans and requires a specific number of downloads.
- Subscription model: Buzzsprout takes a 15% cut of your earnings.
How Podbean Wins Here:
- Monetization available even on the lowest-tier plans.
- Access to the PodAds Marketplace, Patron Program, and Premium Sales.
- You keep 100% of your subscription revenue, with no revenue sharing.

Storage Limits — The Hidden Costs of Buzzsprout
Buzzsprout’s storage limits can quickly become a financial burden, especially for podcasters who publish frequently.
- Paid plans range from 3 to 12 hours of uploads per month.
- Every additional hour costs $2 to $4, and there’s no true unlimited option.
Podbean’s Approach:
- Unlimited Audio plan for $9/month with unlimited storage and unmetered bandwidth.
- No extra fees for uploading more episodes or extending the length of episodes.
Advanced Features and Customization
Buzzsprout charges extra for features that come standard with Podbean plans.
- Magic Mastering: Available for an extra fee, offering audio enhancement.
- Cohost AI: Only on higher-tier plans, providing limited episode scripting assistance.
Podbean Includes:
- Podbean AI for audio enhancement and episode scripting.
- Video podcasting support on higher-tier plans.
- Fully customizable podcast websites included in every plan.
Monetize Your Podcast from Day One with Podbean.
No Revenue Sharing, No Upload Caps — Start Earning Now →
Pricing Comparison — The Bottom Line
Hidden Costs Add Up Quickly
Buzzsprout’s a la carte approach may seem flexible, but it often results in a bloated monthly bill. Here’s what you’re really paying for:
- $12/month for only 3 hours of uploads
- $6/month extra for Magic Mastering
- $4/hour if you go over your upload limit
- Additional costs if you want access to AI tools like Cohost
Meanwhile, Podbean includes most of these features in their base plan — for less.
📊 Quick Comparison: Buzzsprout vs. Podbean
| Feature | Buzzsprout | Podbean |
|---|---|---|
| Free Plan | 2 hrs/month, expires in 90 days | 5 hrs total, 100GB bandwidth |
| Storage on Paid Plans | 3–12 hrs/month, then $2–$4/hr | Unlimited storage & bandwidth |
| Monetization Access | Limited, 15% fee on subscriptions | Built-in ads, patron support, 0% cut |
| AI Tools | Cohost AI (add-on) | Podbean AI (included) |
| Audio Mastering | Magic Mastering ($6/mo extra) | Included with Podbean AI |
| Video Podcast Support | ❌ Not supported | ✅ On higher-tier plans |
| Custom Podcast Website | Basic customization | Fully customizable on all plans |
| Price for Unlimited Hosting | ❌ Not available | ✅ $9/mo (billed annually) |
| Buzzsprout’s pricing structure can be misleading. While the entry-level plan seems affordable, extra fees for storage, Magic Mastering, and Cohost AI can add up quickly. | ||
- Entry-level plan starts at $12/month for 3 hours of content.
- Magic Mastering costs an additional $6/month.
- Cohost AI is another added expense.
Podbean’s Pricing:
- Unlimited Audio plan for $9/month (billed annually), including unlimited storage and bandwidth.
- Unlimited Plus plan for $29/month (billed annually), adding video support and more advanced features.
What You’re Missing Out On If You Stick with Buzzsprout
Before we wrap this up, let’s talk about what you won’t get if you stick with Buzzsprout:
- Unlimited uploads (you’ll keep hitting caps)
- Built-in monetization tools from day one
- Support for video podcasting
- Full access to advanced features without stacking add-on fees
Why settle when another option gives you more for less?
Conclusion: Why Podbean Is the Smarter Podcast Host
If you’re planning to take your podcast seriously — or even just want to avoid getting nickel-and-dimed as you grow — it’s time to think twice about Buzzsprout. Yes, they offer a friendly interface and decent onboarding, but that comes with capped storage, premium-priced add-ons, and limited monetization control.
Podbean, on the other hand, includes more out of the box:
- Unlimited audio hosting with no hidden fees
- Real monetization tools from day one
- Advanced features like AI and video support
You’re building a brand. Don’t start on a platform that holds you back.
Act Now — Before You Lock Yourself Into a Limited Platform
Podbean’s $9/month unlimited plan includes what Buzzsprout charges extra for — but pricing like this doesn’t always last.
👉 See why Podbean is the smarter choice →
“Ready to Start Monetizing Your Podcast?”
Don’t just settle for limited options. Learn the 10 Proven Ways to Monetize Your Podcast — from ads and sponsorships to premium content and listener support.
👉 Grab the Complete Monetization Guide Here →
Best Podcast Platforms for Making Money in 2026: Reviews, Comparisons & Monetization Tips
Click here for our favorite money-making platform
Best Podcast Platform for Monetization
Are you ready to finally earn real revenue from your podcast? Whether you’re just starting your show or you’re already getting thousands of downloads, choosing the right podcast platform to monetize with can mean the difference between making pennies on the dollar—or turning your content into a profitable business.
Podcasting is bigger—and more competitive—than ever. With ad spending expected to hit $2.55 billion this year and over 580 million global listeners, even small shows can earn real income. But how you monetize depends heavily on your hosting platform, the monetization tools it offers, and your strategy for combining ads, subscriptions, fan support, and more.
Who is this guide for?
- Creators who want to turn their podcast into a side hustle or full-time gig
- Beginners who want the easiest path to their first dollar
- Brands and networks who need scalable monetization and reporting
- Anyone comparing Podbean, Buzzsprout, Spotify, and more for revenue potential
Favorite Platform To Monetize: Podbean
How Podcast Monetization Works
You can earn from your podcast in several ways—and the best platforms let you use multiple streams at once:
- Dynamic & Programmatic Ads: Automatically inserted by your host, or placed by sponsors.
- Sponsorships: Custom ad reads or partnerships with brands (usually for larger shows).
- Subscriptions: Offer bonus or ad-free episodes for a monthly fee (via Apple, Patreon, Podbean, etc.).
- Listener Support: Tips, donations, and recurring support from superfans.
- Affiliate Marketing: Get paid for recommending gear, tools, or services.
- Merchandise: Sell branded products, guides, or digital downloads.
But not all platforms offer every option. Some take big cuts or require thousands of downloads. Others are beginner-friendly, but limit your growth. That’s why choosing the right platform for your goals is essential.
Quick Comparison Table: 2026’s Best Podcast Monetization Platforms
| Platform | Monetization Methods | Pricing | Platform Cut/Fees | Payout Minimum/Method | Eligibility | Typical CPM / Revenue |
|---|---|---|---|---|---|---|
| Podbean | Dynamic Ads, Sponsorships, Subs, Merch, Donations, Live Gifts | Free, $14–$129/mo | $1/CPM ad fee; 5% on Patron; $0.20/min transcription; AI $6–$8/mo | Not detailed. Usually PayPal/bank | No min. for Ads Marketplace; Paid plan for Fan Club | $25 CPM (mid-roll example) |
| Buzzsprout | Affiliate, Subs, Listener Support, Dynamic Ads | Free trial, $19–$79/mo | 15% on Subs; $10–$20/mo AI; Magic Mastering $6–$12/mo | PayPal; in-app wallet; not always detailed | Paid plan for most; no min. for ads | $10 CPM (Buzzsprout Ads); $18–$25 CPM (industry) |
| Transistor | Dynamic Ads, Private Podcasts, Patreon Integration, YT Auto-Post | $19–$99/mo | No explicit platform cut on ads; $5–$20/mo for transcription | Not detailed | Pro plan for dynamic ads; none for own ads/Patreon | N/A (You keep what you earn on your own deals) |
| Spotify for Podcasters (inc. Megaphone) |
Dynamic Ads, Subs, Premium Video, Fan Support, Host-Read Ads | Free (hosting); Megaphone $99+/mo | 50% of ad revenue; 100% of subs (minus fees) | $10 minimum (bank); monthly payouts | Partner: 10k+ hours, 2k unique, 12+ episodes Megaphone: 20k+/ep |
$20–$26 CPM; top earners $100k+/quarter (video) |
| Libsyn | Auto Ads, Ads Marketplace, Apple Subs | $7–$150/mo | 40% of Auto Ads; 30% of Marketplace; 0% Apple Subs | $20 min, PayPal, check, ACH; 30–90 day payout | No min for Auto Ads; 20k+/ep for Marketplace | $18–$25 CPM (ads) |
| Captivate | Subs, Tips, Dynamic Ads, Direct Sponsorship, Analytics | $19–$99/mo | No explicit cut on tips/subs; payment processor fees apply | Payment processor (Stripe/PayPal), varies | All features on all paid plans | N/A (you keep what you sell; DAX ad rates vary) |
| Acast | Dynamic Ads, Sponsorship, Premium Subs | Free, $14.99–$40/mo | 50% of ad revenue; paid plan for best features | 100 USD/EUR/GBP, 1000 SEK; payout 30–60 days | 10k+ downloads/mo typical for ads | SEK 0.48 ARPL (avg), CPM varies |
| RedCircle | Host-Read Ads, Programmatic Ads, Subs, Donations, Cross-Promo | Free, $14.99–$119.99/mo | 30% host-read ads; 50% programmatic; instant payout on Growth+ | Monthly/instant payout (Growth+); min. not always detailed | 500+ downloads/wk for RAP | Host-read: you set CPM; programmatic: varies |
| Patreon | Subs, Digital Products, Community | 10% fee (new), 8–12% legacy; no hosting | 2.9–5%+processing, 2.5% currency, payout fees | $10 min for PayPal; bank, Payoneer, payout holds | No min; you set up page | Varies by sub price; no CPM |
| Apple Podcasts Subs | Premium/Early Access, Bonus, Ad-Free | $19.99/year (US) | 30% year 1, 15% after; Apple processes payments | Not detailed (Apple pays creators direct) | Must join Apple Podcasters Program | Varies by sub price; no CPM |
This Is Our Favorite Podcast Hosting Platform: PodBean
What to Look For in a Monetization Platform
Before you pick a host, here’s what really matters for maximizing your earnings:
1. Platform Fees and Revenue Share
Some hosts take up to 50% of your ad revenue! Always check the fine print—especially on “free” or ad-driven plans. Lower fees = more money in your pocket.
2. Payout Minimums and Speed
Some platforms require you to hit $100+ before you can cash out. Others pay monthly, or instantly. If fast payments matter, compare this up front.
3. Eligibility Requirements
Many ad networks require a minimum audience (like 2,000+ downloads/month), or restrict features to paid plans. Make sure you qualify before you commit.
4. Monetization Features
Does your host support dynamic ads? Subscriptions? Donations? The more options you have, the easier it is to diversify and scale your income.
5. Support, Analytics, and Extras
Look for hosts with good customer support, transparent analytics, and tools like video podcasting, AI-powered show notes, or audience insights.
Don’t overlook: Hidden fees, forced branding, or plans that don’t scale as your show grows. And in 2026, video podcasting and AI-powered features are game-changers for discoverability and higher CPMs.
Platform-by-Platform Breakdown: Who Wins for Monetization?
Below, we highlight each major platform’s strengths, fees, and unique monetization features:
Podbean
Best all-in-one toolkit
- Dynamic ads, listener donations, premium subscriptions, fan club, live streaming with gifts, merch sales.
- Transparent $1/CPM ad fee; 5% on patron payments; affordable AI/transcription add-ons.
- No download minimum for Ads Marketplace (great for new shows).
- Unlimited hosting on paid plans.
- Strong for community monetization (fan club, live events).
Buzzsprout
Best for beginners and easy affiliate/ads
- Super simple interface, great support.
- 15% cut on listener subscriptions; $10 CPM for Buzzsprout Ads.
- Affiliate marketplace built-in; dynamic ads, premium content.
- Fast PayPal payouts, in-app wallet.
- Best for podcasters just starting or those who value support over advanced features.
Transistor
Best for podcast networks & private podcasts
- Manage unlimited shows under one account.
- Dynamic ads (Pro/Business plans), private podcast feeds, Patreon integration.
- No explicit platform cut on ads; you keep what you sell.
- Pricing based on downloads (not storage).
- Ideal for course creators, businesses, or multi-show brands.
Spotify for Podcasters & Megaphone
Best for video monetization and large audiences
- Free hosting, strong video focus, access to Spotify Audience Network.
- 50% of ad revenue goes to Spotify; you keep 100% of subscriptions (minus fees).
- Partner Program requires 10k+ listening hours/month & 2k unique users.
- Megaphone ($99+/mo) for large networks (20k+/ep).
- Most lucrative for shows with major reach and/or video content.
Libsyn
Legacy platform with deep ad marketplace
- Automatic ads (no min.), Ad Marketplace (20k+/ep), Apple Podcasts Sub integration.
- 40% cut on automatic ads; 30% on marketplace; 0% on Apple subs.
- Predictable pricing based on upload hours.
- Robust analytics, long track record.
- Best for established/professional shows who want access to direct sponsorships.
Captivate
Best for growth and all-included features
- Memberships, tips, dynamic ads, direct sponsorships—all plans.
- No explicit cut on listener support; standard processing fees apply.
- Unlimited podcasts/uploads; pricing based on downloads.
- Advanced analytics, DAX ad integration.
- Perfect for creators focused on audience building and community revenue.
Acast
Best for global ad network access
- Dynamic ads, sponsorships, premium subs.
- 50% cut on ad revenue; paid plans unlock best features.
- $100 minimum payout, 30–60 day window.
- Best for shows with 10k+ monthly downloads seeking access to global brands.
RedCircle
Best for cross-promotion and monetization variety
- Host-read and programmatic ads, subscriptions, listener donations, cross-promo marketplace.
- 30% cut on host-read ads; 50% programmatic; instant payouts on Growth+ plans.
- 500+ downloads/week required for RedCircle Ad Platform (RAP).
- OpenRAP lets you monetize elsewhere without switching hosts.
- Great for creators who want flexibility and rapid payouts.
Patreon
Best for direct fan support and digital sales
- Memberships, digital products, direct community engagement.
- 10% fee (new plans); 2.9–5% processing, currency, and payout fees.
- No minimum audience size; you set your tiers.
- Not a podcast host, but integrates with all major platforms.
- Best for podcasters building a loyal community willing to support.
Apple Podcasts Subscriptions
Best for in-app premium content
- Premium content, ad-free, early access for Apple listeners.
- $19.99/year creator fee; 30% cut year 1, 15% after.
- Must join Apple Podcasters Program.
- No CPM; revenue based on your price and number of subscribers.
- Top for creators with a big Apple Podcasts audience.
Monetization Methods: Real-World Examples
1. Ads & Sponsorships:
- Dynamic/programmatic ads: Podbean, Spotify, Libsyn, Buzzsprout
- Host-read sponsorships: RedCircle, Captivate, Acast
- Typical CPM: $10–$30 CPM for 1,000 listens (varies by niche, ad type, placement)
2. Subscriptions & Premium Content:
- Apple Podcasts Subs: 70–85% payout
- Patreon memberships: Set your own tiers; fans pay monthly
- Podbean/Buzzsprout/RedCircle: Premium episodes, bonus content
3. Affiliate & Product Sales:
- Buzzsprout’s Affiliate Marketplace: One-click links and recurring commissions
- Podbean, Captivate: Merch sales and custom landing pages
4. Listener Support:
- Podbean Fan Club, Buzzsprout listener support, RedCircle tips: Let your audience send one-time or monthly donations
FAQ: Podcast Monetization in 2026
How hard is it to qualify for monetization?
- Anyone can start with tips, donations, or affiliate links. Ads usually require minimum downloads (500–2,000+/mo), while premium content works best with a loyal audience.
What’s the average payout?
- Ad rates range from $10–$30 CPM; subs and merch vary by audience. Diversified shows make more.
Can I use multiple monetization methods?
- Yes! Top earners combine ads, subs, merch, and affiliate links for stability.
Do I need to switch hosts to earn more?
- Not always—some platforms (RedCircle, Patreon) let you layer on new revenue without migrating your show.
Pro Tips for Maximizing Your Podcast Revenue
- Mix and Match Revenue Streams: Don’t rely on just ads. Add listener support, subscriptions, affiliate links, or merch for more consistent income.
- Leverage Video & AI: Video podcasts earn higher payouts on Spotify and YouTube. Use AI tools for transcripts, SEO, and better content.
- Know Your Fees: Always check what your host takes from your earnings—and how fast they pay.
- Promote Across Platforms: Cross-promote on social, email, and guest on other shows to grow your audience (and ad rates).
- Upgrade As You Grow: Start with beginner-friendly tools, but move to advanced platforms as your audience and income scale.
Final Verdict: Which Platform Should You Choose?
- Just starting out or want simplicity? Try Buzzsprout or Podbean for easy monetization and low minimums.
- Running multiple shows or a business? Transistor or Captivate make managing growth easy.
- Ready for video and bigger CPMs? Spotify for Podcasters or Megaphone is your ticket.
- Loyal fanbase? Double down on Patreon or Apple Podcasts Subscriptions.
- Want global ad network access? Acast or Libsyn are top choices for established shows.
- Want it all? Combine two or more for maximum reach and earnings.
→ Pro Tip: Test drive a couple of platforms (many offer free trials) and compare your revenue before committing long-term.
Top Ways to Monetize a Podcast
If you’re trying to figure out other ways to monetize your podcast, then you might want to check out our new tool which customizes a solution based on what your show’s needs are. You can access the tool for free here.
- Dynamic Ad Insertion: Auto-inserted ads based on listener location and behavior
- Subscriptions: Offer premium episodes for a monthly fee
- Affiliate Links: Promote tools, books, or gear in your niche and earn a commission
- Donations: Accept support via Patreon, Buy Me a Coffee, or built-in buttons
- Merch: Sell physical or digital products to superfans
Final Verdict
There’s no one-size-fits-all solution, but if we had to choose one:
🏆 Our Top Choice: Podbean for Monetization Versatility
From beginners to pros, Podbean offers everything you need to build, grow, and monetize your podcast with ease.
Want a full breakdown of Podbean’s pricing plans?
Still comparing? Check out our full guides on Buzzsprout pricing and Transistor pricing.
How Haliey Welch Could Have Turned “Hawk Tuah” Into a Business Empire (Without Crypto Scandals)
Haliey Welch became an internet sensation when her off-the-cuff response in a street interview—”You gotta give him that hawk tuah and spit on that thang!”—turned into a viral meme. Within weeks, the phrase had taken over TikTok, Instagram, and Twitter, with millions of views, remixes, and even merchandise popping up everywhere.
Like many viral stars, Welch had a golden opportunity to turn her 15 minutes of fame into a long-term business. She launched Talk Tuah with Haliey Welch, a podcast produced by Jake Paul’s Betr Media, and quickly built an audience beyond just meme enthusiasts.
But then she made a crucial mistake. Instead of focusing on sustainable ways to monetize her fame, she endorsed the $HAWK cryptocurrency, which skyrocketed in value before collapsing in a classic pump-and-dump scandal. The backlash damaged her reputation, leaving many wondering: What if she had taken a different approach?
Had Welch avoided the crypto route, she could have built a multimillion-dollar brand through smart monetization strategies like affiliate marketing, merchandise sales, and a well-optimized website. Here’s how she could have done it the right way.
Why Crypto Was the Wrong Move
Meme coins can seem like easy money, but they come with major risks. Many influencers who launch their own cryptocurrencies end up facing accusations of fraud, even if they had no intention of scamming anyone. Prices skyrocket, early investors cash out, and everyday people lose money. The same thing happened with $HAWK.
Instead of relying on a short-term gamble, Welch could have focused on long-term, legitimate ways to make money—ways that wouldn’t destroy trust with her audience.
Affiliate Marketing Could Have Been a Goldmine
One of the easiest ways Welch could have monetized her massive online following was through affiliate marketing. She had millions of people quoting her catchphrase and engaging with her content—prime real estate for product recommendations.
With the right partnerships, she could have made thousands per month just by linking to products her audience would love. Some easy affiliate opportunities for her brand include:
- Funny T-shirts and novelty gifts – Amazon Associates, Redbubble, TeePublic
- Podcast and streaming gear – Rode, Shure, Blue Yeti microphones
- Southern fashion & accessories – Wrangler, Ariat, cowboy hat brands
- Betting & gaming platforms – Betr Media’s gambling verticals
- Beverages & party products – Energy drinks, whiskey brands, funny shot glasses
A simple “Shop My Favorite Things” page on her website could have turned into a consistent passive income stream.
The Missed Opportunity of a “Hawk Tuah” Merch Empire
Welch’s meme was tailor-made for merchandise, and yet, she barely capitalized on it beyond a few quick collaborations. The reality? She could have built an entire clothing and accessories brand around Hawk Tuah.
Think about the possibilities:
- T-shirts & hoodies with viral catchphrases
- Trucker hats that fit the Southern-country vibe
- Mugs & drinkware for that signature “spit on that thang” humor
- Stickers & decals to appeal to TikTok and meme fans
By setting up an independent Shopify store (or even using Printify and Printful for a hassle-free approach), she could have made steady profits for years—long after the meme stopped trending.
Brands like Friday Beers and Nelk Boys have built multi-million dollar businesses off meme-inspired merchandise. Welch could have done the same.
A Website Would Have Turned Her Fame into Passive Income
Relying solely on social media for income is risky. Welch should have launched a website where she could control her brand, drive traffic, and generate income through multiple revenue streams.
A well-optimized Hawk Tuah website could have included:
- Blog content & SEO – Articles ranking for keywords related to internet culture and meme trends, bringing in ad revenue.
- An online store – Selling her own merch instead of letting bootleggers profit.
- Lead magnets – Collecting emails in exchange for free downloads, eventually turning them into loyal buyers.
- Brand sponsorships – Companies paying for shoutouts and collaborations.
With a strong website, Welch wouldn’t have to rely on social media algorithms or viral moments—she could have built a real business.
YouTube and Podcast Monetization Had Bigger Potential
Welch already had Talk Tuah, a podcast that was gaining traction. But instead of risky ventures, she could have leaned harder into podcast and YouTube monetization.
She could have:
- Maximized YouTube Ad Revenue – By turning clips from her podcast into viral YouTube Shorts and long-form videos, she could have earned consistent income from ads.
- Secured Sponsorship Deals – Big brands would have lined up to advertise on her show if it stayed controversy-free.
- Created Exclusive Memberships – Patreon, YouTube memberships, or a private fan club with extra content could have been a steady moneymaker.
Many creators make six figures just from these revenue streams alone.
What Could Have Been: The Long-Term Potential of “Hawk Tuah”
If Welch had focused on building a legitimate business, her Hawk Tuah brand could have expanded far beyond its meme origins.
Imagine:
- A “Hawk Tuah” Comedy Tour, selling out shows across the U.S.
- A collab with major brands—Wrangler, Budweiser, or Barstool Sports.
- A Southern lifestyle brand with its own clothing line and accessories.
- Even a TV deal or Netflix special, turning her viral moment into a lasting entertainment career.
Other viral stars have done it—look at how Bhad Bhabie (Danielle Bregoli) turned a meme into a successful music and business career. Welch could have done the same.
The Lesson: Quick Money vs. Smart Money
Welch’s story is a cautionary tale of what happens when viral fame is monetized the wrong way. Instead of launching a questionable cryptocurrency, she could have:
✅ Built a sustainable business through affiliate marketing
✅ Created a thriving merch brand
✅ Developed a website that printed money through SEO and sponsorships
✅ Used YouTube and podcasting for consistent revenue
Instead, she’s now fighting to repair her reputation while others profit off her meme.
The takeaway? If you ever go viral, don’t chase quick money. Focus on building something that lasts.
Interested in turning your podcast into a business that earns money passively? Click here to get my free monetization guide and start now!
- StreamYard Pricing (2026): Full Comparison of Plans, Differences, Features & Discounts
- SquadCast Pricing Explained: Every Plan, Feature, and Trade-Off Worth Knowing
- Zencastr Pricing Explained: Which Plan Actually Fits Your Podcast?
- Best Podcast Cameras in 2026: Creator Picks for Every Budget
- Yamaha MGX Series for Podcasting: The Practical Guide (MGX12 vs MGX16 vs MGX-V)