uncategorized
OSB Encoding Overloaded Fix
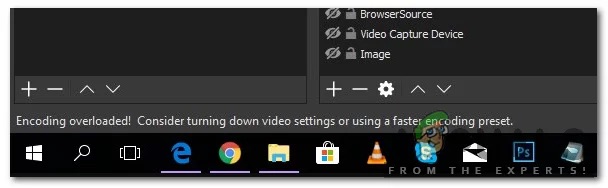
If OBS throws the dreaded “Encoding Overloaded” error at you. It’s frustrating, but don’t worry; you can fix it. Let me show you how.
What Does “Encoding Overloaded” Mean?
In simple terms, it means your computer’s CPU (the brain of your machine) is struggling to keep up with the demands of processing and compressing your video in real-time. Think of it like trying to stuff a giant suitcase into a tiny overhead bin—it just won’t fit! Screen recording, especially with high resolutions and frame rates, is particularly taxing on your CPU but you can fix it by offloading the work to a GPU (graphics processor) which is made for this sort of thing!
Troubleshooting Steps: Let’s Get Started
Before diving into OBS settings, let’s do some quick checks:
- Close Unnecessary Programs: Free up CPU and RAM by closing any background applications you don’t need for your recording or stream.
- Check Task Manager (Windows) or Activity Monitor (Mac): Monitor your CPU usage during recording. You’ve found the culprit if it’s consistently at or near 100%!
OBS Settings: Tweak Your Way to Smooth Recording
Now, let’s fine-tune your OBS settings:
Output (Scaled) Resolution:
Lowering this reduces the workload on your CPU. If you’re at 1080p, try 720p to start.
Frame Rate (FPS):
- Less FPS means less work for your CPU. 30 FPS is a good balance of smoothness and performance.
Encoder:
- If you have a dedicated NVIDIA or Intel GPU, try their hardware encoders (NVENC or QuickSync) to offload some work from your CPU.
- If not, stick with the software encoder (x264) but adjust its settings.
Encoder Preset:
- Within your chosen encoder, switch to a faster preset like “very fast” or “superfast” to ease the CPU load. Remember that faster presets might slightly reduce video quality.
Recording Format:
- If you’re recording for later editing, consider using a less CPU-intensive format like .mkv or .flv instead of .mp4.
Want to Fix CPU Overloaded Permanently? Get This.
Advanced Tips for Gamers
- Lower in-game graphics settings to reduce the complexity of visuals.
- Disable Game Mode and Game DVR on Windows, which can sometimes interfere with OBS.
- Use a Capture Card to offset the CPU usage.
Need More Help?
Don’t give up if you’ve tried these steps and still see that error! Consider:
- Simplifying complex scenes in OBS.
- Upgrading your hardware (a faster CPU or a dedicated GPU can make a world of difference).
- Reaching out to the OBS community or forums for further assistance.
- Using a Capture Card for OBS.
Remember, fixing the “Encoding Overloaded” error is entirely possible. With some tweaking and patience, you’ll be back to recording and streaming smoothly fast!
Why My Voice Sounds Weird When Recorded: Solved
If you’ve ever recoiled in horror while listening back to your own podcast recordings, you’re not alone. The jarring disconnect between the voice you hear in your head and the one emanating from your speakers is a common phenomenon, often dubbed the “weird voice” syndrome. But fear not, aspiring podcaster! Understanding the science and art behind this auditory illusion can empower you to achieve a podcasting voice that’s both authentic and captivating.
Cracking the “Weird Voice” Code
Several factors conspire to create this sonic discrepancy. Let’s break them down:
- Bone Conduction vs. Air Conduction: Your voice isn’t just something you hear; it’s something you feel. When you speak, sound vibrations travel not only through the air to your ears but also through your skull and bones, creating a richer, fuller sound that you’re intimately familiar with. Microphones, however, are deaf to this internal symphony, capturing only the airborne vibrations. The result? A recording that sounds thinner, less resonant, and altogether… weird.
- The Psychology of Perception: Your brain has spent a lifetime constructing a mental image of your voice, shaped by years of bone-conducted sound. When confronted with a recording that lacks this internal resonance, it’s like encountering a stranger wearing your face. This cognitive dissonance triggers the “uncanny valley” effect, making your own voice sound alien and unsettling.
- The X-Factors: Equipment and Environment: The quality of your microphone, the acoustics of your recording space, and the nuances of audio processing all play a role in shaping your recorded voice. A mismatched mic, a noisy room, or overzealous editing can amplify imperfections and create a sonic caricature that’s far removed from your natural voice.
Podcasting: Where Sound Quality Matters
For podcasters, the stakes are high. Your voice is your brand, your connection to your audience. A “weird” voice can be distracting, undermining your message and credibility. Let’s explore how equipment and environment specifically impact your podcast’s sonic landscape.
The Microphone: Your Sonic Soulmate
Think of your microphone as an extension of your voice, a conduit for your personality and passion. Choosing the right one is crucial.
- Dynamic vs. Condenser: Dynamic mics are like trusty workhorses, rugged and forgiving, ideal for handling loud voices and plosives. Condenser mics, on the other hand, are more sensitive and nuanced, capturing subtle details and delicate inflections.
- Cardioid vs. Omnidirectional: Cardioid mics are laser-focused, picking up sound primarily from the front and rejecting noise from the sides and rear. Omnidirectional mics, conversely, are all-inclusive, capturing sound from all directions. They’re great for interviews and group recordings but less ideal for noisy environments.
- USB vs. XLR: USB mics offer plug-and-play simplicity, perfect for beginners. XLR mics require an audio interface but provide greater flexibility and control for advanced users.
The Audio Interface: Your Sonic Control Center
An audio interface acts as the bridge between your microphone and your computer, converting analog signals to digital. It’s the unsung hero of your podcasting setup, ensuring a clean, high-quality signal.
- Preamps: Think of preamps as the muscle behind your microphone, amplifying its signal for optimal recording. Quality preamps can make a noticeable difference in clarity and detail.
- Inputs and Outputs: Choose an interface with enough inputs for multiple microphones or instruments, and outputs to connect headphones or studio monitors for monitoring.
- Phantom Power: Condenser mics require 48V phantom power, supplied by the audio interface. Make sure your interface has this feature if you’re planning on using a condenser mic.
Headphones and Monitors: Your Sonic Feedback Loop
Accurate monitoring is essential for capturing a great sound. Headphones allow you to hear your voice in isolation, while studio monitors provide a more realistic representation of how your podcast will sound on speakers.
- Closed-Back vs. Open-Back Headphones: Closed-back headphones offer superior isolation, preventing sound leakage during recording. Open-back headphones are more spacious and have a more natural sound, ideal for mixing and mastering.
- Studio Monitors: Invest in monitors with a flat frequency response for accurate sound reproduction. Consider the size of your room and your budget when making your selection.
Recommended Equipment To Improve Recorded Voice
| Category | Budget-Friendly | Mid-Range Upgrade | Premium Setup |
|---|---|---|---|
| Microphone | Audio-Technica ATR2100x-USB | Rode PodMic | Shure SM7B |
| Headphones | Sony MDR7506 | Beyerdynamic DT 770 PRO | Sennheiser HD 650 |
| Audio Interface | Focusrite Scarlett Solo (Optional) | Universal Audio Volt 2 | Universal Audio Apollo Twin X DUO |
| Acoustic Treatment | Auralex Studiofoam Wedgies | More Auralex or GIK Acoustics 242 | GIK Acoustics Tri-Trap & Panels |
| Software | Audacity or Reaper | Adobe Audition or Logic Pro X | Pro Tools |
| Additional | Mic Stand, Pop Filter, Shock Mount, Cables | Mic Stand, Pop Filter, Shock Mount, Cables | Mic Stand, Pop Filter, Shock Mount, Cables |
Acoustic Treatment: Your Sonic Sanctuary
Your recording environment is more than just a backdrop; it’s an active participant in shaping your sound. Acoustic treatment helps tame unruly reflections, reverberations, and background noise, creating a sonic sanctuary for your voice.
- Absorption Panels: These panels absorb sound waves, reducing echoes and reverberation. Strategically placed on walls and ceilings, they can transform a chaotic space into a controlled recording environment.
- Bass Traps: Low-frequency sounds can be particularly problematic, muddying your recordings with boomy bass. Bass traps are designed to absorb these frequencies, tightening up your sound.
- Diffusers: Diffusers scatter sound waves, creating a more balanced and natural sound. They’re especially useful in smaller rooms where absorption alone can make the sound too dead.
- Software and Plugins: Your Sonic Playground
Audio editing software and plugins offer a world of possibilities for enhancing your podcast’s sound.
- DAWs (Digital Audio Workstations): DAWs like Audacity, GarageBand, and Logic Pro X are your virtual recording studios, allowing you to record, edit, mix, and master your audio.
- EQ and Compression: These essential tools help you shape your voice, control dynamics, and achieve a polished, professional sound.
- Noise Reduction and De-essing: These plugins help eliminate unwanted background noise and harsh sibilance, improving clarity and intelligibility.
- Reverb and Delay: Add depth and atmosphere to your voice with these creative effects, but use them sparingly to avoid sounding artificial.
From “Weird” to Wonderful: Tips for a Professional Podcast Sound
Ready to transform your podcast from amateur hour to audio excellence? Here are some key tips:
- Choose the Right Mic: Research different microphone types and select one that complements your voice and recording style.
- Optimize Your Space: Treat your recording environment with acoustic panels, bass traps, and diffusers. Minimize background noise and distractions.
- Master Your Tools: Learn the basics of audio editing and processing. Start with subtle adjustments and avoid over-processing.
- Practice and Experiment: The more you record and listen back, the better you’ll understand your voice and how to capture it effectively.
- Embrace Your Uniqueness: Your voice is your signature. Don’t try to sound like someone else. Embrace your natural tone and let your personality shine through.
Free Podcast Sound Effects
To stand out in the podcasting landscape, you need more than just great content – you need a professional and engaging listening experience. And that’s where sound effects come in.
From dramatic stings to subtle transitions, sound effects can elevate your podcast to the next level. However, finding high-quality, legally usable sounds can be tricky. This guide will walk through everything you need to know about finding and using free sound effects, all while staying on the right side of copyright law.

Understanding Sound Effects in Podcasting
Sound effects are the unsung heroes of podcasting. They can set the mood, or create the atmosphere, and enhance your storytelling in ways that words alone can’t. Here are some of the common types of sound effects used in podcasts:
- Intro/Outro Music: Short musical clips to introduce or conclude your podcast episodes
- Transition Sounds: Sounds to smoothly transition between segments or topics within an episode
- Background Ambience: Soundscapes to create atmosphere or setting (e.g., city sounds, nature sounds)
- Sound Effects: Specific sound effects to enhance storytelling or add humor (e.g., footsteps, door creaks, applause)
Used effectively, sound effects can:
- Grab the listener’s attention.
- Create a sense of professionalism.
- Enhance the storytelling
- Add humor or drama
- Make your podcast more memorable.
Navigating Copyright & Licensing for Sound Effects
Before we dive into the treasure trove of free sound effects, let’s talk about copyright. Copyright law protects original creative works, including sound effects. Using copyrighted sound effects without permission can lead to legal trouble.
That’s where licensing comes in. A license grants you permission to use a copyrighted work under certain conditions. Here are some key terms you need to know:
- Royalty-free: You pay a one-time fee to use the sound effect, and there are no ongoing royalties or licensing fees.
- Creative Commons: A non-profit organization that offers various licenses with different levels of restrictions. Some may require attribution or prohibit commercial use.
- Public Domain: Works or effects (rare) that are no longer protected by copyright and are free for anyone to use.
Remember: Always check the license of each sound effect before using it in your podcast.
Top Resources for Free Podcast Sound Effects
Ready to find some awesome sounds? Here are some of the best websites offering free sound effects for podcasts:
-
- Pixabay: Offers a vast library of royalty-free sound effects with no attribution required.
- Freesound: Database of Creative Commons licensed sounds. Attribution is often required.
- SoundBible: Provides a mix of royalty-free and Creative Commons-licensed sound effects. Check individual sound descriptions for licensing information.
- YouTube Audio Library: Royalty-free music and sound effects.
| Resource | License Type(s) | Attribution Required? | Pros | Cons |
|---|---|---|---|---|
| Pixabay | Royalty-free | No | Vast library, easy to use | May have less unique or niche sounds |
| Freesound | Creative Commons | Often | Large community, diverse selection | Licensing can be complex |
| SoundBible | Mixed | Varies | User-friendly, good for basic sound effects | Smaller library |
| YouTube Audio Library | Royalty-free | No | Easy to access for YouTube creators | Limited selection compared to other sites |
| PremiumBeat by Shutterstock | Royalty-free (paid) | No | High-quality, curated collection | Requires subscription or individual purchase |
Tips for Choosing and Using Sound Effects
- Match the mood: Select sound effects that complement the tone and content of your podcast.
- Less is more: Don’t overdo it with sound effects. Use them strategically to enhance, not distract.
- Seamless integration: Ensure sound effects blend smoothly with your audio. Use audio editing software to adjust volume and timing.
- Double-check licensing: Always verify the license and attribution requirements before publishing your podcast.
Creative Ways to Use Sound Effects
- Create a signature sound: Use a unique sound effect to brand your podcast and make it instantly recognizable.
- Build suspense: Use sound effects to create tension and anticipation.
- Enhance storytelling: Use sound effects to bring your stories to life and immerse your listeners.
- Add humor: Use funny sound effects to punctuate jokes or create lighthearted moments.
Bonus: Free Tools for Editing and Mixing Sound Effects
- Audacity: A free, open-source audio editor with powerful features for editing and mixing sound effects.
- GarageBand (Mac): A user-friendly audio editing software that comes pre-installed on most Macs.
- Online audio editors: Several free online tools, like TwistedWave, offer basic audio editing capabilities.
The Best Audio Interfaces That Will Instantly Upgrade Your Podcast
 Click Here To Learn More About This Interface
Why Interfaces Matter for Podcasters
Question podcasters ask: “Do I really need an audio interface if I already have a USB mic?”
Expert answer: A dedicated interface is the gateway to professional audio. Unlike a computer’s built-in sound card, it gives you clean microphone preamps, phantom power, accurate conversion, and zero-latency monitoring. If you want your podcast to sound like the shows you admire, this is the piece of gear that takes you from hobbyist to pro.
1. How Many Microphones Do I Really Need?
Question: “How many inputs should I buy?”
- Solo show: 1 input is enough (but 2 gives flexibility).
- Co-hosts/interviews: At least 2 inputs.
- Roundtables/panels: 4–8 inputs.
- Pro tip: Buy one size up, or pick a unit with ADAT expansion to future-proof.
Pros of fewer inputs: cheaper, smaller, easier to use.
Cons: you’ll need to upgrade if your show grows.
Recommendations:
- Solo: Focusrite Vocaster One (simple, podcast-ready).
- Duo: Scarlett 2i2 (4th Gen) (industry standard starter).
- Panel: Zoom PodTrak P4 (budget) or RØDECaster Pro II (high-end).
2. Do Preamps Really Make a Difference?
Question: “Why spend more on preamps?”
Answer: Preamps boost your mic signal. Better ones give higher clean gain (important for dynamic mics like the Shure SM7B) and less hiss.
- Budget pres: fine with condensers, may struggle with quiet dynamics.
- High-end pres: 70–76 dB of whisper-quiet gain (RØDECaster Pro II, Apollo Twin X, RME).
Pros of stronger preamps: no need for external boosters.
Cons: raises the price of the interface.
Recommendations:
- Budget: Audient EVO 4 (console-grade pres).
- Mid: UA Volt 476P (adds analog warmth/compression).
- High: RØDECaster Pro II (Revolution Preamps with 76 dB gain).
3. Which Features Actually Matter for Podcasters?
Question: “Do I need podcast-specific features?”
Answer: It depends on workflow.
- Podcast-centric features:
- Mix-minus (remote calls without echo)
- Loopback (capture computer/Zoom audio)
- Bluetooth/phone integration
- On-board SD card recording
- Sound pads for jingles/sponsors
- Auto gain & Clip Safe (prevent clipping mistakes)
- Traditional interfaces:
- Better suited for those who also record music/voiceovers.
- Clean sound, flexible routing, fewer built-ins.
Pros of podcast hubs: faster production, less post-work.
Cons: larger, pricier, less flexible for non-podcast use.
Recommendations:
- Podcast hub: RØDECaster Pro II or Zoom PodTrak P4.
- Traditional: Apollo Twin X (studio sound) or MOTU M4 (loopback + low latency).
4. Should I Worry About Latency and Connectivity?
Question: “What’s latency and will I notice it?”
Answer: Latency is the delay between speaking and hearing yourself. Cheap interfaces can feel “laggy.”
- USB-C: standard, reliable for most podcasters.
- Thunderbolt (UA Apollo): ultra-low latency, pricier.
- RME/Clarett+ drivers: praised for stability and ultra-low latency.
Pros of paying for better drivers: smoother live streams, no distracting delay.
Cons: higher cost, sometimes more complex setup.
5. Do I Need a Portable or Studio Setup?
Question: “Should I buy for travel or set up a home studio?”
- Portable/bus-powered: Scarlett 2i2, Audient EVO 4, Zoom PodTrak P4.
- Studio/external power: RØDECaster Pro II, Scarlett 18i20, Clarett+ 8Pre.
Pros of portable: lightweight, simple cabling.
Cons: limited inputs/features.
Pros of studio rigs: more inputs, built-in routing, reliable power.
Cons: bulkier, less travel-friendly.
6. Budget Breakdown: What to Expect at Each Tier
Budget (<$150)
- Pros: Affordable, simple, plug-and-play.
- Cons: Limited I/O, plastic builds, weaker preamps.
- Examples: M-Audio M-Track Duo, Behringer UMC22, Audient iD4 MkII.
Mid-Tier ($150–400)
- Pros: Stronger preamps, stable drivers, podcast features (loopback, phone input).
- Cons: More complexity, still limited to 2–4 mics unless expandable.
- Examples: Scarlett 2i2 (4th Gen), Vocaster Two, UA Volt 476P, MOTU M6.
High-End ($500+)
- Pros: Broadcast-quality preamps, ultra-low latency, DSP processing, expandable.
- Cons: Expensive, overkill for casual podcasters.
- Examples: RØDECaster Pro II, Apollo Twin X, RME Babyface Pro FS, Focusrite Clarett+ 8Pre.
7. Quick Scenario-Based Picks
- Solo creator: Scarlett 2i2 (4th Gen) or Vocaster One.
- Two hosts: Vocaster Two (auto-gain, Bluetooth).
- Mobile panel (4 mics): Zoom PodTrak P4.
- Studio panel (4 mics): UA Volt 476P or RØDECaster Pro II.
- Large panels (5–8 mics): Behringer UMC1820 (budget) or Scarlett 18i20/Clarett+ 8Pre (mid/high).
- Pro studio sound: Apollo Twin X or RME Babyface Pro FS.
8. Comparison Table: Top Picks by Tier and Mic Count
| Mic Inputs | Budget Pick (<$150) | Mid-Tier Pick ($150–400) | High-End Pick ($500+) |
|---|---|---|---|
| 1–2 Mics | Audient iD4 MkII – Great entry-level preamps, solid build, simple setup. | Focusrite Vocaster Two – Podcast-specific features (auto gain, Bluetooth, loopback). | UA Apollo Twin X – Pro converters, Unison preamps, real-time DSP. |
| 3–4 Mics | Zoom PodTrak P4 – 4 XLR inputs, sound pads, mix-minus, SD recording. | UA Volt 476P – 4 pres, analog warmth & compression built-in. | RØDECaster Pro II – All-in-one studio hub with 4 Revolution preamps, APHEX DSP, dual USB-C. |
| 5+ Mics | Behringer UMC1820 – Cheapest path to 8 XLR inputs; solid value. | Focusrite Scarlett 18i20 – 8 pres, loopback, ADAT expansion for 16 mics. | Focusrite Clarett+ 8Pre or RME Fireface UFX II – Premium preamps, expandable, rock-solid drivers. |
9. Beyond the Interface
- Microphones: Dynamics (SM7B, PodMic) for untreated rooms; condensers (Rode NT1) for treated spaces.
- Headphones: Closed-back to avoid bleed. (ATH-M20x → budget; DT770 → mid; Rode NTH-100 → pro).
- Accessories: Pop filters, mic arms, headphone amps for multiple listeners.
Final Verdict
Expert advice: Buy for the show you have plus one step ahead. Don’t overspend on features you’ll never use, but don’t limit your growth with too few inputs. For podcasters, the right interface is less about “best specs” and more about best workflow fit.
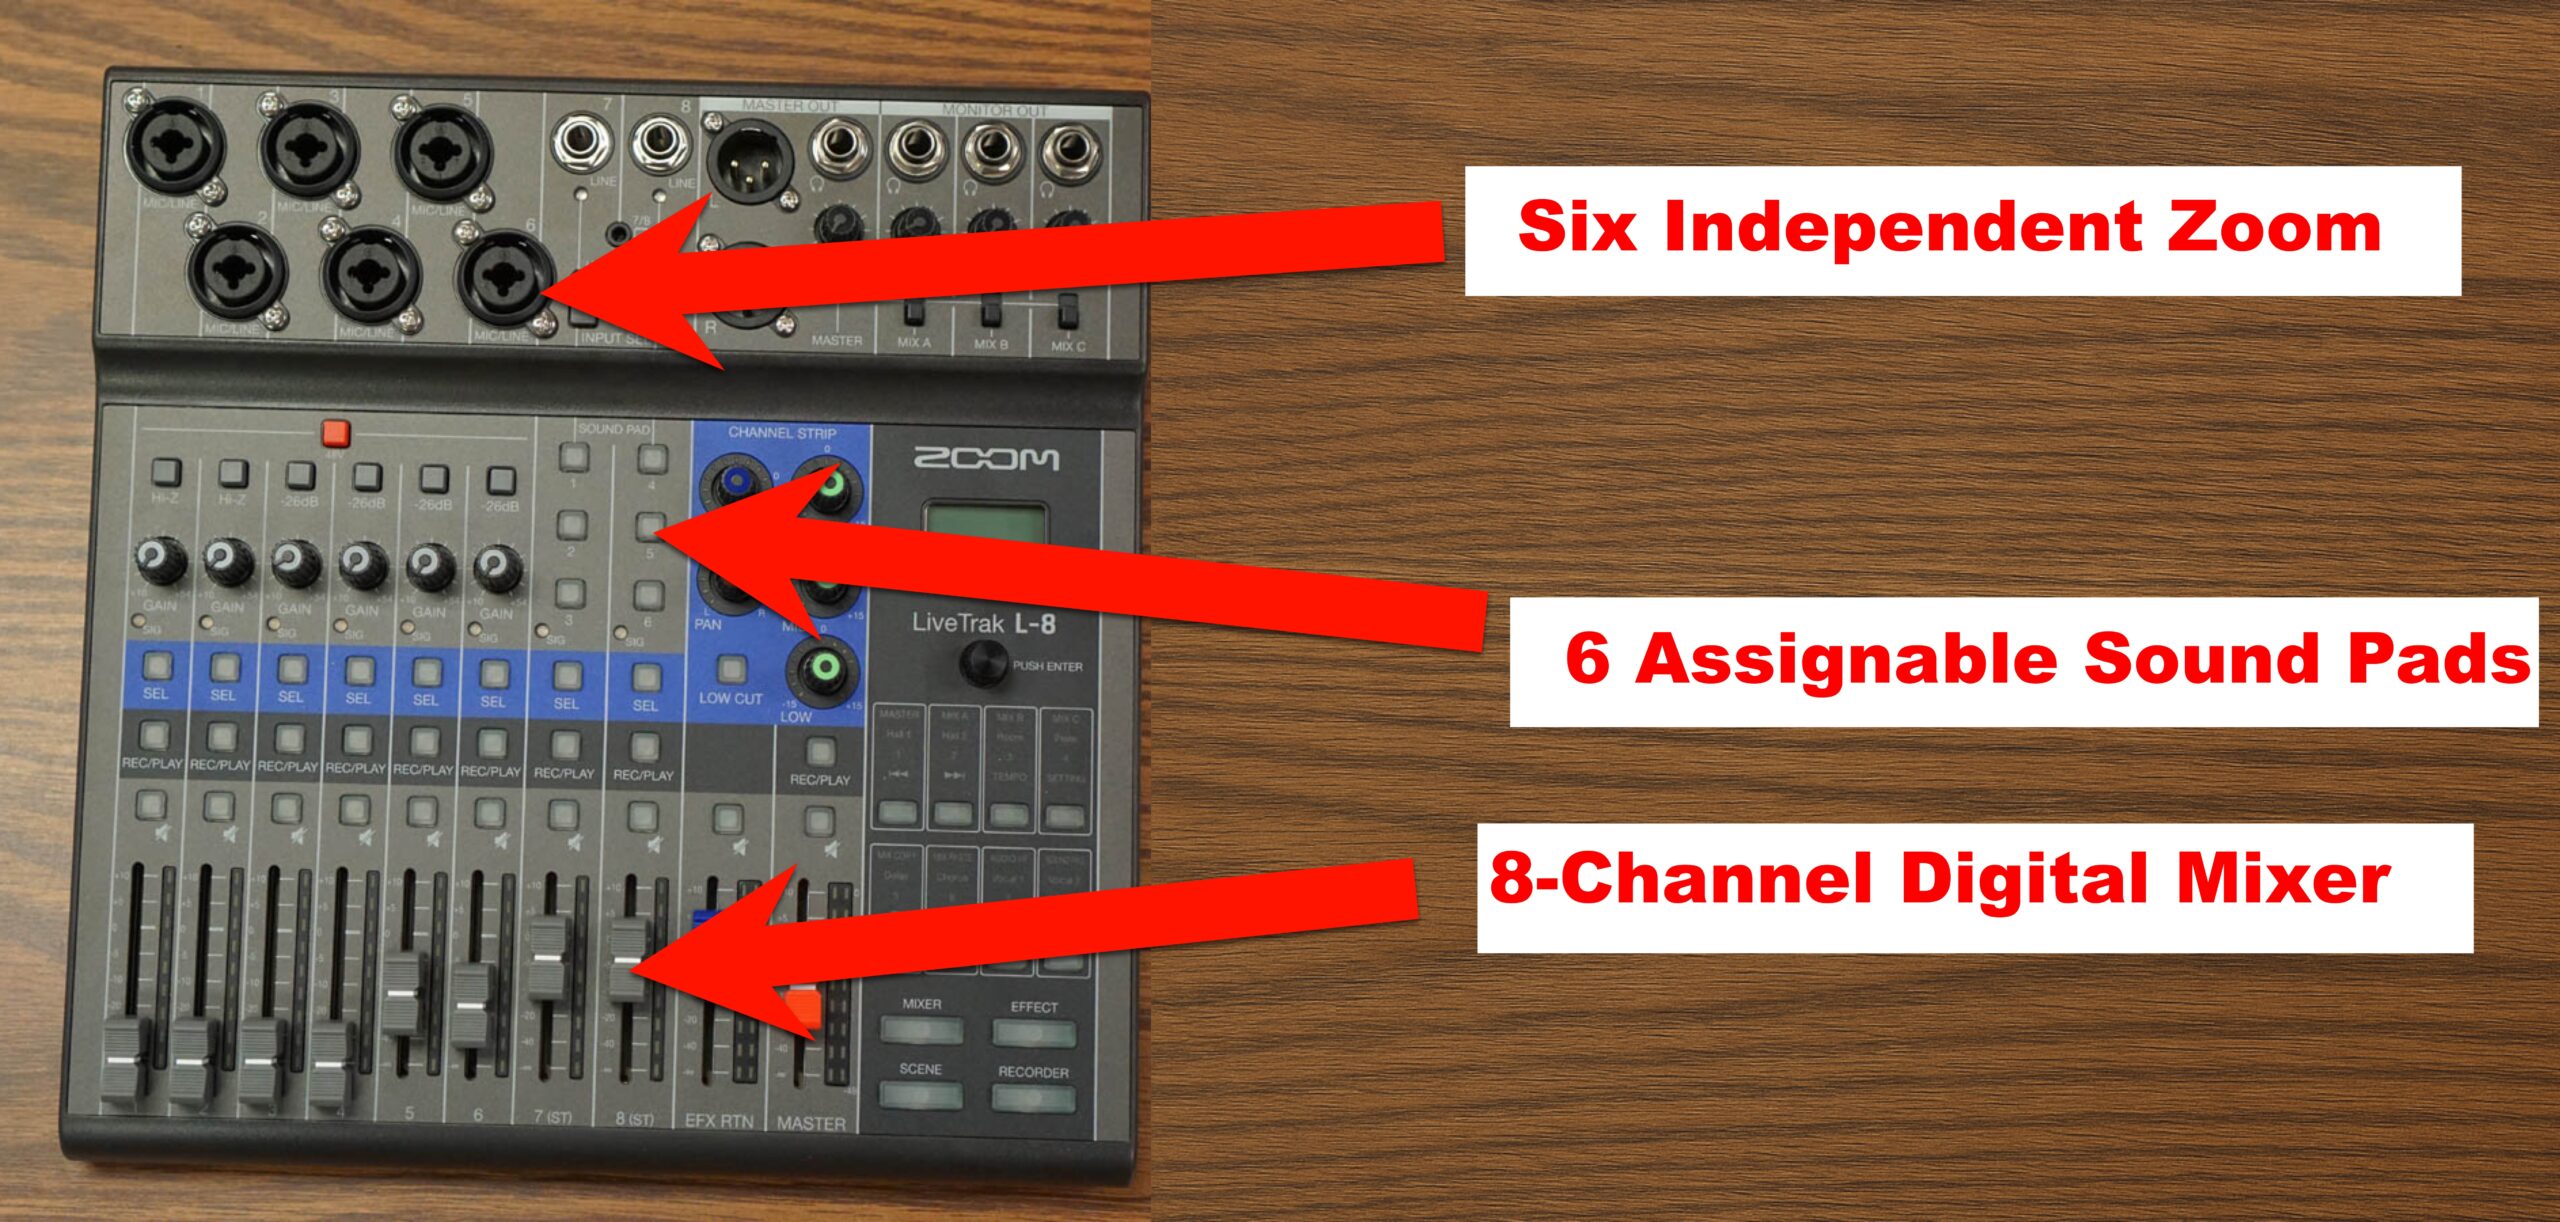
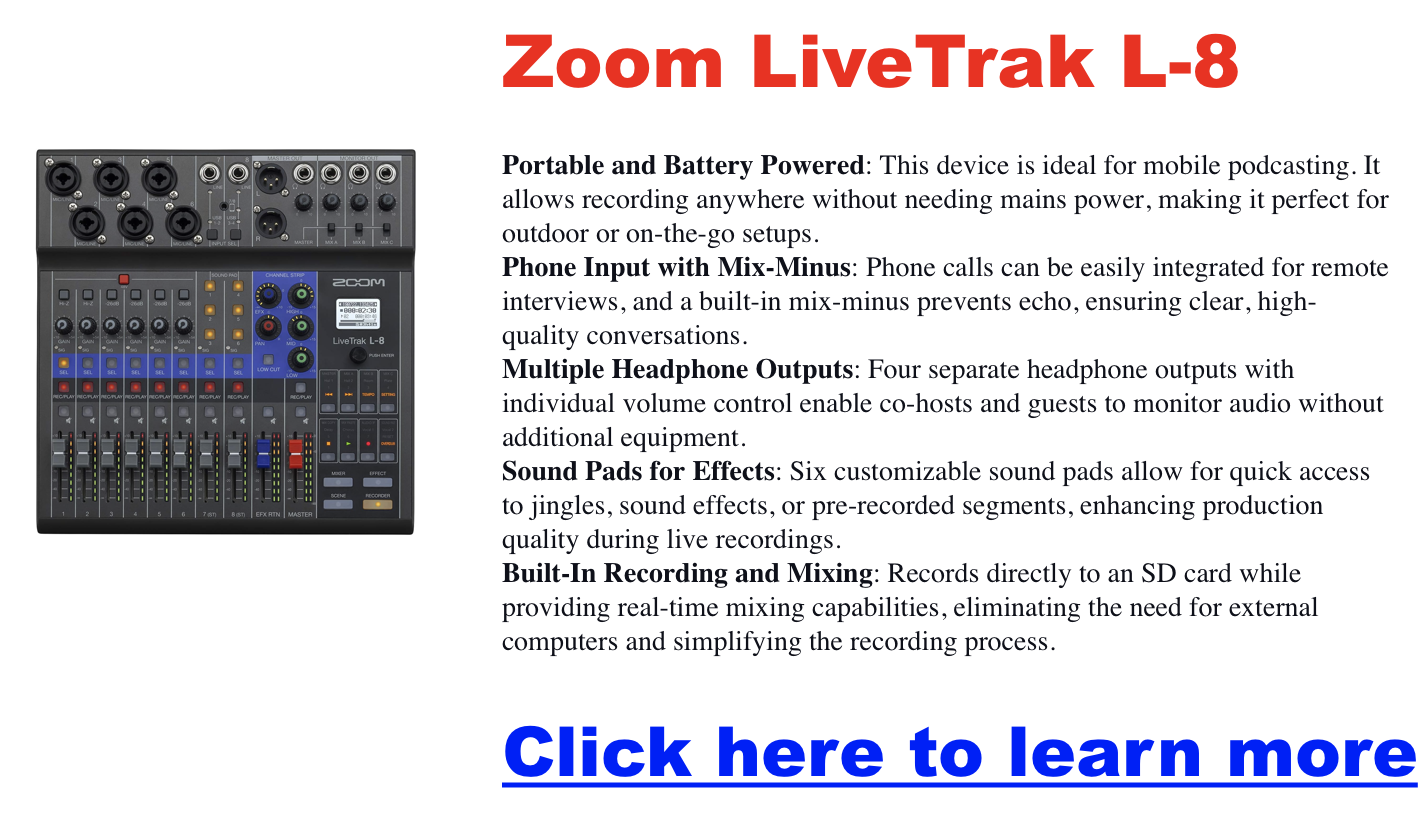
Zoom Livetrak L-8 for Podcasting
If you’re a podcaster, musician, or live performer looking for a portable, do-it-all mixer and recorder, the Zoom LiveTrak L-8 might be on your shortlist. But is it worth it in 2025? We compiled real user reviews and technical comparisons to help you decide if it’s the right fit for your workflow.
What Is the Zoom LiveTrak L-8?
The L-8 is an 8-channel digital mixer and multitrack recorder tailored for podcasters, musicians, and creators on the move. It delivers pro-level recording quality with minimal setup, powered by batteries or USB, making it ideal for both studio and field use.
Key Specifications
- Channels: 8
- Inputs: 6 x XLR-1/4″ combo, 2 x 1/4″ TS, 1 x 1/8″ TRRS
- Outputs: 2 x XLR main, 4 x 1/4″ TRS headphones
- Recording: 12-track simultaneous, 10-track playback
- Resolution: 24-bit/96kHz
- Dimensions: 10.55″ x 11.1″ x 2.91″
- Weight: 3.4 lbs
Who Should Consider the L-8?
This mixer is a favorite among:
- Podcasters needing mix-minus, multiple headphone outputs, and portability
- Musicians recording jam sessions or live gigs
- Streamers and content creators using iOS devices or OBS setups
Firmware and Software Compatibility
Firmware Updates: Zoom continues to release updates to improve DAW compatibility and recording stability. Always download the latest firmware from Zoom’s official site.
DAW and Streaming Software: Works with GarageBand, Ableton, Pro Tools, and OBS. For iOS use, grab an Apple Lightning to USB Camera Adapter.
iOS Integration: Acts as a 12-in/4-out interface when used with an iPad or iPhone — ideal for mobile setups and podcasting on the go.
Key Features That Stand Out
Portability: Battery-powered, compact, and travel-friendly. Great for remote interviews, church setups, or mobile musicians.
Multitrack Recording: Simultaneously record all inputs to an SD card. Mix on the device or export to your DAW later.
Sound Quality: Includes 6 low-noise mic preamps and onboard effects like reverb and chorus. 3-band EQ + high-pass filter per channel.
User-Friendly Interface: Touch-friendly knobs, intuitive layout, and 6 sound pads for triggering audio clips or stingers during a live show.
Zoom L-8 vs Other Mixers
Zoom L-8 vs. L-12
- Phantom Power: L-8 has group phantom on/off; L-12 allows split (ch. 1–4 and 5–8)
- Size: L-8 is lighter, battery-powered
- Best For: L-8 for mobility, L-12 for bigger setups with varied mics
L-8 vs. Rodecaster Pro
- Processing: Rodecaster has advanced DSP; L-8 offers EQ control instead
- Connectivity: Rodecaster uses USB-C; L-8 uses micro-USB
- Price: L-8 is more budget-friendly
Real Use Case Highlights
Podcasting: Mix-minus works seamlessly for phone interviews. Multiple headphone outs let everyone monitor the session.
Music Recording: Capture high-res multitracks without a laptop. Built-in FX save post-processing time.
Live Sound: Great for performers and public speakers. Easily record live sets or mix stage monitors in real-time.
Pros and Cons
Pros
- Battery-powered, great for remote use
- Multitrack recording and playback
- Solid preamps and onboard effects
- Easy mix-minus for podcasters
Cons
- Group-only phantom power toggle
- Micro-USB instead of USB-C
- Limited onboard effect routing
Frequently Asked Questions
Is it good for beginners? Yes — intuitive interface and sound pads make it beginner-friendly with room to grow.
Can I use it for remote interviews? Absolutely. The built-in mix-minus prevents call feedback — just plug in your phone via TRRS.
Does it run without an outlet? Yes, via 4 AA batteries or USB power bank.
L-8 or L-12? Choose L-8 for mobile use. Go with L-12 for more channels and individual phantom power zones.
Where can I buy it? Amazon, Sweetwater, and B&H all carry the L-8 with occasional discounts and bundles.
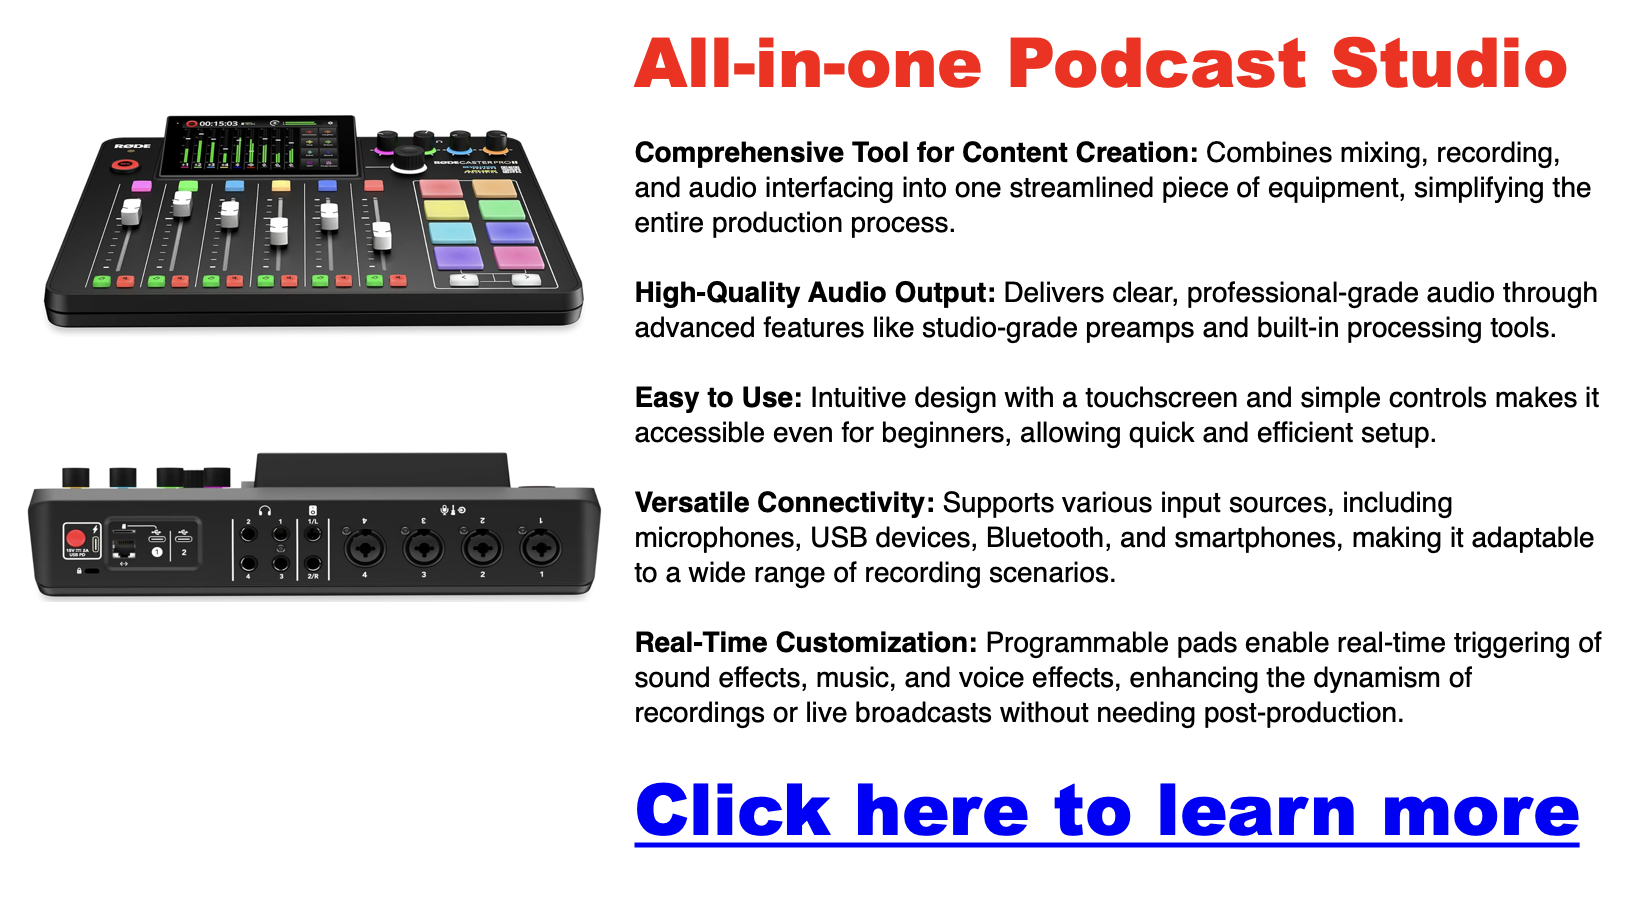
Rodecaster Pro: All-in-One Podcast Production Studio
Looking for the best podcast production setup in 2025? The Rode RØDECaster Pro II is a standout solution for creators who want professional-quality sound without the headache of complicated gear. Whether you’re launching your first show or upgrading your studio, this guide breaks down everything you need to know—from features and benefits to expert tips and upgrade advice.
RØDECaster Pro II Overview: What It Does Best
The RØDECaster Pro II is a feature-packed audio production console built for podcasters, streamers, musicians, and content creators. It blends studio-quality preamps, onboard audio processing, customizable SMART pads, and multi-track capabilities—all in one sleek unit.
Key Features:
-
Four high-quality mic inputs with studio-grade preamps
-
SMART Pads to trigger sound effects, voice FX, or MIDI commands
-
APHEX audio processing for pro-level clarity and tone
-
Multi-track recording for post-production flexibility
-
Built-in mixer with faders and multiple input types (USB, Bluetooth, TRRS)
Why Creators Choose the RØDECaster Pro II
High-Quality Audio, No Hassle
With up to 76dB of gain and ultra-low noise, this console eliminates the need for mic boosters—even for gain-hungry mics like the Shure SM7B. It works beautifully with both dynamic and condenser mics.
Beginner-Friendly Design
Despite its power, the RØDECaster Pro II is incredibly easy to use. The large touchscreen interface and intuitive layout mean even first-time users can produce professional-grade sound with minimal setup.
Versatile for All Content Types
This unit isn’t just for podcasts. It’s perfect for livestreams, remote interviews, music production, and video content creation. You can connect smartphones via Bluetooth, plug in USB-C devices, or use traditional XLR mics.

What’s New vs the Original RØDECaster Pro?
The Pro II adds major upgrades:
-
Improved preamps with higher gain and lower noise
-
Dual USB-C ports to connect two devices at once
-
Enhanced Bluetooth for clearer remote interviews
These improvements make it a great step up—especially if you’re managing multi-source audio or want cleaner results without extra gear.

Programmable SMART Pads
The RØDECaster Pro’s SMART pads are more than just sound effect triggers. These eight pads are fully customizable, allowing you to load them with your audio files, music beds, or voice effects. Additionally, you can use these pads for advanced functions like pitch shifting, reverb, and even MIDI commands, giving you full control over your audio environment.
Highlights:
- Customization: Load your audio files and effects.
- Advanced Functions: Includes pitch shifting, reverb, and MIDI commands.
- Dynamic Control: Easily add layers to your content with a single tap.
Advanced Audio Processing
The RØDECaster Pro II is equipped with APHEX audio processing tools, including the Aural Exciter, Big Bottom, and Compellor. These tools are designed to enhance the quality of your audio, whether by adding warmth and depth to voices or compressing dynamic range for a more consistent output. Additionally, the built-in noise gate and compressor help reduce background noise and maintain balanced levels throughout your recording.
Highlights:
- APHEX Processing: Enhances audio clarity and richness.
- Noise Gate and Compressor: Keeps background noise at bay and balances levels.
- Professional Sound: Achieve broadcast-quality audio with ease.
Multi-Track Recording
One of the standout features of the RØDECaster Pro II is its multi-track recording capability. This feature lets you record each input channel separately, which is incredibly useful during post-production. Whether you need to edit out a mistake or apply effects to individual tracks, multi-track recording gives you the flexibility to refine your content to perfection.
Highlights:
- Separate Track Recording: Each input can be recorded individually.
- Post-Production Flexibility: Easier to edit and apply effects.
- DAW Integration: Seamless export to Digital Audio Workstations for further editing.

The RØDECaster Pro II: What’s New?
Key Upgrades
The RØDECaster Pro II takes everything great about the original and enhances it with several key upgrades. The most notable improvements include even better preamps with higher gain and lower noise, dual USB-C interfaces that allow you to connect multiple devices simultaneously, and enhanced Bluetooth connectivity for superior audio quality during remote interviews or call-ins.
Highlights:
- Enhanced Preamps: Higher gain, lower noise.
- Dual USB-C Interfaces: Connect multiple devices simultaneously.
- Improved Bluetooth: Better audio quality for remote connections.
Who Should Upgrade?
If you already own the original RØDECaster Pro, the decision to upgrade will depend on your specific needs. If you frequently work with multiple devices, require even higher audio fidelity, or engage in many remote interviews, the RØDECaster Pro II could be a worthwhile investment.
Considerations:
- Multiple Device Connections: Ideal for complex setups.
- Higher Audio Fidelity: Best for professional-grade projects.
- Remote Interviews: Enhanced Bluetooth for clearer calls.
User Testimonials and Reviews
What Users Love
Many users rave about the RØDECaster Pro’s ease of use, high-quality audio output, and versatility of the SMART pads. It’s often praised for simplifying the production process without compromising on the quality of the final product.
Common Praise:
- Ease of Use: Intuitive and user-friendly.
- Audio Quality: Consistently high across various setups.
- Versatility: Adapts to different content creation needs.
Common Complaints
While the RØDECaster Pro is generally well-received, some users have noted the steep learning curve associated with its more advanced features. The price point can also be a barrier for hobbyists or those new to content creation.
Common Issues:
- Learning Curve: Advanced features may be challenging for beginners.
- Price: Considered expensive by some users, especially beginners.
How to Optimize Your Use of the RØDECaster Pro
Best Practices for Audio Quality
Pay attention to microphone placement and level settings to get the best possible audio from your RØDECaster Pro. Use the built-in noise gate and compressor to maintain clean, balanced audio, and use the APHEX processing to add warmth and depth to your recordings.
Tips:
- Microphone Placement: Keep it consistent and at the right distance.
- Use Audio Processing: Leverage the noise gate and compressor for balanced levels.
- Adjust Levels: Ensure levels are set correctly to avoid distortion or clipping.
Customizing Your Workflow
The RØDECaster Pro is highly customizable, allowing you to tailor its settings to fit your specific needs. Spend some time setting up the SMART pads with your most-used effects and sounds, and adjust the input levels to match your recording environment.
Tips:
- Customize SMART Pads: Load frequently used effects and sounds.
- Adjust Inputs: Set levels that suit your recording space.
- Streamline Workflow: Tailor settings to your production style for efficiency.
Troubleshooting Common Issues
If you encounter issues with the RØDECaster Pro, such as connectivity problems or audio glitches, you can take a few steps. First, ensure that all firmware is up to date. If problems persist, consult the user manual or Rode’s support resources for further guidance.
Tips:
- Update Firmware: Ensure the latest updates are installed.
- Check Connections: Verify that all cables and devices are properly connected.
- Consult Resources: Use Rode’s support and forums for troubleshooting.
FAQs About the RØDECaster Pro
Common Questions
Many users wonder if the RØDECaster Pro can handle multiple simultaneous inputs or what software is compatible with the device. The good news is that the RØDECaster Pro is designed to be highly versatile and works seamlessly with most recording software.
Common FAQs:
- Multiple Inputs: Yes, it can handle up to four simultaneous inputs.
- Software Compatibility: Compatible with most DAWs and recording software.
- Live Streaming: Yes, it’s ideal for live-streaming setups.
Expert Tips
If you’re looking to get the most out of your RØDECaster Pro, here are a few expert tips:
Insider Tips:
- Backup Recordings: Always create a backup of your recordings directly to the microSD card to avoid losing data.
- Firmware Updates: Regularly check for updates to benefit from the latest features and improvements.
Podcast Setup For Two Gear & Thoughts
Podcasts have become an incredibly popular medium for sharing ideas, stories, and entertainment. With the ability to connect with audiences on a personal level, more and more people are venturing into the world of podcasting. If you’re considering starting a podcast with a friend, colleague, or partner, the prospect of a two-person setup might seem daunting. But don’t worry! This guide will walk you through everything you need to know to get your two-person podcast up and running smoothly.
When searching for “podcast setup for two,” you’re likely looking for information on the essential equipment, recording space optimization, and software recommendations specifically tailored for two hosts. We’ll cover all these aspects and more to ensure you have a clear roadmap to podcasting success.
Essential Equipment for a Two-Person Podcast
Microphones
The heart of any podcast setup is the microphone. For two people, you have two main options:
- Individual Microphones: This is the most common setup, providing greater control over individual audio levels and reducing the risk of crosstalk. Consider dynamic microphones for their durability and ability to handle louder voices or condenser microphones for their sensitivity and detailed sound capture. Both USB and XLR microphones are suitable, depending on your audio interface choice. Popular models for two-person setups include the Shure SM58 (dynamic), Audio-Technica AT2020 (condenser), and Blue Yeti (USB condenser).
- Single Microphone: If you’re on a tight budget or have limited space, a single microphone can work. Look for a microphone with a wide pickup pattern, such as a cardioid or omnidirectional pattern, to capture both voices effectively. However, be mindful of potential audio bleed and challenges in balancing individual voices.
Audio Interface/Mixer
An audio interface / mixer acts as the bridge between your microphones and your computer. It converts an analog audio signal from the microphone into digital signal that your computer can understand. For two microphones, you’ll need an audio interface with at least two input channels. Popular options include the Focusrite Scarlett 2i2, PreSonus AudioBox USB 96, and Rode AI-1. To learn more about mixers click here.
Headphones
Headphones are essential for monitoring audio during recording and ensuring a clean, professional sound. Closed-back headphones are ideal for podcasting as they isolate sound and prevent audio bleed into the microphones. Consider options like the Sony MDR-7506, Audio-Technica ATH-M50x, or Beyerdynamic DT 770 Pro.
Additional Accessories
- Pop filters: These reduce plosive sounds (like “p” and “b” sounds) for clearer audio.
- Mic stands or boom arms: Provide stability and flexibility for microphone positioning.
- Shock mounts: Minimize vibrations and handling noise.
- XLR cables: Connect XLR microphones to your audio interface.
Budget-Friendly Options & Podcast Starter Kits
If you’re starting, several affordable podcast starter kits bundle essential equipment, including microphones, headphones, and an audio interface. Popular options include:
- Rode PodMic Dynamic Podcasting Kit: This kit includes two Rode PodMic microphones, two PSA1 boom arms, two XLR cables, and a two-channel USB audio interface, providing everything needed for a basic two-person setup.
- Focusrite Vocaster Two Studio: This all-in-one solution offers a two-channel audio interface, two XLR microphone inputs, two headphone outputs, and a suite of software designed specifically for podcasting.
- Maono AU-A04T USB Condenser Podcast Microphone Kit: This budget-friendly kit includes two condenser microphones, two adjustable boom arms, two pop filters, two shock mounts, and a USB audio interface.
These kits can simplify the process of getting started, ensuring you have compatible equipment while saving money compared to buying each item individually.
Setting Up Your Recording Space
Choosing the Right Location
Use a quiet room with minimal background noise and echo. Smaller rooms with soft furnishings like carpets, curtains, and bookshelves tend to have better acoustics. If you’re recording in a larger space, consider using acoustic panels or blankets to dampen reflections and improve sound quality.
Arranging the Microphones
Position the microphones about 6-12 inches away from each host’s mouth to capture clear audio without excessive plosives or sibilance. Use microphone stands or boom arms to adjust the height and angle for optimal positioning. If using a single microphone, place it equidistant between both hosts and experiment with positioning to achieve a balanced sound.
Connecting the Equipment
- Connect each microphone to an input channel on your audio interface/mixer using XLR cables.
- Connect the headphones to the headphone output on the audio interface/mixer.
- Connect the audio interface/mixer to the computer using a USB cable.
- Configure the audio settings in the recording software to confirm the correct input and output devices.
Recording and Editing Software
Recommended Software
Several excellent recording and editing software options are available, both free and paid. Popular choices include:
- Audacity (Free): A versatile and user-friendly open-source software ideal for beginners.
- GarageBand (Free for Mac users): A powerful and intuitive option with a range of built-in features.
- Adobe Audition (Paid): A professional-grade software offering advanced editing and mixing capabilities.
- Hindenburg Journalist (Paid): Specifically designed for spoken-word audio, offering streamlined editing and mastering tools.
Basic Editing Tips
- Trim: Remove any unwanted sections or mistakes from the recording.
- Noise reduction: Reduce background noise and hum for a cleaner sound.
- Leveling: Balance the audio levels of both hosts for a consistent listening experience.
- Add music and sound effects: Enhance the podcast with intro/outro music and sound effects.
Remote Recording Considerations (Optional)
If you and your co-host are in different locations, remote recording is a viable option.
Tools for Remote Recording
- Zoom: A popular video conferencing platform that also allows for separate audio track recording.
- Riverside.fm: A dedicated platform for remote recording with high-quality audio and video capabilities.
- SquadCast: Another excellent option for remote recording with features like automatic backup and separate track recording.
Tips for Successful Remote Recording
- Stable internet connection: Ensure both hosts have a reliable internet connection to avoid audio dropouts or delays.
- Suitable recording environment: Minimize background noise and distractions in both locations.
- Test audio and video quality: Conduct a test recording before the official session to ensure everything is working correctly.
Additional Tips and Resources
Common Mistakes to Avoid
- Poor audio quality: Invest in decent microphones and ensure a quiet recording environment.
- Inconsistent recording schedule: Maintain a regular release schedule to keep your audience engaged.
- Lack of promotion: Actively promote your podcast on social media and other channels.
Tips for Engaging Content
- Plan your episodes: Outline your topics and talking points beforehand.
- Maintain a natural conversation flow: Avoid scripted dialogues and let the conversation unfold organically.
- Engage with your audience: Encourage feedback and interaction through social media or email.
Conclusion
Setting up a two-person podcast requires careful planning and the right equipment, but it’s an achievable goal with the information and resources available. By following this guide, you’ll be well on your way to creating a successful and engaging podcast with your co-host.
Remember, the most important aspect of podcasting is to have fun and share your passion with the world. So, grab your microphones, fire up your recording software, and let your voices be heard!
How to Start a Podcast on Youtube
In the ever-evolving world of digital content creation, podcasters constantly seek ways to expand their reach and connect with new audiences. One increasingly popular strategy is repurposing podcast content for YouTube, the world’s second-largest search engine and a hub for video consumption. But is this the right move for you? Let’s dive in and explore the potential benefits and challenges of launching a YouTube channel for your podcast.
Is YouTube Right for Your Podcast?
Before you jump headfirst into video production, take a moment to assess whether YouTube aligns with your podcast format and target audience.
- Podcast Format: Some formats naturally lend themselves to video. Interview-style podcasts, where viewers can see the dynamic between host and guest, often thrive on YouTube. Similarly, storytelling or educational podcasts can benefit from visual aids and demonstrations. However, the transition to video may be more challenging if your podcast is highly niche or relies heavily on audio elements like sound effects or music.
- Target Audience: Do your listeners engage with video content? Analyze your audience demographics and preferences. Are they active on YouTube? Do similar podcasts in your niche have successful YouTube channels? Understanding your audience’s viewing habits will help you gauge the potential for growth on the platform.
Weighing the Pros and Cons of Starting a YouTube Channel
Starting a YouTube channel for your podcast offers several exciting possibilities but also comes with its own set of challenges. Let’s weigh the pros and cons.
Pros:
- Expanded Reach: YouTube boasts a massive audience, allowing you to tap into new listeners who might not have discovered your podcast otherwise.
- Monetization Opportunities: YouTube offers various monetization options, including advertising revenue, sponsorships, and merchandise sales, which could potentially create new income streams for your podcast.
- Increased Engagement: YouTube’s comment section and live chat features facilitate real-time interaction with your audience, fostering a stronger sense of community.
- Discoverability: Optimizing your videos for YouTube’s search and recommendation algorithms can boost your visibility and attract organic viewers — MORE ON THIS BELOW! THIS IS HUGE!
Cons:
- Time and Resources: Producing high-quality videos requires time, effort, and often additional equipment and software.
- Technical Skills: Video editing and production may involve a learning curve if you’re new to the medium.
- Audience Fragmentation: Juggling multiple platforms can be demanding, and you risk dividing your audience’s attention.
- Algorithm Dependency: YouTube’s algorithm can be unpredictable, making it challenging to maintain consistent viewership.
YouTube, Google, and the Power of Search
Having a presence that shows on Google & Youtube is a massive advantage because YouTube videos themselves can rank not only in YouTube’s search engine (example: how to videos – how to tie a tie has 60 million views), but YouTube videos also rank in Google (and other search engines too) for a given keyword as well.
Here take a look. This is the search result in YouTube for how to tie a tie… Take a look at the age of the video and the view count. It is a piece of content that has become an asset…. it was created once, and it has been popular for 9-14 years for these top results…. and they earn money on this!

Now lets take a look at the Google result as well…

Check out that thumbnail, the #2 result on YouTube is also the #1 result on Google. Safe to say that it gets a ton of traffic!
I use a keyword tool for Google and a different keyword tool for YouTube — let’s see how popular the search term is, and we’ll get back to why this is important.


I hope you’re following along, because the phrase “how to tie a tie” is searched for over 650 THOUSAND TIMES per month on YouTube itself.
How to Tie a Tie is also searched for over 300,000 times a month on Google itself.
That is close to a million searches a month! And it explains how they got so many views… And you can do this too with your podcast!
Relating It Back to Your Podcast…
I’m trying to show that if you’re strategic with the content you make with your podcast that you could very easily show up in the search results for something somebody is looking for.
That means if you have a podcast episode about something specific like “The Best Strategies for Winning in Dungeon and Dragons” you have a good chance of showing up both in YouTube and Google.
This also means you’ll attract a flood of new listeners to your channel if there is search volume for the topic.
New listeners means more subscribers, more visits to your podcast’s website, more clicks on the offers that get you paid — and a show that is growing exponentially!
If you have a website and a call to action in the podcast and description, you funnel those new listeners to your website and use that to make money (more on that below!).
Key Considerations Before You Launch
If you’re ready to take the plunge, here are some essential factors to consider:
- Content Strategy: Will you simply repurpose existing episodes or create unique video content? Experiment with formats like shorter clips or highlight reels to cater to YouTube’s shorter attention spans. Craft compelling titles and thumbnails to entice viewers to click.
- Technical Setup: Invest in a decent camera, microphone, and video editing software. Plenty of affordable options are available, and numerous free tutorials online can help you master the basics of video editing.
- Promotion and Growth: Cross-promote your YouTube channel on your podcast, website, and social media platforms. Utilize relevant keywords and tags to improve discoverability. Actively engage with your viewers through comments and community features.
Get a Webhost & Leverage Your Show’s Site
Click here to learn how to sign up for web hosting
If you have a website for your podcast, your YouTube channel can become a powerful tool to funnel viewers back to your site. This opens up a world of monetization opportunities beyond YouTube’s built-in features.
-
- Create Engaging Content for Each Episode
- Blog Post: Publish a blog post for each episode, summarizing key points, providing additional context, or offering behind-the-scenes insights.
- Transcript: Include a full or partial transcript of the episode, making your content accessible to a wider audience and improving SEO.
- Resources and Downloads: Provide free downloadable resources related to the episode’s topic, such as worksheets, checklists, or templates.
- Calls to Action: Encourage viewers to visit the website for further information, to join your email list, or to purchase related products or services.
- Create Engaging Content for Each Episode
Creating valuable (aka helpful) and engaging content on your website gives your audience a reason to visit and interact with your brand beyond just listening to your podcast or watching your videos. This fosters a deeper connection, builds trust, and ultimately increases conversion rates for your monetization efforts.
- Monetization Strategies:
- Sell merchandise: Offer branded t-shirts, mugs, or other products related to your podcast.
- Offer premium content: Create exclusive content or early access for paying subscribers on your website.
- Affiliate marketing: Promote products or services relevant to your audience and earn a commission on sales.
- Offer online courses or workshops: Share your expertise and generate income through educational content.
- Secure sponsorships or brand deals: Attract sponsors who want to reach your engaged audience.
- Protect Your Brand: Before launching your channel, ensure your podcast’s name is available as a .com and register it as a trademark to prevent others from using it. This safeguards your brand identity and future growth potential.
Can You Make Money From a Podcast?
Podcasting’s popularity is undeniable, and the potential to monetize these captivating audio creations is growing. If you’re wondering if you can actually make money from a podcast, the answer is a resounding YES! With dedication and strategic planning, podcasting presents numerous income-generating opportunities. Let’s explore some ways you can make money with your podcast.
Direct Monetization Strategies
Click here for a free money-making guide with tons of info
Direct monetization for podcasts primarily revolves around brand partnerships and audience engagement. Partnering with businesses for sponsorships or ad placements within episodes can generate substantial revenue, particularly for podcasts with large and engaged audiences. Additionally, affiliate marketing allows podcasters to earn commissions by promoting relevant products through unique links. Offering premium content or exclusive access via platforms like Patreon for dedicated fans fosters loyalty and creates a sustainable income stream. Finally, accepting donations through platforms or a “tip jar” enables listeners to directly support the show and contribute to its growth.
- Advertising and Sponsorships:
- Partner with brands for pre-, mid-, or post-roll ads within your episodes.
- Consider dedicated sponsored segments or even integrated brand mentions.
- Ad rates depend on audience size, demographics, and niche relevance.
- Successful podcast sponsorships showcase substantial revenue potential.
- Affiliate Marketing:
- Promote relevant products or services with unique affiliate links and earn commissions on sales.
- Choose products that align with your brand and maintain audience trust.
- Popular affiliate networks offer a variety of products to promote.
- Integrate affiliate links in show notes or on your website.
- Premium or Exclusive Content:
- Offer bonus episodes, behind-the-scenes access, or early releases to paying subscribers.
- Use platforms like Patreon for managing memberships and gated content.
- Consider tiered membership levels with varying perks and pricing.
- Donations and Listener Support:
- Invite your audience to contribute financially through donations.
- Platforms like Patreon, Ko-fi, or simple “tip jars” empower listeners to support you directly.
- Express gratitude and offer incentives for generous contributions.
Indirect Monetization Strategies
Beyond direct monetization, podcasts offer indirect revenue streams through merchandise, live events, and content repurposing. Creating branded merchandise like t-shirts or mugs fosters audience engagement and generates additional income. Hosting live shows or workshops, in-person or virtually, offers another lucrative revenue stream through ticket sales and potential sponsorships. Additionally, repurposing podcast content into ebooks, online courses, or consulting services allows podcasters to monetize their expertise while providing further value to their audience. Expanding reach through platforms like YouTube can also open up additional monetization avenues.
- Merchandise Sales:
- Create and sell branded merchandise like t-shirts, mugs, or stickers.
- Tap into inside jokes or memorable moments to design appealing items.
- Leverage social media to promote your merchandise and boost sales.
- Live Events and Workshops:
- Host live shows, meet-ups, or workshops related to your podcast’s theme.
- Charge for admission or offer premium experiences.
- Leverage online platforms for virtual events to reach a broader audience.
- Partner with sponsors or businesses to enhance profitability.
- Repurposing Content:
- Transform podcast episodes into e-books, guides, online courses, or consulting services.
- Monetize your knowledge and skills while providing additional value to your audience.
- Syndicate episodes or create video content for platforms like YouTube.
The Power of Owning a Podcast Website
A dedicated website is absolutely crucial for podcasters looking to maximize their monetization potential and overall success. It serves as the central hub for your show, providing a user-friendly platform to access episodes, show notes, and other valuable resources. A well-designed website with straightforward navigation, mobile optimization, and visually appealing elements creates a positive user experience, encouraging deeper listener engagement and fostering community.
Furthermore, your website is a powerful monetization amplifier, seamlessly integrating with various revenue-generating strategies. You can showcase potential sponsors, prominently display affiliate links, promote premium content subscriptions, and even host your own merchandise store directly on the site. Strategically placed calls to action and banners guide visitors toward desired outcomes, maximizing conversion rates and driving revenue.
Beyond monetization, a professional website is critical in brand building and audience growth. It reinforces your podcast’s unique identity, establishes credibility, and conveys professionalism.
- Central Hub:
- Provides a user-friendly platform for listeners to access episodes and resources.
- Features clear navigation, mobile optimization, and visually appealing design.
- Monetization Amplifier:
- Integrates with various monetization strategies (sponsorships, affiliate links, premium content, etc.).
- Showcases effective calls to action and strategically placed banners.
- Brand Building & Audience Growth:
- Reinforces brand identity and establishes credibility.
- Optimized for search engines to attract new listeners and boost reach.

Conclusion
Podcasting presents a wealth of opportunities for generating income, both directly and indirectly. The possibilities are vast, from advertising to merchandise and repurposed content. This variety of strategies opens up a world of potential for your podcast.
A well-designed, simple, website is a crucial tool for monetization, brand building, and audience growth. By establishing a central hub and leveraging the diverse strategies outlined in this post, you can unlock the full potential of your podcast and turn your passion into a sustainable business.
So, if you’ve been wondering if you can make money from a podcast, the answer is a resounding YES! Embrace the opportunities, experiment, and watch your podcast thrive creatively and financially. With the right strategies and dedication, your podcast can indeed become a source of income.
Buzzsprout vs Anchor
Choosing the right podcast hosting platform is crucial for any podcaster, whether you’re just starting or looking to take your show to the next level. Two popular options that often come up in discussions are Buzzsprout and Anchor.
Overview of Buzzsprout and Anchor
Buzzsprout:
- Key features: Unlimited storage, advanced statistics, multiple team members, customizable website, and excellent customer support
- Pricing structure: Paid plans start at $12/month with a free plan offering limited features.
- Target audience: Podcasters of all levels, particularly those seeking professional features and growth potential
Anchor:
- Key features include free hosting, built-in recording and editing tools, easy distribution to major podcast directories, and monetization options.
- Pricing structure: Completely free
- Target audience: Beginners and podcasters on a tight budget.
| Feature | Buzzsprout | Anchor (now Spotify for Podcasters) |
|---|---|---|
| Hosting | Cloud-based hosting | Free unlimited hosting with a 250MB file size limit |
| Distribution | Automatic distribution to major platforms | Automatic distribution to major platforms |
| Audio Quality | High-quality with Magic Mastering option | Maintains original audio quality, including 256 kbps |
| Creation Tools | Built-in editing and Magic Mastering | Built-in recording, drag-and-drop editing, Spotify music integration |
| Monetization | Buzzsprout Ads, Dynamic Content | Ads by Anchor program |
| Analytics | IAB certified, advanced analytics | Basic analytics, not IAB certified |
| Website | Free podcast website with SEO optimization | No dedicated website feature |
| Pricing | Free (2 hrs/month for 90 days); Paid plans from $12/month | Completely free |
| Pros | User-friendly, excellent support, advanced features | Free, user-friendly, easy for beginners |
| Cons | Limited upload time, no rollover, limited website customization | Limited advanced features, basic analytics, potential platform lock-in |
| Verdict | Great for beginners and intermediates, but limited for long/frequent episodes | Ideal for beginners or hobbyists, but lacks advanced capabilities |
Feature Comparison
- Hosting & Storage: Buzzsprout offers unlimited storage, whereas Anchor has limits depending on your plan. Buzzsprout also supports various audio file types, while Anchor has more restrictions.
- Distribution: Both platforms make it easy to distribute your podcast to significant directories like Apple Podcasts and Spotify.
- Analytics & Statistics: Buzzsprout provides detailed analytics, including listener demographics and engagement metrics. Anchor’s analytics are more basic.
- Monetization: Anchor offers built-in monetization options like ads and listener support. Buzzsprout allows you to integrate with third-party monetization platforms.
- Ease of Use: Anchor is known for its user-friendly interface, making it ideal for beginners. Buzzsprout’s interface is also intuitive but may have a slight learning curve.
- Additional Features: Buzzsprout offers features like Magic Mastering (audio enhancement) and podcast transcriptions. Anchor has built-in recording and editing tools.
Pros and Cons
Buzzsprout
- Pros: Powerful features, reliable hosting, excellent customer support, and growth potential.
- Cons: Paid plans and limited features on the free plan.
Anchor
- Pros: Free hosting, beginner-friendly, built-in tools for recording and editing.
- Cons: Limited features, less control over monetization, potential limitations as your podcast grows
Choosing the Right Platform
- Consider your budget: Anchor’s free plan is attractive if you’re on a tight budget. But if you can invest in your podcast, Buzzsprout’s paid plans offer more value in the long run.
- Consider your experience level: Anchor is perfect for beginners, while Buzzsprout is suitable for those who want more control and advanced features.
- Consider your goals: Anchor’s built-in options might be appealing if monetization is a priority. If you’re focused on growth and need in-depth analytics, Buzzsprout is the better choice
Conclusion
Both Buzzsprout and Anchor have their strengths and weaknesses. The best platform for you depends on your individual needs and goals. Anchor is a great starting point if you’re a beginner or on a budget. But if you’re serious about podcasting and want to invest in professional tools and features, Buzzsprout is worth considering.
- Best Podcast Cameras in 2026: Creator Picks for Every Budget
- Yamaha MGX Series for Podcasting: The Practical Guide (MGX12 vs MGX16 vs MGX-V)
- What Is Streamyard, This Weird Tool That Helps You Run a Professional Live Show
- What the “Async” Rebrand Actually Means for Your Old Podcast Files
- Why Serious Podcasters Are Moving to 10GbE NAS