
Matt
Choosing the Best Audio Format for Your Podcast: A Beginner’s Guide
Why Audio Format Matters for Your Podcast
The audio format you choose plays a crucial role in your podcast’s overall quality and listener experience. It affects the sound clarity, file size, and compatibility with podcast platforms. Whether recording, editing, or uploading your podcast, selecting the right format ensures you deliver a professional product without unnecessary complications.
The Best Format for Recording High-Quality Audio
When recording your podcast, it’s essential to prioritize quality. Formats like WAV or AIFF are ideal for this stage because they are uncompressed and retain all the original details of your audio. These formats are widely supported by editing software and provide a clean starting point for post-production.
For optimal recording, set your equipment to:
- Sample Rate: 44.1 kHz or 48 kHz (48 kHz is slightly better for podcasts).
- Bit Depth: 24-bit for richer sound and better dynamic range.
Although these files can be large (around 10 MB per minute), the quality makes them worth it for the recording phase.
Sharing and Editing: Finding the Sweet Spot
After recording, your focus shifts to sharing and editing the audio. While WAV files are perfect for editing due to their quality, their size can be impractical for sharing. For this reason, many podcasters export their episodes in MP3 format.
MP3 files strike a balance between size and quality, making them ideal for distribution. Here are some guidelines for MP3 settings:
- Bitrate:
- 128 kbps for voice-only podcasts (mono).
- 192-256 kbps for podcasts that include music or sound effects (stereo).
- Sample Rate: 44.1 kHz.
If you’re collaborating with editors or co-hosts, use WAV files during the editing process to preserve quality. For file sharing, use platforms like Google Drive, Dropbox, or WeTransfer.
Meeting Hosting Platform Requirements
Every podcast hosting platform has its own requirements, but most expect your files to be in MP3 format. Here’s why:
- MP3 files are small enough for quick downloads and easy streaming.
- All major podcast players and directories, like Spotify and Apple Podcasts universally support them.
Platforms often compress audio files further to optimize delivery, so starting with a high-quality export ensures your final product sounds its best.
For most platforms:
- File Format: MP3.
- Bitrate: 128-192 kbps.
- Maximum File Size: Check your hosting service, as limits can vary.
Balancing Quality with File Size
One of the challenges podcasters face is balancing audio quality with file size. Large files can slow downloads for listeners and increase your hosting costs, but overly compressed files can sound unprofessional.
For perspective:
- A WAV file is approximately 10 MB per minute of audio.
- An MP3 file at 128 kbps is about 1 MB per minute.
This significant size reduction makes MP3 the best choice for final uploads. To maintain a professional sound, use tools like Auphonic to optimize your files for loudness and add metadata before publishing.
Tips for Collaboration and Distribution
When working with others, file sharing becomes a priority. Here are some best practices:
- Use WAV files for collaboration to avoid losing quality.
- Share large files using cloud storage or transfer services like Dropbox or WeTransfer.
For distribution, always export your finished episodes as MP3 files. This ensures compatibility with hosting platforms and podcast directories. Tools like Auphonic or Audacity can make this process easier by allowing you to adjust audio settings and optimize your files.
Of course while the format matters it’s nothing without having great audio equipment to go with it, and if you’re doing a video podcast, having a great camera and lenses. After all, dark and crummy audio is a sure-fire way of getting people to tune out!
Common Questions About Podcast Audio Formats
Can I use WAV files for publishing my podcast?
While WAV files offer excellent quality, their large size makes streaming or downloading them impractical. Stick to MP3 for final uploads.
What’s the difference between mono and stereo audio?
Mono audio uses a single channel and is ideal for voice-only podcasts, reducing file size without affecting quality. Stereo uses two channels, making it better for music or sound-heavy podcasts.
Why do hosting platforms recommend MP3?
MP3 is universally supported, has smaller file sizes, and delivers good audio quality, making it perfect for online distribution.
How can I reduce file size without sacrificing quality?
Use lower bitrates (128 kbps for mono, 192 kbps for stereo) and tools like Auphonic to compress and optimize your audio.
Wrapping It Up
Choosing the right audio format for your podcast doesn’t have to be complicated. Record and edit in WAV for the highest quality, then export your episodes as MP3 for distribution. Following these tips’ll ensure your podcast sounds professional while staying within platform requirements.
Need Help Monetizing the Podcast?
📩 Drop an email on the homepage for our FREE monetization guide which will blow your mind!
Affordable Podcast Microphones: Budget-Friendly Options for Clear Audio
Good audio quality is one of the most important aspects of podcasting. It’s what keeps your listeners engaged and coming back for more. But getting high-quality sound doesn’t mean you need to spend a fortune. With the right microphone, you can achieve professional results without blowing your budget. This guide explores some of the best affordable podcast microphones and helps you choose the perfect one for your setup.
What Matters When Choosing an Affordable Podcast Mic?
When looking for a budget-friendly podcast mic, it’s essential to know what to prioritize:
- Sound Quality: Clear voice capture and noise reduction are key. A mic that picks up your voice naturally will save time in editing.
- Connectivity Options: USB mics are simple to use and great for beginners. XLR mics offer better sound quality but require additional equipment.
- Durability: Affordable doesn’t mean disposable. Look for mics made with sturdy materials that can handle regular use.
- Flexibility: Some microphones offer both USB and XLR connections, letting you upgrade your setup without replacing your mic.
- Extras: Features like built-in pop filters, headphone jacks, and adjustable gain are nice bonuses.
Top Picks for Affordable Podcast Microphones
Samson Q2U
A dynamic microphone with both USB and XLR connectivity, the Samson Q2U is perfect for podcasters who want flexibility. It has a stand, pop filter, and cables, making it an excellent starter kit. Its durable metal construction and clear sound make it a favorite for beginners.
Blue Snowball
This USB condenser microphone is a stylish, compact option that’s easy to set up and use. With two recording modes—cardioid and omnidirectional—it works well for solo podcasters or small group recordings. It’s a great choice for hobbyists looking for reliable performance.
HyperX SoloCast
Designed with simplicity in mind, the HyperX SoloCast is a USB condenser mic with a cardioid pickup pattern for focused sound. It features a tap-to-mute sensor and a compact design, making it ideal for small recording spaces or minimalist setups.
Audio-Technica ATR2100X-USB
This dynamic mic offers both USB and XLR connections, making it a long-term investment for podcasters who want to grow their setup. It includes a built-in headphone jack for real-time monitoring and delivers excellent clarity for voice recordings.
Other Budget-Friendly Options
- Behringer XM8500: An ultra-affordable XLR mic known for solid sound quality at a very low price.
- Rode NT-USB Mini: Compact and under $100, this mic offers great sound and a sleek design.
How to Choose the Right Microphone for Your Podcast
- Start with Your Setup: If you’re recording in an untreated space, a dynamic mic like the Samson Q2U will reject more background noise. USB mics are better for plug-and-play setups, while XLR mics are ideal for professional use.
- Consider Your Budget: Entry-level mics like the Blue Snowball or HyperX SoloCast cost between $50 and $80, while versatile options like the Samson Q2U or ATR2100X-USB range from $80 to $120.
- Don’t Forget Accessories: Many affordable mics come with stands or pop filters, but you might need to buy these separately for some models.
Stretching Your Budget Further
- Buy Refurbished or Used: Platforms like Amazon Renewed or eBay often have great deals on lightly used microphones.
- Look for Bundles: Some mics include extras like stands and cables, saving you money on accessories.
- Use Free Tools: Editing software like Audacity can help you polish your audio without additional costs.
A Quick Comparison of Affordable Microphones
| Microphone | Type | Price Range | Features | Best For |
|---|---|---|---|---|
| Samson Q2U | Dynamic USB/XLR | $70-$100 | Dual connectivity, durable | Versatility, beginners to pros |
| Blue Snowball | USB Condenser | $50-$70 | Compact, plug-and-play | Casual podcasters, hobbyists |
| HyperX SoloCast | USB Condenser | $50-$80 | Compact, tap-to-mute | Minimalist setups, small spaces |
| Audio-Technica ATR2100X | Dynamic USB/XLR | $100-$120 | Headphone monitoring, dual input | Long-term growth, live recording |
Tips for Professional Audio on a Budget
- Optimize Your Space: Use blankets, rugs, or foam panels to dampen echoes and background noise.
- Learn Good Mic Technique: Position the mic close to your mouth and avoid speaking directly into it to reduce plosives.
- Edit Like a Pro: Use free tools to remove hiss, background noise, or clicks for a polished final product.
Affordable Doesn’t Mean Compromising on Quality
You don’t need to spend a fortune to get great audio for your podcast. Options like the Samson Q2U, Blue Snowball, and HyperX SoloCast prove that affordable mics can deliver impressive results. Whether you’re just starting or looking to upgrade, there’s a microphone on this list for every budget and need.
Do You Really Need a Podcast Mixer? Here’s the Truth No One Tells You
Do You Need a Mixer for a Podcast?
TL;DR: No, you don’t need a mixer to start a podcast — especially if you’re using a USB mic and recording solo. But if you plan to grow your show, add guests, record calls, or want broadcast-level audio, a podcast mixer can be a total game-changer. Here’s why.
When starting a podcast, one of the most common questions is whether you need a mixer. The answer depends on your setup and goals. A mixer might not be necessary for solo podcasters or beginners using a USB microphone. However, a mixer can be a game-changer if you’re managing multiple audio sources, hosting guests, or aiming for professional sound quality. Let’s explore why mixers matter and how to choose the best one for your needs.
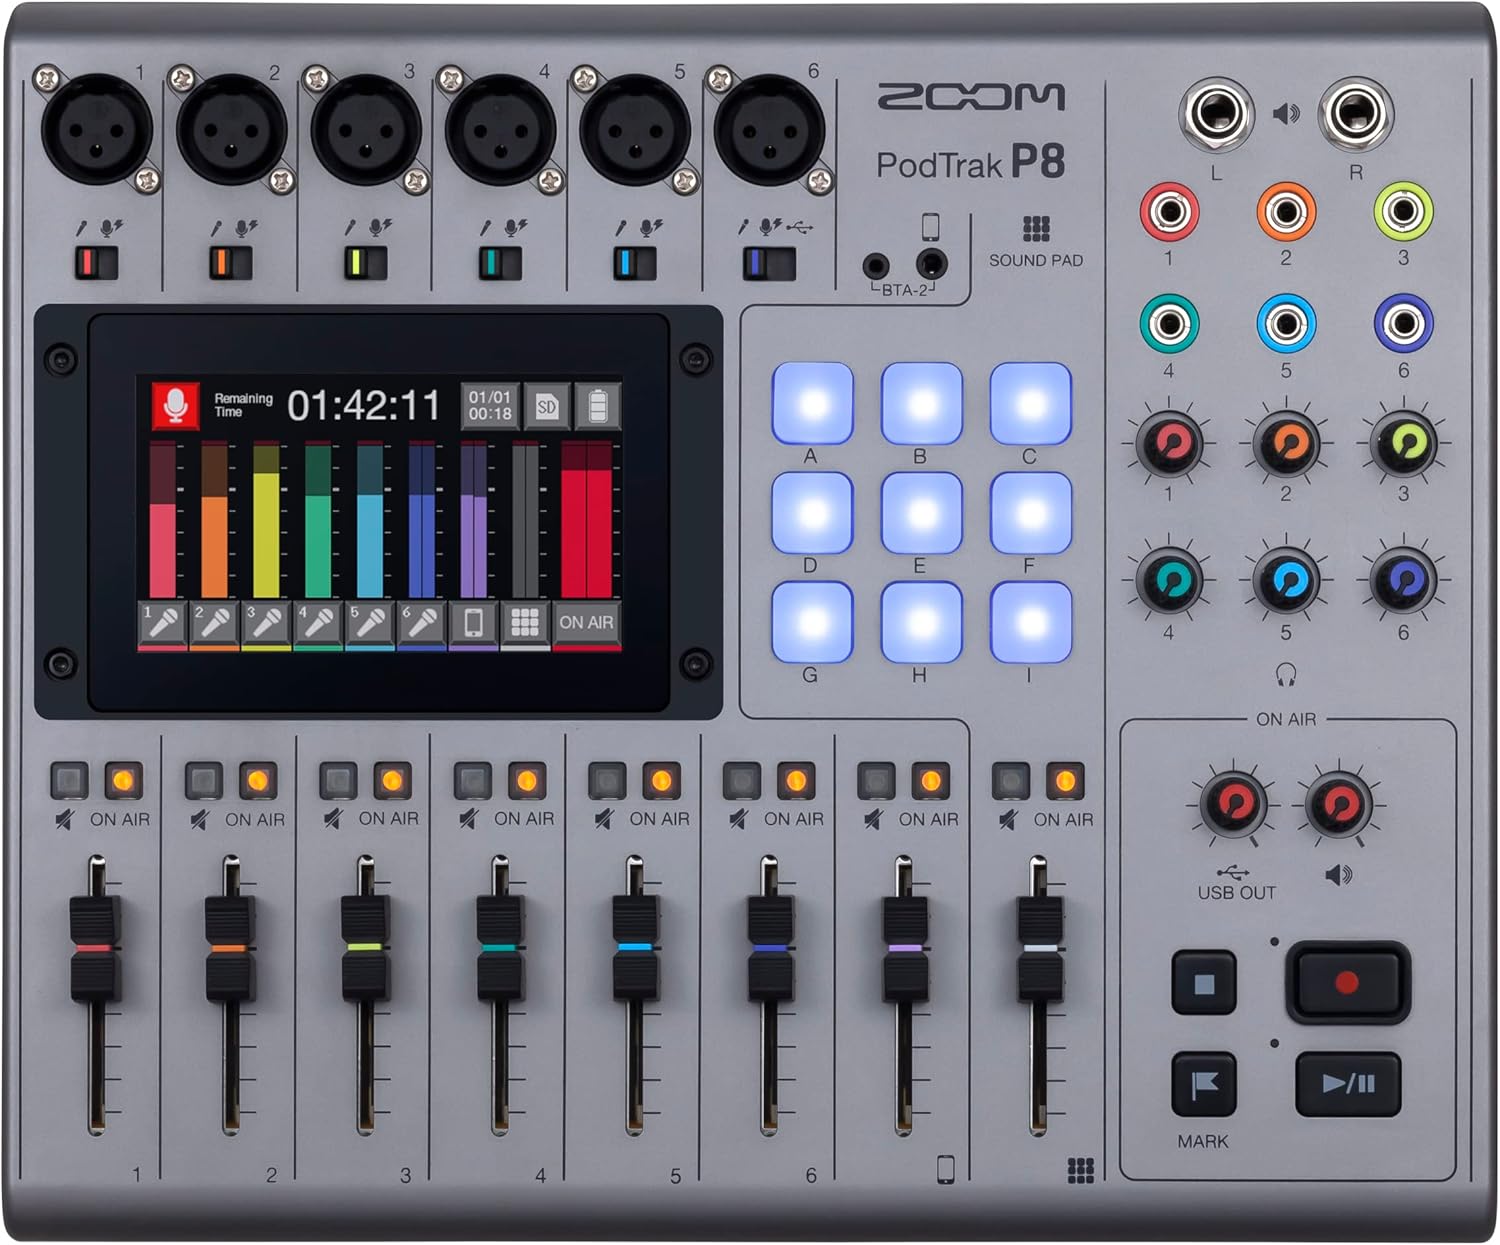 Click to learn more about this mixer
Do You Need a Mixer?
You probably don’t need a mixer if you’re recording a solo podcast or using basic equipment like a USB microphone. But if your podcast involves:
- Multiple hosts or guests
- Mixing sound effects or music live
- Recording live streams
- Advanced audio quality goals
…then investing in a mixer could take your podcast to the next level.
What Exactly Does a Mixer Do for a Podcast?
A podcast mixer allows you to combine, shape, and route audio from multiple sources. This means:
- Balancing levels for multiple mics or sound sources
- Applying EQ, compression, or reverb in real-time
- Monitoring audio with headphones for each speaker
- Recording multi-channel or live audio with more control
Whether you’re recording in a home studio or on the road, a mixer gives you precision and flexibility over your audio setup.
Pros and Cons of Using a Mixer
Why You’ll Love a Mixer:
- Audio Control: Fine-tune your sound live — no need to fix it in post.
- Input Flexibility: Handle multiple mics, calls, or instruments with ease.
- Real-Time Adjustments: Adjust gain, EQ, or mute channels instantly.
- Built-In Effects: Many mixers have onboard compression, de-essing, or FX.
Why a Mixer Might Not Be for You:
- Learning Curve: Mixers can be intimidating to learn at first.
- Cost: Higher-end models like the Rodecaster Pro aren’t cheap.
- Desk Space: Mixers take up room and aren’t great for minimalist setups.
- Overkill for Simple Setups: If you’re solo with a USB mic, you likely won’t benefit from one — yet.
Types of Mixers for Podcasters
- Analog Mixers: Basic, budget-friendly, but limited in features.
- Digital Mixers: More precise with built-in processing and presets.
- USB Mixers: Plug-and-play with your computer. Great for beginners.
- Podcast Mixers: All-in-one units with phone integration, sound pads, and multi-channel recording. Popular models include the Zoom PodTrak P4 and Rodecaster Pro.
- Portable Mixers: Lightweight and ideal for recording on the go.
- Virtual Mixers: Software-based like VoiceMeeter — free, but complex.
How to Choose the Best Mixer
Think through the following:
- People Count: Hosting guests? Choose a mixer with enough XLR inputs.
- Budget: Analog for entry-level, digital or podcast-specific for pro features.
- Portability: Need to travel? Look into compact units like PodTrak P4.
- Live or Pre-Recorded: Live shows benefit from real-time FX and monitoring.
Start Small and Upgrade Over Time
If you’re new to podcasting, start with something like a USB mixer or an affordable analog model. Learn how to manage levels, EQ, and gain — then consider upgrading to something like the Zoom LiveTrak L-8 or Rodecaster Pro as your show evolves.
Final Thoughts
So, do you need a mixer for your podcast? Not always. But if you’re aiming for better sound, smoother workflow, or a multi-person setup, a mixer is one of the best upgrades you can make.
Helpful resources:
- Audio Mixer for Podcast – A full breakdown of what mixers do
- Zoom PodTrak P4 – A portable, budget-friendly option
- Rodecaster Pro – An all-in-one powerhouse for serious podcasters
- Zoom LiveTrak L-8 – Versatile, expandable, and pro-grade
Whether you’re just getting started or upgrading your gear, choose the right mixer based on your goals — and let it unlock the full creative potential of your podcast.
Podbean vs Spotify for Podcasters (Anchor): Which Hidden Features Will Take Your Podcast to the Next Level?
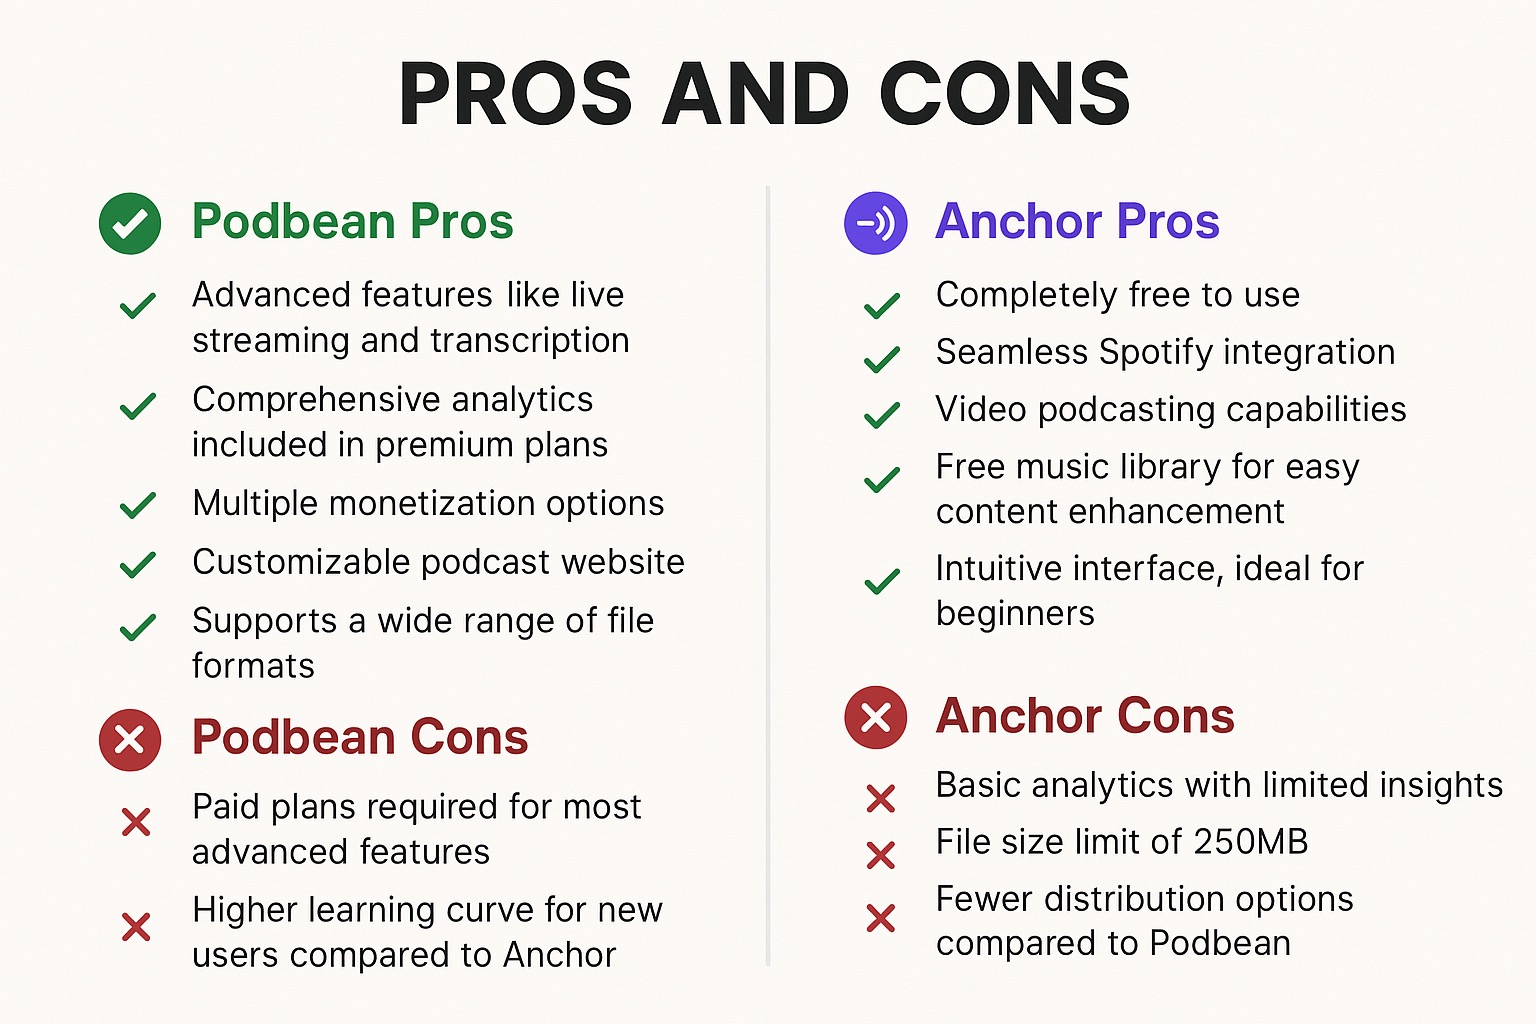
Choosing a podcast hosting platform can be stressful. Podbean and Anchor (now rebranded as Spotify for Podcasters) are the two biggest names in the industry—but which one is right for you in 2025?
Whether you’re launching your first episode or leveling up your show, this comparison reveals the hidden strengths, weaknesses, and critical recent updates (like the removal of Anchor’s mobile recording tools) that you need to know.
Don’t make a decision without reading this breakdown first.
Podbean vs. Anchor (Spotify): At a Glance
The Core Difference: Anchor is a “walled garden” designed to feed content into Spotify. Podbean is an open platform designed to grow your show everywhere (Apple, Amazon, Google).
Pricing
- Anchor (Spotify for Podcasters): Completely free. No storage limits, no monthly fees. This makes it the default choice for hobbyists.
- Podbean: Freemium model. The free plan is limited (5 hours storage). Serious growth requires paid tiers starting at $9/month, which unlock unlimited storage, bandwidth, and monetization.
Advanced Features
- Podbean:
- IAB Certified Analytics: Industry-standard stats required by most sponsors.
- Live Streaming: Host live audio shows with up to 200 participants.
- Monetization Freedom: Patron programs, Apple Subscriptions integration, and dynamic ad insertion.
- Full Website: You get a customizable website for your podcast, not just a landing page.
- Anchor (Spotify):
- Video Podcasting: The easiest way to upload video episodes (viewable mostly on Spotify).
- Fan Interaction: Q&A and Polls that appear directly in the Spotify app.
- Riverside Integration: New Update! Native recording tools have been replaced by a built-in version of Riverside.fm for recording and editing.
Spotify for Podcasters: The “Hidden” Constraints
While the rebrand to “Spotify for Podcasters” brought new features, it also introduced limitations that old “Anchor” users might not expect:
1. The “Walled Garden” Effect
Features like Video Podcasts, Q&A, and Polls only work on Spotify. If you rely heavily on these, you may alienate listeners on Apple Podcasts or Overcast who cannot see or interact with them.
2. Monetization Rules
To qualify for the Spotify Partner Program (ads), you need high engagement from Spotify listeners specifically. It is currently available primarily in the US, UK, Canada, and Australia. Their cut of ad revenue can be variable, whereas Podbean offers a more transparent marketplace.
3. Ownership & Analytics
Spotify’s analytics are incredible for Spotify listeners (showing you exactly where they stopped listening), but they are weak for other platforms. Podbean provides a holistic view of all your downloads across every app.
Distribution & Market Share
Podbean acts as a universal donor, pushing your RSS feed equally to all directories. Spotify for Podcasters distributes to major platforms, but its workflow is optimized to prioritize the Spotify ecosystem.
Market Context: As of recently, Anchor/Spotify holds a dominant ~30% market share due to its free entry point, while Podbean follows closely as a top choice for professional independent creators.
Click Here To Learn More About Podbean
Pros and Cons Breakdown
Podbean Pros
- True Ownership: You own your website and RSS feed control.
- Professional Stats: Essential for pitching sponsors outside of Spotify.
- Live Streaming: Engage with your community in real-time.
Podbean Cons
- Cost: You will eventually need to pay ($9/mo) as you grow.
- Interface: The dashboard is functional but less “sleek” than Spotify’s modern UI.
Anchor (Spotify) Pros
- 100% Free: Zero cost for unlimited hosting.
- Video: Best-in-class support for video podcasts on Spotify.
- Music Integration: Use licensed music (but episodes become Spotify-exclusive).
Anchor (Spotify) Cons
- New Complexity: The switch to Riverside for editing has a steeper learning curve than the old “record button.”
- Weak External Stats: Harder to understand your audience on Apple/Google.
Comparison Table: Quick View
| Feature | Podbean | Anchor (Spotify) |
|---|---|---|
| Pricing | Free + Paid ($9/mo+) | Free |
| Best For | Professional Growth | Hobbyists & Video |
| Recording | Basic Upload | Riverside.fm Integration |
| Analytics | IAB Certified (Standard) | Spotify-Deep / Apple-Weak |
| Website | Full Custom Site | Basic Landing Page |
Click Here To Learn More About Podbean
Lesser-Known AI Features
Podbean AI: Podbean has aggressively integrated AI, offering noise reduction, auto-generated show notes, and “magic chapters” to save you editing time.
Spotify’s “Vertical” Push: Spotify is now testing features that allow you to upload vertical video “shorts” to preview your episodes, trying to mimic the TikTok discovery engine inside the audio app.
Final Verdict: Which should you choose?
- Choose Anchor/Spotify if: You have zero budget, you want to do a video podcast, or you are just experimenting.
- Choose Podbean if: You want to build a business, own your website, and sell ads to sponsors yourself.
Both platforms are capable, but they serve different masters. Spotify serves the listener; Podbean serves the podcaster.
Click Here To Learn More About Podbean
Buzzsprout vs Captivate: Magic Mastering or Network Creation?
When it comes to podcast hosting, Buzzsprout and Captivate are two platforms that stand out for their user-friendly features and innovative tools. Both cater to podcasters at different stages of their journey, but each offers unique advantages. This guide will compare Buzzsprout and Captivate to help you decide which platform aligns with your podcasting goals.
Buzzsprout vs Captivate Features
User Interface
If you’re just starting out, Buzzsprout might feel like a breath of fresh air. Known for its clean and super-intuitive design, it’s perfect for beginners. The dashboard is easy to navigate, making it straightforward to upload and manage your episodes without any hassle. Plus, their Magic Mastering tool is a game-changer—it automatically fine-tunes your audio for that polished, professional sound.
Captivate caters to podcasters who are ready to level up. While it’s still beginner-friendly, its real strength lies in its growth-focused features. With tools for audience expansion, detailed show notes, guest booking, and even monetization, it’s a fantastic option for those who want to grow and monetize their podcast like a pro.
Distribution
Both Buzzsprout and Captivate offer seamless distribution to major directories like Spotify, Apple Podcasts, and Google Podcasts. Captivate goes a step further with advanced features like podcast network creation, which allows users to manage multiple shows under one account, and embedded calls-to-action within its customizable podcast player.
Analytics
Buzzsprout provides detailed analytics, giving podcasters insights into listener behavior, platform usage, and geographic data. These analytics are available on all plans, providing essential data to improve content strategies.
Captivate also excels in analytics, offering advanced metrics designed to help podcasters grow their audience. Its dashboard provides deeper insights into download trends, listener locations, and engagement rates, making it a strong choice for growth-focused creators. Additionally, Captivate’s analytics include tools to measure the performance of dynamic content and sponsorship campaigns.
Monetization Tools
While Buzzsprout offers monetization options like affiliate links, sponsorship opportunities, and subscriptions, it takes a 15% cut from podcast subscriptions. Captivate stands out by offering comprehensive monetization features, including dynamic ad insertion, listener donations, membership subscriptions, and premium content sales—all without taking a cut from the podcaster’s revenue.
Pricing
Free Plan
- Buzzsprout: Offers a free plan with 2 hours of upload time per month, but episodes are hosted for only 90 days.
- Captivate: Does not offer a free plan, but provides a 7-day free trial on any plan.
Paid Plans
- Buzzsprout: Plans start at $12/month for 3 hours of upload time and increase based on usage. All plans include essential features like analytics and transcription tools.
- Captivate: Plans start at $19/month and include unlimited podcasts, unlimited storage, advanced analytics, and audience growth tools. Captivate’s pricing is based on monthly download limits, starting at 30,000 downloads per month.
Pros and Cons
Buzzsprout Pros
- Clean and beginner-friendly interface.
- Free plan to test the platform.
- Advanced analytics included in all plans.
- Magic Mastering tool for audio enhancement.
Buzzsprout Cons
- Episodes on the free plan expire after 90 days.
- Limited storage compared to Captivate.
- Takes a 15% cut from podcast subscription revenue.
- Fewer advanced growth and monetization tools.
Captivate Pros
- Growth-focused features like podcast network creation and detailed show notes.
- Unlimited storage and podcasts on all plans.
- Advanced analytics designed to optimize audience engagement.
- Comprehensive monetization options with no revenue cuts.
- Built-in tools for creating a sponsor kit and SEO-focused website customization.
Captivate Cons
- Higher starting price than Buzzsprout.
- No free plan; only a 7-day trial is available.
- Interface may feel overwhelming to beginners.
Comparison Table
FeatureBuzzsproutCaptivate
User Interface Clean and beginner-friendly Growth-focused, suitable for experienced users
Distribution Major platforms Major platforms with network creation, calls-to-action
Analytics Included in all plans Advanced growth-focused analytics
Monetization Tools Basic options like sponsorships Dynamic ads, donations, subscriptions, premium content
Free Plan 2 hours/month (90-day episode hosting) 7-day free trial
Paid Plans Starts at $12/month Starts at $19/month
Best For
Buzzsprout is best for:
- Beginners seeking an easy-to-use platform.
- Podcasters who value straightforward analytics and audio enhancement tools.
- Those looking for a free plan to start with.
Captivate is best for:
- Growth-oriented podcasters aiming to expand their audience.
- Those managing multiple podcasts or creating podcast networks.
- Podcasters looking for advanced monetization tools without revenue cuts.
Conclusion
Buzzsprout and Captivate are both excellent podcast hosting platforms, but they cater to different audiences. Buzzsprout’s simplicity and affordability make it ideal for beginners, while Captivate’s advanced features are better suited for podcasters focused on growth and monetization.
Consider your podcasting goals, budget, and level of expertise when choosing between these platforms. Both Buzzsprout and Captivate provide the tools and support you need to create, grow, and monetize your podcast.
The Ultimate Podcasting Space Guide – You Won’t Believe How Easy This Is!
Choosing the right place to record a podcast is one of the most important steps toward creating professional-quality episodes. A well-thought-out space can significantly improve sound quality, reduce distractions, and boost your overall production process. Whether you’re just starting or leveling up, this guide will help you explore the best locations for podcasting and show you how to set up a great recording environment.
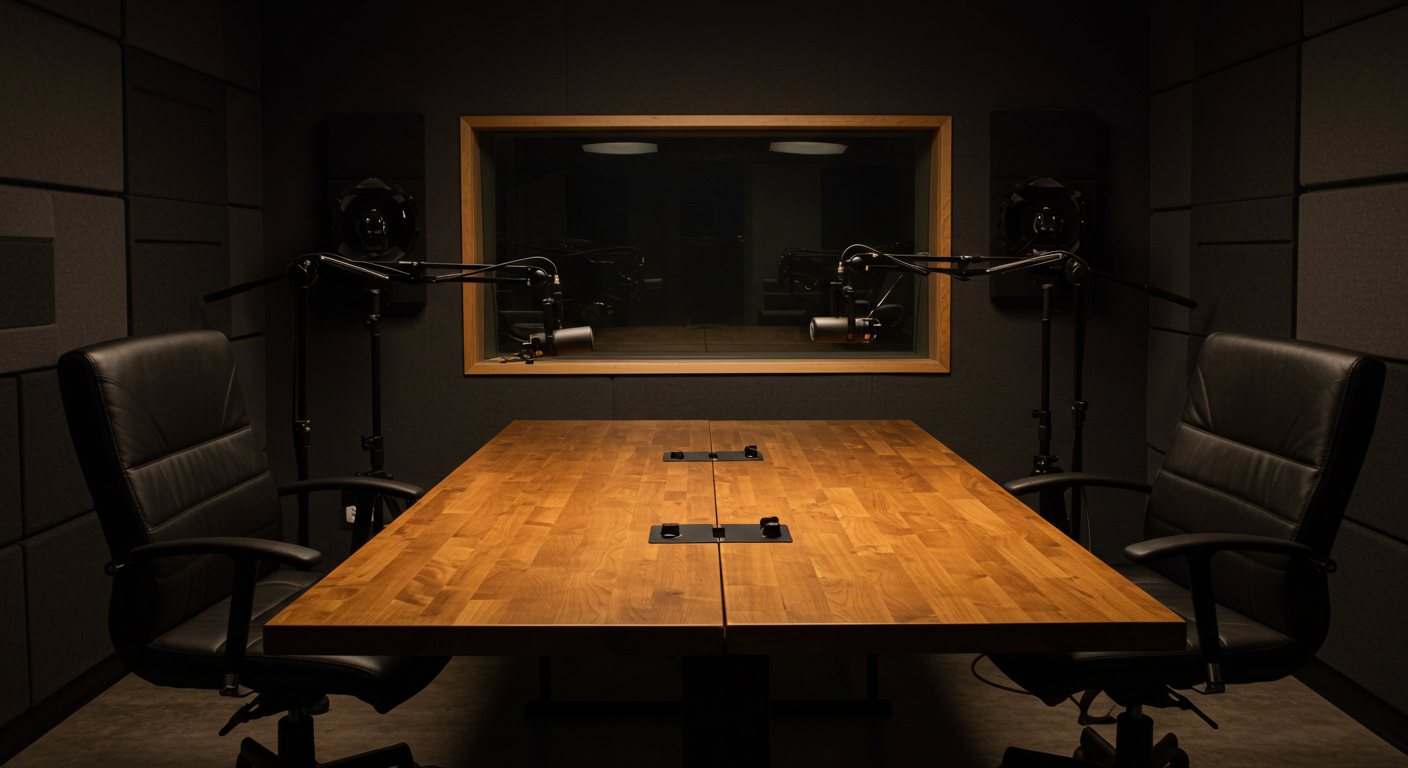
What Kind of Recording Space Do You Need?
Before deciding where to record, think about your unique needs. Are you a solo podcaster recording from home, or do you host interviews with guests? Do you want a free or budget-friendly space, or are you ready to invest in a professional studio?
Your choice will impact the type of equipment you need and the quality of your audio. Understanding your goals, budget, and recording style will make it easier to find the ideal space.
Recording at Home: Affordable and Convenient
Home studios are a popular choice for many podcasters. They’re budget-friendly and convenient, offering the freedom to record at any time. However, creating a good recording environment at home requires a bit of preparation.
- Choose a Quiet Room: Avoid spaces with lots of external noise or echo. Closets or rooms with carpeting can work well.
- Invest in Soundproofing: Foam panels, rugs, and even heavy curtains can help dampen sound reflections and outside noise.
- Set Up Your Equipment: Use a sturdy desk, a good microphone, and an adjustable boom arm for a comfortable setup.
With a little effort, you can turn a spare room or even a corner of your home into a functional podcasting space.
Professional Studios: For High-Quality Production
If you’re aiming for the best audio quality or recording with multiple guests, professional studios are worth considering. These spaces are designed for perfect acoustics and come equipped with high-end microphones, mixers, and soundproofing. Click here for our recommended podcasting equipment.
- Why Choose a Studio? They save you from technical setup headaches and ensure top-tier sound quality.
- Where to Find One: Many websites and coworking spaces list studios available for rent.
- Who Should Use This Option? Professional studios are ideal for podcasters with higher budgets or those working on high-profile projects.
Coworking Spaces and Podcast Booths: A Modern Solution
Many coworking spaces now feature podcast recording booths with pre-installed equipment. These setups are perfect for podcasters who don’t have a dedicated space at home but want a polished environment.
- Benefits: Access to professional gear, soundproofing, and a quiet space.
- Examples: Look for coworking spaces that offer podcasting booths or purpose-built pods.
- Tip: Book your time in advance, as these spaces can be in high demand.
Creative Alternatives for Recording
Sometimes, you need to get creative with your recording space. Here are a few unconventional options:
- Libraries and Community Centers: Some offer quiet rooms for recording.
- Rental Spaces: Short-term rentals with good acoustics can work for a podcast series.
- Portable Setups: Use a laptop, microphone, and isolation shield to record in any quiet space, even outdoors.
Podcasting Space Hacks You Can Try Right Now
You don’t need to spend a fortune or rent a professional studio to get high-quality sound. These quick and simple hacks will help you transform almost any space into a podcasting-ready environment.
- Turn Your Closet into a Studio
Your closet isn’t just for clothes—it’s a natural soundproofing solution! Hanging clothes absorb sound, while the enclosed space reduces echo. Just set up a small table, your microphone, and you’re good to go. - DIY Soundproofing on a Budget
Can’t afford expensive foam panels? Use household items like pillows, blankets, and rugs to create a cozy, echo-free zone. Drape a blanket over a chair and sit underneath for an instant recording booth. - Hack Your Kitchen or Bathroom
Believe it or not, smaller spaces like kitchens and bathrooms often have great natural acoustics. Just avoid recording next to loud appliances like fridges or dishwashers. - Use Your Car as a Recording Booth
Park your car in a quiet area and turn it into a mobile recording studio. Cars have excellent natural soundproofing and are great for capturing clean audio. - Optimize What You Already Have
Position yourself away from windows, turn off fans and AC units, and place a rug under your desk to reduce noise. Small tweaks can make a huge difference.
Essential Equipment to Set Up Your Podcast Space
Click here for our recommended podcasting equipment.
No matter where you record, the right equipment will elevate your podcast quality. Here’s what you need:
- Microphone: Go for professional-quality mics like the Shure SM7B or Rode PodMic.
- Audio Interface or Mixer: Devices like the Focusrite Scarlett 4i4 or Tascam Mixcast 4 make multi-mic setups easy.
- Soundproofing: Foam panels and isolation shields, such as the Pyle Microphone Isolation Shield, help eliminate unwanted noise.
- Accessories: Boom arms, pop filters, and noise-canceling headphones improve recording clarity and comfort.
With this setup, you’ll be ready to produce professional-quality episodes from any location.
How to Optimize Any Space for Podcasting
Even the best space needs a little tweaking to become podcast-ready. Here are some quick tips to optimize your setup:
- Reduce Background Noise: Close windows, unplug noisy appliances, and use soft furnishings to absorb sound.
- Comfort Matters: Invest in ergonomic furniture and keep your recording area tidy for stress-free sessions.
- Test Your Sound: Always do a quick test recording to ensure everything sounds perfect before diving into a full episode.
Resources to Help You Find or Build Your Recording Space
Whether you’re looking to rent a studio or set up a home space, there are plenty of resources to guide you:
- Studio Directories: Websites and coworking hubs can connect you with professional studios.
- DIY Guides: Tutorials offer step-by-step instructions for building a home studio.
- Podcast Starter Kits: Ready-to-use kits from brands help you get started within your budget.
Conclusion: Start Recording Like a Pro
Finding the perfect space to record your podcast doesn’t have to be overwhelming. Whether you’re recording from the comfort of home, a professional studio, or a coworking pod, the key is to match your space to your goals and invest in the right equipment. With these tips, you’ll be ready to produce high-quality episodes that sound amazing.
Rode PodMic vs. Shure MV7: Which Mic Cuts Background Noise Better?
Choosing the right microphone can make all the difference when it comes to podcasting or voice recording. The Rode PodMic and Shure MV7 (Update: as of Aug 2024 the MV7 has been replaced by the newer MV7+ — new PodMic vs MV7+ post here) two popular options, each catering to different needs and budgets. In this comparison, we’ll dive into their features, pros and cons, FAQs, and what users have to say to help you decide the better fit for your setup.

Rode Podmic vs Shure MV7
Rode PodMic
Key Features
- XLR-Only Connectivity: The Rode PodMic requires an audio interface, as it does not offer USB connectivity.
- Built-In Enhancements: Comes with an internal pop filter and shock mount to reduce plosives and vibrations.
- Durable Design: Crafted with a rugged all-metal body, ensuring longevity.
- Sound Profile: Specifically tailored for spoken word, delivering broadcast-quality sound.
Pros
- Affordable: Offers high-quality audio at a budget-friendly price point.
- Background Noise Rejection: Excellent at isolating your voice from environmental sounds.
- Durable Build: Designed to withstand heavy usage in studio settings.
Cons
- Limited Versatility: Its frequency response is optimized for spoken word, making it less suitable for other applications like singing or instrumental recordings.
- Requires Additional Equipment: An audio interface is necessary to use the PodMic.
What Users Say
The Rode PodMic is celebrated for its affordability and durability. Podcasters especially love its clear sound quality and noise rejection. However, some users feel restricted by its lack of versatility and reliance on an audio interface.
Shure MV7 (Discontinued, new model MV7+ here)
Key Features
- Hybrid Connectivity: Offers both USB and XLR connections, making it adaptable to different recording setups.
- Touch Controls: Built-in controls allow for easy adjustment of gain, mute, and headphone volume.
- Sound Customization: The ShurePlus MOTIV app provides options to fine-tune sound settings to suit individual preferences.
- Cardioid Pattern: Effectively reduces background noise, ensuring clear voice recordings.
Pros
- Flexible Setup: The hybrid connectivity allows beginners to start with USB and later transition to XLR.
- High-Quality Audio: Produces professional-grade sound with minimal need for post-production.
- User-Friendly: The MOTIV app makes it easy to adjust settings for optimal results.
Cons
- Price: The MV7 is more expensive than many other podcasting microphones.
- Voice-Centric Design: Not ideal for non-vocal applications, as its tuning is optimized for speech.
What Users Say
Users frequently highlight the MV7’s flexibility, exceptional sound quality, and intuitive setup. However, its heavier build and higher price tag are notable downsides. Additionally, users seeking to record instruments or group sessions might find it limiting.
FAQs
FAQ for Rode PodMic
- What type of connection does the Rode PodMic use? The Rode PodMic uses an XLR connection, meaning it requires an audio interface or mixer to connect to a computer or recording device.
- Is the Rode PodMic suitable for music recording? While the PodMic is primarily designed for spoken word applications like podcasts and broadcasting, it can be used for music recording, but its frequency response is tailored more for voice.
- Does the Rode PodMic come with a shock mount or pop filter? The Rode PodMic has an internal pop filter and shock mount, which helps reduce plosive sounds and vibrations, but it does not come with an external shock mount.
- What is the build quality of the Rode PodMic? The Rode PodMic features a durable all-metal construction, making it robust and suitable for regular use in various environments.
- Do I need any additional equipment to use the Rode PodMic? Yes, you will need an audio interface or mixer that provides phantom power to use the Rode PodMic effectively.
FAQ for Shure MV7
- What types of connections does the Shure MV7 support? The Shure MV7 supports both USB and XLR connections, allowing for versatile use with computers and professional audio equipment.
- Can I use the Shure MV7 without an audio interface? Yes, you can use the Shure MV7 directly with a computer via USB without needing an audio interface.
- What features does the Shure MV7 have for sound control? The Shure MV7 includes touch-sensitive controls for gain, mute, and headphone volume, as well as compatibility with the ShurePlus MOTIV app for further sound customization.
- Is the Shure MV7 good for podcasting? Yes, the Shure MV7 is highly regarded for podcasting due to its excellent sound quality, ease of use, and flexible connectivity options.
- Does the Shure MV7 require any software to operate? While you can use the MV7 without additional software, using the ShurePlus MOTIV app allows you to access advanced settings and customize your sound profile.
Which Microphone Should You Choose?
- Choose the Rode PodMic if:
- You’re on a budget and have an audio interface.
- Your primary focus is podcasting or voiceovers.
- You want a durable, studio-quality microphone with excellent background noise rejection.
- Choose the Shure MV7 if:
- You need flexibility in connectivity (USB and XLR).
- You value easy setup and software integration for sound customization.
- You’re willing to invest more for professional-grade audio and a user-friendly experience.
Both microphones offer excellent quality tailored for podcasters and voice recording enthusiasts. The Rode PodMic stands out for its affordability and durability, while the Shure MV7 shines in versatility and ease of use – now that the MV7 has been discontinued, please see our comparison of the MV7+ and the PodMic here. Evaluate your needs, setup, and budget to make the best choice for your recording journey.
Buzzsprout vs Libsyn: Why One of These Platforms Could Transform Your Podcast
Picking the right podcast hosting platform can really shape your podcasting journey. Two big players in the game—Buzzsprout and Libsyn—are trusted by podcasters everywhere. But which one is right for you? They each offer unique features tailored to different needs, and in this guide, we’ll break them down so you can find the perfect fit for your goals. Let’s get started!
Buzzsprout vs Libsyn Features
Click here for the podcast host that’s sure to grow your podcast fast
User Interface
Buzzsprout is widely known for its clean and intuitive interface, making it an awesome choice for beginners. With straightforward and modern navigation, with step-by-step guides, even first-time podcasters can manage their episodes with ease. It also provides built-in tools such as automated transcript generation and editable chapter markers.
Libsyn, while feature-rich, has a more complex dashboard. It caters to experienced podcasters who need advanced tools and don’t mind a steeper learning curve. Additionally, Libsyn offers video podcasting capabilities and built-in podcast branding tools.
Distribution
Both Buzzsprout and Libsyn offer seamless distribution to major directories such as Spotify, Apple Podcasts, and Google Podcasts. However, Libsyn has the upper hand with its ability to distribute to a wider range of niche directories, which can help podcasters reach more specific audiences.
Recording Capabilities
Buzzsprout does not include built-in recording capabilities, requiring podcasters to use external software for recording and editing. Libsyn similarly lacks a native recording tool, making both platforms dependent on third-party solutions for content creation.
Analytics
Buzzsprout provides detailed analytics across all its plans, offering insights into listener behavior, geographic location, and directory performance. Libsyn also offers advanced analytics, but these are available only on higher-tier plans, making them less accessible for podcasters on a budget.
Pricing
Free Plan
- Buzzsprout: Offers a free plan with 2 hours of upload time per month. However, episodes are hosted for only 90 days.
- Libsyn: Does not provide a free plan, but offers a low-cost entry plan starting at $5/month.
Paid Plans
- Buzzsprout: Paid plans start at $12/month for 3 hours of upload time, increasing with additional hours. All plans include features such as podcast websites and transcription tools.
- Libsyn: Paid plans start at $5/month with 50 MB of storage. Higher-tier plans provide more storage and access to advanced features like detailed analytics. Libsyn also offers unlimited storage on its Pro plan, priced at $9.60/month.
Pros and Cons
Buzzsprout Pros
- User-friendly interface perfect for beginners.
- Free plan to test the platform.
- Advanced analytics included in all plans.
- Features like transcription, Magic Mastering for audio enhancement, and chapter markers.
Buzzsprout Cons
- Episodes on the free plan expire after 90 days.
- No built-in recording capabilities.
- Limited storage compared to Libsyn.
- Unused upload time expires at the end of the month.
Libsyn Pros
- Wide range of distribution options, including niche directories.
- Highly customizable podcast website and media player.
- Advanced analytics for higher-tier plans.
- Long-standing reputation as an industry leader.
- Supports both audio and video podcasting.
Libsyn Cons
- Steep learning curve for new users.
- No free plan.
- Storage is capped based on the plan, potentially limiting larger podcasts.
- Additional cost for advanced analytics.
Comparison Table
FeatureBuzzsproutLibsyn
User Interface Clean and beginner-friendly Complex, designed for advanced users
Distribution Major platforms Major and niche platforms
Recording Capabilities Not available Not available
Free Plan 2 hours/month (episodes expire in 90 days) None
Paid Plans Starts at $12/month Starts at $5/month
Analytics Advanced stats on all plans Advanced stats on higher-tier plans
Best For
Click here to see my favorite podcast hosting platform
Buzzsprout is best for:
- Podcasters who are just starting out and need a user-friendly platform.
- Those who value built-in analytics and transcription services.
- Podcasters who prefer a clean, intuitive experience.
Libsyn is best for:
- Experienced podcasters who need extensive distribution options.
- Those seeking customizable podcast websites and media players.
- Podcasters with larger archives who need cost-effective storage options.
Conclusion
Buzzsprout and Libsyn both provide excellent podcast hosting services, but they do cater to different types of users. Buzzsprout is ideal for beginners or podcasters seeking simplicity and ease of use. Libsyn, on the other hand, is perfect for advanced users who need more customization and broader distribution options.
By evaluating your podcasting goals, technical expertise, and budget, you can choose the platform that best meets your needs. Both Buzzsprout and Libsyn offer reliable hosting and tools to support your podcasting j
Which Podcast Hosting Platform Will Skyrocket Your Show: Buzzsprout or Podbean?
Buzzsprout vs Podbean: Which Podcast Hosting Platform is Right for You?
Buzzsprout and Podbean are two of the most popular podcast host choices. Each offers a robust set of features, catering to different needs and levels of podcasting expertise. In this blog post, we’ll compare Buzzsprout and Podbean to help you decide which one is the best fit for your podcasting journey.
Podbean vs Buzzsprout Features
Click here for the podcast host that’s sure to grow your podcast fast
User Interface
Buzzsprout is celebrated for its simplicity and ease of use, making it ideal for beginners. The clean, intuitive interface allows podcasters to upload, edit, and manage episodes effortlessly.
Podbean also provides a user-friendly interface but offers additional tools for recording and live streaming directly through its mobile app, making it a more versatile choice for on-the-go podcasters.
Distribution
Both Buzzsprout and Podbean support seamless distribution to major directories like Spotify, Apple Podcasts, and Google Podcasts. Buzzsprout simplifies the submission process with step-by-step guidance, while Podbean’s automated distribution includes additional support for niche platforms.
Recording Capabilities
Buzzsprout lacks built-in recording features, requiring podcasters to use third-party tools. Podbean, on the other hand, includes a mobile app that supports recording, editing, and live streaming, making it an all-in-one solution for podcasters who prioritize convenience.
Analytics
Buzzsprout offers detailed analytics on all plans, providing insights into listener behavior, geographic data, and platform performance. Podbean also includes analytics, but advanced statistics are available only on higher-tier plans.


Pricing
Free Plan
Buzzsprout offers a free plan with 2 hours of upload time per month, but episodes are hosted for only 90 days. Podbean’s free plan offers 5 hours of storage and 100 GB of monthly bandwidth, with no time limit on episode hosting.
Paid Plans
- Buzzsprout: Paid plans start at $12/month for 3 hours of upload time and increase based on usage. All plans include advanced features like transcription and podcast websites.
- Podbean: Paid plans start at $9/month and include unlimited storage and unlimited bandwidth, making it a cost-effective option for podcasters with high-volume needs.
Pros and Cons
Buzzsprout Pros
- Intuitive interface suitable for beginners.
- Step-by-step distribution guidance.
- Advanced analytics included on all plans.
- Supports transcription and dynamic content insertion.
Buzzsprout Cons
- Limited free plan (episodes expire after 90 days).
- No built-in recording capabilities.
Podbean Pros
- Unlimited storage and bandwidth on premium plans.
- Mobile app for recording, editing, and live streaming.
- Comprehensive monetization tools, including ads and listener donations.
- Offers a free plan with no time limit on episode hosting.
Podbean Cons
- Advanced analytics require a higher-tier plan.
- Website customization is limited compared to other platforms.
Comparison of Podbean & Buzzsprout
| Feature | Buzzsprout | Podbean |
|---|---|---|
| User Interface | Simple and intuitive | User-friendly with advanced tools |
| Distribution | Step-by-step guidance | Automated with niche support |
| Recording Capabilities | Not available | Mobile app for recording and live streaming |
| Free Plan | 2 hours/month (episodes expire in 90 days) | 5 hours of storage with 100 GB bandwidth |
| Paid Plans | Starts at $12/month (capped uploads) | Starts at $9/month (unlimited storage) |
| Analytics | Advanced stats on all plans | Advanced stats on higher-tier plans |
Best For
Buzzsprout is best for:
- Beginners seeking an easy-to-use platform.
- Podcasters who value analytics and transcription services.
- Those who want a straightforward hosting experience with great customer support.
Podbean is best for:
- Podcasters who need unlimited storage and bandwidth.
- Creators who want built-in recording and live streaming tools.
- Those looking for robust monetization options.
Pain Points
Podbean Pain Points
- Limited Free Plan: The free plan offers very little storage (only 5 hours) and lacks features like video podcast capabilities and advanced analytics.
- Expensive for Solo Podcasters: Podbean’s pricing can be relatively expensive for independent podcasters, especially those just starting out.
- Outdated Interface: The platform feels like a relic from the 2000s, lacking a modern and user-friendly interface.
- Recording Limitations: Users cannot record from the desktop app and are limited to using the mobile app for recording.
- File Format Restrictions: Podbean only supports lossy file formats (mp3, m4a, and mp4) and has a 3GB maximum file size limit for single uploads.
- Live Streaming Constraints: Live streaming is audio-only, limited to 2 hours in length, and restricted to an audience of 200.
- Patron Program Limitations: Podbean patrons must use the Podbean app to access rewards, which may be inconvenient for listeners used to other platforms.
Buzzsprout Pain Points
- Limited Storage and Bandwidth: There’s no unlimited storage or bandwidth option on any plan. The highest tier offers only 12 hours of content per month.
- Misleading Free Plan: The free plan is essentially a 90-day trial, after which users must upgrade to a paid plan or risk losing their episodes.
- Upload Timing Issues: When posting a new episode, users cannot input episode details before uploading the sound file, potentially leading to incomplete or rushed postings.
- Inadequate Analytics: The platform’s statistics are described as “awful” by some users, with unclear metrics that make it difficult to track listener engagement effectively.
- Lack of Advanced Features: Buzzsprout doesn’t offer features like A/B testing, which can be limiting as a podcast grows and starts generating revenue.
- No Mobile App: Unlike some competitors, Buzzsprout lacks a dedicated mobile app for both listeners and podcasters.
- Limited Post-Production Tools: The platform doesn’t allow users to replace audio files, trim, split, or edit audio after publishing.
- Restricted Affiliate Marketplace: Buzzsprout’s built-in affiliate marketplace offers only two brands for promotion, limiting monetization options.
Good Points
Podbean Good Points
Hosting Capabilities:
- Offers unlimited audio and video hosting.
- No limits on downloads or episode count.
- Affordable flat-rate plans for podcasters.
Advanced Features:
- AI-powered audio enhancement tools.
- Noise elimination and volume balancing.
- Automated transcript generation.
- Automatic title and description creation.
Monetization Options:
- Built-in podcast ad campaigns.
- Comprehensive monetization tools.
- Ability to target podcast listeners directly.
User Experience:
- Designed to be user-friendly.
- No steep learning curve.
- Supports both novice and experienced podcasters.
- Offers video podcasting capabilities.
Buzzsprout Good Points
Audio Quality:
- Magic Mastering tool for audio optimization.
- Automatic audio enhancement.
- No audio compression.
- High-quality sound preservation.
Distribution:
- Automatic submission to multiple podcast platforms.
- Reaches millions of potential listeners.
- Supports distribution to Apple Podcasts, Spotify, YouTube, and more.
Flexibility:
- Monthly fee-based plans.
- Can pause or archive podcast without losing content.
- Free plan offers 2 hours of hosting for 90 days.
Additional Features:
- Real-time podcast statistics.
- Dynamic content insertion.
- Episode transcription.
- Social media sharing tools.
Conclusion
Buzzsprout and Podbean both offer excellent podcast hosting services, but their strengths cater to different types of podcasters. If you’re a beginner or prefer a simple, analytics-driven platform, Buzzsprout is a fantastic choice. However, if you need unlimited hosting, built-in recording tools, and advanced monetization options, Podbean might be the better fit.
Consider your podcast’s goals, budget, and technical needs to choose the platform that will help you succeed. Both Buzzsprout and Podbean provide reliable, high-quality hosting solutions to support your podcasting journey.
This Tool Fixes My Bad Audio
Hey everyone! I’m currently working on a new video about print-on-demand and wanted to take a moment to share an awesome tool that has been a game-changer for my audio production. If you’re like me and just want something simple yet effective to fix your audio, this tool is perfect. Let’s dive into the process!
Fixing Audio Has Never Been So Simple
Click here to give it a shot for yourself
I’m creating a 30-minute video on print-on-demand, so stay tuned for that. But today, I wanted to focus on enhancing my audio. I’m not a sound expert, but this tool makes it so easy to get professional sound with minimal effort.
Original Audio Clip
Fixed Audio Clip
Step-by-Step Process
Click here for my favorite tool to fix audio in post super easy
Exporting the Audio
- Start by properly sharing your screen and exporting your audio file.
- You can export in various formats, but I chose M4A for this project.
- For example, my original audio track was 20MB in size.
Using the Tool
- Open the tool and upload your audio file by dragging it to the timeline.
- Save your project, or create a new one for a fresh start.
- The tool supports recording, importing, and many other features, but for now, let’s focus on audio cleaning.
Cleaning the Audio
- Adjust the timeline to start from the beginning.
- Right-click and apply the tool’s “Magic Dust“ feature (or equivalent).
- Play the original and fixed audio to hear the difference:
- Original Audio: Selling merchandise and making money with your podcast does not need to be a super complicated process…
- Fixed Audio: Boosted clarity and improved sound quality.
Exporting the Cleaned Audio
- Export the cleaned file in your desired format.
- Note: The paid tiers of the tool offer additional file types for export.
- The rendering process takes around 2–3 minutes, depending on file size and system performance.
Integrating the Audio in Final Cut Pro
- Open Final Cut Pro and drop the new audio track into the timeline.
- Sync the new track with your video to replace the original audio.
- Pro Tip: If your playback lags while multitasking, don’t worry—it’s likely due to system load.
Coffee Break (Optional!)
While waiting for files to render or export, I made some coffee. Sometimes, you need a little patience with the process. 😊
Final Thoughts
This tool has been a lifesaver for my production workflow. It’s simple and effective and makes my videos sound professional without requiring advanced technical skills.