Best Podcast Microphone for Beginners in 2026
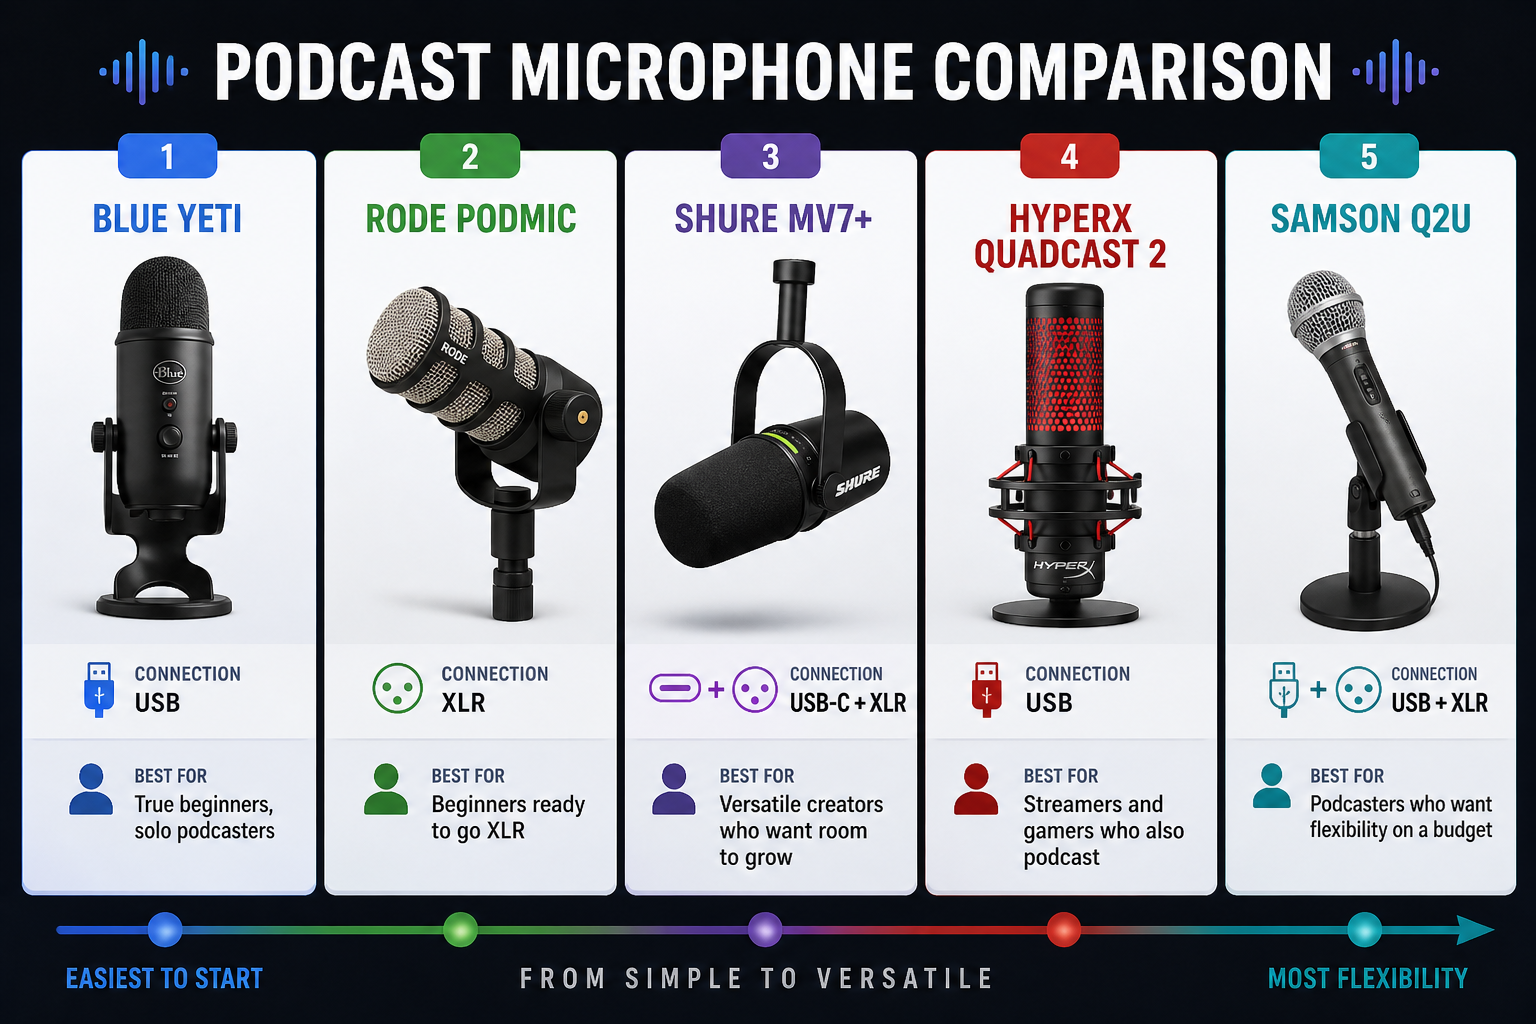
The best podcast microphone for beginners in 2026 is the Blue Yeti. It’s USB plug-and-play, captures broadcast-quality audio without an interface, and costs under $130. If you’re ready to step up to XLR from day one, the Rode PodMic is the best beginner-to-intermediate bridge mic on the market.
Listeners will tolerate a shaky camera, but bad audio ends podcasts. The good news: you don’t need to spend $400 to sound professional. The right beginner mic — matched to your room and workflow — gets you 90% of the way there from your first episode.
→ Check the current price on the Rode PodMic
Best Beginner Podcast Microphones at a Glance
| Microphone | Connection | Price Range | Best For |
|---|---|---|---|
| Blue Yeti | USB | ~$100–$130 | True beginners, solo podcasters |
| Rode PodMic | XLR | ~$100–$120 | Beginners ready to go XLR |
| Shure MV7+ | USB-C + XLR | ~$200–$250 | Versatile creators who want room to grow |
| HyperX QuadCast 2 | USB | ~$120–$150 | Streamers and gamers who also podcast |
| Samson Q2U | USB + XLR | ~$60–$80 | Lowest cost hybrid option |
The 4 Types of Podcast Microphones (And Which One Beginners Actually Need)
Before picking a model, you need to understand the four mic categories. Your room and recording situation matter more than specs.
1. USB Microphones — Best for True Beginners
USB mics combine a microphone and audio interface in one unit. Plug into your laptop or desktop, select it as your input device, and you’re recording. No extra gear required. The Blue Yeti and HyperX QuadCast 2 are the most-recommended in this category.
The tradeoff: USB mics are harder to use in multi-mic setups because most computers only accept one USB audio input cleanly. If you’re planning to eventually record with a co-host in the same room, consider a hybrid or go straight to XLR. See our full breakdown on the XLR vs USB decision before you buy.
2. XLR Dynamic Microphones — Best Bang for the Buck Long-Term
Dynamic mics use a moving coil to capture sound and are forgiving of background noise — the hum of an HVAC, a dog barking down the hall, a keyboard clicking. They require an audio interface or mixer (an extra $50–$100 investment), but the total cost is often comparable to a premium USB mic.
The Rode PodMic is the most popular beginner XLR dynamic for good reason: it sounds like a $300 mic, costs under $120, and is nearly indestructible. For setup guidance, see our podcast microphone setup guide. You’ll also want to check our recommended audio interfaces to pair it with the right interface.
Not sure whether dynamic or condenser is right for your room? Our microphone polar patterns guide explains exactly how pickup patterns affect what your mic hears.
3. XLR Condenser Microphones — Skip These Until Your Room Is Treated
Condensers capture incredible detail — which is the problem. In an untreated bedroom or home office, that sensitivity means they also capture every keyboard click, HVAC rumble, and ambient echo. Unless you’ve foam-treated your walls or record inside a closet, a condenser mic will actually sound worse than a dynamic in most beginner setups.
Once your room is sorted, condensers shine. Popular options include the Audio-Technica AT2020 and Rode NT1-A. For now, start dynamic.
4. USB/XLR Hybrid Microphones — Best for Future-Proofing
Hybrid mics like the Shure MV7+ offer USB simplicity today and XLR capability for later. They cost more upfront but eliminate the need to buy a second mic when you upgrade your setup. If you’re serious about podcasting long-term, the MV7+ is worth the premium. Compare it directly in our Rode PodMic vs Shure MV7+ face-off and the original PodMic vs MV7 comparison.

Best Beginner Podcast Microphones — Full Reviews
1. Blue Yeti — Best USB Mic for Beginners
The Blue Yeti has been the go-to beginner podcast mic for over a decade, and for good reason: it sounds great, it’s simple, and it works on every platform. Four selectable polar patterns (cardioid, bidirectional, omnidirectional, stereo) give you flexibility as your show evolves. Gain control and a zero-latency headphone jack are built in.
The Yeti’s weakness is its size — it’s a large desktop mic that captures more room noise than a dynamic. Keep it 6–8 inches from your mouth in cardioid mode and you’ll get podcast-ready audio. If you upgrade to a boom arm later, the Blue Yeti Nest Boom Arm guide covers the best options.
Verdict: Best first mic for solo podcasters recording in a reasonably quiet room.
2. Rode PodMic — Best XLR Mic for Beginners
The Rode PodMic is a broadcast-style dynamic mic built for close-mic vocal recording. Its tight cardioid pattern and internal shock mount make it forgiving of untreated rooms and table vibrations. You’ll need an interface — a Focusrite Scarlett Solo (~$60) pairs perfectly — but the total cost is competitive with the Yeti.
The PodMic looks the part too, which matters if you’re recording video content alongside your audio. For a complete picture of what comes in a typical XLR beginner setup, see podcast equipment bundles and solo podcaster recording setups.
Verdict: Best XLR beginner mic. Sounds better than its price point suggests.
3. Shure MV7+ — Best Upgrade Mic for Serious Beginners
The MV7+ is Shure’s successor to the wildly popular MV7, adding USB-C connectivity and improved internal preamps. If you’re starting a podcast you plan to monetize or grow aggressively, buying the MV7+ upfront saves you from replacing a cheaper mic in 12 months.
It’s a dynamic mic, so it handles untreated rooms well. The MOTIV app gives you DSP-level control: EQ, compression, limiter, and high-pass filter baked into the firmware. No post-production required if your monitoring game is solid — check our best podcast headphones guide to make sure you can hear what you’re recording.
Verdict: Best mic if you’re investing for the long haul from day one.
4. HyperX QuadCast 2 — Best for Streamers Who Also Podcast
The QuadCast 2 is a USB condenser with a built-in shock mount, LED indicator, and tap-to-mute function. It’s designed for live streaming environments and looks great on camera. It has more pickup than a dynamic, so it’s sensitive to room noise — but if you’re recording in a treated space or small quiet room, it delivers rich, detailed audio.
For streamers using OBS or similar software alongside podcast recording, this mic integrates cleanly. See our StreamYard vs OBS breakdown if you’re also live streaming your podcast.
Verdict: Best beginner mic for creators who record in a treated room and want visual polish on camera.
5. Samson Q2U — Best Budget Beginner Mic
At $60–$80, the Samson Q2U is the best budget hybrid mic available. USB and XLR outputs let you start simple and scale up without buying a new mic. Sound quality is solid for the price — not Blue Yeti-level, but well above built-in laptop audio. If budget is the constraint, this is the call.
Verdict: Best entry-level mic for podcasters who need to start cheap and grow into XLR later.
How to Choose the Right Beginner Podcast Microphone
| Your Situation | Best Choice | Why |
|---|---|---|
| Recording solo in a noisy or untreated room | Rode PodMic (XLR dynamic) | Tight cardioid pattern rejects background noise |
| Want zero extra gear to buy | Blue Yeti (USB) | Plug-and-play, no interface needed |
| Recording with a co-host in the same room | Two Rode PodMics + Behringer mixer | USB doesn’t scale to multi-mic; see our co-host equipment guide |
| Tight budget (<$100 total) | Samson Q2U | USB/XLR hybrid for under $80 |
| Want one mic for 3+ years | Shure MV7+ | Premium build, USB + XLR, DSP processing built in |
| Recording on the go or traveling | See portable podcast mics | Different form factor needed for travel setups |
Essential Accessories for Your First Podcast Setup
The mic is only part of the equation. These accessories separate professional-sounding podcasts from amateur recordings:
Pop Filter: Reduces plosive sounds (the hard “p” and “b” sounds that clip audio). Essential for any condenser mic; helpful for dynamic mics too. Budget ~$10–$20.
Boom Arm or Desk Stand: Keeps the mic at consistent distance from your mouth and isolates it from keyboard vibration. See our microphone setup guide for positioning tips.
Shock Mount: Absorbs desk vibrations before they reach your mic capsule. Most important for condenser mics, but useful for all types.
Closed-Back Headphones: You need to hear what you’re recording in real time. Open-back headphones bleed sound back into the mic. Our best podcast headphones guide covers options at every budget — the Sony MDR-7506 remains the industry standard at ~$100.
Audio Interface (for XLR mics): Converts your XLR mic signal to USB for your computer. See best audio interfaces for podcasting. If you’re considering a mixer with more inputs and built-in effects, the Behringer Xenyx Q802USB is a popular budget option, and the podcast audio mixer overview covers the full category.
Recording Software: Your DAW for editing. See best podcast editing software and editing software for all levels for the full breakdown.
Tips to Get the Best Sound From Any Beginner Mic
Mic distance: Position the mic 6–8 inches from your mouth, slightly off-axis (angled away from your lips). This reduces plosives without a pop filter and keeps the low-end presence that makes voices sound warm.
Treat the room first: Acoustic treatment doesn’t mean expensive foam panels. Heavy curtains, bookshelves full of books, a closet full of clothes, or a duvet draped behind you absorb reflections. If you’re hearing echo in your recordings, read how to fix echo on your mic.
Gain staging: Set your input gain so your voice peaks around -12 to -6 dBFS. Clipping is unfixable in post. Low levels are fixable — see how to increase volume for a podcast audio file.
Monitor with headphones while recording: You can’t fix problems you didn’t hear happening. The right podcast headphones make a measurable difference in your final edit time.
Consistency is everything: Record at the same gain level, same mic position, same time of day if possible. Inconsistent recordings are the hardest to fix in editing.
For a complete overview of your first recording session, see how to record a podcast and home podcast setup. If you’re recording with a remote co-host, how to record a podcast remotely covers the full workflow.
Where This Fits in Your Full Equipment Picture
A great mic is just one piece. For the complete starter setup — mic, interface, headphones, software, and accessories — see the podcast equipment guide and recording equipment for solo podcasters. Budget-focused? The best cheap podcast microphones post covers options under $60. Already thinking about wireless? See wireless podcast microphones.
If you’re also wondering about the total cost of getting started, how much it costs to start a podcast breaks down every budget tier.

Frequently Asked Questions
What is the best microphone for a beginner podcaster?
The Blue Yeti is the best beginner podcast microphone for most people. It connects via USB with no additional gear required, delivers broadcast-quality audio under $130, and works on any computer. For beginners willing to add an audio interface, the Rode PodMic is a better long-term investment at a similar price.
Do I need an audio interface for a beginner podcast microphone?
Not if you buy a USB mic like the Blue Yeti or Samson Q2U. USB mics have the interface built in. If you choose an XLR mic like the Rode PodMic, you’ll need a separate interface — the Focusrite Scarlett Solo (~$60) is the standard beginner recommendation.
Is the Blue Yeti good enough for a professional podcast?
Yes. Hundreds of professional and monetized podcasts use the Blue Yeti. The limiting factor is almost always the room, not the mic. Proper mic technique, acoustic treatment, and clean gain staging matter more than upgrading to an expensive XLR mic.
What’s the difference between a USB and XLR podcast microphone?
USB mics are self-contained — plug directly into your computer and record. XLR mics require an audio interface between the mic and your computer, but offer better signal quality, more gain control, and easier expansion to multi-mic setups. See our full XLR vs USB comparison for a complete breakdown.
Can I use a condenser microphone for podcasting as a beginner?
Only if your recording space is quiet and acoustically treated. Condenser mics are highly sensitive and will capture every background noise, keyboard click, and room echo. In untreated rooms, a dynamic mic like the Rode PodMic will sound significantly better than a condenser at the same price point.
What accessories do I need with a beginner podcast microphone?
Essential: closed-back headphones for monitoring, a pop filter for plosive reduction, and a boom arm or desktop stand for consistent positioning. For XLR mics, add an audio interface. Optional but helpful: a shock mount and basic acoustic panels or foam. See our full podcast equipment bundles guide.
How much should I spend on my first podcast microphone?
Budget $60–$130 for a solid beginner mic. The Samson Q2U at ~$70 is the floor for podcast-quality audio. The Blue Yeti at ~$120 and Rode PodMic at ~$110 are the sweet spot. Spending more than $200 as a first-time podcaster rarely improves your actual sound more than improving your room would. Check how much it costs to start a podcast for full budget planning.
What microphone do professional podcasters use?
The most common professional podcasting microphones are the Shure SM7B (~$400), Electro-Voice RE20 (~$450), and Rode PodMic for shows on a mid-range budget. Many professional shows — including some of the most popular in their categories — still use the Shure MV7 or MV7+. Equipment matters less than technique and room treatment at any level.
Should I buy a dynamic or condenser microphone for podcasting?
Dynamic for most beginners. Dynamic mics reject background noise and are forgiving of untreated rooms — the reality for most home podcasters. Condensers capture more detail and nuance but require a treated, quiet environment to perform well. Our microphone polar patterns guide explains how pickup patterns affect what each type hears.
How do I make my podcast microphone sound better?
The single biggest improvement comes from room treatment — heavy curtains, bookshelves, or recording in a closet. After that: maintain consistent mic distance (6–8 inches), set gain so peaks hit -12 to -6 dBFS, and monitor with closed-back headphones in real time. See microphone techniques for podcasters for the full approach.
Final Verdict
For most beginners, the choice comes down to two mics:
Buy the Blue Yeti if you want zero friction getting started — plug it in and record. It’s the most beginner-friendly podcast mic available at under $130 and will serve you well for years.
Buy the Rode PodMic if you’re willing to pair it with an interface and want a mic that still sounds great two or three setups from now. The total investment is similar to the Yeti and the ceiling is higher.
Either way: treat your room, set your gain correctly, and monitor with headphones. The mic is only as good as the environment you put it in. For everything else you need to build your first professional-sounding setup, start with the complete podcast equipment guide.