helpful-info
How to Animate Your Podcast Show with AI (No Animation Skills Needed)
More Than Just Ads: How Crime Junkie Monetizes Smarter
If you’re running a true crime podcast, you’ve probably thought about monetization—and the most obvious method is running sponsored ads on your episodes.
Maybe you’re already pitching sponsors or considering mid-roll spots. Yes, ads can bring in money. But what if there’s a whole ecosystem of income streams that can multiply your revenue, often with less effort, and help you build a sustainable business around your podcast?
The Sponsored Ad Mindset: What You’re Missing
Running sponsored ads is just the first step on a longer journey. It’s important, but it’s only one piece of the puzzle.
Ads:
- Depend on your current download numbers to command decent rates
- Require you to constantly find new sponsors or renew deals
- Are limited to direct ad reads or pre-produced spots
- Can feel like you’re “selling out” if the sponsor doesn’t really align with your audience
If you want to grow your income without chasing sponsors every month, it’s time to start thinking bigger.
Enter Crime Junkie: The True Crime Monetization Masterclass
Let’s look at one of the biggest true crime podcasts: Crime Junkie. Their monetization success isn’t just from ad reads.
Their secret? They’ve built a monetization machine that leverages their podcast and their website, community, and brand into multiple income streams.

How Crime Junkie Does It
1. Website as a True Crime Hub
Their site isn’t just a landing page. It’s a rich resource center with:
- Detailed case summaries, photos, timelines
- Interactive maps and quizzes about cases
- Links to cold case resources, news articles, and support groups
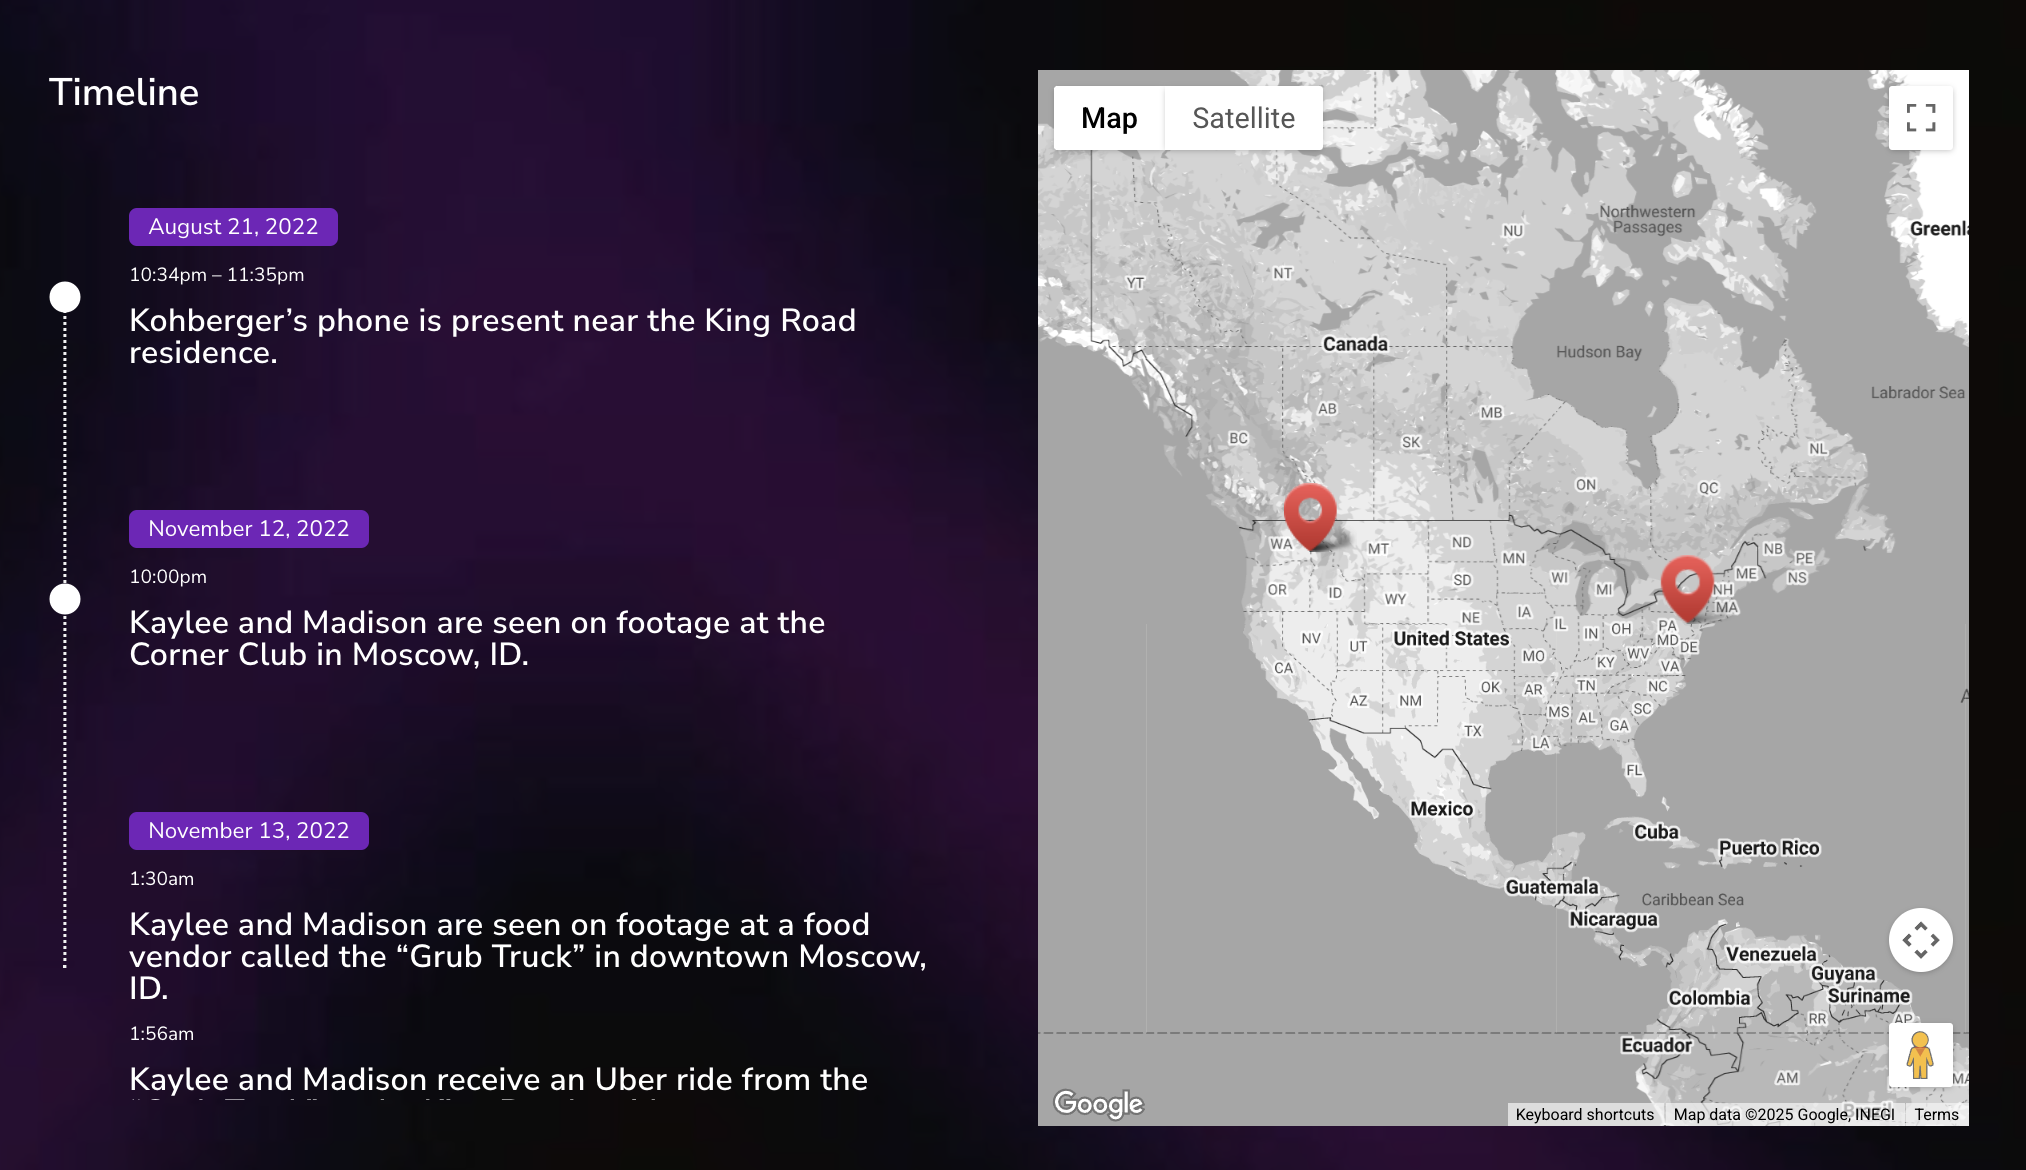
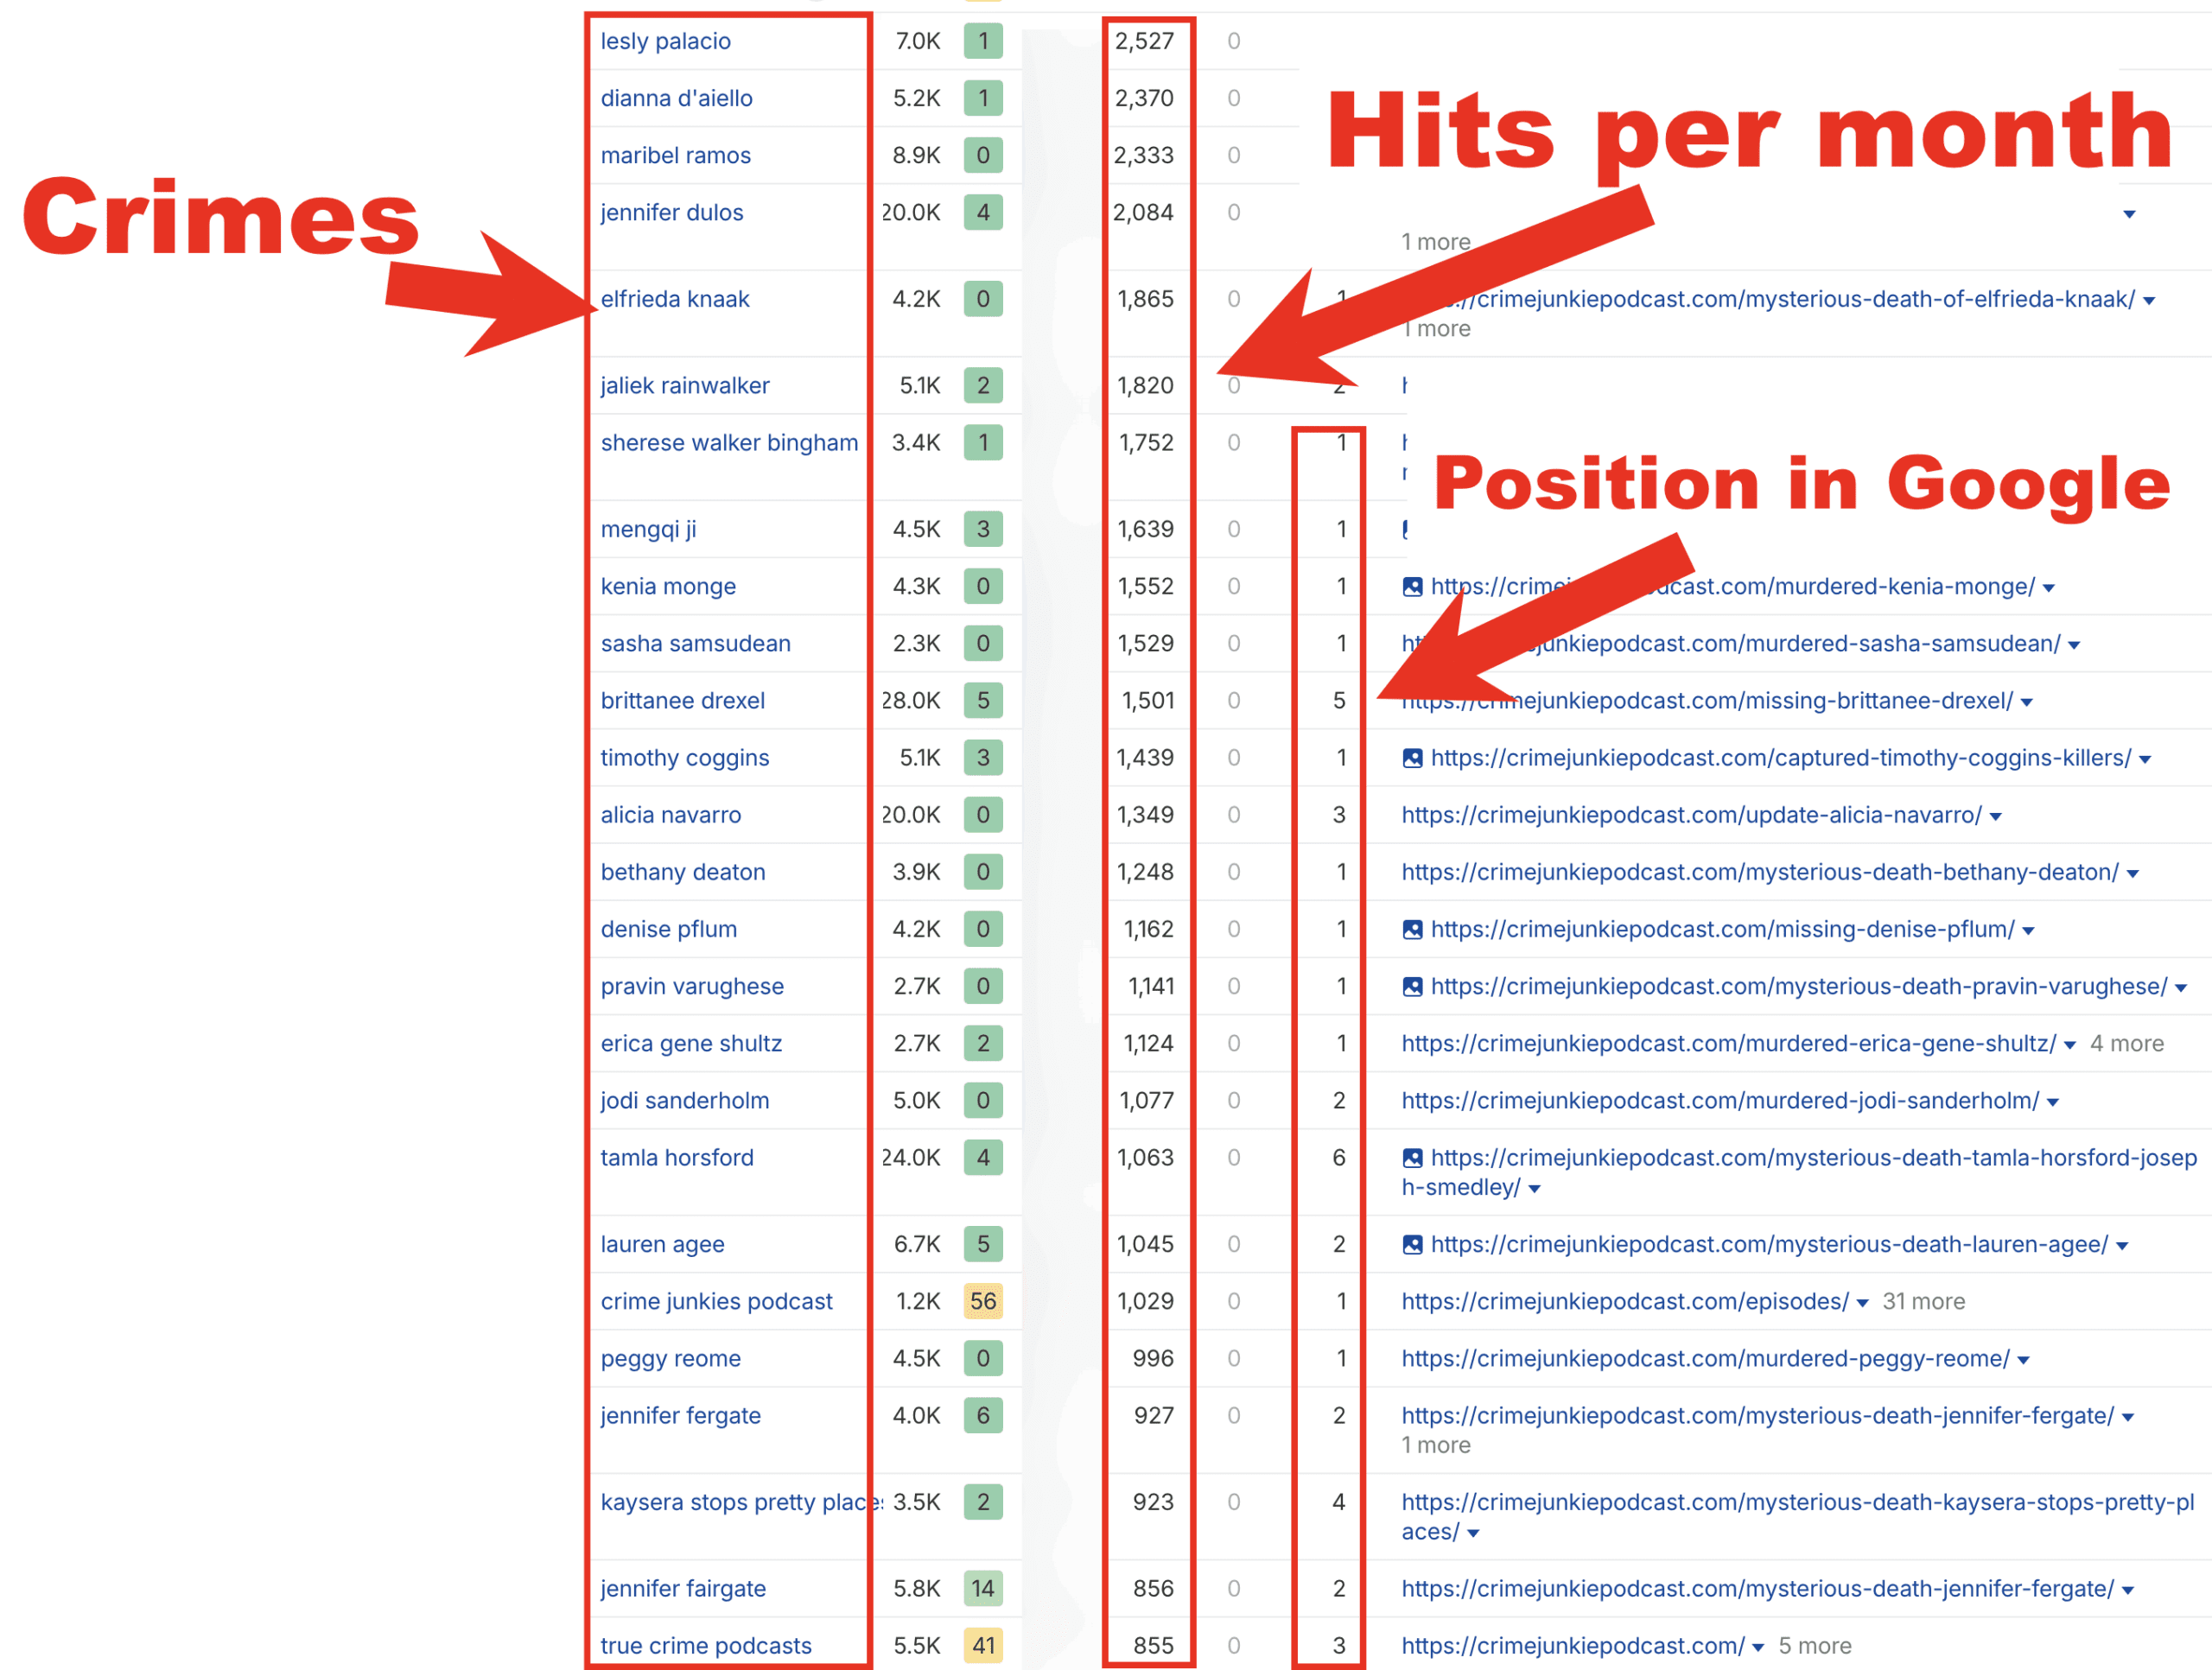
This content ranks high on Google, pulling in search engine traffic from people looking for crime info—many discovering the podcast through the site.

And if you were to search the keywords they show up for in my fancy tool you’d see them for yourself!
2. Building a Loyal, Engaged Community
Beyond listeners, Crime Junkie cultivates superfans:
- Email newsletters with exclusive content
- Membership perks with bonus episodes or early access
- Fan club and social media engagement that keeps listeners coming back
This community is a direct channel for monetization beyond podcast platforms.
3. Smart Sponsorships & Brand Partnerships
They partner with companies that fit their true crime audience:
- Mystery subscription boxes (e.g., Hunt a Killer)
- True crime books and documentaries
- Crime-themed games and collectibles
These partnerships include ads on the podcast, website banners, newsletter placements—creating bundled, high-value sponsorship packages.
4. Affiliate Marketing & Merchandising
Crime Junkie promotes products their fans actually want—often earning commissions on sales or offering exclusive merchandise:
- Mystery box affiliate programs
- True crime books and streaming services
- Themed merchandise sold directly or through third parties
Click For Free Podcast Monetization Strategy
What This Means For Your Podcast
If you’re only thinking “I need a sponsor to make money,” it’s time to expand your view. You can start building your own monetization ecosystem:
- Create a website packed with rich content that ranks in Google for true crime searches
- Grow an email list to communicate directly with your listeners—offering exclusive content and offers
- Find sponsors and partners that deeply align with your niche, then bundle ad opportunities across your podcast, website, and newsletter
- Add affiliate promotions for products your audience cares about, generating passive income
- Offer premium content or memberships for superfans willing to pay for bonus episodes, behind-the-scenes access, or ad-free listening
Starting Small: Your First Steps Beyond Ads
Even with a modest audience, you can:
- Build a simple website with episode show notes, transcripts, and resources
- Create a lead magnet (like a checklist or case tracker) to start collecting emails
- Reach out to a handful of sponsors that fit your niche and propose simple ad deals
- Add 1–2 affiliate links into your show notes or website content
- Engage your listeners with bonus content on Patreon or a private community
Click For Free Podcast Monetization Strategy
Why This Matters
Ads alone can be a fickle income source. But with a diverse, audience-centered monetization strategy, you create:
- Multiple income streams
- Stability if sponsors leave or platforms change
- Greater creative freedom—you’re not tied to just one revenue source
- A valuable asset you own and control: your website, email list, and community
Final Thought
If you want to go beyond “just sponsored ads” and build a podcast monetization machine like Crime Junkie’s, the best time to start is now.
Your podcast deserves more than just ads—it deserves a smart, diversified strategy that grows with your audience and maximizes your earning potential.
Ready to build a real, scalable monetization system for your podcast?
Click For Free Podcast Monetization Strategy
Is Transistor.fm the Right Podcast Host for You? A Helpful, Honest Review for 2026
Transistor.fm is a modern podcast hosting platform built for creators who want power without complexity. Whether you’re running a solo podcast, a team of branded shows, or a private series for your coaching clients, Transistor offers a clean interface, strong features, and scalable plans. It’s one of the few hosts that lets you run multiple podcasts on a single plan, making it a favorite among podcasters who like to experiment.
🌟 TL;DR
- Ideal for indie podcasters & small teams
- Unlimited shows under one plan
- Private podcasting at every tier
- Dynamic audio insertion & YouTube posting (Pro+)
- Starts at $19/month with 14-day free trial
![]()
🌟 Who Is Transistor Best For?
Transistor.fm is perfect for:
- New Podcasters who want simplicity without sacrificing control
- Teams & Agencies managing multiple shows and collaborators
- Business Owners offering private content to subscribers or students
- Coaches & Course Creators running membership-style podcasts
🛠️ Key Features Breakdown
Here’s a closer look at what makes Transistor.fm a strong contender:
- ✔️ Unlimited Podcasts — One login, multiple shows, no added cost
- ✔️ Private Podcasting — Secure RSS feeds even at the entry level
- ✔️ Dynamic Audio Insertion — Add or update ads and CTAs after publishing
- ✔️ Dynamic Show Notes — Apply standard notes across episodes with ease
- ✔️ YouTube Auto-Publish — Pro+ plans can push new episodes to YouTube with a static image
- ✔️ Customizable Embedded Player — Clean, responsive, and avoids autoplay skewing
- ✔️ Unlimited Team Logins — Admin/member roles supported
- ✔️ Third-Party Integrations — Works with Mailchimp, ConvertKit, Chartable, etc.
- ✔️ Episode Comparison Analytics — See which content is resonating most
- ✔️ 14-Day Free Trial — Try it out before you commit
📅 Pricing Plans (2026)
| Plan | Monthly | Yearly | Downloads | Private Subs | Key Features |
|---|---|---|---|---|---|
| Starter | $19 | $190 | 20K | 50 | Unlimited shows, private feeds |
| Professional | $49 | $490 | 100K | 500 | Dynamic tools, YouTube posting |
| Business | $99 | $990 | 250K | 3,000 | White-label, deeper private tools |
All plans include unlimited podcasts and team members. Private podcasting is included even in the Starter tier.
📄 Switching to Transistor.fm: What to Expect
Thinking of moving from Buzzsprout, Podbean, or another host? Here’s how easy it is:
- Import your existing podcast via RSS feed
- Redirect your old feed (Transistor provides instructions)
- No interruption to your subscribers
- No audio compression or quality loss
Many users report completing the switch in less than 30 minutes.
⚖️ Pros & Cons
| Pros | Cons |
| Unlimited shows per plan | Analytics may not be as deep as Captivate |
| Clean, beginner-friendly UI | YouTube auto-posting only on Pro+ |
| Responsive embedded player | No native monetization marketplace |
| Excellent, fast customer support | Download caps may worry fast-growing shows |
| Private podcasting at every level |
🤔 Common Questions Answered (FAQ)
Can I run both public and private podcasts on one account?
Yes, every plan supports multiple public and private feeds.
Will my current subscribers be affected if I migrate to Transistor?
Nope. Transistor provides tools to set up a 301 redirect, keeping your audience intact.
Does Transistor offer video podcasting?
Not directly. However, Pro+ users can auto-post audio episodes to YouTube with a static image.
Can I monetize my podcast with Transistor?
Transistor doesn’t offer a built-in ad network, but it supports dynamic ad insertion and integrations with third-party monetization platforms.
Is there a mobile app for creators?
Not currently. You access Transistor through a responsive web dashboard.
🌐 Transistor.fm vs Other Podcast Hosts
| Feature | Transistor | Buzzsprout | Podbean | Captivate |
| Unlimited Shows | ✔️ | ❌ | ❌ | ✔️ |
| Private Podcasting | ✔️ (all plans) | Limited | Pro-only | Pro-only |
| Dynamic Audio | ✔️ | Pro-only | ✔️ | ✔️ |
| YouTube Auto-Posting | Pro+ Only | ❌ | ❌ | ❌ |
| Built-in Monetization | ❌ | ✔️ (Ads) | ✔️ (Ads) | ❌ |
| Free Trial | 14 days | 90 days | Limited | 7 days |
🏆 Final Verdict
Transistor.fm delivers a near-perfect blend of simplicity and power. For podcasters managing multiple shows, offering private content, or scaling up to a business-grade operation, it’s one of the most thoughtful, streamlined platforms available in 2025.
You may want to explore alternatives if you need built-in monetization or ultra-deep analytics, but for the majority of creators, Transistor is a fantastic long-term home.
How to Present Information Clearly on Your Podcast (Audio-Only or Video)
Podcasting isn’t just about talking into a microphone—it’s about clearly delivering value to your audience in a way that sticks. Whether you’re hosting an audio-only show or a full video production, the way you present information directly impacts how well your listeners absorb, remember, and act on what you share.
This guide walks you through proven strategies for both audio and video formats, ensuring your content is clear, compelling, and impossible to tune out.
Why Presentation Style Matters in Podcasting
Podcasting is unique in that it’s an intimate, one-to-one medium—often consumed while driving, cooking, or exercising. If your ideas aren’t clearly delivered, they’re gone. Listeners can’t skim or re-read like on a blog.
Why clarity is essential:
- Listeners may tune out quickly if confused or overwhelmed
- Retention and loyalty increase with clarity and pacing
- More effective storytelling = better word-of-mouth
- Sponsors and guests respect professional delivery
Core Principles for Presenting Information (Both Formats)
| Principle | Why It Matters | How to Apply It |
|---|---|---|
| Use Conversational Tone | Makes you more relatable and easier to follow | Avoid jargon, speak like you’re talking to a friend |
| Break It Into Segments | Helps listeners process and retain information | Use headings, segments, and transitions |
| Repeat Key Points | Reinforces takeaways and helps with recall | Paraphrase important ideas 2–3 times per episode |
| Use Examples & Stories | Makes abstract or complex ideas easier to digest | Insert relevant metaphors, stories, or analogies |
| Summarize Frequently | Keeps listeners oriented and reminds them of value | End each section with a mini-recap or listener takeaway |
Strategies for Audio-Only Podcasts
Without visuals, you need to make your information “seeable” with your voice.
🌟 Paint Pictures With Words
- “Imagine standing in front of a giant whiteboard…”
- Use storytelling, analogies, and sensory language
- Think of each episode as an audio TED Talk with visuals in your voice
⚠️ Signpost and Structure
- Start by telling listeners what to expect
- Use phrases like:
- “Here’s what we’re going to cover…”
- “That brings us to part two…”
- “So, what’s the big takeaway here?”
♻️ Repeat & Reinforce
- Use the Power of Three: introduce, explain, summarize
- Give examples after explanations
- Say: “Let me break that down again quickly…”
🔗 Show Notes & External Resources
- Tease downloads early: “Don’t worry about remembering all this—I’ve got a cheat sheet in the show notes.”
- Drive action: “Visit [yourdomain.com/framework] for the visual guide.”
😊 Invite Real-Time Interaction
- “Pause and write this down.”
- “Picture this in your head for a second…”
- Ask reflective questions that listeners mentally respond to
Strategies for Video Podcasts
With visuals, you can directly show your ideas, not just describe them.
🖼️ On-Screen Text and Overlays
- Add text overlays during key insights
- Use bullet points for list segments
- Highlight quotes or stat comparisons while speaking
🎥 Screen Share or Cutaway Footage
- Screen share for walkthroughs, tutorials, data visualizations
- Cut to relevant B-roll to keep things dynamic and multi-sensory
📊 Slides or Whiteboards
- Think of your podcast as a mini masterclass
- Use pre-designed slides (Canva, Google Slides)
- Call out each visual: “Take a look at the bottom right corner…”
- Use an onscreen whiteboard to demonstrate and teach
➡️ Camera Cuts & Transitions
- Use multi-camera setups or zooms for emphasis
- Hard cuts between segments help keep viewers engaged
🧡 Real Props
- Hold up a book you’re referencing
- Demonstrate a tool or physical item
- Creates trust and energy through tactile connection
📰 Companion Visual Downloads
- Turn your slides or frameworks into downloadable PDFs
- Mention them early and at the end
- “You can get the visual breakdown of this at podname.com/visualguide”
Repurposing Visuals for Other Platforms
| Platform | Repurposing Ideas | Benefits |
| YouTube Shorts | Clip a key visual moment + add captions | Expands reach and improves discoverability |
| Turn slides into carousels or reels | Builds community and boosts visual storytelling | |
| Pin episode takeaways or visual summaries | Drives evergreen traffic to episodes and show notes | |
| Blog | Embed visuals as support for written posts | Improves SEO and on-page engagement |
| Send recap graphics, visual outlines, or download links | Increases opens and clickthroughs with added value content |
❓ Podcast Presentation FAQ
Q: Should I script or speak freely?
A: Use a hybrid method. Scripts help with clarity, especially for intros, transitions, or complex content. Freestyle speaking helps you sound authentic and human. Many podcasters bullet their points and freestyle around them.
Q: What if my topic is complex or data-heavy?
A: Break it into small, digestible parts. Offer analogies. Use repetition. And always pair the episode with a cheat sheet or visual reference in the show notes.
Q: How do I make listeners remember what I said?
A: Echo ideas using the Rule of Three: say it, show it, summarize it. Connect each point to something relatable or emotional. Stories work better than stats.
Q: Can I use visuals if my podcast is audio-only?
A: Absolutely. Visuals can live in your:
- Show notes
- Blog posts
- Social media clips
- Downloadable resources (e.g., PDFs, mind maps, swipe files)
Q: What tools help with presenting visually on video?
A: Top tools include:
- OBS Studio for live overlays and scenes
- Riverside.fm for recording guests and split-screen
- Ecamm Live for live shows and presentations
- Descript for editing and adding text/visuals post-recording
Q: How long should visual segments stay on screen?
A: Long enough for the viewer to read (5–10 seconds), but not so long that it stalls the flow. Use animations or fades to guide the eye.
Q: How can I turn these ideas into email growth or monetization?
A: Offer companion resources:
- Visual guides, swipe files, checklists
- Mention them mid-episode and place CTAs in the show notes
- Use these to build your list or offer tripwire products
Final Thoughts
Great podcasting isn’t just about having something to say—it’s about saying it clearly, memorably, and visually. Your listeners need help following along, retaining what they hear, and applying your ideas. The clearer your delivery, the deeper your impact.
Whether you’re narrating a story, teaching a process, or explaining a product—clarity builds trust.
The Podcaster’s Guide to RAID, NAS, and Reliable Storage: How to Keep Your Episodes Safe and Your Workflow Smooth
The Invisible Risk Behind Every Podcast
Let’s be honest: you probably didn’t get into podcasting to learn about RAID levels or NAS configurations. But what would happen if your podcast files vanished tomorrow? Interviews, solo episodes, multi-cam video shoots—gone. All because a single drive failed.
It’s more common than you think, and the more content you produce, the higher the stakes. Fortunately, a smart storage setup can protect your creative work and streamline your workflow at the same time.
The 3 Storage Headaches Podcasters Face
- Drive failure – All hard drives eventually die. It’s not a matter of if, but when.
- Slow editing workflow – External USB drives choke on high-resolution video.
- Messy backup systems – One project in Dropbox, another on a flash drive, and raw files scattered across desktops.
RAID, NAS, DAS, JBOD—WTF Does It All Mean?
Here’s the breakdown, made podcaster-friendly:
| Term | What It Is | Why It Matters for Podcasters |
|---|---|---|
| RAID 1 | Mirror backup across 2 drives | If one dies, the other keeps your episodes safe |
| RAID 5/6 | Redundant storage with parity | Handles 1–2 drive failures without losing data |
| JBOD | “Just a Bunch of Disks” (no protection) | Avoid this. If a drive fails, you’re toast |
| NAS | Networked drive enclosure with smart OS | Access files across devices, use apps for backup, sync, and streaming |
| DAS | Direct connection (USB/Thunderbolt) | Great for speed but not shareable or redundant |
| SSD vs HDD | SSDs are fast, HDDs are big | SSDs for active editing, HDDs for storage |
Use Our Storage Calculator
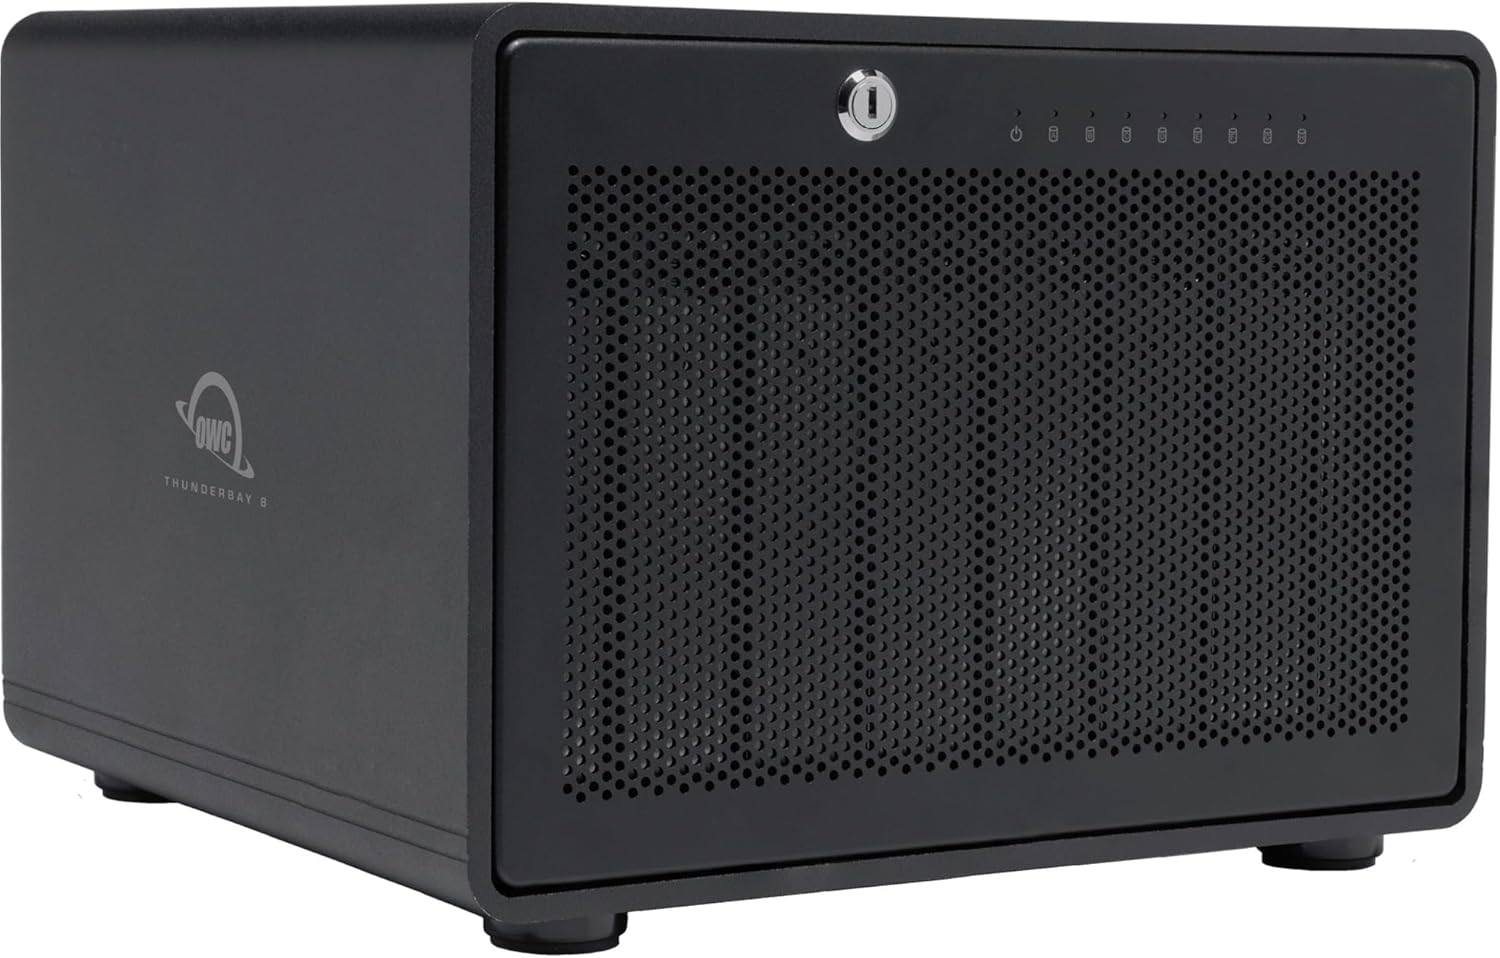
OWN Thunderbay 8 is a JBOD configuration
Real-World Podcast Use Cases
Scenario 1: Solo audio podcaster with limited gear
- 1TB external SSD for editing
- Google Drive for cloud backup
Scenario 2: Video podcast team with multi-cam setup
- 5-bay NAS with RAID 5 and 20TB of storage
- SSD scratch drive for current project edits
- Cloud backup of finished episodes
Scenario 3: Podcast editor managing multiple clients
- RAID-protected NAS for archive + backup
- Separate folders per client with version history
- Offsite backup using Backblaze B2 or Synology C2
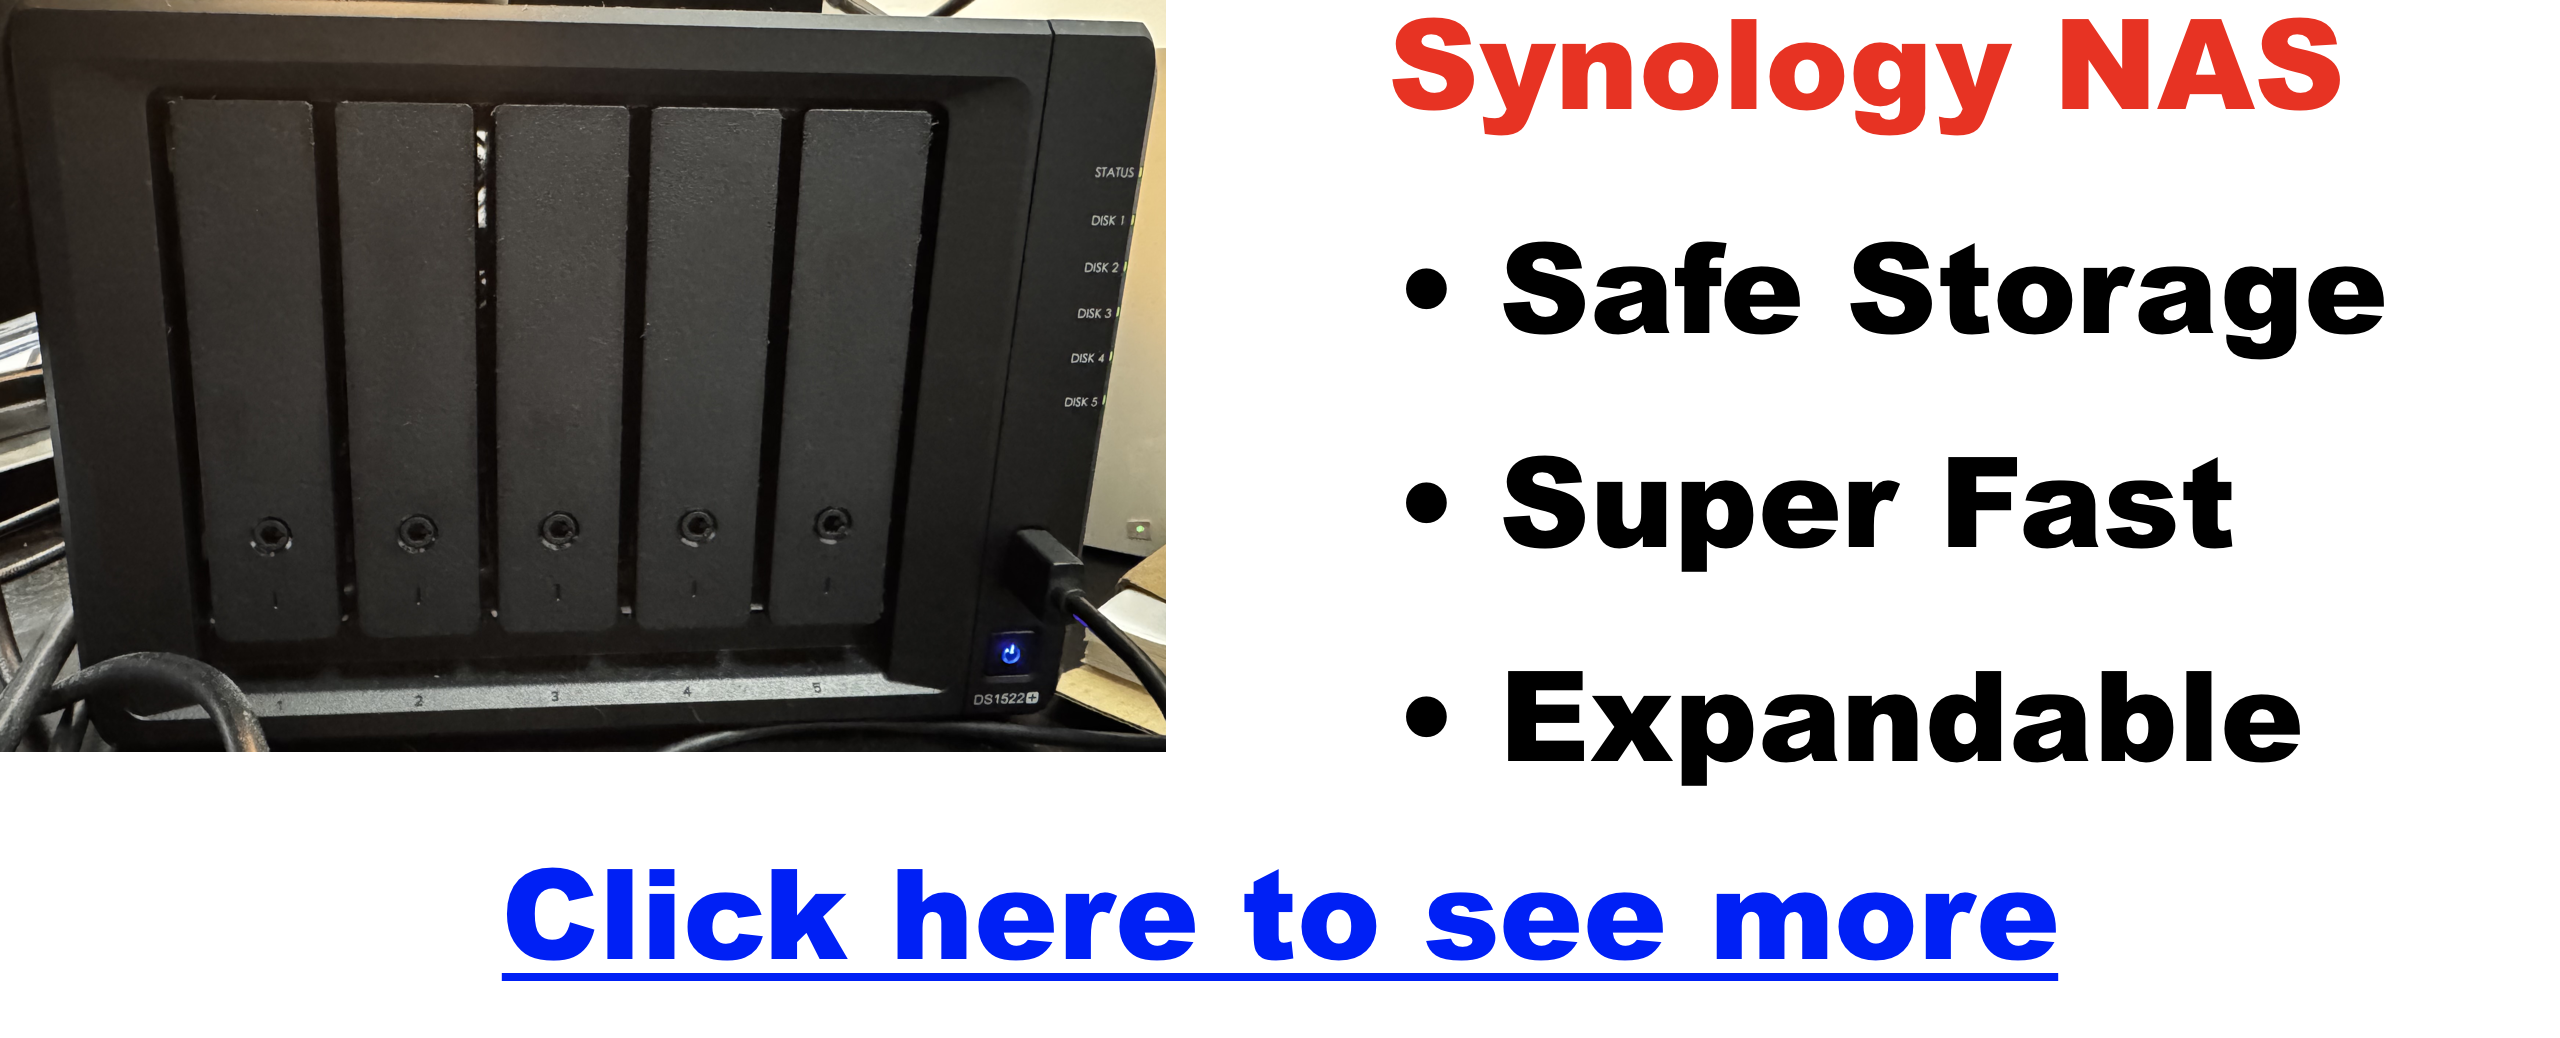
Why We Use the Synology DS1522+
This 5-bay NAS is our personal choice for podcasting, and here’s why it’s fantastic:
- Flexible RAID: Start with RAID 5, expand later
- DSM (DiskStation Manager): Synology’s software is clean, powerful, and easy to use
- Synology Drive: Acts like your own private Dropbox
- Hyper Backup: Schedule backups to cloud or external storage
- Add-ons: SSD cache for speed, 10GbE networking for video workflows
You get redundancy, remote access, client collaboration, and peace of mind—all in one box. Click for a full review of the Synology 1522+. However, if you plan to edit video directly from a NAS, you’ll want to read this before making a purchase.
How to Set Up a Foolproof Podcast Storage System
Step 1: Capture & Edit
- Record and edit on a fast SSD (external or internal)
Step 2: Store
- Move finished files to a RAID-protected NAS like the DS1522+
Step 3: Backup
- Use Synology Hyper Backup to push copies to the cloud (Backblaze B2, Dropbox, or Google Drive)
Step 4: Archive
- For older projects, keep offline copies on cold storage or low-cost HDDs
Recommended Tools for Podcasters
- NAS: Synology DS1522+ – click to see my personal review of this device
- Drives: Seagate IronWolf or WD Red Plus
- Cloud Backup: Backblaze B2, Synology C2, or CrashPlan
- SSD: Samsung T7 or SanDisk Extreme for editing
- Apps: Synology Drive, Hyper Backup, Plex (for private streaming)
Final Thoughts: Save Now or Pay Later
You don’t need to become an IT expert to protect your podcast—but you do need a system. Even one reliable NAS setup can make the difference between smooth sailing and a creative disaster.
Don’t wait until you lose an irreplaceable interview to act.
Build your podcast storage strategy now—your future self (and your audience) will thank you.
Need help choosing a setup for your podcast workflow? Drop your questions in the comments or reach out—we’ve got your back!
Why Every Podcaster Should Use ECC Memory in Their NAS (Especially If You’re Editing, Archiving, or Automating)
ECC stands for Error-Correcting Code. It’s a type of memory that can detect and correct single-bit errors in RAM before they cause damage. These errors can happen randomly due to electrical interference, cosmic rays, or system instability.
Non-ECC memory? It just shrugs and continues when an error happens. That could mean corrupted files, botched renders, or backups that silently fail.
Why podcasters should care: If your RAM goes bad while rendering, transcribing, or archiving—you may never know until it’s too late.
Personal Story: I’ve worked in the visual effects industry, where rendering massive amounts of frames + videos might take hours or even DAYS to complete. I’ve seen first hand what happens when an error occurs and renders a render…useless. That might be 48 hours worth of compute time gone in an instant. That’s why my NAS search started with finding a unit that has ECC memory. Because I’m going to use it not just to store my podcasting files, but I also planned to edit from it, backup from it, and more.
Click Here For My Favorite ECC RAM Synology NAS
Common NAS Use Cases for Podcasters
Modern podcasters do a lot more than hit record. Here’s where your NAS (Network Attached Storage) comes in:
| Use Case | Why It Matters |
|---|---|
| Archiving multitrack sessions | Sessions can span tens of gigabytes and are irreplaceable |
| Backing up raw & mastered audio | Uncompressed WAVs take space; NAS makes them accessible & safe |
| Collaborative editing | Share files with remote producers/editors without the cloud |
| AI-driven tools & automation | Self-hosted Whisper, transcription tools, or post-processing workflows |
| Long-term evergreen storage | Your podcast catalog is intellectual property—protect it |
Where ECC Memory Becomes Critical
1. Audio & Video Editing
RAM errors can crash your DAW or corrupt a project file during export. With ECC, those errors get fixed silently in the background.
2. ZFS or Btrfs Filesystems
Running TrueNAS, Unraid, or Synology with Btrfs/ZFS? These systems assume memory is reliable. If your RAM flips a bit, ZFS will trust the bad data and replicate it across your disks.
ECC is required by ZFS best practices for exactly this reason.
3. Automated Transcription, Tagging & Backups
Using Whisper to transcribe episodes? Automating backups to cloud? One bad calculation or unreadable string can result in:
- Bad transcripts
- Broken audio
- Failed uploads
The Hidden Cost of Skipping ECC
| Problem | What Can Happen |
| No ECC | Silent data corruption (bitrot) |
| Using ZFS without ECC | Corrupted scrubs, bad backups |
| Long renders | Crashes mid-export, audio glitches |
| VM-based workflows | VM crashes, misbehavior, data loss |
“But I’ve never had an issue…” Until one day, a beloved episode won’t open, or a sponsor contract gets corrupted. It is devesdating.
What Does ECC Cost?
ECC RAM is slightly more expensive, and you need a compatible CPU and motherboard. Here’s a ballpark breakdown:
| Component | ECC-Ready Option | Cost Premium |
| RAM | DDR4/DDR5 ECC UDIMM | ~10-20% more |
| CPU | AMD Ryzen Pro, Xeon, some Ryzen 5/7 | Varies |
| NAS OS | TrueNAS, Unraid (ZFS/Btrfs) | Free / license based |
Compared to losing data? It’s cheap insurance.
When ECC Might Be Overkill
ECC may not be essential if:
- You’re only storing small MP3 files
- You edit and back up on a single local device
- You use cloud storage exclusively (Google Drive, Dropbox, etc.)
- You don’t mind losing your data
But if you’re:
- Editing multitrack sessions
- Storing archives of original content
- Automating anything on your NAS
…then ECC is the smarter move.
ECC-Recommended NAS Setups for Podcasters
Click Here For My Favorite ECC RAM Synology NAS
| Setup Type | Platform | ECC Support | Ideal For |
| DIY NAS | TrueNAS Core (ZFS) on Xeon/Ryzen Pro | Yes | Pro editors, AI workflows, archival storage |
| Synology | Plus/XS+ series with ECC RAM | Yes (on select models) | Mid-to-pro users needing reliability |
| Unraid | ECC optional but recommended | Partial | Hybrid media/VM setups |
Final Thoughts: Don’t Gamble with Your Podcast Archive
Your podcast isn’t just content—it’s a brand, a business, and an asset. If you’re using a NAS, especially with ZFS or Btrfs, not using ECC memory is a silent risk you don’t need to take.
It adds a small upfront cost but pays for itself the moment it saves a corrupted session or prevents a bad backup.
👉 Thinking of upgrading your NAS or building one from scratch? Prioritize ECC. Your future self will thank you. Here are my top NAS picks for podcasting / video editing.
How to Archive and Back Up Your Podcast Like a Pro
If you’ve been podcasting for any length of time, you’ve likely poured countless hours into planning, recording, editing, and promoting your episodes. But what happens if your hard drive fails, your podcast host shuts down, or you lose access to your files? Without a reliable backup and archiving strategy, your entire podcast catalog could vanish overnight.
This guide will walk you through how to back up your podcast like a pro—whether you’re a solo creator or running your podcast as a full-fledged business.
What Does “Backing Up Your Podcast” Actually Mean?
Backing up your podcast involves more than saving your final MP3s. A thorough strategy should cover:
- Raw audio (interviews, original recordings)
- Final edited episodes
- Episode assets (intros, outros, music)
- Show notes, scripts, and outlines
- Artwork and promotional graphics
- RSS feed and host settings
- Legal documents (music licenses, guest releases)
Think of it as protecting your intellectual property and future revenue potential.
The 3-Layer Backup Strategy for Podcasters
The most resilient podcast backup strategy uses a layered approach:
1. Local Storage
Start by organizing your podcast files on your main editing machine:
- Use folders like:
Ep001_raw,Ep001_final,Ep001_assets - Use descriptive filenames and consistent naming conventions
- Store on a fast, external SSD (e.g., Samsung T7, SanDisk Extreme)
2. Network Attached Storage (NAS)
A NAS device acts as your always-on backup hub. Top picks:
- Synology DS224+: Easy to use, supports automatic backups, and integrates with cloud
- QNAP TS-264: Ideal for power users needing HDMI or more advanced media features
- Asustor Drivestor 4 Pro: Budget-friendly, great for RAID 5 and long-term growth
NAS systems offer RAID protection, private cloud syncing, and automation.
3. Offsite & Cloud Backups
For true redundancy, you need an offsite copy:
- Sync your NAS or computer to Crashplan Business, Backblaze B2, Google Drive, or Dropbox
- Archive old seasons to Amazon S3 Glacier for long-term, low-cost storage
- Keep encrypted copies on a rugged external drive stored in a different location
Best Tools for Podcast Backup & Archiving
Local/NAS Software:
- Synology Drive: Dropbox-style syncing for NAS
- Hyper Backup: Schedule backups to external/cloud
- ChronoSync (Mac): Great for scheduled drive mirroring
- Resilio Sync: Peer-to-peer syncing across locations
Cloud Storage Options:
- Crashplan Business: Favorite choice overall, unlimited backups, unlimited versioning, great cost value.
- Backblaze B2: Great value, easy NAS integration
- Google Drive / Dropbox: Good for smaller setups or document storage
- Amazon S3 / Glacier: Excellent for deep archiving
Automation Tools:
- Arq Backup: Automated, encrypted backups to any cloud or drive
- rclone: Command-line power for syncing to multiple providers
Business-Grade Backup Services (Even Solo Podcasters Can Use These)
Many podcasters treat their show as a business, and business-class backup tools offer stronger protection without complexity.
Top Picks:
| Service | Best For | Key Benefits |
|---|---|---|
| CrashPlan for Small Business | Solopreneurs | Unlimited cloud, simple dashboard, cross-platform |
| Carbonite Safe Pro | Growing shows/teams | External drive support, HIPAA-ready |
| iDrive Business | Budget-conscious users | Hybrid local/cloud, NAS compatible |
| Acronis Cyber Protect | Tech-savvy creators | Full system imaging, ransomware recovery |
You don’t need to register an LLC to use these services. They’re built for solo operators too.
Pro Tips for Podcast Backup Success
- Automate everything. Set it once, then let it run.
- Test your restores. Practice recovering your files quarterly.
- Encrypt your offsite copies with VeraCrypt or native OS tools.
- Keep an asset checklist for each episode (template link here if offering one).
Don’t Forget: RSS and Host Backups
Your podcast host controls your feed, but you should:
- Export and save your RSS feed
- Download and store all episodes from your host
- Backup your website or podcast landing page regularly
Conclusion: Your Podcast Deserves a Backup Plan
Treat your podcast like the valuable asset it is. With the right strategy and tools, you can protect your years of work from accidents, hardware failures, or business changes.
Podcast Idea Generator
9 Best Podcast Marketing Services (With Case Studies & Growth Results)
Podcasting has exploded in recent years—more than 210 million Americans have now listened to a podcast, and thousands of new shows launch every month. But in a sea of audio content, simply publishing great episodes isn’t enough. Strategic marketing is now essential for podcast growth, visibility, and monetization.
If you’re searching for “podcast marketing services,” you’re likely ready to take your show to the next level. Whether you’re launching a new podcast or trying to grow an existing one, this guide compares the top agencies, highlights key features, shares real case studies, and provides a helpful comparison table so you can find the best fit for your goals and budget.
Why Podcast Marketing Matters
- Podcasting is competitive: With over 5 million active shows globally, breaking through requires more than just good content.
- DIY efforts can stall: While social posts and word-of-mouth help, real growth comes from a strategic blend of PR, paid ads, influencer outreach, and expert optimization.
- Professional agencies offer:
- Custom strategy and creative execution
- Access to press, cross-promotion, and ad networks
- Advanced analytics and audience targeting
- Proven frameworks for rapid and sustainable growth
What to Look for in a Podcast Marketing Service
When evaluating potential partners, consider:
- Strategy & Customization: Do they create tailored plans or use a one-size-fits-all template?
- Services Offered: PR, paid ads, SEO, social media, influencer partnerships, guest booking, etc.
- Results & Case Studies: Can they show proof of growth for similar clients?
- Pricing Transparency: Are costs clear and aligned with your budget?
- Industry/Genre Experience: Have they succeeded with shows like yours?
- Reporting & Communication: How will you measure success and stay updated?
Questions to Ask Before Hiring:
- What’s included in your standard package?
- Do you have case studies or testimonials?
- How do you measure ROI?
- What’s your experience in my podcast’s niche or industry?
The Best Podcast Marketing Agencies & Services (With Case Studies)
Below are the top podcast marketing agencies in 2025, including notable clients and real-world results.
1. Quill Podcasting
- Full-service growth: Strategy, paid ads, repurposing, analytics
- Clients: PwC, Walmart, Expedia Group
- Case Study: TD Bank’s podcast “C Suite” saw a 11,704% listener increase (to 200K+ downloads, #3 global tech rank)
2. The Podglomerate
- End-to-end: Production, marketing, monetization, PR
- Clients: Freakonomics Radio, PBS, Netflix, Harvard
- Case Study: Launched “Missing Pages” to critical acclaim and strong audience growth
3. Content Allies
- B2B focus: Production, LinkedIn outreach, SEO, content repurposing
- Clients: Amazon, Meta, SEMrush
- Case Study: “LTC Heroes” podcast exceeded 20,000 downloads with direct business impact
4. Caspian Studios
- Full-stack: Production, targeted ad campaigns, SEO
- Clients: Slack, IBM, Asana, Dell
- Case Study: Repurposed content strategy amplified enterprise reach
5. Pacific Content
- High-end narrative: Story-driven branded podcasts
- Clients: Shopify, Slack, Dell, Mozilla
- Case Study: Delivered audience results that exceeded client expectations
6. Lower Street
- Promotion/PR: Rebranding, programmatic ads, cross-promotion, SEO
- Clients: B2B brands, agencies, startups
- Case Study: Grew “The Breakout” from 257 to 42,412 monthly downloads (#7 Apple Podcasts)
7. Fame
- B2B growth: Production, influencer outreach, growth guarantees
- Clients: Zendesk, people.ai
- Case Study: Inhabit’s vacation rental podcast reached 700,000+ downloads and top-5 chart status
8. Podspike
- PR & visibility: Branding, press, cross-promotion, chart exposure guarantees
- Clients: Indie creators, branded podcasts
- Case Study: “The Third Act” and “The Engineering Edge” both charted on Apple Podcasts
9. Resonate Recordings
- Editing & marketing assets: Audiograms, show notes, transcripts, hosting
- Pricing: Transparent ($25/mo+ hosting)
- Case Study: Helped small/medium shows boost downloads and engagement
Comparison Table
| Agency | Key Services/Features | Pricing | Ideal Clients/Industries | Notable Clients/Results |
|---|---|---|---|---|
| Quill | Full-service, paid ads, analytics, repurposing | Custom/Quote | Large brands (finance, tech, retail) | TD Bank: 200K+ downloads |
| Podglomerate | Production, marketing, monetization, PR | Custom/Quote | Media, non-profits, existing big shows | Freakonomics, PBS, Netflix |
| Content Allies | B2B production, SEO, LinkedIn outreach | Custom/Quote | B2B, SaaS, tech companies | LTC Heroes: 20K+ downloads |
| Caspian Studios | Production, ads, SEO, repurposing | Custom/Quote | Enterprise tech, SaaS | Slack, IBM, Asana |
| Pacific Content | Narrative, story-driven, paid media integration | Custom/Premium | Global brands, narrative shows | Shopify, Slack, Dell |
| Lower Street | Promotion, PR, cross-promotion, ads, SEO | Flexible, campaign | B2B brands, agencies, startups | The Breakout: 42K+/mo downloads |
| Fame | B2B, influencer, guaranteed growth | Subscription tiers | B2B, SaaS, demand-gen | Inhabit: 700K+ downloads |
| Podspike | PR, branding, press, cross-promo, chart guarantees | A la carte/bundle | Indies, first-time podcasters, brands | Third Act: Apple charts |
| Resonate Recordings | Editing, show notes, hosting, marketing assets | Transparent ($25+/mo) | Small/medium podcasters, organizations | Boosted downloads/engagement |
How to Choose the Right Podcast Marketing Service for You
- Define your goals: Are you launching, growing, or monetizing?
- Decide on scope: Need full-service or just specific help (PR, ads, guest booking)?
- Set a budget: Enterprise agencies are custom-quoted; indie-focused services may start under $1,000/month.
- Check proof: Prioritize agencies with clear, recent case studies and transparent processes.
- Ask about reporting: How will they show you the impact of their work?
Red Flags:
- No case studies or testimonials
- Vague service promises or lack of reporting
- “One size fits all” approach
Frequently Asked Questions (FAQs)
How much do podcast marketing services cost?
- Full-service agencies: $2,000–$20,000+/month (often custom-quoted for enterprise)
- Niche/indie-focused: $500–$2,500/month (or a la carte for single campaigns)
Can I expect guaranteed download growth?
- Some agencies (e.g., Fame, Podspike) offer growth guarantees; most provide realistic, case-backed expectations rather than empty promises.
What’s the difference between a full-service agency and niche provider?
- Full-service: Handles everything (strategy, production, ads, PR, analytics)
- Niche: Specializes in one area (PR, guest booking, cross-promotion)
How do I measure success?
- Track downloads, listener engagement, chart rankings, business leads, and brand mentions. Good agencies will provide detailed reporting.
Is podcast marketing worth it for small shows?
- Yes, if you want to grow faster, reach new audiences, or monetize. Indie-friendly services like Podspike and Resonate are affordable starting points.
Conclusion & Next Steps
- Professional podcast marketing can mean the difference between a show that fizzles out and one that finds lasting success.
- Use the comparison table and agency overviews to shortlist partners that fit your goals, industry, and budget.
- Always request a call, ask for case studies, and clarify reporting expectations before signing up.
Microphone Polar Patterns: A Complete Guide for Creators, Podcasters & YouTubers
Whether you’re podcasting, streaming, recording music, or filming YouTube videos, you need the right microphone. One of the most overlooked yet critical aspects of mic selection is the polar pattern—the area around the mic that captures sound. Using the wrong polar pattern can ruin your audio by capturing too much background noise or missing the subject entirely.
In this guide, you’ll learn what microphone polar patterns are, how they work, and when to use each type for optimal results.
What Is a Microphone Polar Pattern?
A microphone polar pattern (also called a pickup pattern) describes how sensitive a microphone is to sound coming from different directions. Some mics pick up sound evenly from all around, while others are laser-focused on one direction.
Understanding polar patterns can help you:
- Capture cleaner audio
- Minimize room noise or echoes
- Choose the right mic for your recording scenario
Quick Comparison Chart
| Polar Pattern | Picks Up Sound From | Best For | Avoid When… |
|---|---|---|---|
| Omnidirectional | All directions (360°) | Group discussions, ambient audio | In noisy or echo-heavy environments |
| Subcardioid | Mostly front, some sides | Natural vocal recording | High-noise spaces |
| Cardioid | Front only | Solo podcasting, voiceovers | Sound sources are behind the mic |
| Supercardioid | Front + slight rear | Studio voice work, narration | Rear noise sources are present |
| Hypercardioid | Narrow front, rear lobe | Noisy rooms, on-location shoots | Rear reflections or noise exist |
| Bi-directional | Front & back | 2-person interviews (face-to-face) | Side noises are prevalent |
| Shotgun | Extreme front focus | Film sets, vlogging, outdoor audio | Indoors with hard reflections |
In-Depth: Microphone Polar Patterns Explained
🎧 Omnidirectional
- How It Works: Captures sound evenly from all directions.
- Best For: Group conversations, lavalier mics, ambient sound capture.
- Downside: Can pick up unwanted background noise and room echo.
🎙 Subcardioid
- How It Works: A softer directional pattern than cardioid. Wider pickup with more room tone.
- Best For: Natural-sounding vocals with some isolation.
- Downside: Not as focused as cardioid in noisy rooms.
❤️ Cardioid
- How It Works: Picks up sound from the front while rejecting noise from the rear.
- Best For: Solo podcasting, streaming, voiceovers.
- Pro Tip: Great for untreated rooms and reducing background noise.
🎯 Supercardioid
- How It Works: Narrower than cardioid, with slight rear pickup.
- Best For: Close-mic vocals, directional focus in controlled environments.
- Downside: May pick up sound from behind the mic.
🚫 Hypercardioid
- How It Works: Tighter front pickup with more pronounced rear sensitivity.
- Best For: Film shoots, loud environments.
- Downside: Rear noise and reflections may creep in.
🧍↔️🧍 Bi-directional (Figure-8)
- How It Works: Picks up equally from the front and back, rejects the sides.
- Best For: Face-to-face interviews using one mic.
- Downside: Side noise rejection can be too aggressive.
🔫 Shotgun
- How It Works: Very narrow front pickup, excellent for distance capture.
- Best For: Outdoor interviews, film shoots, stage audio.
- Downside: Poor performance indoors unless acoustics are controlled.
Visual Guide: Microphone Pickup Patterns
Insert your custom infographic here showing each pattern clearly.
Which Mic Polar Pattern Should You Use?
| Scenario | Recommended Pattern |
| Solo podcasting | Cardioid |
| YouTube tutorial voiceover | Cardioid |
| Face-to-face interview (1 mic) | Bi-directional |
| Group talk (1 mic) | Omnidirectional |
| Filming a vlog outside | Shotgun |
| Recording in a noisy room | Hypercardioid |
| Natural sounding vocals (roomy) | Subcardioid |
Final Tips for Better Audio
- If you’re unsure what mic to get, start with a cardioid USB mic.
- Always point your mic correctly: even great polar patterns fail when aimed poorly.
- Don’t share mics unless you’re using a pattern designed for it (like bi-directional or omni).
- Treat your room or use close-mic techniques to reduce echo and reverb.
Frequently Asked Questions
Q: Can I switch polar patterns on my microphone?
A: Only if it’s a multi-pattern mic. Examples include the Blue Yeti, Audio-Technica AT2050, or Rode NT2-A.
Q: My mic sounds distant and echoey. What’s wrong?
A: You might be using an omnidirectional setting in a reflective room. Try switching to cardioid and getting closer.
Q: What does “proximity effect” mean?
A: Directional mics like cardioid boost low-end frequencies when you’re very close. This can be used creatively, but it may also cause muddiness.
Related Resources
- The Ultimate Guide to Choosing Cameras and Lenses for Podcasting
- StreamYard Business Plan Review: Is It Worth $299/Month for Teams?
- Synology DS1525+ for Podcasters: What You Need to Know Before You Buy
- StreamYard Pricing (2026): Full Comparison of Plans, Differences, Features & Discounts
- Podbean Pricing: The Best Podcast Hosting Platform for Getting Started?