Matt
Why Serious Podcasters Are Moving to 10GbE NAS
If you’re a podcaster still moving files over Google Drive, Dropbox, or a USB SSD, you’ve probably felt it:
-
Multi-camera episodes take forever to copy
-
Editors complain about download times
-
Backups happen eventually (or not at all)
-
Your “studio storage” is a pile of drives and folders
This is where 10 Gigabit Ethernet (10GbE) stops being a networking flex and starts being a production upgrade.
The Synology DS1522+ is one of the most interesting NAS options for podcasters right now—not because it’s flashy, but because it’s built to move large media files fast and reliably.
This article breaks down what podcasters actually need from a 10GbE NAS, where the DS1522+ shines, and where you need to be careful.
The Real Podcasting Problem Isn’t Recording — It’s File Movement
Modern podcasting isn’t just audio anymore:
-
4K or 6K video podcast recordings
-
Multi-track audio sessions (Riverside, SquadCast, local WAVs)
-
Project files moving between hosts, editors, and producers
-
Redundant backups that must be trustworthy
Gigabit Ethernet caps you at ~113 MB/s.
That means:
-
A 200 GB episode = ~30 minutes to copy
-
Every revision compounds the delay
-
Editors wait on transfers instead of editing
10GbE raises the ceiling to 1,250 MB/s, which fundamentally changes how a podcast team works.
Why the DS1522+ Is a Better Fit for Podcasters Than Older Synology Models
A CPU Chosen for Throughput, Not Transcoding
The DS1522+ uses an AMD Ryzen Embedded R1600, instead of the Intel Celeron chips found in older “media-friendly” NAS units.
For podcasters, this is actually a win.
-
Better handling of large sustained file transfers
-
More reliable network I/O under load
-
ECC memory support for long-term archive integrity
You lose hardware video transcoding—but podcasters shouldn’t be transcoding on the NAS anyway. Your NAS should store, serve, and protect media—not process it.
This design choice makes the DS1522+ much better suited for:
-
Shared project folders
-
Large sequential reads/writes
-
Editor pull/push workflows over 10GbE
How Podcasters Actually Get 10GbE on the DS1522+
The E10G22-T1-Mini Upgrade
 10GbE on the DS1522+ is optional and unlocked via Synology’s E10G22-T1-Mini.
What matters for podcasters:
-
Single 10GbE port (RJ-45)
-
Works with CAT6 / CAT6a
-
Supports 2.5G and 5G if you’re mid-upgrade
This isn’t a “fake” 10GbE slot—the PCIe bandwidth is sufficient to saturate the link if your storage can keep up.
Real-World Podcast File Speeds (What Editors Will Actually See)
With a properly configured setup, podcasters can expect:
-
600–800 MB/s typical large-file transfers
-
900+ MB/s reads in optimized scenarios
-
6–8× faster than 1GbE
What this means in practice:
-
A 200 GB episode copies in ~4–6 minutes
-
Editors can pull entire projects locally without waiting
-
You stop “planning around transfer time”
This is the difference between:
“I’ll send it overnight”
and
“I’ll grab it and start cutting now.”
The Hidden Bottleneck Podcasters Miss: Drive Count
Here’s the trap: 10GbE doesn’t help if your drives are too few or too slow.
A single HDD tops out around ~250 MB/s.
That means:
-
2–3 drives → wasted 10GbE potential
-
5 drives → finally enough throughput
Best RAID Choice for Podcast Production
RAID 5 / SHR-1
-
Best balance of speed + capacity
-
~700 MB/s writes with 5 drives
-
Ideal for large media libraries
RAID 10
-
Faster writes, better latency
-
Loses 50% capacity
-
Awkward in a 5-bay unit
For most podcasters:
👉 5-drive RAID 5 is the sweet spot.
NVMe Cache: Why It Helps Podcasters (and When It Doesn’t)
The DS1522+ includes two NVMe slots—but they’re not magic speed buttons.
Where NVMe does help podcasters:
-
Faster browsing of large episode libraries
-
Quicker project file open/save operations
-
Smoother experience over the network
Where it doesn’t by default:
-
Large sequential video/audio transfers
Synology skips sequential writes to protect SSD lifespan. If you want NVMe to absorb incoming episode uploads at full 10GbE speed, you must:
-
Use a read-write NVMe cache (RAID 1)
-
Disable “Skip Sequential I/O”
This is optional—but powerful for studios ingesting footage daily.
Reliability Matters More Than Raw Speed for Podcast Archives
This is where the DS1522+ needs honest discussion.
Heat Is the Biggest Risk
The 10GbE module uses a Marvell (Aquantia) chipset that runs hot.
Under load:
-
60–70°C idle
-
90°C+ sustained transfers
If unmanaged, this can cause:
-
Speed drops
-
Network disconnects
-
Forced reboots
Podcaster fix:
-
Set NAS fans to Cool Mode
-
Keep the unit well-ventilated
-
Don’t bury it in a soundproof cabinet
Best Practices for Podcast Studios Using the DS1522+
If you’re building this as your podcast “source of truth,” do these from day one:
-
Use a static IP for 10GbE (avoid random dropouts)
-
Fully populate the drive bays
-
Use CAT6a cabling
-
Enable Jumbo Frames end-to-end
-
Treat the NAS as storage, not a media server
-
Back it up to a second NAS or cloud
This turns the DS1522+ into:
-
A shared studio vault
-
An editor handoff point
-
A reliable archive for years of episodes
Final Take: A 10GbE NAS That Actually Fits Podcast Production
The Synology DS1522+ isn’t trying to be a Plex box or a toy server.
For podcasters, that’s a good thing.
Configured correctly, it becomes:
-
A fast, centralized episode library
-
A friction-killer for editors and collaborators
-
A serious upgrade from drives and cloud folders
But it demands intent:
-
Enough drives
-
Proper cooling
-
A real network
If your podcast is growing into a media operation—not just a hobby—this is the kind of infrastructure shift that pays dividends every single episode.
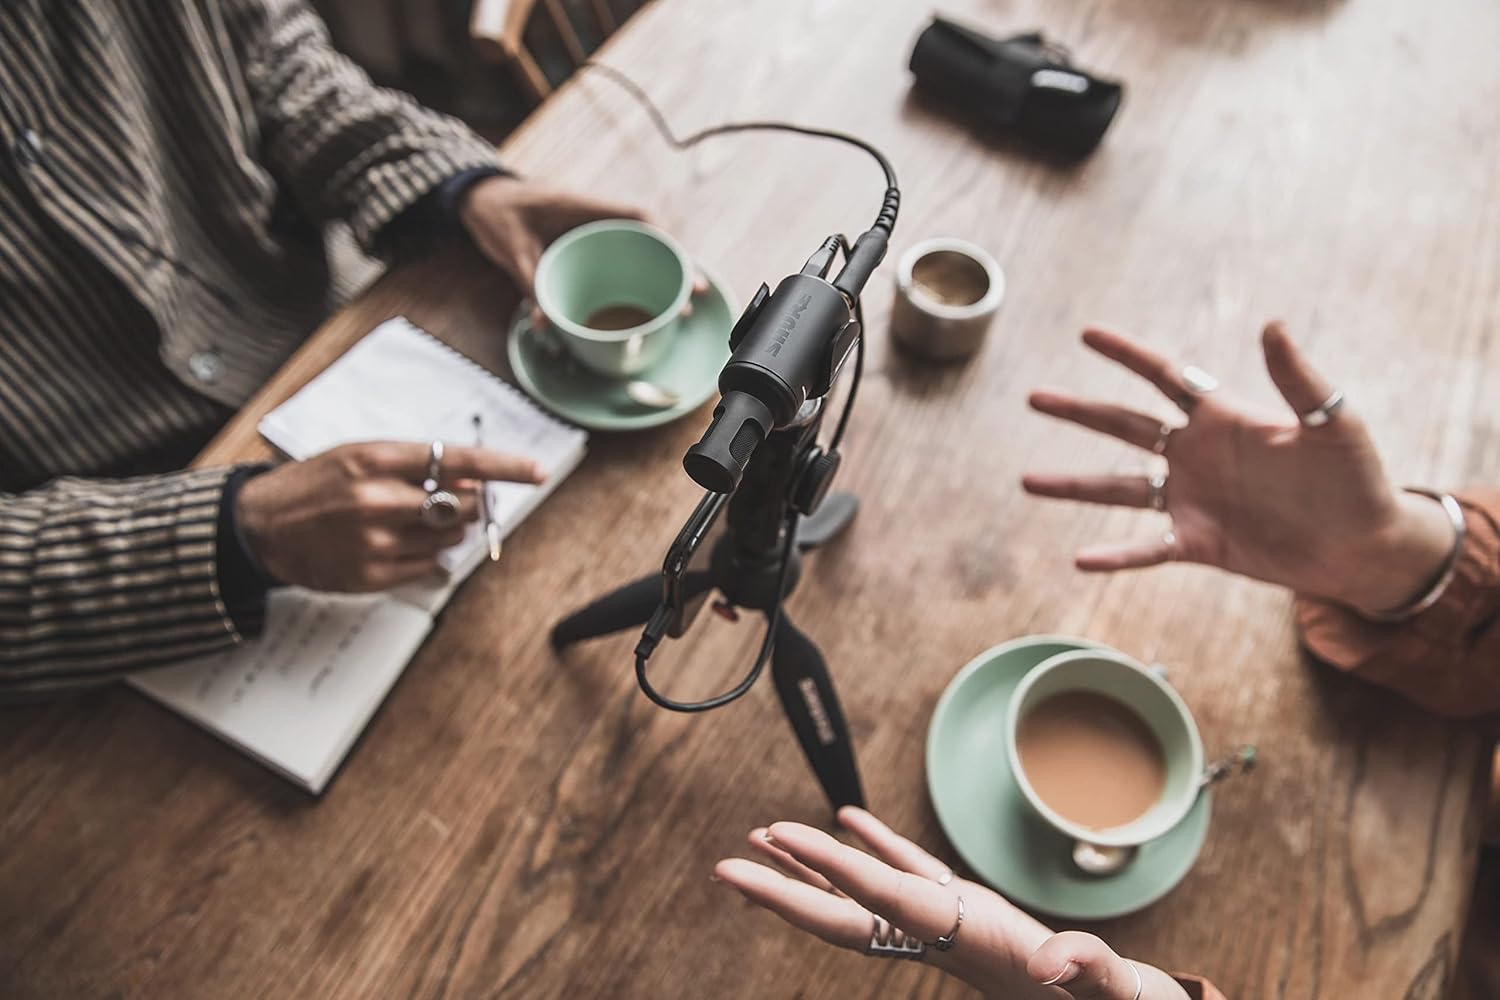
Is the Shure MV88+ Video Kit Good for Podcasting?
Click For Shure MV88+ Details
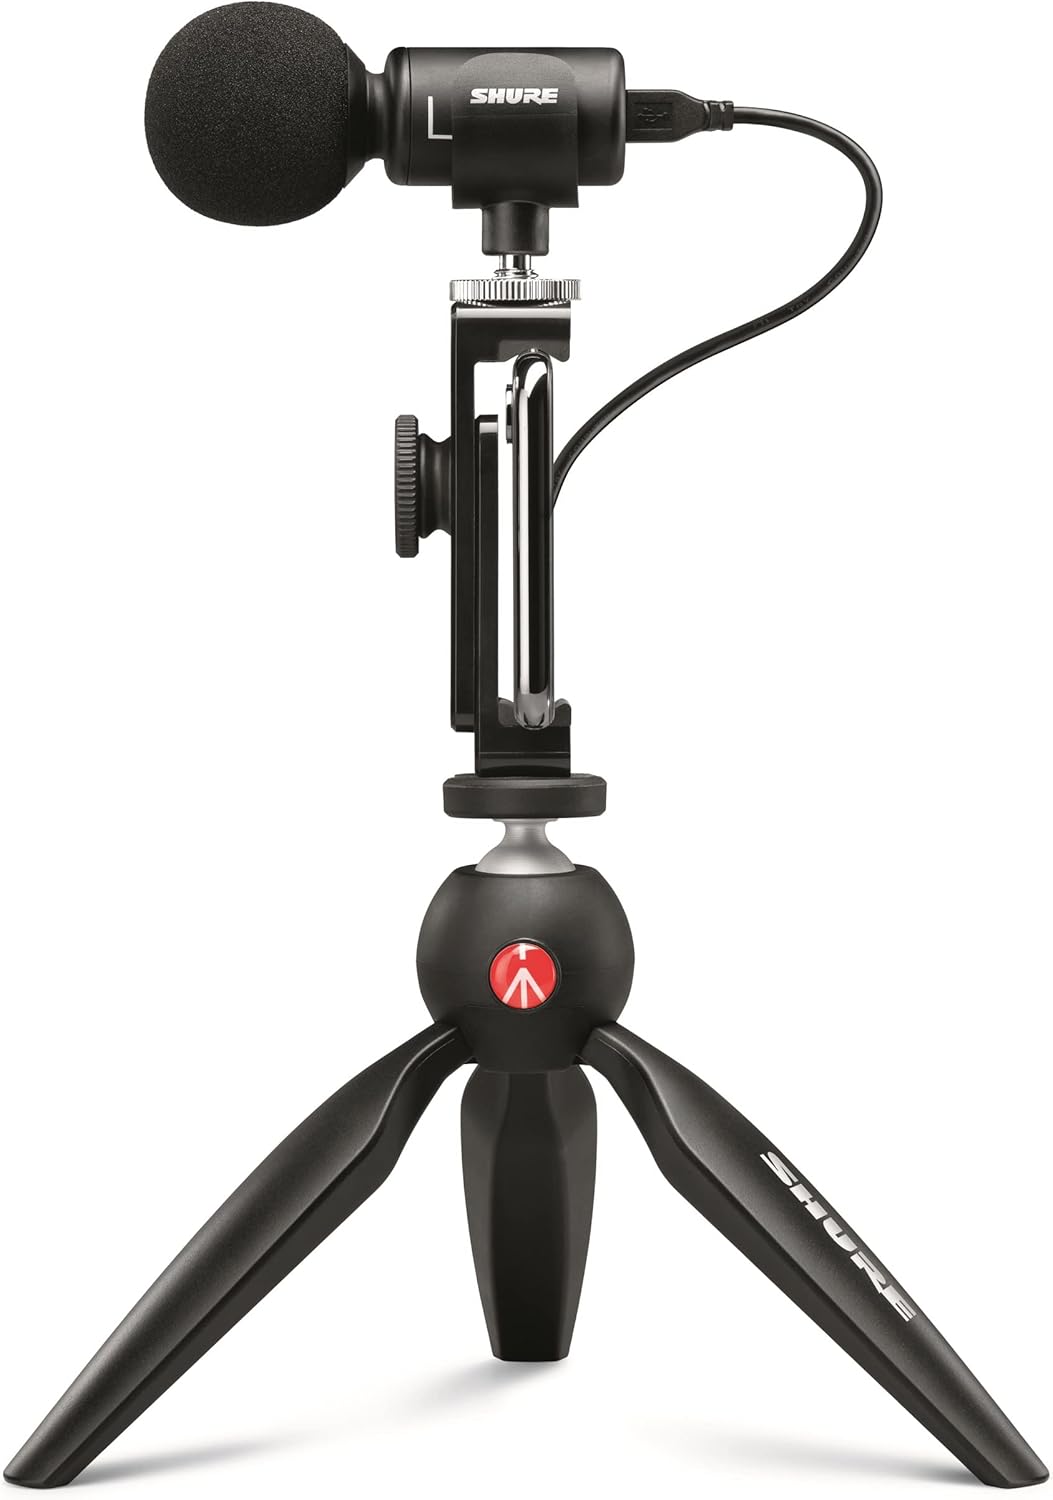
What Is the Shure MV88+ Video Kit?
- MV88+ microphone
- Manfrotto mini tripod
- Phone clamp
- USB-C + Lightning cables
- Foam windscreen
- Carrying case
The #1 Question Podcasters Ask:
“Is the audio quality good enough for a podcast?”
- Built-in phone mics
- Lavalier mics
- Budget USB microphones
Background Noise: The Honest Truth
What it does well
- Captures voices with excellent clarity
- Handles outdoor and mobile environments better than most podcast mics
- Includes built-in DSP (compression, EQ, limiting)
Where you need to be careful
- It will pick up room noise in untreated spaces
- It’s more sensitive than dynamic podcast mics (like the MV7 or SM7B)
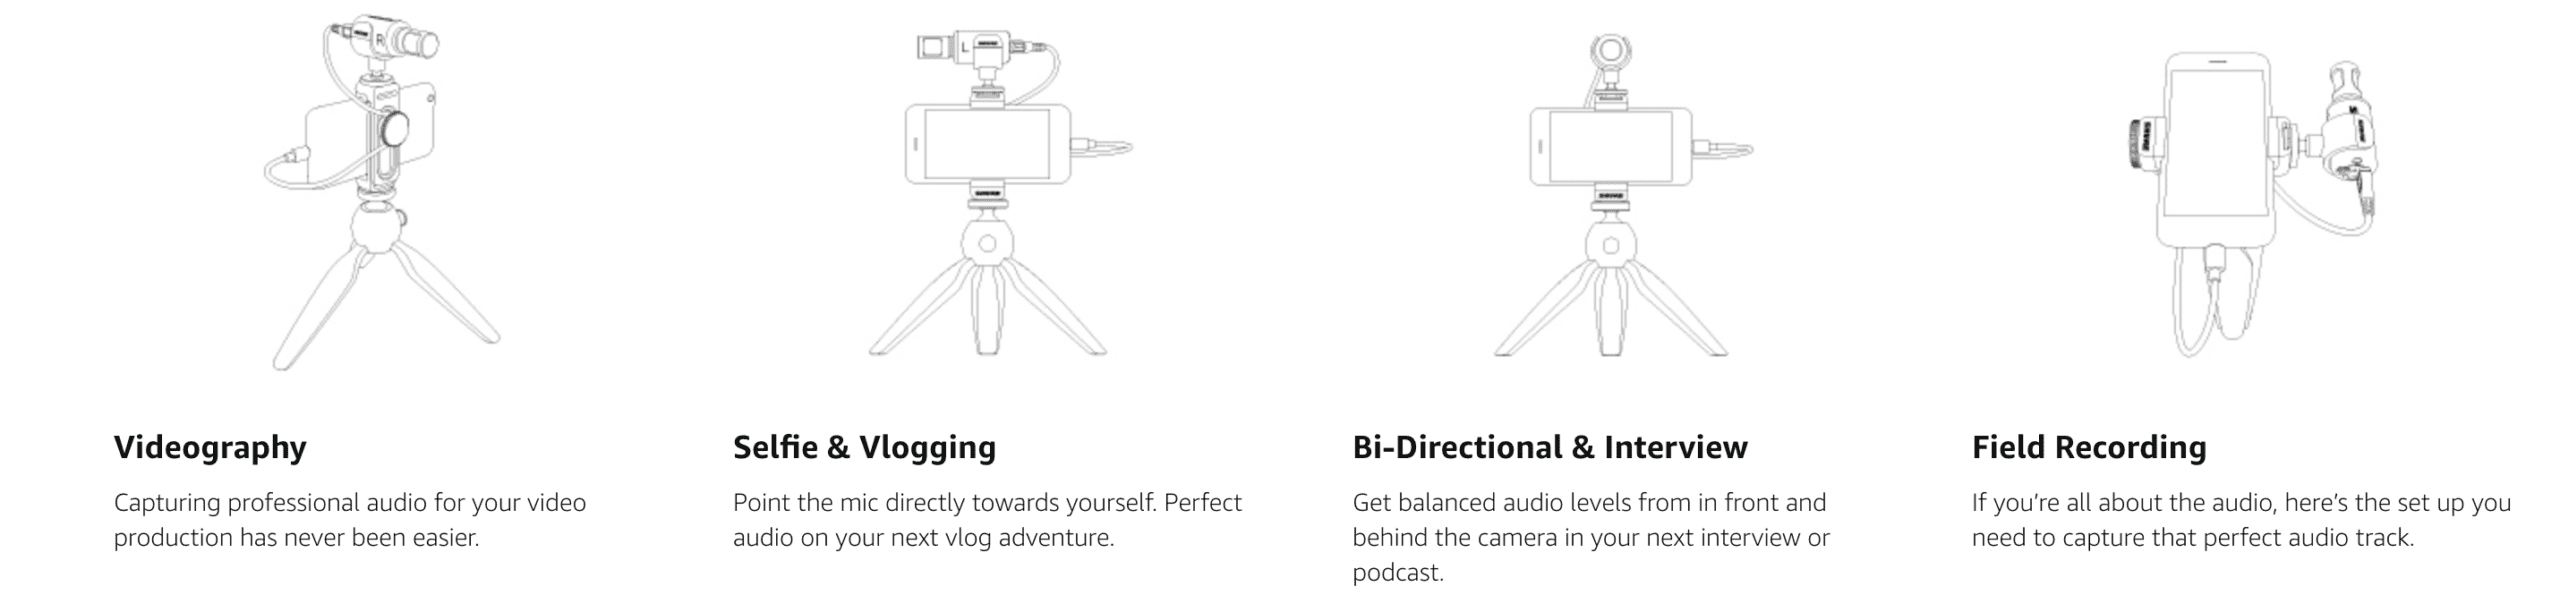
How podcasters should set it up
- Use mono cardioid or Speech mode in the Shure MOTIV app
- Keep the mic close to your mouth (6–12 inches)
- Avoid wide stereo settings for spoken podcasts
Can You Use It With Podcasting Apps?
- iPhone & iPad
- Most modern Android phones
- Mac & Windows computers
- Record directly in the Shure MOTIV app
- Or use any podcasting or recording software (Audacity, GarageBand, Hindenburg, Adobe Audition, Zoom, Riverside, etc.)
Pro tip: You can set your mic settings in the MOTIV app, then record in your preferred podcast app.
Monitoring & Latency (A Big Win)
- You hear your voice in real time
- No echo
- No delay
- No guessing if your levels are right
Editing & Post-Production Workflow
What podcasters should know:
- You’ll usually want mono audio for spoken podcasts
- If you record in stereo, you can convert to mono in seconds during editing
- Files import cleanly into all major DAWs
- Flat recording (do all processing later)
- Or light processing baked in (compression/EQ)
Portability: Where This Mic Shines
- Entire kit fits in a small case
- No audio interface required
- No power supply needed
- Sets up in under a minute
- Record on location
- Podcast while traveling
- Combine podcasting with video
Is It Worth It for Podcasting?
The MV88+ is a great choice if you:
- Want high-quality audio on your phone
- Record podcasts on the go
- Do interviews, travel shows, or video podcasts
- Want one mic that works across multiple devices
You may want a different mic if you:
- Record exclusively at a desk
- Have a noisy, untreated room
- Want maximum vocal isolation
Final Verdict for Podcasters
Dirt Cheap NAS Storage – Podcasting & Video Creation
As a content creator who runs multiple mini-shows, clips, ads, and more — I have a huge need for rock solid storage, and more importantly, storage I can expand. Too many times have I put everything onto a single drive, only to have it crash, delete, or lose various parts of my files. This is ultimately why I put the money into a storage device.
I put this together for the people who need cheap storage, who want something that’s good with electricity.
Just a quick rundown of the things I’ve used….
- Windows Server (at least 4 different builds)
- Linux Server(s)
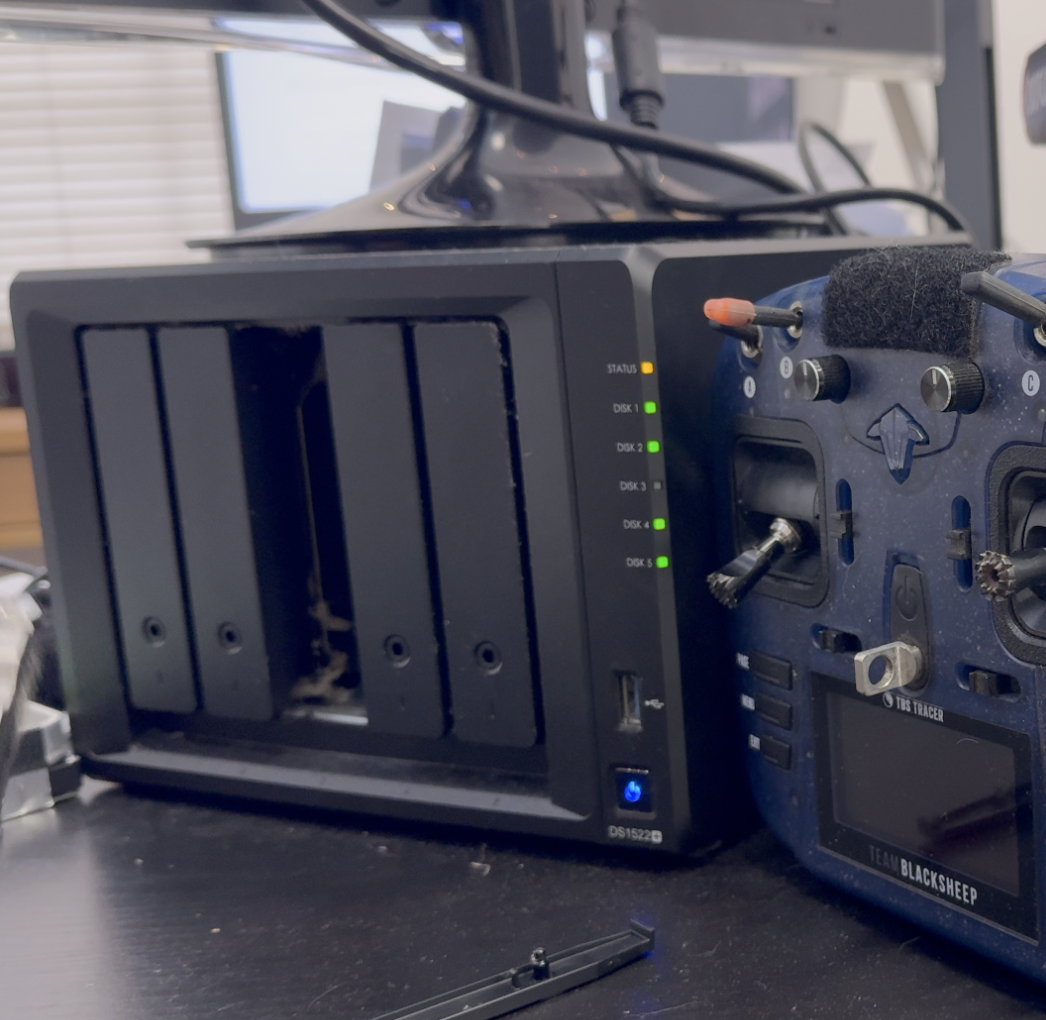
- Synology 1522+ NAS
Why I Dropped Windows & Linux Boxes
There’s nothing wrong with building your own computer, shoving a bunch of drives into it, and using hardware RAID, or some kind of software RAID hybrid, but I dropped these approaches because they were annoying to maintain, and they use a lot of power considering it’s just sitting there idle 24/7.
I actually got off all of the storage-pooling stuff for a few years and just raw-dogged an external drive with extremely careful backups.
But as my needs shifted, and the scariness of losing everything in the blink of an eye….I bought a Synology 1522+ last year.
And if you’re a podcaster, video creator, of a collector of stuff…you should get one

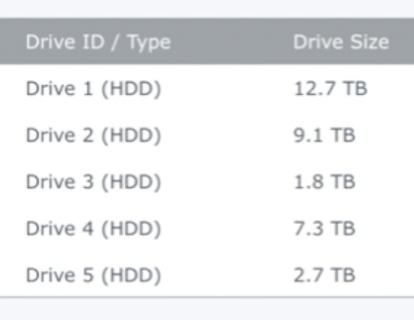
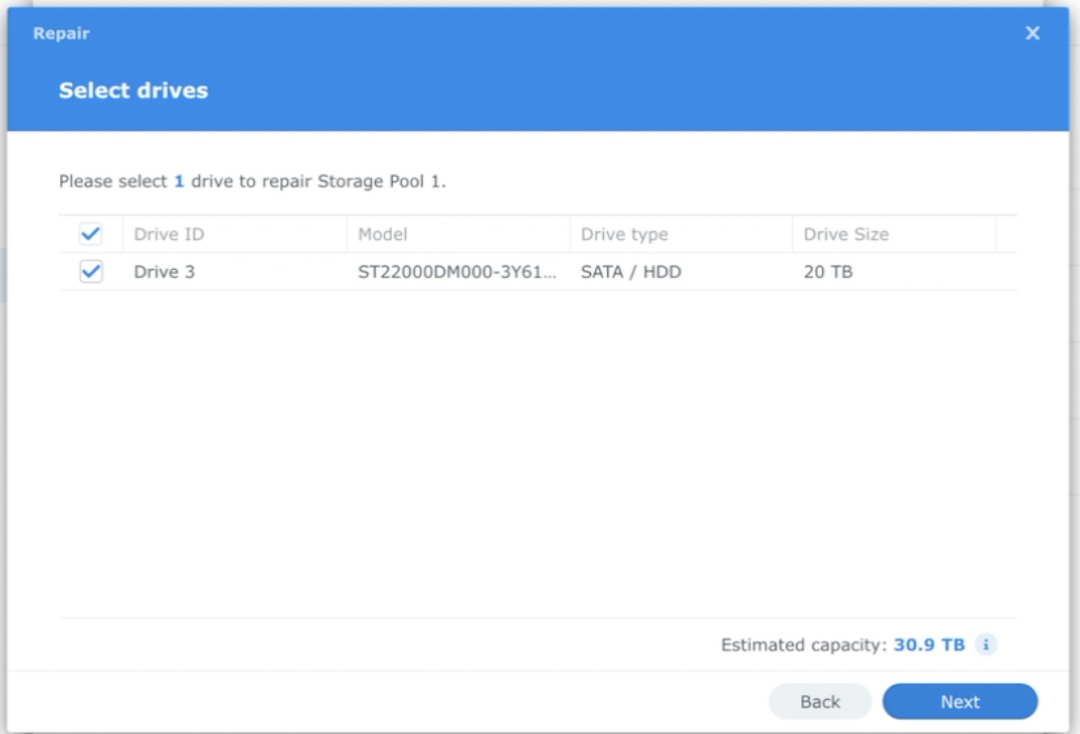
How I Sourced My Drives
I basically used spare drives I already had to start the pool. Then I started to slowly swap in newer drives.
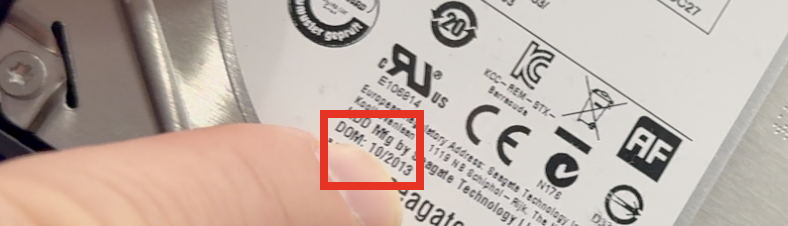
I had a 2tb drive manufactured in 2013, and it also was the smallest drive in the pool and it was time to swap it out.
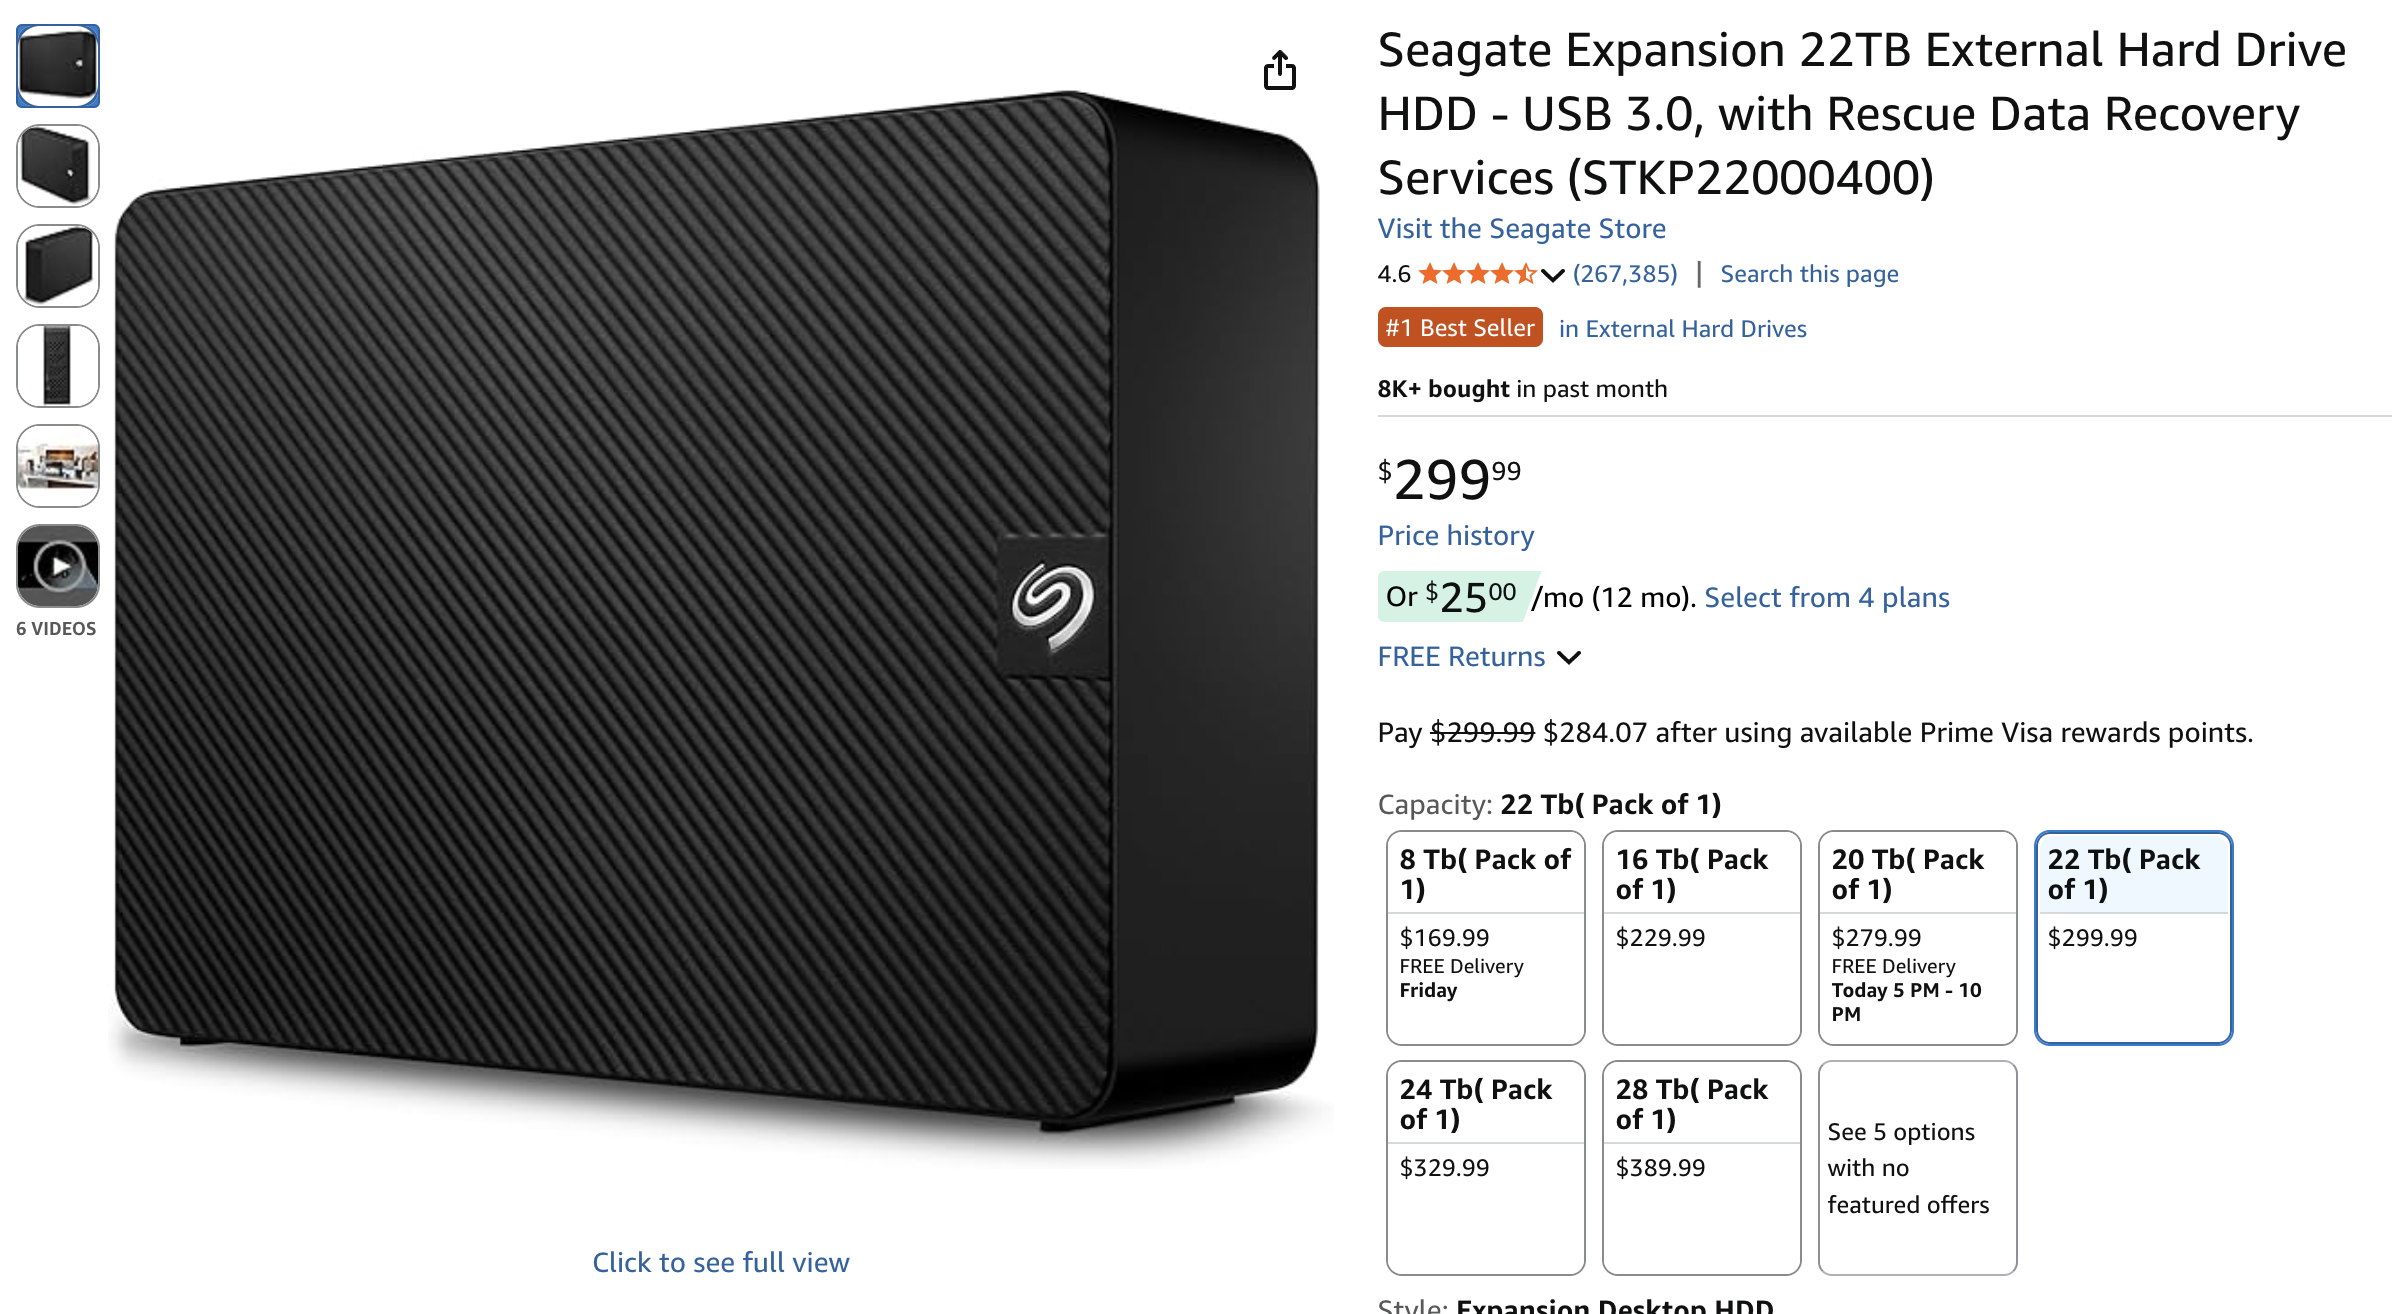
The Drive I Bought…
Truth be told I wanted to get the 28tb drive on their Black Friday sale (it was $100 off) but it sold out before I could grab it. So I opted for the next best thing… the measily 22tb monster. It’s technically a Seagate stkp22000400 shucked if you need to know how to shuck it, watch the video at the top of the page. I show you how to do it.
 Why An External Drive?
This is not always the route to take – this is just the route that I take — I like to buy external drives because you can get much more storage at a discount when you compare the prices to similar-sized drives that don’t come in an enclosure. I don’t know why the pricing works out this way, but you can look for yourself and see how prices compare. It’s usually $100 difference for the same amount of space!
I am also less particular about “which drive to get” because as long as it’s Seagate, Western Digitial, Hitachi, or some other known brand — you’re probably going to be okay. I just wouldn’t get an off-brand drive… no thanks!
Also — I’m comfortable ripping these cases open, because after the tsunami of 2011 in Thailand…. hard drive prices went through the roof because that’s where they make most of them. So at the time I needed to fill one of my servers and that’s how I discovered this little price hack 😉

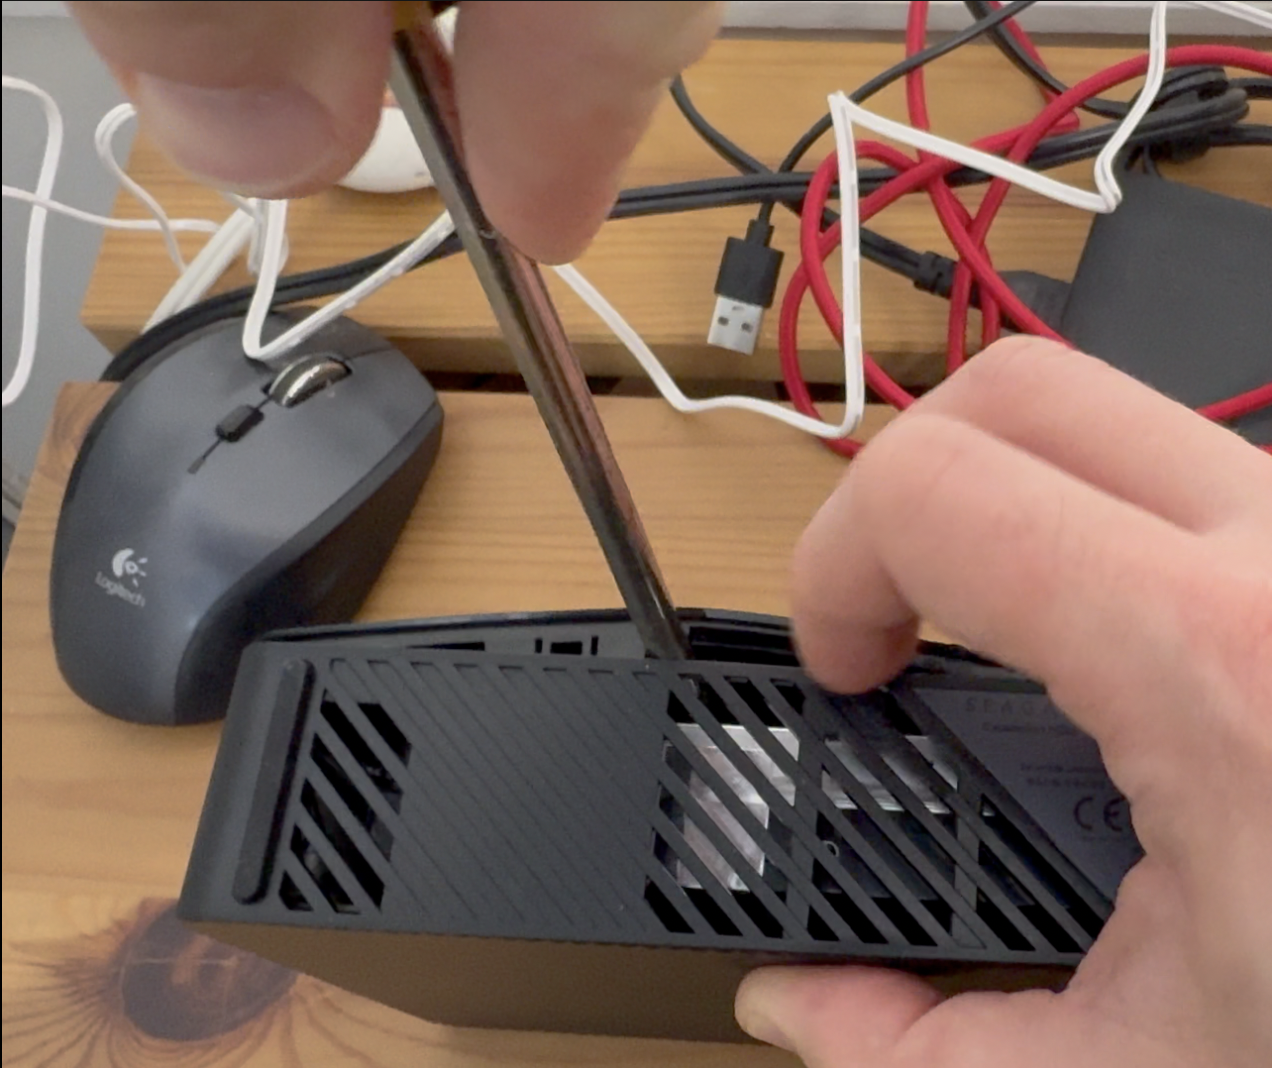
Shucking The Drive
All you need is a screwdriver and a little patience. I would encourage you to watch my video because I show you how to do it simply. And you’re in luck, because most of these drives are made the same way and open the same way.
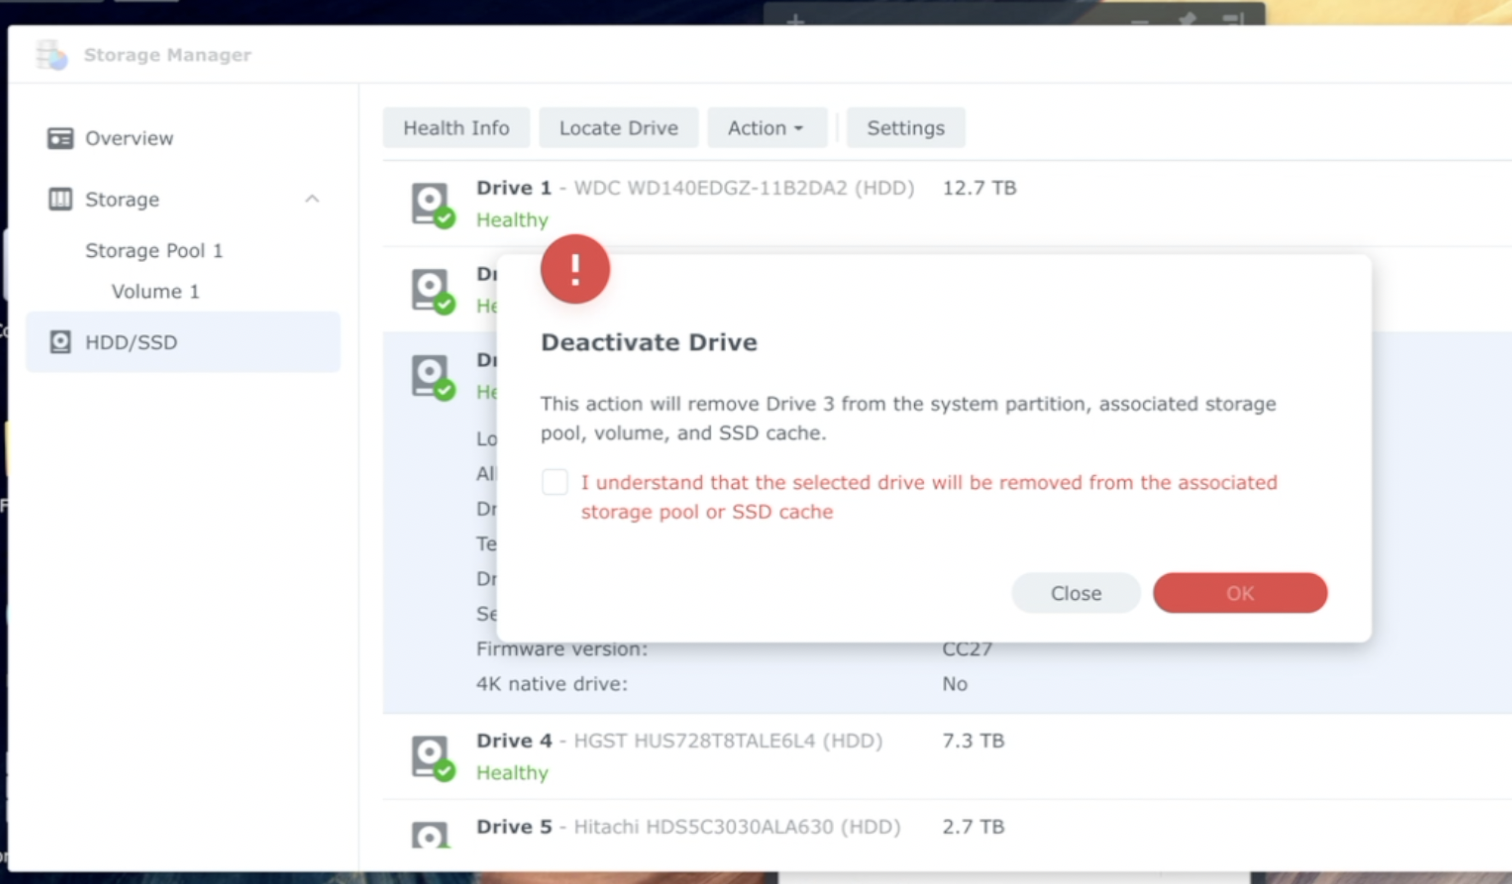
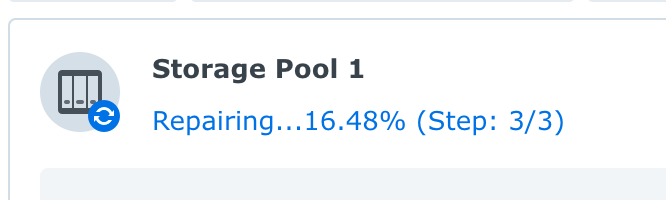
Adding The Drive To The Pool
Again…watch the video I made! But it’s very simple, you deactivate the drive, you pop the new drive in, add it to the pool, and boom you’re off to the races. I can still work while the pool adds the new drive in!
Data Protection On Steroids
This is hands down the best way to back up a small podcast, YouTube channel, graphics designer….whatever you do. I have about 30tb of storage, I can add more as I grow, and it’s super fast too.
I always advocate for the 3-2-1 back up solution…. so while this thing is fantastic, you will want to back up your stuff to another medium in another location — and the software in Synology makes that super simple to do.
Lastly, I also use CrashPlan Pro which is technically a business-level backup solution, but this is a business, and if you’re making money with your stuff you can write it off. The reason why I use these guys is because it allows for devices like this to be backed up without any restrictions, and it’s unlimited storage too!
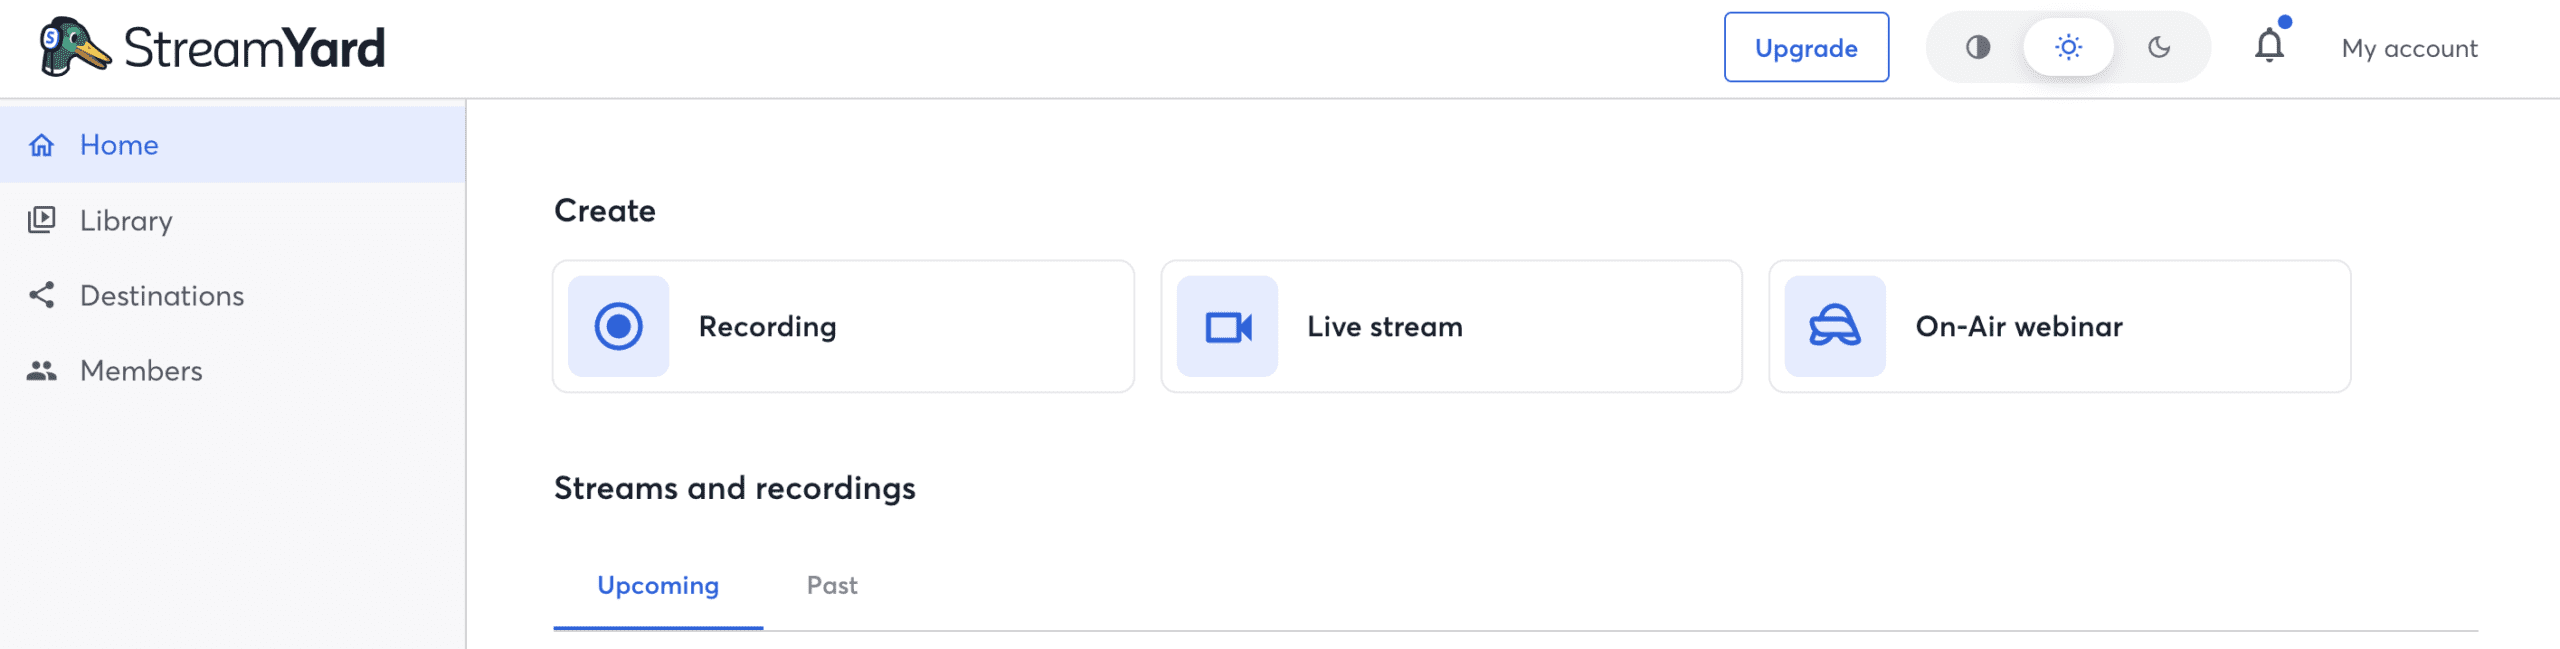
StreamYard vs. Riverside: Stop Comparing Features, Start Comparing Risks
Most reviews will tell you that StreamYard is for live streaming and Riverside is for recording. While true, that advice is useless when you are staring at a “Buy Now” button.
The real difference isn’t about features; it is about friction.
If you are a creator, a marketer, or a business owner, you aren’t just buying software. You are buying a workflow. You are choosing between Live Safety (StreamYard) and Studio Quality (Riverside).
This guide ignores the marketing fluff to put both platforms through the “Reality Test”—focusing on what happens when the internet drops, the guest isn’t tech-savvy, or you’re running late on a deadline.
Click here to try StreamYard for free →
Feature Comparison: StreamYard vs. Riverside
| Feature | StreamYard | Riverside |
|---|---|---|
| Local Recording | No | Yes (up to 4K video, 48kHz WAV audio) |
| Multistreaming | Yes | Yes (select plans) |
| Guest Capacity | Up to 10 guests | Up to 8 guests |
| Branding Tools | Custom overlays, banners, logos | Branding on recordings |
| Ease of Use | Very easy (browser-based) | Easy but more advanced tools |
| Video Quality | Up to 1080p | Up to 4K |
| Audio Quality | Good | Excellent (uncompressed WAV) |
| Editing Tools | None built-in | AI-powered, timeline & text-based |
| Transcription | No | Yes |
| Pricing | Free + paid plans | Paid plans (with free trial) |
-
StreamYard is a Broadcaster. It processes video in the cloud. It prioritizes keeping the stream alive above all else. If your internet dips, the quality lowers, but the show goes on.
-
Riverside is a Recorder. It processes video locally on your computer (and your guest’s computer). It prioritizes resolution (4K) above all else. It uploads massive files in the background while you talk.
We Recommend Checking Out StreamYard Pricing & Plans (2026)
Risk Factor 1: The “Guest Friction” Test
The Scenario: You are interviewing a VIP guest who is using an older laptop (a “potato”) on weak hotel Wi-Fi.
The Riverside Reality: High Reward, High Risk
Because Riverside records “locally” (on the guest’s actual device), it demands significant processing power (CPU).
-
The Risk: If your guest opens Riverside on an old laptop with 20 Chrome tabs open, their fan will start spinning, and their browser might freeze.
-
The Bottleneck: After the interview ends, the guest must keep their browser open to finish uploading the high-quality file. If they close the tab too early, you lose the high-quality footage. This can be awkward to enforce with VIP guests.
The StreamYard Reality: The “it Just Works” Factor
StreamYard is incredibly lightweight because the heavy lifting is done on StreamYard’s servers, not your laptop.
-
The Benefit: It works on tablets, phones, and old computers without issue.
-
The Trade-off: You are recording the internet feed. If the guest has bad Wi-Fi, their video will look pixelated (blocky) because you are capturing what is coming over the wire, not what is on their camera sensor.
The Verdict: If you control the environment (e.g., internal team meetings), choose Riverside. If you interview strangers with unknown tech skills, choose StreamYard for safety.
Risk Factor 2: The “Sync Panic” (Audio Drift)
The Scenario: You record a 60-minute episode. When you open the files to edit, the guest’s lips are moving 2 seconds after their voice is heard.
The Riverside Reality
Variable frame rates and local recording glitches can sometimes cause “Audio Drift.” While Riverside has improved this massively in 2024/2025, it is a known risk of browser-based local recording.
-
The Workflow Cost: If drift happens, you (or your editor) must manually cut and slide the audio track every few minutes to get it back in sync. It turns a 1-hour edit into a 4-hour nightmare.
The StreamYard Reality
Because StreamYard is processing a live feed, the audio and video are “baked” together in real-time.
-
The Benefit: It is nearly impossible for a StreamYard recording to be out of sync. The file you download is exactly what you saw on screen.
-
The Trade-off: The audio is compressed. It sounds like a good phone call or Zoom call, not a studio WAV file.
The Verdict: Do you have an editor? If yes, they can handle Riverside’s quirks. If you are a “one-man band,” StreamYard offers peace of mind.
Risk Factor 3: Post-Production Speed
The Scenario: The recording finishes at 2:00 PM. You want it on YouTube by 3:00 PM.
StreamYard: The “Zero-Edit” Workflow
StreamYard is designed to be “Live-to-Tape.” You can add your logo, lower-third name tags, and intro videos while you are recording.
-
The Result: When you hit “End Broadcast,” the video is essentially finished. You can download it and upload it to YouTube immediately. No rendering, no syncing, no branding to add in post.
Riverside: The “Pro-Edit” Workflow
Riverside gives you the raw ingredients: a high-quality video track and a high-quality audio track for every guest.
-
The Result: You must edit these. You have to sync them, color correct them (since they are raw), and add your branding in software like Premiere Pro or Descript.
-
Note: Riverside has added AI editing tools (“Magic Clips”), but for full episodes, most users still export to an external editor for fine-tuning.
The Comparison Matrix: Risks & Rewards
Here is the breakdown of what you are actually signing up for:
| Feature | StreamYard (The “Broadcaster”) | Riverside (The “Filmmaker”) |
| Primary Goal | Reliability. “The stream must not fail.” | Fidelity. “The video must look 4K.” |
| Video Quality | Good (1080p). Dependent on internet speed. | Excellent (4K). Independent of internet speed. |
| Guest Requirements | Low. Works on weak Wi-Fi & old devices. | High. Needs strong CPU & Chrome/Edge. |
| The “Silent” Risk | Pixelated video if connection drops. | Audio Drift or guest closing tab too early. |
| Editing Workflow | Fast. “Baked-in” branding means zero editing. | Slow. Requires syncing & mixing tracks. |
| Best For… | Solopreneurs, Live Streamers, Non-Techies. | Podcast Networks, production teams, “Clip” creators. |
Final Recommendation: Which “Anxiety” Can You Handle?
You aren’t choosing a tool; you are choosing which problem you prefer to deal with.
Buy StreamYard If:
-
You are a Solo Creator: You don’t have time to edit multitrack audio. You want to hit “Record,” have your name tag appear automatically, and upload the file instantly.
-
You Value “Live” Engagement: You want to highlight user comments on the screen in real-time to build community.
-
Your Guests are Unpredictable: You interview people who might struggle with technology.
Buy Riverside If:
-
You are Building a Brand Asset: You want your podcast clips to look like Netflix quality on TikTok/Instagram (4K vertical video).
-
You Have an Editor: Or you are a patient editor. You are willing to spend time fixing audio levels or sync issues to get perfect quality.
-
You Hate “Zoom Quality”: You refuse to accept the grainy video look that comes with internet streaming.
The Bottom Line: If you want to be a broadcaster, get StreamYard. If you want to be a filmmaker, get Riverside.
StreamYard Pricing & Plans
Best Tripods for Podcasters: The Complete Buyer’s Guide

If you’re filming a podcast this year—whether a solo talking-head, a two-person interview, a product review show, or a mobile travel podcast—your tripod plays a massive role in how professional your content looks.
A tripod isn’t just a stand. It affects:
-
How stable your camera is
-
How sharp your video looks
-
How easy it is to frame your shots
-
Whether your setup stays consistent every episode
-
How quickly you can shoot, travel, and reset
And the right choice depends entirely on the kind of podcaster you are.
Below is the definitive, simplified guide that helps podcasters choose the perfect tripod based on their filming style, setup, and budget—without the confusion.
What Type of Podcaster Are You? (And Which Tripod You Need)
Tripods aren’t one-size-fits-all. Podcasters fall into a handful of distinct categories, and each category requires a different style of support.
Here’s how to match your tripod to your podcast.
Solo Desk Podcasters (Talking-Head at a Desk)
If you film seated at a desk, with the camera 1–3 feet away, you want something compact, stable, and height-adjustable.
Best tripod type:
Desktop Tripod
Why:
-
Perfect for eye-level framing
-
Doesn’t take up floor space
-
Simple, stable, and fast to adjust
-
Ideal for podcasters who rarely reposition the camera
Top choices:
-
Ulanzi MT-44
-
Manfrotto PIXI Evo
-
SmallRig Tabletop Tripod
Perfect for: teachers, coaches, solo YouTube podcasters, creators filming in small rooms.
Two-Person Podcasts & Interview Setups
If you podcast with a co-host or guests, you need a wider shot and more distance between the camera and set.
Best tripod type:
Full-Size Floor Tripod
Why:
-
Reaches eye level from 4–8 feet away
-
More stable than tabletop solutions
-
Great for seated or standing episodes
-
Works well in living rooms, studios, or rented spaces
Top choices:
-
Amazon Basics 60” (budget)
-
Ulanzi Zero Y
-
Manfrotto Befree Advanced
Great for: interview shows, multi-host podcasts, coaching duos.
Podcasters Who Shoot Product Reviews or Overhead Shots
If you film podcast episodes that include unboxings, tabletop demos, B-roll, or top-down overhead shots, you need more flexibility than a standard tripod offers.
Best tripod type:
Multi-Angle Center-Column Tripod
Why:
-
Lets you swing the camera out horizontally
-
Allows true overhead shots
-
Perfect for tech reviews, cooking, hand demos, or gear showcases
-
More stable than makeshift overhead rigs
Top choices:
-
Vanguard Alta Pro 2+
-
Manfrotto 055 XPRO
-
SmallRig FreeBlazer with center column
Ideal for: reviewers, educators, hybrid podcasters who mix video + podcasting.
Podcasters Who Travel or Film On Location
If you shoot in hotels, Airbnbs, events, conferences, coworking spaces, or outdoors, you need something extremely portable but strong enough to hold real cameras.
Best tripod type:
Lightweight Travel Tripod (preferably carbon fiber)
Why:
-
Packs small into backpacks
-
Lighter for travel days
-
Strong enough for mirrorless cameras
-
Fast setup and teardown
Top choices:
-
Peak Design Travel Tripod
-
Manfrotto Befree Live
-
Ulanzi Zero F/Y
Perfect for: vlog pods, journalists, digital nomads, multi-location creators.
Studio Podcasters With Permanent Setups
If your camera doesn’t move much—or you run multiple angles—you want long-term durability, repeatability, and stability.
Best tripod type:
Heavy-Duty Studio Tripod or Fluid Head
Why:
-
Ultra-stable foundation
-
Supports heavier lenses, teleprompters, and monitors
-
Smooth movement if you pan or tilt
-
Built to last for years of episodes
Top choices:
-
Manfrotto 190 / 290
-
SmallRig Heavy-Duty
-
Sachtler Ace M / flowtech 75
Great for: dedicated podcast studios, 2–4 camera setups, high-quality video pods.
Smartphone-Only Podcasters
If you’re filming on an iPhone or Android, you don’t need a full-size tripod unless you plan to upgrade your camera soon.
Best tripod type:
Mini Tripod + Phone Clamp
Why:
-
Simple
-
Affordable
-
Incredibly portable
-
Works for both horizontal and vertical content
Top choices:
-
Joby GripTight One
-
Ulanzi MT-08
-
Manfrotto PIXI (with phone clamp)
Perfect for: beginner podcasters, coaches, creators filming social-friendly podcasts.
Top Tripod Picks for Podcasters in 2026
Here are the best overall tripods across all categories.
⭐ Best Overall Tripod for Podcasters: Peak Design Travel Tripod
(Lightweight, stable, excellent for travel and studio use)
Why creators love it:
-
Packs smaller than almost anything else
-
Very sturdy for mirrorless cameras
-
ARCA-Swiss compatibility
-
Lifetime warranty
-
Works for desk, floor, and travel setups
⭐ Best Budget Tripod for Podcasters: Ulanzi MT-44
(The perfect affordable desk pod tripod)
Why it’s great:
-
Taller than most desktop tripods
-
Strong enough for phones + lightweight cameras
-
Great for beginners and small spaces
-
Under $40
⭐ Best Tripod for Two-Person Podcasts: Manfrotto Befree Advanced
Why it’s great:
-
Eye-level height
-
Quality leg locks
-
Durable + travel-friendly
-
Available with fluid head version for movement
⭐ Best Tripod for Overhead & Review Pods: Vanguard Alta Pro 2+
Why it’s great:
-
Multi-angle center column
-
Easy overhead shots
-
Great rigidity and height
-
Strong value for the price
⭐ Best Professional Studio Tripod: Sachtler Ace M / flowtech 75
Why it’s great:
-
Industry-standard broadcast stability
-
Smoothest pan/tilt in this category
-
Can handle heavy lens setups
-
Built for daily studio use
Should You Mount Your Microphone on Your Tripod? (No.)
Podcasters often ask if they can mount their main microphone on the same tripod as the camera.
The answer: Never.
Here’s why:
-
Touch the tripod → vibration → ruined audio
-
Pan the camera → vibration → ruined audio
-
Adjust height → vibration → ruined audio
Always use:
-
A boom arm (for desk setups)
-
A floor mic stand (for larger studios)
-
A C-stand (for shotgun mics)
Your tripod should be camera-only.
Tripod Buying Checklist for Podcasters
Before clicking buy, make sure your tripod checks these boxes:
Payload:
Choose a model that can handle 1.5× your camera setup’s weight.
Height:
-
Desk podcasters: 6–20 inches
-
Seated/interview podcasters: 55–65 inches
-
Standing podcasters: 65–72 inches
Material:
-
Aluminum = cheaper but heavier
-
Carbon fiber = lighter + better vibration dampening
Head type:
-
Fluid head = best for movement
-
Ball head = easiest & fastest for static framing
-
Pan-tilt = most precise
Quick Release:
Choose ARCA-Swiss for compatibility across brands.
Final Recommendations
If you’re unsure which to buy, use this simple rule:
-
Filming at a desk? → Desktop tripod
-
Filming with a co-host? → Full-size floor tripod
-
Doing product content or overhead shots? → Multi-angle tripod
-
Traveling often? → Lightweight carbon fiber travel tripod
-
Running a full studio? → Heavy-duty tripod with a fluid head
Best Joe Rogan Podcasts Updated Regularly
Best Joe Rogan Podcast Episodes… 2025-2026
Some of the more interesting JRE episodes below…. an ongoing list that is always up to date – Please note we trim episodes as the page becomes too long, but we are usually trailing the last year or so.
#2413 Theo Von
#2411 Gavin de Becker
#2408 Bret Weinstein
#2399 Daryl Davis & Jeff Schoep
#2397 Richard Lindzen & William Happer
Joe sits down with Lindzen and Happer—both veteran scientists—to challenge mainstream climate-change talking points. They argue that CO₂’s warming effect is far smaller than commonly portrayed, that feedback mechanisms in climate models are overestimated, and that many current energy-policies reflect political or financial motives more than rigorous science.
#2392 John Kiriakou
A former CIA operative, Kiriakou shares his journey from tracking Al Qaeda in the Afghan-Pakistan region, to refusing participation in the agency’s “enhanced interrogation” program, to becoming a whistleblower and facing severe legal consequences. He also dives into the inner workings of intelligence bureaucracy, the influence of unelected agency players, and his take on current global power dynamics.
#2388 Lionel Richie
#2375 Brigham Buhler
#2375 Tim Dillon
#2370 Dave Smith
Joe Rogan and comedian-political commentator Dave Smith explore how online platforms are reshaping media, contrasting them with traditional outlets by highlighting greater access to uncensored political discourse. They dive into the role of U.S. intelligence agencies in domestic politics and foreign policy, touching on Russiagate, Cold War-era overreach, and broader systemic influence. The conversation also examines shifting public attitudes toward the Israeli-Palestinian conflict, noting changing perceptions and awareness of international legal rulings.
#2355 Mike Baker
Joe Rogan and former CIA operative Mike Baker dive into the mysteries surrounding the Epstein case, focusing on missing or malfunctioning surveillance footage, unexplained circumstances of Epstein’s death, and a recent DOJ interview with Ghislaine Maxwell that happened surprisingly late in the process. They explore media bias and distrust in institutions, touching on NPR leadership controversies as well as the broader erosion of public confidence in traditional news sources.
#2332 Oz Pearlman
Oz Pearlman—a mentalist, ultramarathon runner, and former Wall Street banker—shares how he blends mentalism, psychological insight, and athletic discipline to craft immersive performances. He demonstrates his skills live by reading Joe’s nonverbal cues, accurately deducing elements like Rogan’s ATM PIN, leaving Joe visibly unsettled. The episode also explores the creative process behind mentalism and its speculative connections to concepts like consciousness and the nature of reality.
#2324 Amanda Knox
Amanda Knox reflects on her wrongful conviction and explores how media sensationalism and prosecutorial zeal shaped both her narrative and public perception. She describes an unconventional journey toward healing—forming a dialogue with the prosecutor and translating her book into Italian as gestures of empathy and reconciliation.
#2314 Hal Puthoff
Hal Puthoff talks about his early work in remote viewing research with figures like Ingo Swann, which drew interest from intelligence agencies. He and Joe Rogan discuss Unidentified Aerial Phenomena, unusual materials that defy conventional scientific explanation, and the possibility of non-human intelligence. Puthoff explains how secrecy and compartmentalization have limited broader understanding of these subjects.
#2308 Jordan Peterson
Jordan Peterson and Joe Rogan discuss how psychopathic and narcissistic personalities use manipulation and false victimhood to gain power. Peterson emphasizes responsibility, sacrificial leadership, and moral frameworks, often referencing biblical archetypes. They critique mainstream narratives around climate change and the pandemic, arguing that fear and control undermine genuine problem-solving. Peterson also introduces the Peterson Academy as a low-cost, values-based alternative to traditional universities.
#2304 Gary Brecka
Joe Rogan and biohacker Gary Brecka dive deep into the root causes of chronic diseases, blaming highly processed seed oils, poor nutrition, and harmful food subsidies for driving inflammation and conditions like type 2 diabetes. They highlight biohacking strategies such as hydrogen gas therapy, cold exposure, red/infrared light, and targeted supplementation to combat these issues and support longevity.
#2294 Dr. Suzanne Humphries
Dr. Suzanne Humphries questions mainstream vaccine narratives, especially around polio and smallpox, arguing that improved sanitation and nutrition played a larger role in disease decline. She raises concerns about historical vaccine production, contamination, and adverse effects that she believes were downplayed. The conversation also touches on natural immunity, breastfeeding, and nutritional remedies as overlooked alternatives.
#2291 Bert Kreischer
#2287 Josh Dubin & J.D. Tomlinson
Joe Rogan speaks with Josh Dubin and J.D. Tomlinson about the wrongful convictions of the Ohio Four—four men sentenced based on false testimony. Tomlinson, a former prosecutor, uncovered major flaws in the case, but efforts to overturn the convictions faced resistance. The episode highlights systemic failures in the justice system and advocates for reform to prevent such injustices.
#2282 Bill Murray
Actor and comedian Bill Murray joins Joe Rogan for an engaging conversation. Murray discusses his current role in the film “Riff Raff” and his upcoming appearance in “The Friend,” set to release in theaters on April 4. The discussion also delves into Murray’s illustrious career, his approach to comedy, and his perspectives on the evolving entertainment industry.
#2281 Elon Musk
In episode #2281 of The Joe Rogan Experience, Elon Musk joined Joe Rogan for a wide-ranging discussion covering artificial intelligence, space exploration, Tesla, Neuralink, and his work with X (formerly Twitter). Musk demonstrated new features of Grok 3, an AI chatbot integrated into X, showcasing a playful “sexy” mode. The conversation delved into the advancements of AI, with Musk expressing both excitement and caution about its rapid development. They also touched on the latest progress at SpaceX, including upcoming Mars missions and Starship testing, as well as Tesla’s evolving self-driving technology.
Additionally, Musk spoke about his advisory role in Donald Trump’s 2024 campaign, hinting at potential policy discussions related to technology and free speech. Rogan and Musk also discussed Neuralink’s first human trials, emphasizing its potential for restoring mobility in paralyzed individuals.
#2274 Magnus Carlsen
Magnus Carlsen discusses his chess journey, AI’s impact on the game, high-level strategy, and the 2022 Hans Niemann controversy. He also addresses cheating in chess and internet speculation.
#2274 Mike Baker
Former CIA officer Mike Baker discusses his expedition retracing Lawrence of Arabia’s journey to support veterans, government waste, political polarization, and AI’s impact. He also touches on cryptocurrency scams, geopolitics, and the upcoming JFK assassination files.
#2272 Mike Benz
In JRE #2272, Mike Benz, former State Department official and Executive Director of the Foundation for Freedom Online, discusses government influence on media, censorship, and election narratives. He details how USAID funds were used to shape public perception, influence judicial systems, and support covert operations under the guise of humanitarian aid. Benz highlights organizations like Graphica and the Atlantic Council in driving online censorship and stresses the need for transparency in government and media.
#2269 Bret Weinstein
In episode #2269 of The Joe Rogan Experience, Bret Weinstein, an evolutionary biologist, discusses evolutionary theory, government corruption, technology’s impact on society, and AI regulation. He critiques Darwinian models, highlights corruption in aid programs, and warns about social media’s influence on instant gratification. Weinstein also expresses skepticism about regulating AI, emphasizing the dangers of overconfidence in technological solutions.
#2268 Rick Caruso
In episode #2268 of “The Joe Rogan Experience,” Joe Rogan interviews Rick Caruso, a businessman, civic leader, and philanthropist. Caruso discusses Los Angeles’s challenges, including homelessness, crime, and infrastructure issues. He emphasizes the need for competent leadership and proposes solutions such as reallocating resources to effective non-profit organizations, improving access to affordable housing, and implementing law enforcement reforms. Caruso also advocates for creating a more business-friendly environment in California by reducing regulations and taxes to retain and attract businesses and talent.
#2265 Kurt Metzger
In episode #2265 of “The Joe Rogan Experience,” comedian Kurt Metzger joins Joe Rogan for a wide-ranging discussion. They delve into historical instances of government experiments on unsuspecting citizens, such as “Operation Sea Spray” in San Francisco, where the U.S. Navy released bacteria over the city, leading to infections and at least one death. Touches on the influence of social media on political discourse and the manipulation of information by those in power. Additionally, they explore the origins and capabilities of Unidentified Aerial Phenomena (UAPs), speculating on advanced military or extraterrestrial technology. Throughout, both express skepticism toward mainstream media narratives and question the credibility of scientific and medical institutions.
#2260 Lex Fridman
In episode #2260 of “The Joe Rogan Experience,” Joe Rogan and AI researcher Lex Fridman engage in a comprehensive discussion on artificial intelligence (AI) and its societal implications. Fridman shares insights from his research, highlighting the potential of AI to revolutionize various industries while also acknowledging the challenges in aligning AI behavior with human values. The conversation delves into the complexities of machine learning, the future of human-AI collaboration, and the necessity for interdisciplinary approaches to address the multifaceted issues arising from AI integration into society.
#2255 Mark Zuckerberg
In episode #2255 of “The Joe Rogan Experience,” Joe Rogan interviews Mark Zuckerberg, CEO of Meta Platforms Inc. They discuss Meta’s evolution in content moderation, highlighting the shift from prioritizing free expression to addressing misinformation, especially after events like the 2016 U.S. election and the COVID-19 pandemic. Zuckerberg acknowledges the challenges and criticisms faced during this transition, including accusations of political bias in fact-checking. He explains Meta’s move towards a community-driven approach to provide context rather than direct censorship. The conversation also touches on government pressures to remove certain content, with Zuckerberg expressing concerns about First Amendment implications and the ethical boundaries of such requests.
#2254 Mel Gibson
In episode #2254 of “The Joe Rogan Experience,” actor and director Mel Gibson joins Joe Rogan and discusses his lifelong battle with scoliosis and chronic back pain, expressing his preference for non-surgical treatments like chiropractic care and stem cell therapy. He also reflects on the unrealistic societal expectation of constant happiness, emphasizing the importance of experiencing a full range of emotions for personal growth.
#2253 Theo Von
In episode #2253 of “The Joe Rogan Experience,” comedian Theo Von joins Joe Rogan for a wide-ranging discussion. They begin by reflecting on music legends like Angus Young of AC/DC and delve into topics such as the health implications of fast food, the benefits of weighted blankets, and unique culinary preferences like In-N-Out’s “Flying Dutchman” burger. The conversation also touches on societal issues, including the authenticity of online personas, the complexities of gender identity, and the influence of political correctness. They further explore global matters, discussing the Ukraine conflict, political manipulation, and the challenges of maintaining free speech in the digital age. Throughout, Rogan and Von offer thoughtful reflections on how technology is reshaping society and the importance of discerning authenticity in online interactions.
#2251 Rick Perry & W.Bryan Hubbard
#2247 Duncan Trussell
#2246 James Fox
#2245 Rod Blagojevich
#2240 Roger Avery & Quentin Tarantino
In episode #2240 of The Joe Rogan Experience, Joe Rogan is joined by acclaimed filmmakers Quentin Tarantino and Roger Avary. They discuss their collaborative history, including their work on “Pulp Fiction,” and share insights into their creative processes. The conversation also touches on their podcast, “The Video Archives,” where they revisit classic films and explore the impact of cinema on culture.
#2239 Derek, More Plates More Dates
In episode #2239 of The Joe Rogan Experience, Joe Rogan is joined by Derek, the fitness educator and entrepreneur behind the “More Plates More Dates” YouTube channel and podcast. They discuss various topics, including the challenges of muscle development, particularly in areas like the calves and neck, and delve into the complexities of anti-doping regulations in sports. Derek shares insights from his experience in fitness education, offering a deep dive into the nuances of training and performance enhancement.
#2237 Mike Benz
In episode #2237 of The Joe Rogan Experience, Joe Rogan talks with Mike Benz, a former U.S. Department of State official and the Executive Director of the Foundation for Freedom Online. They discuss the evolution of internet censorship, the balance between government and private sector roles in regulating online speech, and the challenges of combating disinformation while preserving free speech. Benz provides insights from his background in cyber policy, offering a deep dive into the complexities of maintaining an open and free internet in the digital age.
#2236 Protect Our Parks 13
#2235 Mike Rowe
In episode #2235 of The Joe Rogan Experience, Joe Rogan speaks with Mike Rowe, the creator and host of “Dirty Jobs,” “Somebody’s Gotta Do It,“ and “Returning the Favor.“ Rowe is also the CEO of the mikeroweWORKS Foundation, a nonprofit organization that champions the importance of skilled labor and addresses the critical workforce gap. During their conversation, they discuss the value of skilled trades, the evolution of work in America, and the significance of authenticity in media.
#2232 Josh Brolin
In episode #2232 of “The Joe Rogan Experience,” Joe Rogan converses with actor and producer Josh Brolin. They discuss Brolin’s memoir, “From Under the Truck,” delving into his personal journey in Hollywood, the challenges of fame, and the importance of humility and gratitude. The conversation also touches on physical fitness, with Brolin sharing his experiences experimenting with workout routines and questioning traditional recovery times to enhance muscle growth. Additionally, they explore the nature of iconic individuals, discussing what makes someone special or “crazy” and how these traits contribute to their success.
#2230 Evan Hafer
In JRE #2230, Joe Rogan speaks with Evan Hafer, Special Forces veteran and CEO of Black Rifle Coffee Company. They discuss the psychological toll of combat, challenges veterans face when transitioning to civilian life, and the impact of prolonged conflict in Afghanistan under Taliban rule. Hafer reflects on the complexities of Afghan society, the effects of extremist control, and explores the idea of deploying U.S. Special Forces against drug cartels. The conversation also covers community support for veterans and the ethical dilemmas faced in military operations.
#2228 Josh Dubin
In JRE #2228, Joe Rogan interviews civil rights attorney Josh Dubin about wrongful convictions, systemic issues in the criminal justice system, and reintegration challenges for exonerated individuals. They talk about mental health support for incarcerated individuals, the potential of psychedelic therapy for trauma, and the need for advocacy to drive reform. Dubin emphasizes the presumption of innocence and highlights the impact of systemic failures on marginalized communities.
#2226 Theo Von
In episode #2226 of The Joe Rogan Experience, Joe Rogan sits down with stand-up comedian and podcaster Theo Von for an entertaining and candid conversation. Known for his unique storytelling style and Southern charm, Von shares a mix of humorous anecdotes and personal insights from his life and career, touching on the experiences that have shaped his comedy and outlook.
#2225 Dave Smith
In episode #2225 of The Joe Rogan Experience, Joe Rogan engages in a deep conversation with Dave Smith, a stand-up comedian, libertarian political commentator, and host of the podcast Part of the Problem. Throughout the episode, they tackle a variety of significant topics, especially through Smith’s libertarian lens.
The discussion delves into the U.S. political landscape, where Smith critiques the actions and policies of both major political parties, offering his perspective on government overreach and civil liberties. They also touch on concerns about government surveillance, highlighting the tension between national security and individual freedoms. Smith and Rogan explore the influence of mainstream media in shaping public opinion, discussing the value of alternative media as a means to gain varied perspectives.
#2224 Tim Dillon
In episode #2224 of The Joe Rogan Experience, Joe Rogan sits down with comedian Tim Dillon for a characteristically lively discussion, covering a range of topics infused with Dillon’s trademark satire and dark humor. The episode delves into Dillon’s observations on current social and political climates, including his comedic take on economic issues, cultural trends, and the American media landscape. Dillon, who is known for his biting critique of American culture, shares anecdotes from his life and career, particularly his experiences in stand-up and podcasting.
#2223 Elon Musk
In episode #2223 of the Joe Rogan Experience, released on November 4, 2024, Joe Rogan hosts Elon Musk, CEO of Tesla and SpaceX. The discussion covers various topics, including Musk’s recent endorsement of Donald Trump for the 2024 U.S. presidential election. Musk shares his concerns that a potential Kamala Harris presidency could pose threats to his social media platform, X (formerly known as Twitter), possibly leading to increased censorship and legal challenges.
Musk also highlights advancements in SpaceX’s Starlink project, particularly the plan to provide direct-to-cell phone connectivity without additional hardware, aimed at enhancing global communication access. Throughout the episode, Musk shares his thoughts on free speech, government oversight, and innovations in technology.
#2222 John Fetterman
In episode #2222 of the Joe Rogan Experience, released on November 2, 2024, host Joe Rogan interviews John Fetterman, the junior United States senator from Pennsylvania since 2023. The discussion covers Fetterman’s political career, his experiences in the Senate, and his perspectives on current national issues. They dig into topics such as healthcare reform, economic policies affecting the working class, and the importance of mental health awareness. Fetterman also shares personal anecdotes about his journey into politics and his commitment to public service. The episode provides an in-depth look at Fetterman’s legislative priorities and his vision for the future of Pennsylvania and the nation.
#2221 JD Vance
In episode #2221 of the Joe Rogan Experience, JD Vance, U.S. Senator from Ohio and author of “Hillbilly Elegy,” discusses a wide range of political and societal issues. The conversation delves into Vance’s perspectives on American economic policies, the challenges facing the working class, and his views on national and international political dynamics. He shares insights into his background, how it shaped his political ideology, and critiques of current legislative practices. Additionally, Vance and Rogan touch on cultural trends, media influence, and the impact of technology on modern society. The episode offers a comprehensive look at Vance’s beliefs and his approach to addressing the socio-economic challenges in the U.S.
#2219 Donald Trump
In episode #2219, Joe Rogan interviews former President Donald Trump, where they discuss a wide array of topics, including Trump’s views on current U.S. policies, international relations, and his potential future in politics. Trump shares his perspective on economic strategies, border policies, and issues concerning free speech and media influence. They also explore Trump’s reflections on his presidency, addressing both achievements and controversies, and his outlook on America’s future. The episode highlights Trump’s stance on domestic and global challenges, emphasizing his belief in strong leadership and policy reform.
#2218 Sam Tripoli
#2215 Graham Hancock
#2214 Shane Smith
#2212 Jelly Roll
#2211 Michael Shellenberger
#2210 Calley Means & Casey Means, MD
Casey and Calley Means discuss the impact of modern diet and lifestyle on health, focusing on processed foods, chronic diseases, and their link to inflammation and metabolic dysfunction. They emphasize the importance of a nutrient-dense, whole-food diet and delve into the role of food quality—particularly meat quality—in influencing physical and mental well-being. Both advocate for better food labeling and access to healthier food options, highlighting how lifestyle changes can drastically reduce chronic health issues and promote overall wellness.
#2208 Bridgham Buhler
If you’re looking for podcasts like Joe Rogan, click here!

How Podcasters Can Recover a Failed Drive (Our Real-World Rescue Story)
Podcasters live and die by their recordings. Losing raw interviews, DAW session files, or a full season of edited episodes can set you back weeks — or permanently erase irreplaceable content.
We learned this the hard way. An older transfer drive of ours failed with live data on it, and the backup copy turned out to be corrupted. The drive would still mount, but transfers slowed to a crawl and eventually it would drop off mid-copy. Normal methods just didn’t work.
Thankfully, with the help of GNU ddrescue and some patience, we got everything back. This post shares that recovery process, the requirements for attempting it, and what podcasters should do to avoid being in this situation at all.
1. Recognizing the Signs of Drive Trouble
Our drive didn’t make the dreaded “click of death.” It mounted normally, and the file tree looked fine. But:
-
Transfers slowed to near-zero.
-
The drive would disconnect mid-copy.
-
A “backup” we tried to fall back on turned out to be unreadable.
👉 Takeaway: Even a drive that looks fine can be failing. If you see extreme slowdowns, failed copies, or unmounting — stop using it immediately.
2. What We Did First (and What You Shouldn’t Do)
-
We didn’t run Disk Utility First Aid (Mac) or chkdsk (Windows). These can write changes that make recovery harder.
-
We didn’t reformat or initialize the drive.
-
Instead, we disconnected it and researched recovery methods that don’t write anything back to the failing drive.
3. The Recovery Process That Worked
Here’s how we saved our podcast files:
-
Cloned the failing partition with ddrescue → created a sector-by-sector
.imgfile. It took days to accomplish this. Be prepared! -
Used a map file → ddrescue kept track of good vs. bad areas, so we could pause/resume without losing progress.
-
Wrote the image back to a healthy drive → this gave us a clean copy of the original.
-
Mounted the image → from there, we copied files normally at full speed.
Result: 100% of our data recovered. Thankfully, we took note of the file sizes before the transfer, so we knew exactly how much data was on the drive. Once we finished with ddrescue, we were able to verify the file sizes.
4. Our Rescue Script
This is the script we used.
What it does:
-
Reads from the failing partition (
/dev/disk2s2in this example). -
Clones it into an image (
drive.img). -
Uses a map file (
drive.map) to track progress and retries.
⚠️ You must change DISK_NUM, SLICE, and file paths for your system.
5. Requirements (Besides a Healthy New Drive)
If a podcaster wanted to try this approach, here’s what they’d need:
-
Computer: macOS or Linux with Terminal access.
-
GNU ddrescue installed:
-
macOS →
brew install ddrescue -
Ubuntu/Debian →
sudo apt install gddrescue
-
-
Enough free space → as large as the entire partition (e.g., 1.5TB partition = 1.5TB free space). If you need a reliable storage solution, consider our recommended multi-use, multi-drive NAS.
-
Correct partition identification → run
diskutil list(macOS) orlsblk(Linux). -
Sudo privileges → raw disk access requires admin rights.
-
Time & patience → recovery can take hours or days.
Optional but helpful: a good USB/SATA dock, smartctl for health checks, and a UPS to avoid power cuts mid-run.
6. When This Works (and When It Doesn’t)
This method is best if:
-
The drive still spins and mounts.
-
File copies fail, but the partition is visible.
-
You need everything cloned, not just a few cherry-picked files.
It won’t help if:
-
The drive is clicking, grinding, or not recognized at all.
-
The electronics are dead.
-
The data is on an encrypted partition without the password.
Those cases require professional clean-room recovery.
7. The Lessons We Learned
-
A drive can “look fine” but still be in serious trouble.
-
Standard copy methods often choke on bad sectors.
-
ddrescue’s mapfile-based approach was the key to full recovery.
-
A bad backup is as bad as no backup — test them regularly.
-
The only real protection is redundancy (3-2-1 backup rule), which is why we recommend a multi-drive setup for redundancy.
Conclusion: Recovery vs. Prevention
Recovering our failed transfer drive with ddrescue was a relief, but it also showed how fragile podcast production workflows can be. If you’re a podcaster, think of recovery as your last resort — and backups as your insurance policy.
Because when you’re in the middle of a season, the last thing you want is to be Googling “how to rescue a failed drive” at 2 a.m.
DJI Mic 3 vs DJI Mic 2: A Real-World Comparison for Podcasters
When you’re producing a podcast, audio quality isn’t just “nice to have”—it’s your brand. Listeners forgive a lot, but muffled voices, clipping, or dropouts will send them looking for another show. That’s why wireless microphone systems like DJI’s Mic series have become a go-to choice for podcasters who want professional results without a complex studio setup.
With the launch of the DJI Mic 3 in August 2025, creators are asking: how does it stack up against the already-excellent Mic 2? After reviewing multiple hands-on tests and real-world usage reports, here’s what podcasters need to know.
Audio Quality: Subtle but Meaningful Upgrades
Both the Mic 2 and Mic 3 capture pristine 24-bit/48kHz and 32-bit float audio. But the Mic 3 introduces a few features that podcasters will notice in editing and production:
-
Adaptive Gain Control (AGC): The Mic 3 automatically balances levels to avoid clipping when guests suddenly raise their voice—a common headache in interview shows.
-
Voice Tone Presets: Choose “warm” for a radio-style low end or “bright” for crisp detail. Podcasters who want less post-production tweaking will appreciate this.
-
Dual-Stage Noise Cancellation: Instead of a simple on/off switch, the Mic 3 lets you pick between Basic and Advanced ANC, making it easier to tame room noise without sacrificing clarity.
For podcasters recording in imperfect environments (coffee shops, home offices, convention floors), these upgrades make the Mic 3 a safer bet.

Design & Ease of Use
Podcasters juggle gear, guests, and scheduling. A mic system that just works is worth its weight in gold.
-
Smaller, lighter transmitters (16 g vs 28 g): Less visible on camera and more comfortable for long interviews.
-
Magnetic clips with rotatable design: Lets you aim the capsule directly toward your mouth, improving vocal pickup.
-
Redesigned charging case: Finally, the furry windshields and cables fit inside. No more forgetting wind muffs at home.
Trade-off: The Mic 3 removed the 3.5 mm input jack for lavalier mics. If you rely on plugging in an external lav, the Mic 2 may still have an edge.
Battery Life & Reliability
Nothing kills a podcast faster than a dead battery mid-recording. Here, the Mic 3 shines:
-
Battery Life: ~8 hours per transmitter, ~10 hours per receiver, and up to 28 hours total with the charging case (vs 18 hours total for the Mic 2). That’s an extra 10 hours of confidence on remote days.
-
Wireless Range: 400 m line-of-sight compared to 250 m on the Mic 2. You won’t need that much range in a podcast studio, but in event coverage or outdoor interviews, it means fewer dropouts.
Storage & On-Board Recording
Backups are non-negotiable in podcasting. The Mic 3 quadruples onboard memory:
-
32 GB per transmitter (vs 8 GB on the Mic 2).
-
Dual-File Recording: Save both a processed and raw safety track.
That means you’ll have peace of mind knowing your podcast episode won’t be lost to interference or a recorder glitch.
Compatibility & Workflow Features
Podcasters are increasingly recording across platforms: video podcasts, livestreams, or hybrid events.
-
Multi-Device Support: Works with cameras, phones, laptops, and even streams directly via Bluetooth.
-
Timecode & Multi-Channel Support: Up to 4 transmitters and 8 receivers with built-in sync—a huge advantage for panel shows or multi-guest formats.
-
DJI Ecosystem Integration: If you already use DJI cameras (like the Osmo Action 5 Pro), the Mic 3 slots right in.
Quick Comparison: Mic 3 vs Mic 2
| Feature | DJI Mic 3 | DJI Mic 2 |
|---|---|---|
| Weight (TX) | 16 g | 28 g |
| Noise Cancelling | 2 levels (Basic/Advanced) | Single level |
| Voice Presets | 3 tone presets | None |
| Adaptive Gain Control | Yes (auto & dynamic) | Basic limiting |
| On-board Storage | 32 GB | 8 GB |
| Battery Life (total w/ case) | ~28 h | ~18 h |
| Wireless Range | ~400 m | ~250 m |
| Multi-Channel | Up to 4 TX / 8 RX | 2 TX / 1 RX |
| Charging Case | Fits mics + windscreens | Windscreens don’t fit |
Which One Should Podcasters Buy?
-
Choose the Mic 3 if: you want the best possible all-in-one system for podcasting, especially if you record outside a studio or need backups, long battery life, and advanced noise handling.
-
Choose the Mic 2 if: you need an analog lavalier input or want to save some money while still getting excellent audio quality.
For most podcasters, the Mic 3 is the safer long-term investment. It combines reliability, flexibility, and audio enhancements that reduce post-production work—a critical factor when you’re publishing episodes on a tight schedule.
Final Thoughts
Podcasters don’t need more complexity—they need tools that make recording easier and audio more reliable. DJI’s Mic 3 delivers that in spades. While the Mic 2 remains a solid option, especially for lav mic users, the Mic 3’s improvements in battery life, noise control, onboard recording, and ergonomics make it the standout choice for most creators.
In real-world use, the Mic 3 feels like the system that podcasters asked for: compact, dependable, and tuned for modern content creation.
How to End a Podcast: 25 Creative Ways to Wrap Up Your Episodes
When you think about creating a great podcast, your mind probably goes first to the intro—the hook, the energy, the first impression. But here’s the secret many podcasters overlook: the way you end your podcast is just as important as how you start.
The last few minutes of your episode shape how listeners remember you, whether they come back for more, and even if they take the action you want them to take. A well-crafted outro keeps your audience engaged, builds consistency, and turns casual listeners into loyal fans.
In this guide, we’ll explore 25 creative ways to end a podcast, from simple sign-offs to strategic calls-to-action. Whether you’re aiming to grow your audience, monetize your show, or just sign off with style, you’ll find options here you can plug into your own podcast today.
Why Your Podcast Outro Matters
-
Retention: Listeners who know what to expect at the end are more likely to stay through the last minute.
-
Conversions: The outro is prime real estate for asking listeners to subscribe, leave a review, or check out a resource.
-
Branding: A consistent, memorable sign-off strengthens your show’s identity.
I’ve been in podcasting for years, producing and analyzing shows across niches. Time and again, I’ve seen that a thoughtful outro boosts engagement and makes the difference between “just another episode” and a show people stick with long-term.
25 Ways to End a Podcast
Below you’ll find grouped strategies. Some are practical calls-to-action, others are stylistic flourishes. Pick and combine what fits your goals.
| Goal / Situation | Best Outro Approaches | Why It Works |
|---|---|---|
| Grow audience (new podcaster) | Subscribe/follow ask, rating/review request, tease next episode | Builds retention and platform signals that boost discoverability |
| Increase monetization | Sponsor thank-you, affiliate/product plug, promo code, Patreon/membership CTA | Turns attention at the end into direct revenue opportunities |
| Build community | Listener shoutouts, ask a question, invite to FB/Discord group, weekly challenge | Fosters 2-way engagement and strengthens loyalty beyond downloads |
| Educate / teach audience | Recap key takeaway, motivational quote, open loop for next lesson | Reinforces learning and encourages binge-listening |
| Strengthen brand consistency | Signature tagline, branded audio stinger, personal sign-off | Makes the podcast recognizable and professional |
| Keep it light / entertaining | Humor or gag, bloopers/outtakes, casual sign-off | Leaves a positive emotional association with the episode |
🎯 Calls-to-Action (Direct Engagement)
-
Ask listeners to subscribe or follow – Simple but effective: “Hit follow on Spotify so you don’t miss the next one.”
-
Encourage ratings & reviews – Reviews fuel podcast discovery. Ask honestly: “Your review helps more people find the show.”
-
Promote your email list – “Grab the free guide in the show notes and join our newsletter.”
-
Point to a related episode – Keep them binging: “If you liked this, go listen to Episode 27 on ___.”
-
Offer a free resource – A checklist, cheat sheet, or mini training adds value and builds loyalty.
💰 Monetization & Growth
-
Affiliate product mention – Share tools you genuinely use, with a reminder the link is in the notes.
-
Sponsor thank-you – “This episode was brought to you by ___. Check them out at ___.”
-
Promo code offer – Give urgency: “Use code PODCAST20 this week only.”
-
Membership or Patreon pitch – “Get ad-free episodes and bonus content by joining us at ___.”
-
Next-step funnel – Lead them deeper: “Want to dive further? Join my free webinar at ___.”
🤝 Community & Relationship Building
-
Ask a listener question – “What’s your take? Message me on Instagram @___.”
-
Issue a challenge – “Try today’s tip and tag me when you do.”
-
Invite to a community – Point to a group or forum where listeners can connect.
-
Highlight a listener – Read a review or share a fan story on-air.
-
Express gratitude – A sincere “thank you for spending this time with me” goes a long way.
🎙️ Creative & Stylistic Sign-Offs
-
Signature tagline – A catchphrase you repeat every episode. Example: “Keep learning, keep growing.”
-
Personal sign-off – “This is [Your Name], and I’ll see you next time.”
-
Humor or running gag – Lighthearted endings create memorable moments.
-
Behind-the-scenes teaser – Share bloopers or funny outtakes after the outro music.
-
Branded jingle – End with consistent music or a sound logo.
🚀 Forward Momentum
-
Tease the next episode – Build anticipation: “Next week, I’m talking with ___ about ___.”
-
Recap the key takeaway – Reinforce learning: “Remember, today’s big lesson is ___.”
-
Share a motivational quote – Tie it to the theme for a lasting impression.
-
Open a story loop – Start a story you’ll finish in the next episode. Great for series formats.
-
Redirect to other platforms – “Follow me on TikTok for daily tips.”
How to Choose the Right Outro for Your Podcast
Not every show needs all 25 strategies. Think about your goals:
-
Growth focus: Lean on subscribe/follow CTAs and cross-promotion.
-
Monetization focus: Weave in sponsors, affiliate links, and offers.
-
Community focus: End with listener shoutouts, questions, and group invites.
And remember: authenticity matters more than polish. A heartfelt thank-you often outperforms a scripted pitch.
Podcast Outro Examples
Here are three simple templates you can adapt:
Growth-Focused Outro
“Thanks for tuning in! If you enjoyed today’s episode, hit follow on Spotify or Apple Podcasts. And don’t forget to check out Episode 18 for more on this topic.”
Monetization-Focused Outro
“This episode was made possible by [Sponsor]. Visit [URL] and use code PODCAST20 for 20% off. Links are in the show notes!”
Community-Focused Outro
“I’d love to hear what you thought—DM me on Instagram @yourhandle. And if you want to connect with other listeners, join our free Facebook group linked below.”
Conclusion
The way you end your podcast shapes how your listeners remember you. With the right outro strategy, you can boost engagement, build loyalty, and even grow revenue—all while giving your show a professional, polished feel.
Experiment with these 25 podcast outro ideas and find the ones that fit your voice and audience. And remember: all the links, resources, and extras mentioned today? They should always live in your show notes so listeners have an easy next step.
11 Best Podcasting Books That Will Instantly Level Up Your Show (Organized by What You Want to Learn)
Podcasters are everywhere these days — but only a fraction of shows ever stand out. Why? Because great podcasting takes more than just hitting record. You need to master storytelling, sharpen your interview skills, grow an audience, and yes, even learn how to monetize your hard work.
The problem? Most lists of “best podcast books” are just random dumps. This one is different. I’ve organized the best podcasting books by what you want to learn, so you can grab the resource that actually solves your biggest challenge right now.
What Podcasters Usually Need to Learn
- Fundamentals — how to start, what gear you need, and how distribution works.
- Technical & Production — improving sound quality, editing, and workflows.
- Storytelling — creating episodes that people can’t stop listening to.
- Interviewing — asking better questions and connecting with guests.
- Growth & Marketing — attracting and keeping listeners.
- Monetization — turning your podcast into a revenue stream.
- Creative Confidence — developing your voice, presence, and style.
Best Books for Each Learning Goal
🎙️ Fundamentals of Podcasting
- Podcast Launch (John Lee Dumas) — A step-by-step beginner’s guide from one of podcasting’s most recognized names.
- Podcasting for Dummies (Evo Terra, et al.) — Accessible, broad coverage of everything you need to start.
🛠️ Technical & Production Skills
- Sound Reporting (Jonathan Kern) — NPR’s guide to audio journalism and production. A must for anyone serious about professional sound.
- Podcast Solutions (Michael Geoghegan & Dan Klass) — Hands-on workflows and setups to simplify the tech.
🎧 Storytelling & Content Creation
- Out on the Wire (Jessica Abel) — Learn storytelling secrets from Ira Glass and other audio legends.
- Make Noise (Eric Nuzum) — Find your creative voice and craft shows that connect deeply.
- Reality Radio (John Biewen, ed.) — Essays from veteran audio storytellers who shaped the medium.
🗣️ Interviewing
- The Art of the Interview (Lawrence Grobel) — Classic strategies for building trust and drawing out meaningful stories.
- Sound Reporting — Includes practical interviewing insights for journalists and podcasters alike.
📢 Growth & Marketing
- The Audience Is Listening (Tom Webster) — Research-backed strategies for finding and keeping listeners.
- Earn It (Steve Pratt) — Bold, creative approaches to marketing your podcast.
💵 Monetization
- Profit from Your Podcast (Dave Jackson) — Practical monetization tips from one of podcasting’s earliest educators.
- Podcasting for Promotion, Positioning & Profit (Kris Gilbertson) — A more entrepreneurial spin on how to leverage a podcast into authority and income.
🎭 Creative Voice & Confidence
- Permission to Speak (Samara Bay) — Helps you unlock authenticity and power behind the mic.
- Make Noise (Eric Nuzum) — Not just storytelling, but the courage to create your own lane.
Quick Comparison Table
| Topic | Best Books | Why Read Them |
|---|---|---|
| Starting Out | Podcast Launch, Podcasting for Dummies | Clear, structured foundations |
| Sound & Production | Sound Reporting, Podcast Solutions | Learn to sound professional |
| Storytelling | Out on the Wire, Make Noise | Build stronger narratives |
| Interviewing | The Art of the Interview | Master guest conversations |
| Growth | The Audience Is Listening, Earn It | Attract and keep listeners |
| Monetization | Profit from Your Podcast | Turn episodes into income |
| Voice & Confidence | Permission to Speak | Sound authentic and powerful |
How to Choose the Right Book for You
- If you’re brand new: Start with Podcast Launch or Podcasting for Dummies.
- If your audio sounds rough: Dive into Sound Reporting and Podcast Solutions.
- If you want to hook listeners: Out on the Wire and Make Noise are non-negotiable.
- If your format is interviews: The Art of the Interview will transform your approach.
- If you’re stuck on growth: Go with The Audience Is Listening or Earn It.
- If you’re ready to monetize: Grab Profit from Your Podcast.
Remember: don’t just read these — apply them episode by episode. Podcasting is a craft you build over time.
Conclusion
The difference between a podcast that fades out and one that builds a loyal audience often comes down to learning faster and applying smarter. These books give you direct access to the wisdom of podcasting pros who’ve already figured it out.
👉 Pick the book that matches your current challenge and put it into practice this week. You’ll be amazed how quickly your podcast levels up.
If you want even more guidance, check out my free resource: How to Make Money With a Podcast — video training that takes you beyond learning and into earning.
- StreamYard Business Plan Review: Is It Worth $299/Month for Teams?
- Synology DS1525+ for Podcasters: What You Need to Know Before You Buy
- StreamYard Pricing (2026): Full Comparison of Plans, Differences, Features & Discounts
- Podbean Pricing: The Best Podcast Hosting Platform for Getting Started?
- SquadCast Pricing Explained: Every Plan, Feature, and Trade-Off Worth Knowing